Zavedení
This manual provides detailed instructions for the installation, operation, and maintenance of your Cooler Master ML 360 Atmos II Pixel LED ARGB CPU Liquid Cooler. This all-in-one (AIO) liquid cooling system is designed to provide efficient thermal management for your CPU, featuring a low-profile pump, customizable Pixel LED display, and SickleFlow Edge ARGB fans. Please read this manual thoroughly before proceeding with installation to ensure proper setup and optimal performance.
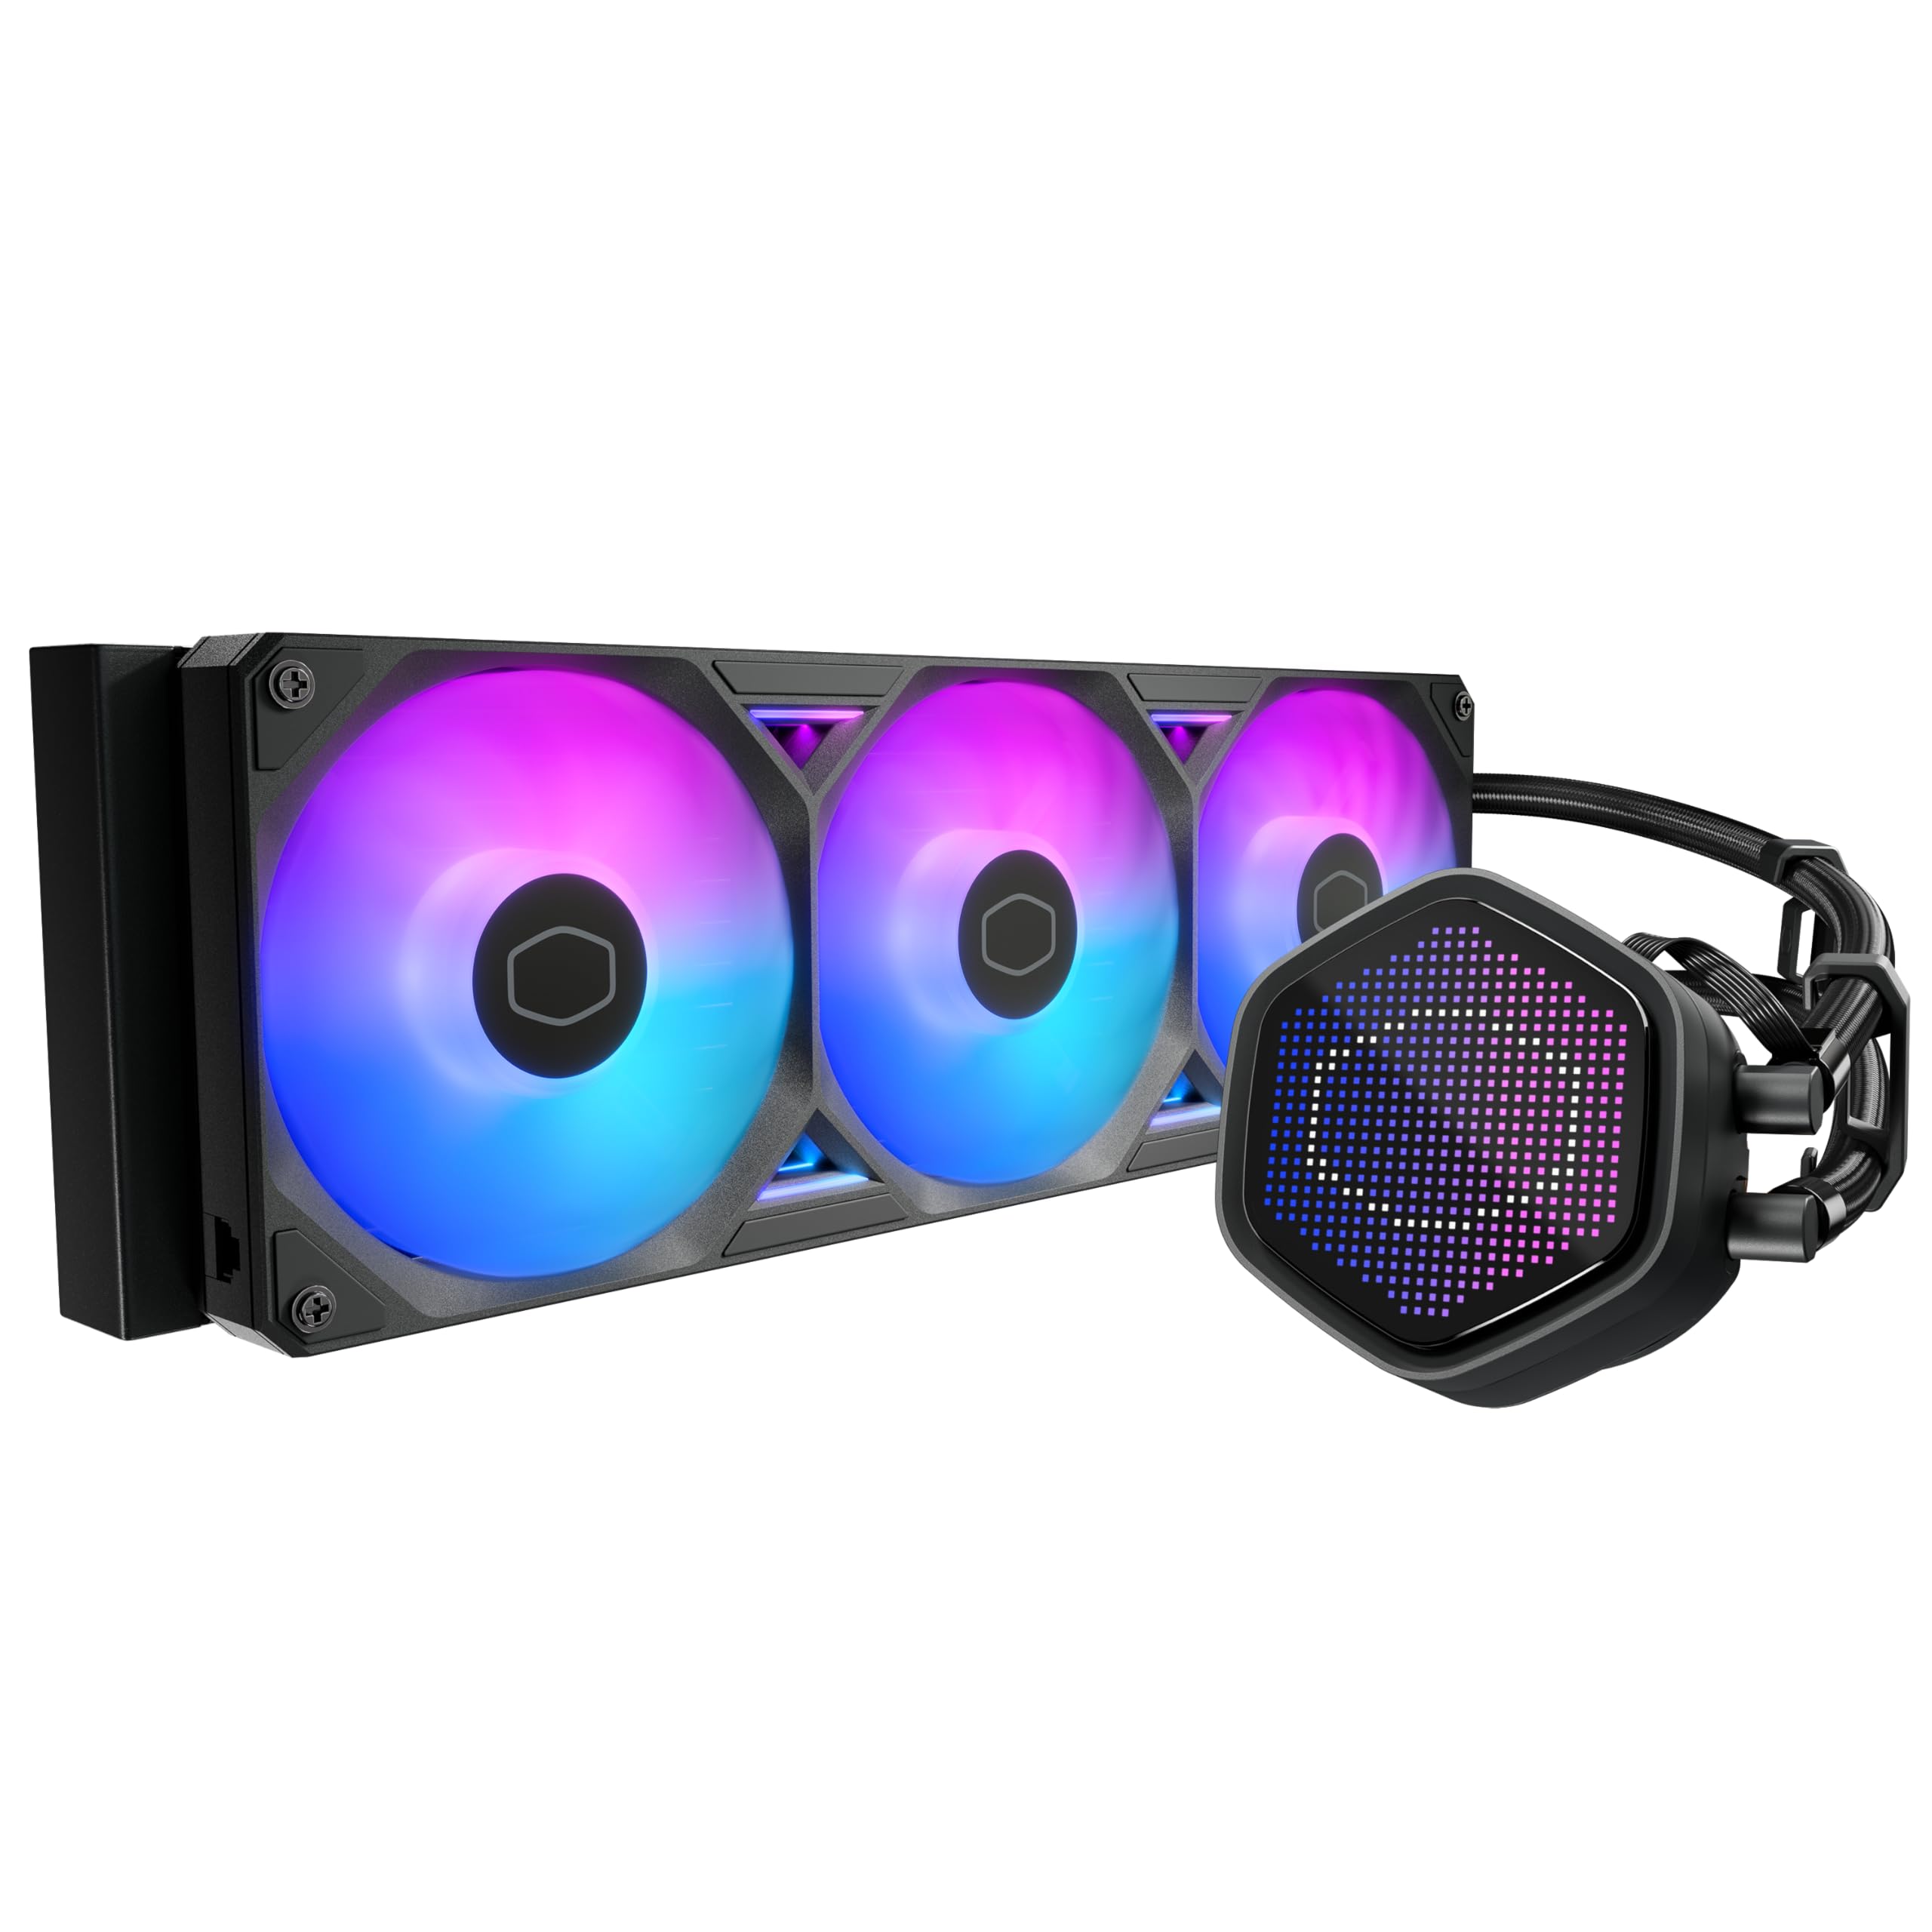
Obrázek 1: Přesview of the Cooler Master ML 360 Atmos II Pixel LED ARGB CPU Liquid Cooler.
Klíčové vlastnosti
The Cooler Master ML 360 Atmos II Pixel LED ARGB CPU Liquid Cooler incorporates several features designed for performance and customization:
- Low-Profile Konstrukce čerpadla: A sleek, space-saving pump design that allows for installation in compact PC cases without compromising cooling performance.
- Customizable Pixel LED Display: An integrated LED panel on the pump head that can display unique patterns, real-time system information, and is controlled via MasterCTRL software.
- SickleFlow Edge 240 ARGB Fans: High-speed, low-vibration fans designed for efficient airflow and static pressure, featuring addressable RGB lighting for enhanced aesthetics.
- Dual Chamber Pump Design: Separates the coolant into two chambers for improved heat dissipation and pump longevity.
- Broad Socket Compatibility: Supports a wide range of mainstream CPU sockets, including LGA1851, LGA1700, AM5, and AM4.
- Snadná instalace: Features a quick-mount kit and pre-installed fans for a straightforward setup process.
- Included CryoFuze Thermal Paste: High-performance thermal compound for optimal heat transfer between the CPU and cold plate.

Figure 2: The MasterLiquid Atmos II Pixel LED cooler showcasing its design and ARGB fans.

Figure 3: The customizable Pixel LED display on the pump head, capable of showing various patterns and system information.

Figure 4: Illustration of the dual chamber pump design, enhancing cooling efficiency and durability.

Figure 5: The ultra-low profile pump design, highlighting its compact dimensions for versatile case compatibility.

Figure 6: The SickleFlow Edge ARGB fans pre-installed on the radiator, ready for mounting.
Průvodce nastavením
1. Vybalení a kontrola součástí
Carefully unpack all components and verify that all items listed below are present. If any components are missing or damaged, contact Cooler Master support.
- Radiator with pre-installed SickleFlow Edge ARGB Fans
- Pump/CPU Block with Pixel LED display
- Mounting hardware for Intel (LGA1851, LGA1700, etc.) and AMD (AM5, AM4) sockets
- CryoFuze Thermal Paste syringe
- ARGB and PWM cables
- USB Type-C to Motherboard 9-pin header cable (for LCD)
- Tube clips
2. Mounting Hardware Preparation
Identify the correct mounting brackets for your CPU socket (Intel or AMD). Attach the appropriate standoffs and brackets to the motherboard according to your CPU type. Refer to the detailed diagrams in the Cooler Master installation guide for your specific socket.

Figure 7: Intel and AMD mounting brackets included for broad CPU socket compatibility.
3. Thermal Paste Application
Clean the CPU surface with isopropyl alcohol to remove any dust or residue. Apply a small amount of the included CryoFuze thermal paste to the center of the CPU's integrated heat spreader (IHS). A pea-sized dot is generally sufficient. The pressure from the cold plate will spread it evenly.
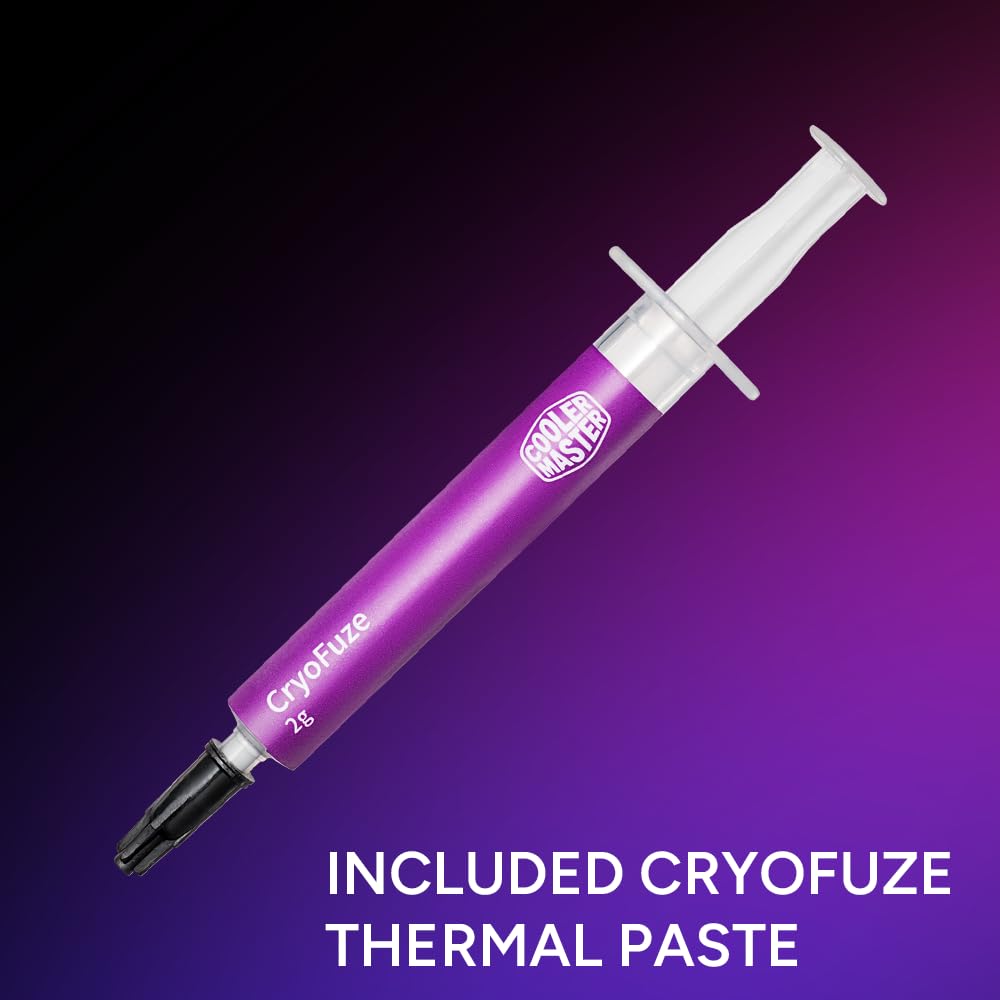
Figure 8: The included CryoFuze thermal paste syringe for optimal heat transfer.
4. Instalace chladiče a ventilátoru
Mount the radiator with the pre-installed fans to an available 360mm fan mount location in your PC case. Ensure the fans are oriented to provide optimal airflow (typically intake or exhaust, depending on your case's airflow design). Secure the radiator using the provided screws.
5. Pump/CPU Block Installation
Carefully place the pump/CPU block onto the CPU, aligning it with the mounting brackets. Secure the pump to the brackets using the provided thumb screws or nuts, tightening them in a diagonal pattern until snug. Do not overtighten.
6. Cable Management and Connections
Connect the pump's 4-pin PWM cable to the CPU_FAN or AIO_PUMP header on your motherboard. Connect the ARGB cables from the fans and pump to an available 3-pin ARGB header on your motherboard or an ARGB controller. Connect the USB Type-C cable from the pump to a free USB 2.0 header (9-pin) on your motherboard for Pixel LED display control. Use the included tube clips to manage the tubing for a clean and secure setup.

Figure 9: Included tube clips assist in organizing the coolant tubes for a tidy installation.
Operace
1. Počáteční zapnutí
After completing the installation and verifying all connections, power on your PC. The pump and fans should begin operating, and the ARGB lighting and Pixel LED display should illuminate. Monitor your CPU temperatures during initial operation to ensure proper cooling.
2. Software Control (MasterCTRL)
Download and install the Cooler Master MasterCTRL software from the official Cooler Master webwebu. Tento software vám umožňuje:
- Customize the Pixel LED display with various patterns, animations, or real-time system information.
- Adjust fan speeds and pump speeds for optimal balance between cooling performance and noise levels.
- Synchronize ARGB lighting effects with other compatible components.
Ensure the USB cable from the pump is connected to the motherboard for software communication with the Pixel LED display.
Údržba
Pravidelná údržba pomáhá zajistit dlouhou životnost a optimální výkon vašeho chladiče kapalin.
1. Čištění prachu
Periodically inspect the radiator fins and fan blades for dust accumulation. Use compressed air or a soft brush to gently remove dust. Excessive dust can impede airflow and reduce cooling efficiency.
2. Cable and Tubing Inspection
Occasionally check all power, ARGB, and USB connections to ensure they are secure. Inspect the coolant tubes for any signs of kinks, leaks, or damage. While AIOs are sealed systems, visual inspection is a good practice.
Odstraňování problémů
If you encounter issues with your Cooler Master ML 360 Atmos II, refer to the following common troubleshooting steps:
- No Power / Fans Not Spinning / Pump Not Operating:
- Ensure all power cables (PWM for pump, fan power) are securely connected to the motherboard.
- Check motherboard BIOS settings to ensure fan headers are configured correctly and not set to 0 RPM.
- Vysoké teploty procesoru:
- Verify the pump is running (you may feel a slight vibration or hear a faint hum).
- Confirm the cold plate is making proper contact with the CPU. Re-seat the pump if necessary, ensuring even pressure.
- Check thermal paste application. Reapply if it appears insufficient or uneven.
- Ensure radiator fans are spinning and oriented correctly for optimal airflow.
- Očistěte prach z žeber chladiče.
- ARGB Lighting / Pixel LED Not Working:
- Ensure ARGB cables are correctly connected to a 3-pin 5V ARGB header on the motherboard or controller.
- Verify the USB Type-C cable from the pump is connected to a motherboard USB 2.0 header for Pixel LED control.
- Check the MasterCTRL software for lighting settings and ensure it detects the cooler.
- Confirm that your motherboard's ARGB software (if applicable) is not conflicting with MasterCTRL.
Specifikace
| Funkce | Detail |
|---|---|
| Rozměry produktu | 8.31 cm D x 5.35 cm Š x 11.5 cm V |
| Značka | Cooler Master |
| Typ napájecího konektoru | 3-Pin ARGB + 4 Pin PWM (Pump), USB Type-C to Mobo 9pin (LCD), 7-Pin PWM + ARGB (Fans) |
| svtage | 12 V (DC) |
| Wattage | 6 wattů |
| Způsob chlazení | Voda |
| Kompatibilní zařízení | CPU, Desktop |
| Úroveň hluku | 38.5 decibelů |
| Materiál | Hliník |
| Maximální rychlost otáčení | 2500 ot./min (ventilátory) |
| Proud vzduchu | 190 krychlových stop za minutu (ventilátory) |
| Hmotnost položky | 3.86 libry |
| Číslo modelu | MLX-D36M-A25SZ-P1 |
Informace o záruce
Cooler Master products are backed by a limited warranty. The specific terms and duration of the warranty may vary by region and product. Please refer to the official Cooler Master website or your product's packaging for the most current and detailed warranty information. Keep your proof of purchase for warranty claims.
Technická podpora
For technical assistance, troubleshooting beyond this manual, or inquiries regarding your Cooler Master ML 360 Atmos II, please visit the official Cooler Master support website. You can find FAQs, driver downloads (including MasterCTRL software), and contact information for customer service.
Oficiální produkt Cooler Master Webmísto: www.coolermaster.com