Zavedení
The ASUS TUF Gaming X870E-PLUS WIFI7 motherboard is engineered to provide a robust and reliable foundation for your AMD Ryzen 9000 Series desktop PC. It integrates essential features for high-performance computing, including advanced power delivery, comprehensive cooling, and next-generation connectivity. This manual provides detailed instructions for installation, operation, and maintenance to ensure optimal performance and longevity of your motherboard.
Mezi klíčové vlastnosti patří:
- Ready for AMD Socket AM5 for AMD Ryzen 9000, 8000, and 7000 Series Desktop Processors.
- Enhanced Power Solution: 16+2+1 80A power staga 8vrstvá deska plošných spojů pro stabilní napájení.
- Intelligent Control: ASUS-exclusive AI Overclocking, AI Cooling II, AI Networking II, and AEMP.
- Latest M.2 Support: Two onboard PCIe 5.0 M.2 slots and two PCIe 4.0 M.2 slots.
- Ultrafast Connectivity: Wi-Fi 7, PCIe 5.0 x16 slot, Realtek 2.5Gb Ethernet, rear two USB4 (40Gbps) Type-C ports, front USB 20Gbps Type-C connector with up to 30W PD Fast-charge.
- Comprehensive Cooling: Enlarged VRM heatsink, M.2 heatsink, PCH heatsink, hybrid fan headers and Fan Xpert 4 with AI Cooling II.
- DIY Friendly Design: PCIe Slot Q-Release Slim, M.2 Q-Latch, Q-LED, BIOS FlashBack and Pre-mounted I/O shield.
Nastavení a instalace
This section guides you through the physical installation of your ASUS TUF Gaming X870E-PLUS WIFI7 motherboard and its primary components.
1. Rozbalení a počáteční kontrola
Carefully remove the motherboard and all accessories from the packaging. Inspect for any visible damage. The package typically includes the motherboard, Wi-Fi antenna, SATA cables, M.2 rubber pads, M.2 screws, and documentation.

Figure 1: ASUS TUF Gaming X870E-PLUS WIFI7 Motherboard and included accessories.

Obrázek 2: Detailní view of the motherboard and various components included in the box, such as SATA cables and the Wi-Fi antenna.
2. Processor (CPU) Installation
Ensure the motherboard is placed on a non-conductive surface. Open the CPU socket lever, align the AMD Ryzen processor with the socket (triangle mark on the CPU matches the socket), and gently place it into the socket. Close the lever to secure the CPU.

Obrázek 3: Detail view of the AMD AM5 CPU socket, ready for processor installation.
3. Instalace paměti (RAM)
Unlock the DIMM slots by pushing the clips outward. Align your DDR5 memory modules with the slots, ensuring the notch on the module matches the notch in the slot. Press firmly on both ends of the memory module until the clips snap into place.
4. Storage (M.2 SSDs) Installation
The motherboard features M.2 Q-Latch for tool-less installation of M.2 SSDs. Locate the M.2 slots (two PCIe 5.0 and two PCIe 4.0). Remove the M.2 heatsink if present. Insert the M.2 SSD into the slot at an angle, then push it down and secure it with the Q-Latch mechanism. Reattach the heatsink if applicable.

Figure 4: Illustration of the M.2 Q-Latch for easy SSD installation and the PCIe Q-Release Slim for graphics card removal.
5. Instalace grafické karty (GPU)
Locate the PCIe 5.0 x16 slot. Open the PCIe Slot Q-Release Slim latch. Insert your graphics card firmly into the slot until it clicks into place. Ensure the latch is closed. Connect necessary PCIe power cables from your power supply to the graphics card.
6. Připojení napájení
Connect the 24-pin ATX power connector and the 8+8 pin ProCool CPU power connectors from your power supply to the motherboard. Ensure all connections are secure.
7. Instalace Wi-Fi antény
Attach the included ASUS Wi-Fi Q-Antenna to the designated connectors on the rear I/O panel for optimal wireless performance.
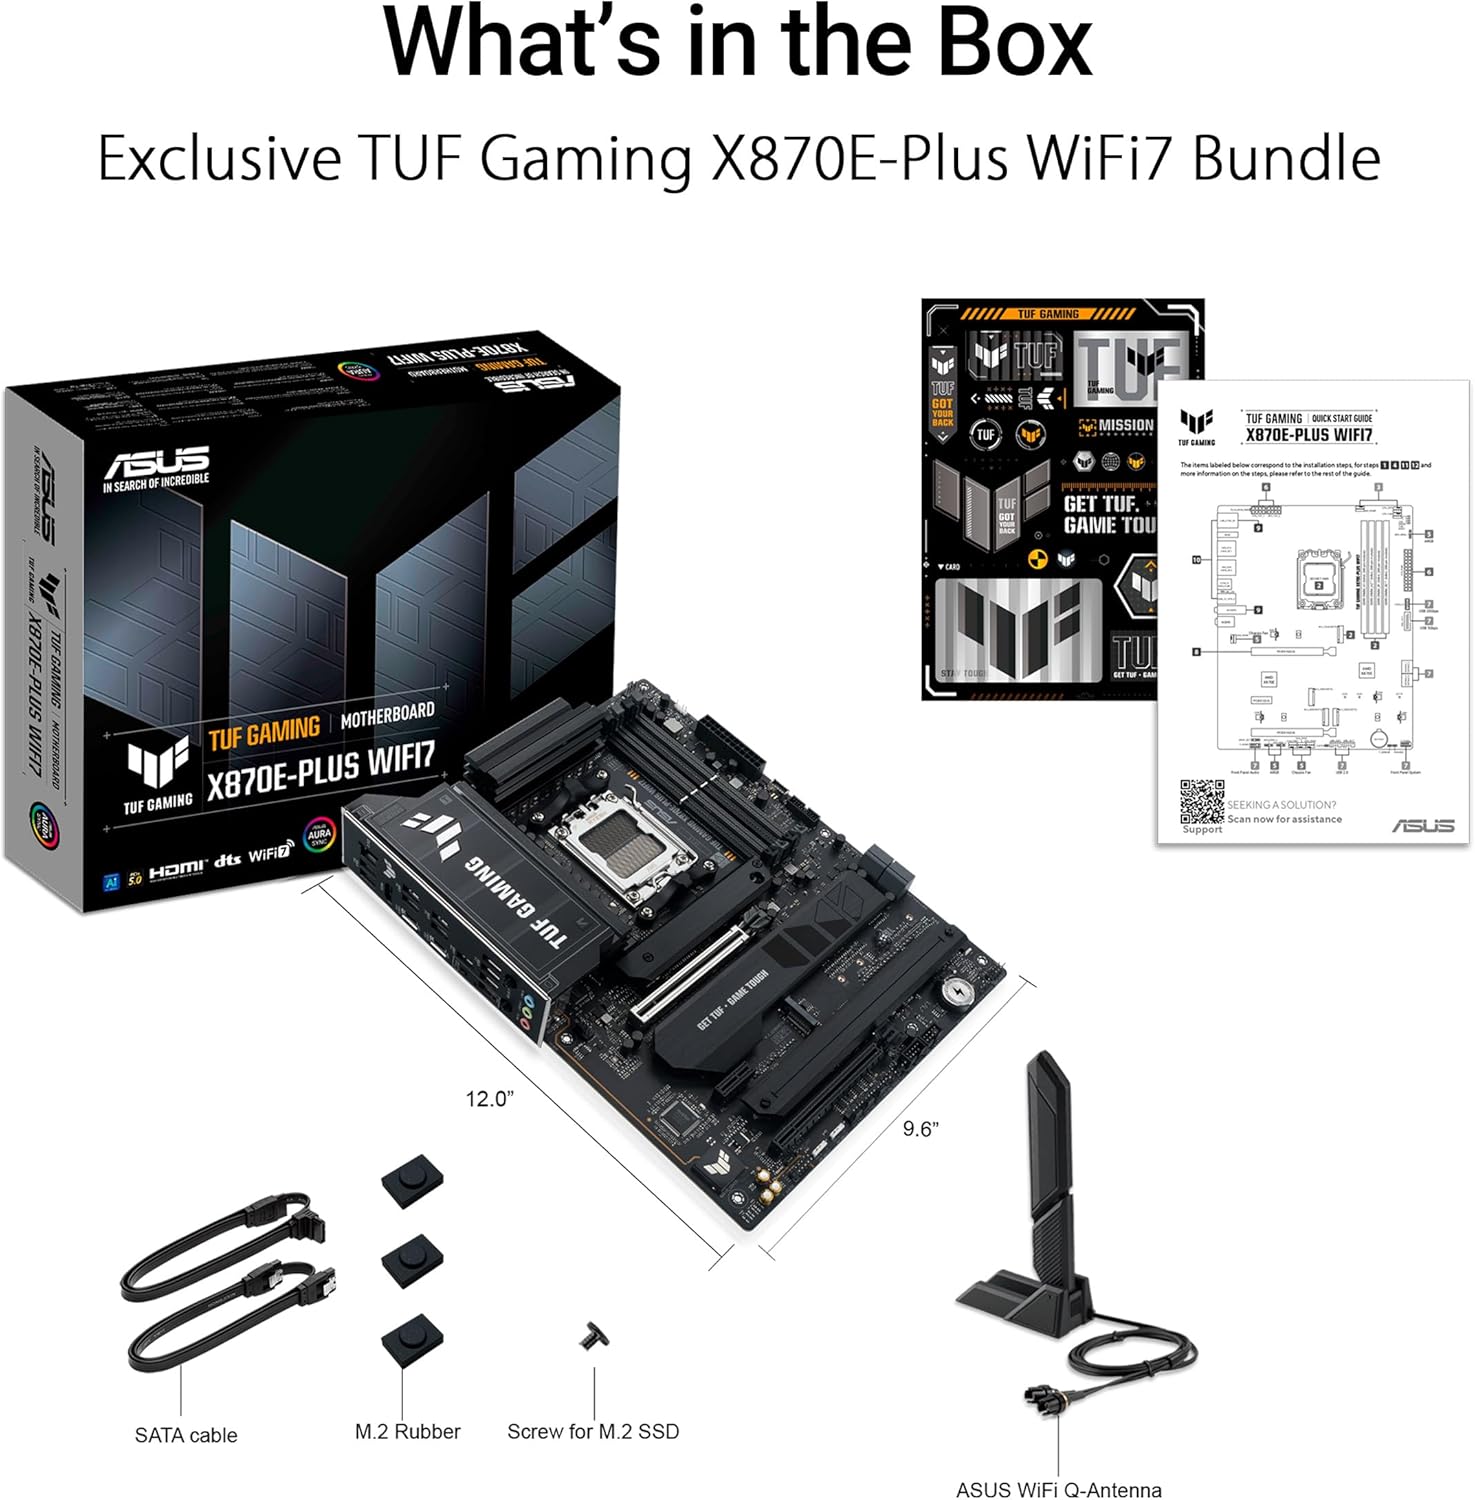
Figure 5: Rear I/O panel showing various ports and the connected Wi-Fi antenna.
Video 1: Overview of the ASUS TUF Gaming X870E-PLUS WIFI7 motherboard, highlighting key features and design elements relevant to setup.
Provozní vlastnosti
Technologie AI
The ASUS TUF Gaming X870E-PLUS WIFI7 integrates several AI-driven technologies to optimize system performance and user experience:
- Přetaktování umělé inteligence: Maximizes CPU performance and predicts ideal CPU and cooling settings.
- Chlazení s umělou inteligencí II: Optimizes thermal performance and reduces noise through dynamic fan speed adjustments based on CPU temperatures.
- Sítě umělé inteligence II: Optimizes network performance for seamless connectivity and maximized Wi-Fi 7 speeds.
- Poradce pro umělou inteligenci od ASUSu: Provides technical assistance and answers questions about motherboard functionality.

Obrázek 6: Přesview of ASUS AI Technologies for system optimization.
Power Solution and Cooling
The motherboard features a robust 16+2+1 80A power stage design and an 8-layer PCB, ensuring stable power delivery for demanding processors. Comprehensive cooling solutions include enlarged VRM and M.2 heatsinks, a PCH heatsink, and hybrid fan headers managed by Fan Xpert 4 with AI Cooling II.

Figure 7: Illustration of the motherboard's power delivery and cooling components.
Konektivita
Experience ultrafast data transfer and networking with:
- Wi-Fi 7: Provides stable connections and low latency with the ASUS Wi-Fi Q-Antenna.
- Realtek 2.5Gb Ethernet: Enhances LAN connection speeds up to 2.5 times faster than 1Gb connections.
- PCIe 5.0: Supports next-generation graphics cards and M.2 SSDs for maximum bandwidth.
- USB4 (40Gbps) Type-C: Two rear ports for high-speed data transfer.
- Front USB 20Gbps Type-C: With up to 30W Power Delivery (PD) Fast-charge.

Obrázek 8: Přesview of the motherboard's advanced connectivity features.
Údržba
Pravidelná údržba zajišťuje dlouhou životnost a optimální výkon vaší základní desky.
- Aktualizace BIOSu: Utilize the BIOS FlashBack feature to update the BIOS without needing a CPU or memory installed. This is crucial for compatibility with new processors or for applying performance and stability improvements.
- Aktualizace ovladačů: Keep your system drivers updated using ASUS DriverHub or by downloading the latest drivers from the official ASUS support webmísto.
- Odstranění prachu: Periodically clean dust from the motherboard and cooling components using compressed air to maintain efficient heat dissipation.
- Kontroly součástí: Ensure all cables and components are securely seated to prevent intermittent issues.
Odstraňování problémů
Pokud narazíte na problémy se základní deskou, zvažte následující kroky pro řešení problémů:
- Q-LED Indicator: The Q-LED feature provides diagnostic codes during boot-up. Refer to your motherboard's quick start guide for the meaning of specific LED indicators (CPU, DRAM, VGA, BOOT) to identify the component causing the issue.
- Bez displeje: Ensure your graphics card is properly seated and connected to power. Verify your monitor is connected to the correct output on the graphics card or motherboard.
- Nestabilita systému: Check memory module seating. Ensure CPU cooler is properly installed and making good contact with the CPU. Verify power supply connections.
- Reset BIOSu: If the system fails to boot after configuration changes, clear the CMOS by removing the CMOS battery for a few minutes or using the dedicated Clear CMOS jumper/button (if available).
- Problémy s ovladači: If a specific component is not functioning correctly, ensure its drivers are installed and up-to-date.
Specifikace
| Funkce | Detail |
|---|---|
| Značka | ASUS |
| Série | TUF GAMING X870E-PLUS WIFI7 |
| Název modelu | TUF GAMING X870E-PLUS WIFI7 |
| Zásuvka CPU | Zásuvka AM5 |
| Kompatibilní procesory | Ryzen™ 9000 & 8000 & 7000 Series Desktop Processors |
| Typ čipové sady | AMD X870E |
| Technologie paměti RAM | DDR5 |
| Rychlost paměti | Až 8000 MHz (přetaktování) |
| Kapacita paměti | 256 GB (max.) |
| Rozměry produktu | 12 x 9.6 x 1.9 palce |
| Hmotnost položky | 3.4 libry |
| Platforma | Windows 11 |
Záruka a podpora
For warranty information, technical support, and driver downloads, please visit the official ASUS website or the ASUS Store.


