Zavedení
The GAMDIAS Aura GC10m V2 WH is a micro-tower computer case designed for Micro-ATX and Mini-ITX motherboards. It features a dual-chamber design, panoramic tempered glass panels, and comes equipped with three Addressable RGB (ARGB) fans to enhance system aesthetics and cooling. This manual provides essential information for the proper installation, operation, and maintenance of your computer case.
Obrázek: Přední strana view of the GAMDIAS Aura GC10m V2 WH Micro-Tower Computer Case, showcasinjeho panely z tvrzeného skla a předinstalované ARGB ventilátory.
Nastavení a instalace
Before beginning installation, ensure you have all necessary components and tools. Refer to your motherboard and component manuals for specific installation instructions.
1. Příprava případu
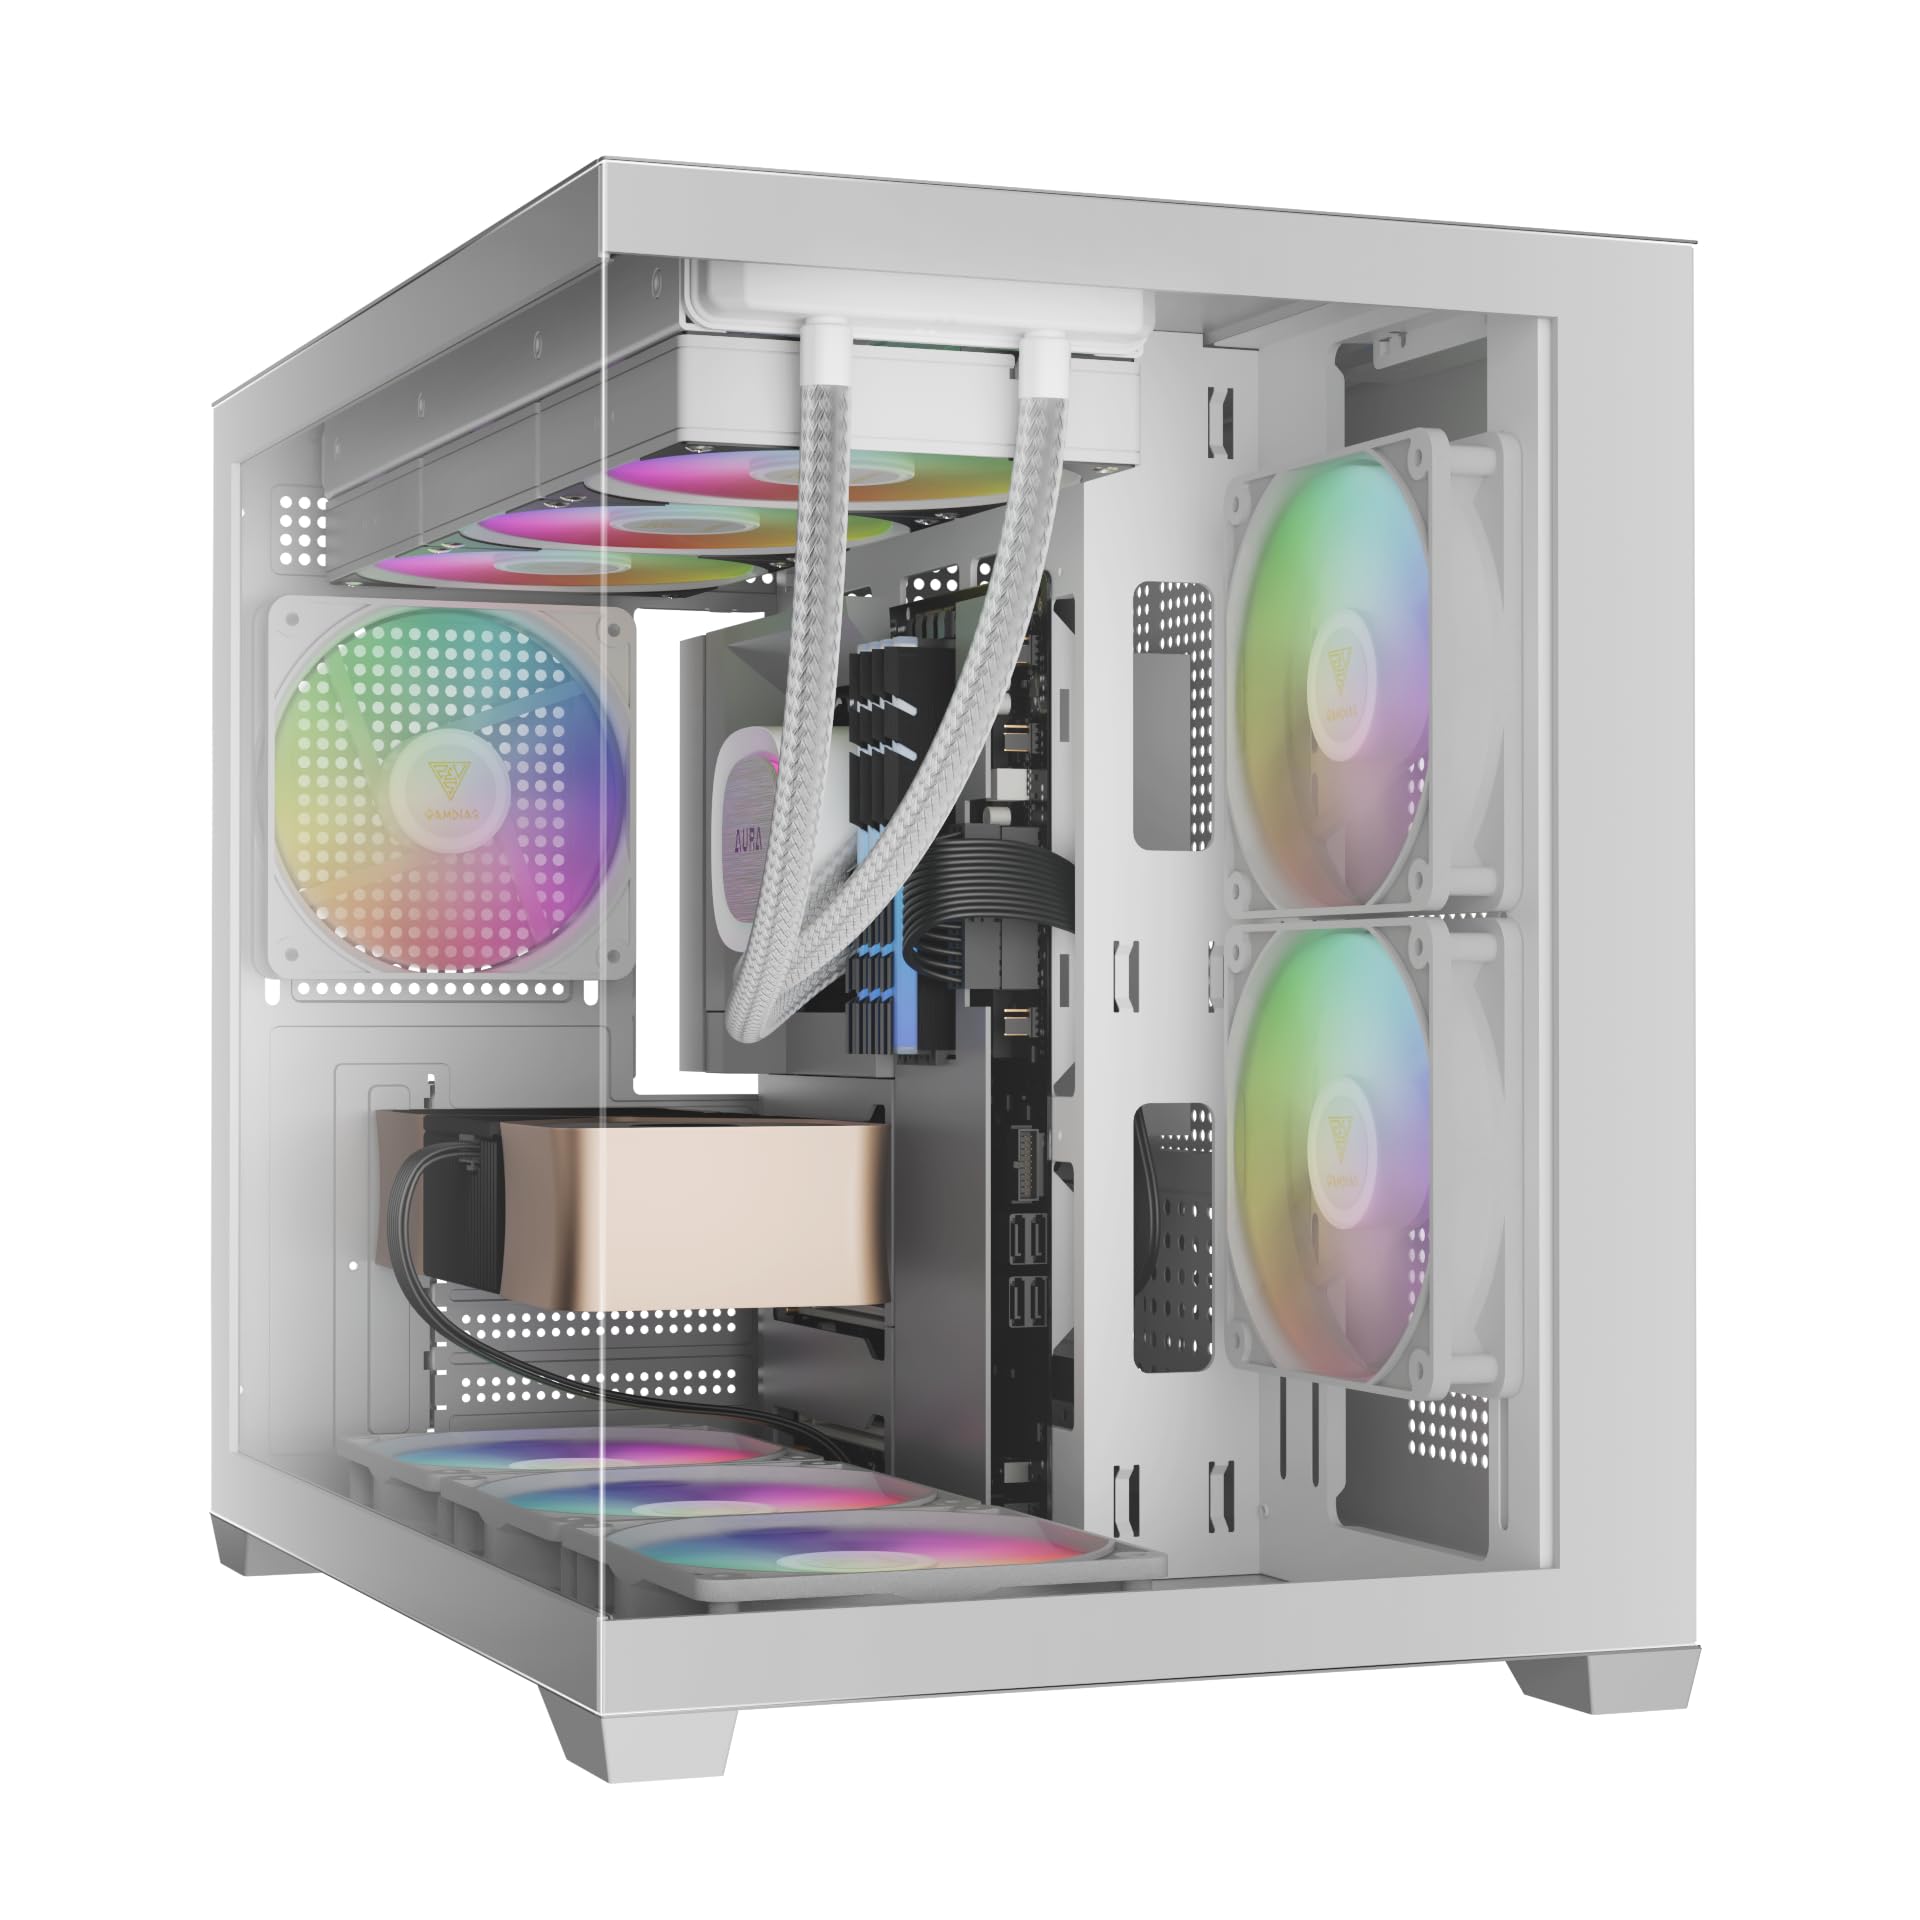
Carefully remove the tempered glass side and front panels. These are typically secured with thumbscrews or a latch mechanism. Place them on a soft, flat surface to prevent scratches.

Obrázek: Úhlový view of the case with the tempered glass side panel removed, showing the internal structure and fan mounts.
2. Instalace základní desky
- Nainstalujte kryt I/O (pokud není předem připojen k základní desce) do zadního otvoru skříně.
- Align your Micro-ATX or Mini-ITX motherboard with the standoffs inside the case.
- Zajistěte základní desku pomocí dodaných šroubů.

Obrázek: Interní view of the case, highlighting the motherboard tray area and fan mounting points.
3. Instalace napájecího zdroje (PSU)
- Install your PSU into its designated compartment, typically at the rear bottom of the case.
- Zajistěte zdroj šrouby ze zadní strany skříně.
- Ensure the PSU fan faces the correct direction for optimal airflow (usually downwards if there's a vent, or upwards if not).

Obrázek: Zadní vnitřní view of the case, showing the PSU mounting area and cable routing options.
4. Instalace měniče
- 3.5" / 2.5" Drive Bay (HDD Cage): Locate the HDD cage. Install one 3.5" HDD or one 2.5" SSD/HDD.
- 2.5" Drive Bays: The case supports three additional 2.5" SSDs/HDDs. Mount these drives to the designated brackets or locations within the case.
5. Instalace ventilátoru a chladiče
The case comes with three pre-installed ARGB fans (two side, one rear). Additional fans or radiators can be installed in the following locations:
- Nahoře: Supports 3 x 120mm or 2 x 140mm fans; 360mm or 280mm radiators.
- Strana: Supports 2 x 120mm or 2 x 140mm fans; 240mm radiators. (Pre-installed 2 x 120mm ARGB fans)
- Dno: Supports 3 x 120mm or 2 x 140mm fans.
- Zadní: Supports 1 x 120mm or 1 x 140mm fan; 120mm radiators. (Pre-installed 1 x 120mm ARGB fan)

Obrázek: Interní view showing the pre-installed ARGB fans on the side and rear, illustrating fan placement.
6. Connecting Front I/O Ports and ARGB
Connect the following cables from the case to your motherboard:
- USB 2.0: Connect the USB 2.0 header cable.
- Typ C: Connect the USB Type-C header cable (if your motherboard supports it).
- HD zvuk: Connect the HD Audio header cable.
- Power/Reset/LEDs: Connect the front panel power, reset, HDD LED, and power LED cables according to your motherboard manual.
- ARGB Fans: Connect the ARGB fan cables to your motherboard's 5V ARGB header or to the integrated ARGB controller (if applicable). The case includes an LED Switch Button for controlling ARGB lighting if connected to the case's internal controller.

Obrázek: Nahoře view of the case, showing the front I/O panel with USB ports and the LED switch button.
Operace
Zapnutí
Once all components are installed and connected, close the side panels. Connect your monitor, keyboard, mouse, and power cable. Press the power button on the front panel of the case to start your system.
Ovládání osvětlení ARGB
Předinstalované ARGB ventilátory lze ovládat dvěma způsoby:
- Tlačítko přepínání LED: If the ARGB fans are connected to the case's internal controller, press the dedicated LED Switch Button on the front I/O panel to cycle through various lighting effects and colors.
- Software základní desky: If the ARGB fans are connected directly to a compatible 5V ARGB header on your motherboard, you can control the lighting effects using your motherboard's proprietary RGB software (e.g., ASUS Aura Sync, MSI Mystic Light, Gigabyte RGB Fusion, ASRock Polychrome Sync).
Údržba
Pravidelná údržba pomáhá zajistit optimální výkon a dlouhou životnost počítačových komponent.
- Prachové filtry: The case features removable dust filters (e.g., on the top and bottom). Periodically remove and clean these filters with compressed air or water (ensure they are completely dry before reinstallation).
- Čištění pouzdra: Použijte měkký, damp cloth to clean the exterior surfaces of the case. For tempered glass panels, use a glass cleaner and a microfiber cloth. Avoid abrasive cleaners.
- Odstraňování vnitřního prachu: Every few months, open the case and use compressed air to remove dust from internal components, especially fan blades and heatsinks.
Odstraňování problémů
Pokud narazíte na problémy, zvažte následující běžná řešení:
- Systém se nezapíná:
- Ujistěte se, že je zdroj zapnutý a správně připojený k elektrické zásuvce.
- Ověřte, zda jsou všechny napájecí kabely (24pinový ATX, CPU, GPU, mechaniky) bezpečně připojeny.
- Check that the front panel power button cable is correctly connected to the motherboard.
- ARGB Fans Not Lighting Up/Spinning:
- Confirm ARGB cables are securely connected to a 5V ARGB header on the motherboard or the case's controller.
- Ensure fan power cables are connected to appropriate fan headers on the motherboard or PSU.
- If using motherboard software, verify it is installed and configured correctly.
- Přední I/O porty nefungují:
- Check that the USB and HD Audio cables from the front panel are correctly connected to their respective headers on the motherboard.
For persistent issues, consult your motherboard manual or contact GAMDIAS support.
Specifikace
| Model | AURA GC10 V2 WH |
| Typ pouzdra | Micro-Tower |
| Podpora základní desky | Micro-ATX, Mini-ITX |
| Rozměry (DxŠxV) | 42 x 29 x 37 cm |
| Hmotnost | 5 kg |
| Drive Bays | 1 x 3.5" or 1 x 2.5" (HDD Cage), 3 x 2.5" |
| I/O porty | 1 x Type-C, 1 x USB 2.0, 1 x HD Audio, 1 x LED Switch Button |
| Předinstalované ventilátory | 2 x 120mm ARGB (Side), 1 x 120mm ARGB (Rear) |
| Podpora fanoušků |
|
| Podpora radiátorů |
|
| Limit výšky chladiče CPU | 165 mm |
| Omezení délky VGA | 400 mm |
| Limit délky zdroje | 160 mm |
Informace o záruce
For detailed warranty terms and conditions, please refer to the official GAMDIAS webwebu nebo záruční kartu dodanou s vaším produktem. Uschovejte si doklad o koupi pro případ reklamace.
Zákaznická podpora
If you require further assistance or have questions regarding your GAMDIAS Aura GC10m V2 WH computer case, please contact GAMDIAS customer support.
- Výrobce: GAMDIAS TAIWAN
- Adresa: No. 113, Jian 2nd Rd., Zhonghe, Dist., New Taipei City 235, Taiwan
- Dovozce (Indie): Allway Distributions Pvt Ltd, No-49, H.B. Samajha Road, Baswangudi , Bengaluru- 560004
- Kontakt dovozce (Indie): 8904307700
- Oficiální Webmísto: www.gamdias.com (Prosím, zkontrolujte oficiální website for the most up-to-date support contact information and resources.)


