1. Úvod
The Leviton ESL01-1LW Lever Edge Rocker Slide Dimmer Switch is designed for controlling dimmable LED/CFL and incandescent/halogen bulbs up to 150 Watts. This device supports both single-pole (one location) and 3-way (two locations) installations. It features an intuitive slide-action for full-range dimming and innovative lever terminals for simplified wiring, ensuring a secure and efficient installation process.
2. Bezpečnostní informace
VAROVÁNÍ: To avoid fire, shock, or death; turn off power at the circuit breaker or fuse and test that power is off before wiring! This device must be installed in accordance with all national and local electrical codes.
- For use with 120V AC, 60Hz circuits only.
- Do not use with non-dimmable bulbs.
- Tento produkt může obsahovat chemikálie, o kterých je ve státě Kalifornie známo, že způsobují rakovinu a vrozené vady nebo jiná poškození reprodukce. Po manipulaci si umyjte ruce.
- Ujistěte se, že všechny kabelové spoje jsou bezpečné a řádně izolované.
- Pokud si nejste jisti jakoukoli částí těchto pokynů, obraťte se na kvalifikovaného elektrikáře.
3. Obsah balení
Před zahájením instalace ověřte, zda jsou všechny komponenty přítomny:
- One Leviton ESL01-1LW Lever Edge Rocker Slide Dimmer Switch - White
4. Specifikace
| Funkce | Specifikace |
|---|---|
| Číslo modelu | ESL01-1LW |
| Typ montáže | Posuvný stmívač |
| Značka | Leviton |
| Materiál | Polykarbonát (PC) |
| Typ terminálu | Lever Edge (Push-in) |
| Aktuální hodnocení | 5 Amps |
| Provozní svtage | 120 voltů |
| Wattage | 150 Watts (LED/CFL), 600 Watts (Incandescent/Halogen) |
| Rozměry produktu | 1.65 x 1.8 x 4.55 palce |
| Hmotnost položky | 4.2 unce |
| Typ přepínače | Jednopólový nebo třícestný |
| Barva | Bílý |
| Dodržování | Seznam UL |
The dimmer's shallow depth allows for easier installation in various junction boxes.

Image: This image displays the precise dimensions of the Leviton ESL01-1LW dimmer switch, showing its height, width, and depth for installation planning.
5. Instalace a nastavení
Pro bezpečnou a správnou instalaci postupujte podle následujících kroků:
- Vypnout napájení: Vyhledejte rozvaděč s jističi a vypněte napájení rozvaděče, na kterém budete pracovat. Ověřte, zda je napájení vypnuté, pomocí regulátoru hlasitosti.tage tester.
- Odebrat stávající přepínač: Opatrně sejměte nástěnnou desku a odšroubujte stávající vypínač z nástěnné krabice. Odpojte vodiče od starého vypínače.
- Identifikace vodičů: Identify the Line (hot), Load, Ground, and Traveler wires (if applicable for 3-way installations). This dimmer does not require a neutral wire for operation.
- Připravte dráty: Strip approximately 1/2 inch (12.7 mm) of insulation from each wire end. The dimmer includes a strip gauge on the back for reference.
- Connect Wires using Lever Edge Terminals:
- Zemnící vodič (zelený): Insert the bare copper ground wire into the green Lever Edge terminal.
- Line/Load Wires (Black/Red): Insert the Line (hot) wire into the black Lever Edge terminal. Insert the Load wire into the TRAV1 (red) terminal. For 3-way installations, refer to the wiring diagrams below for traveler connections.
The Lever Edge terminals are color-coded for easy identification and accept 12 gauge and 14 gauge solid or stranded copper wire. Push the wire firmly into the terminal until you hear an audible 'click', confirming a secure connection. No exposed metal parts ensure added safety.

Image: This image shows a hand inserting a wire into the Lever Edge terminal of the dimmer switch, illustrating the quick and secure wiring method.
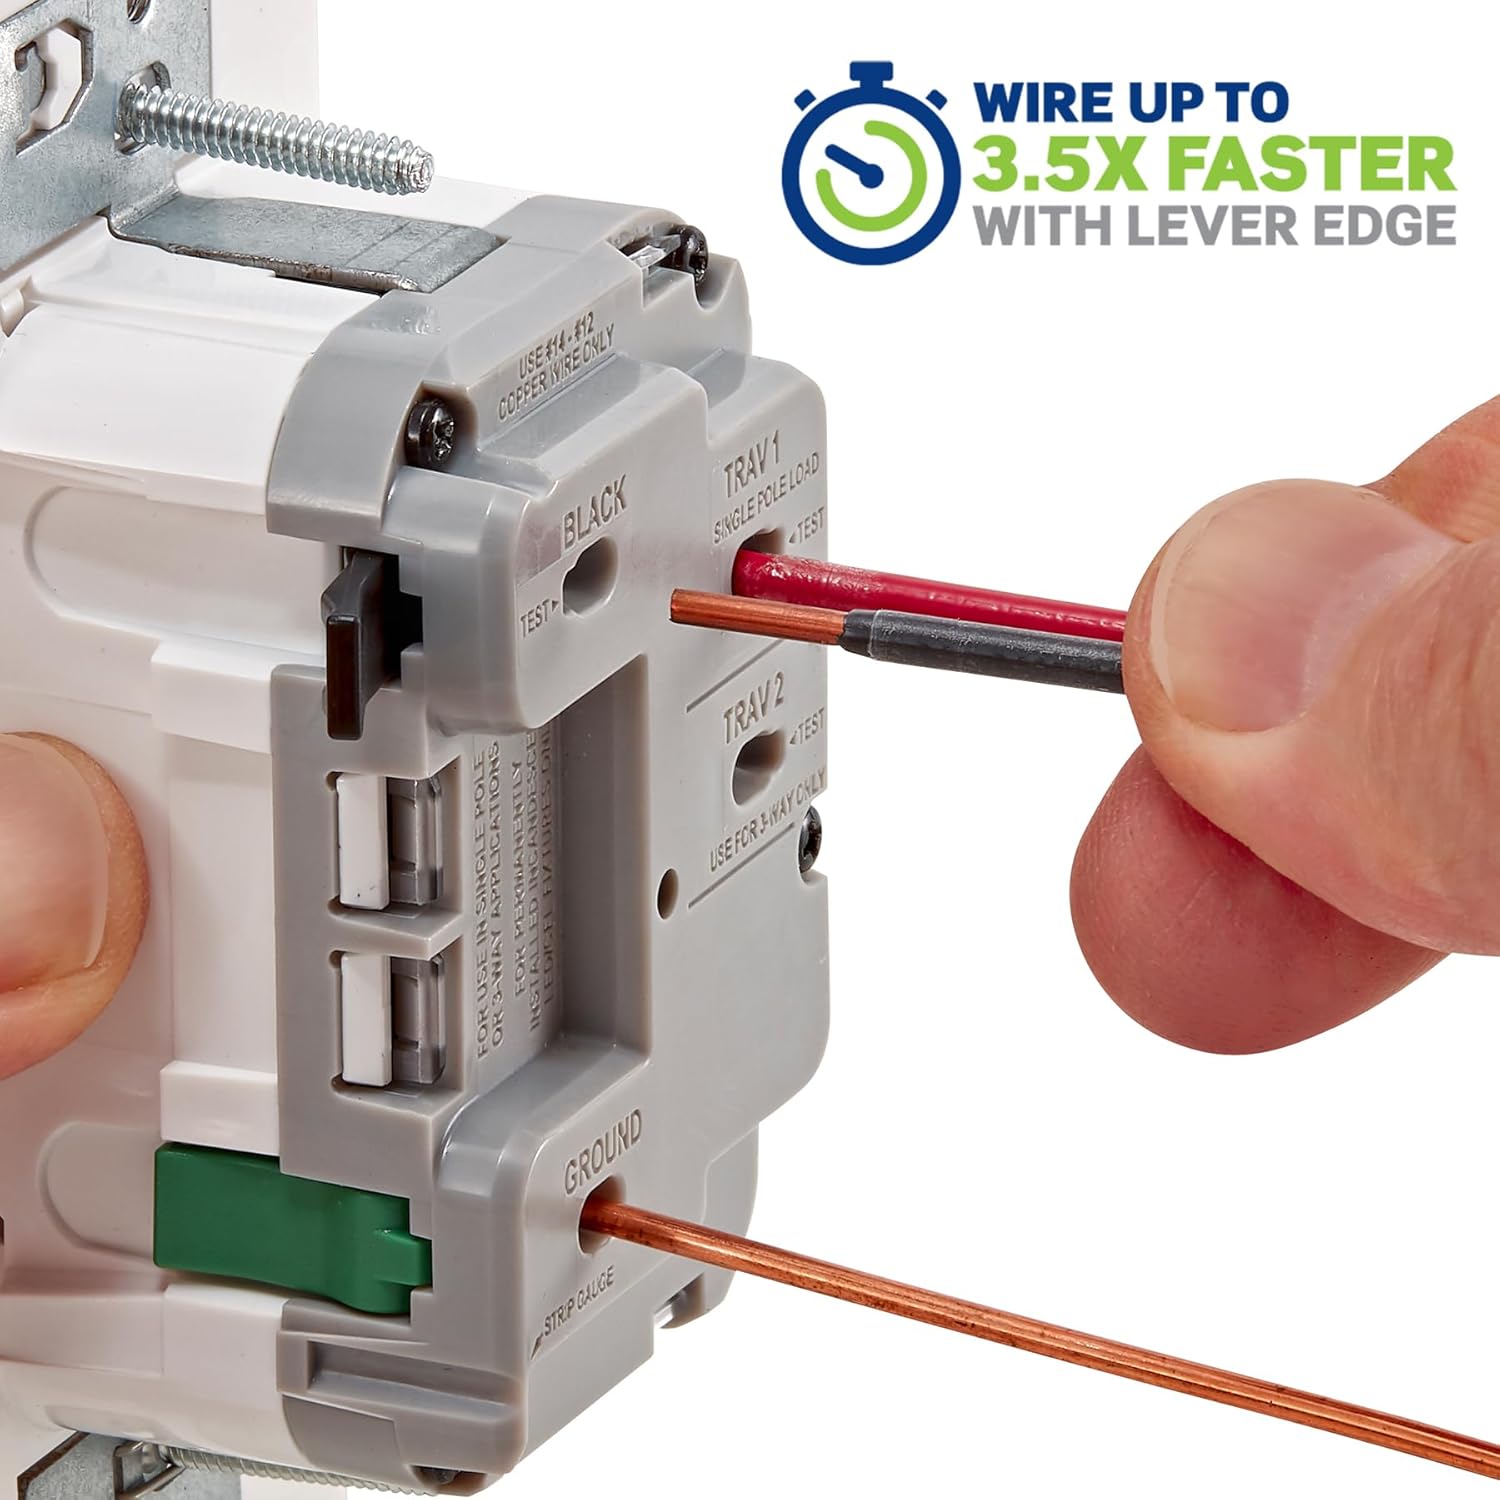
Image: This image visually demonstrates the three simple steps of Lever Edge wiring: Push the wire, Click the lever, and the connection is Done.

Image: This image provides a detailed back view of the dimmer switch, clearly labeling the color-coded Lever Edge terminals for Black (Line), TRAV1 (Load/Traveler), TRAV2 (Traveler), and Ground connections.
- Držák Dimmer: Carefully push the wired dimmer into the wall box. Secure it with the mounting screws provided.
- Instalace nástěnné desky: Attach the decorative wall plate (sold separately) over the dimmer. The dimmer is designed with a tongue and groove alignment for quicker trim-out on multi-gang installations.
- Obnovit napájení: Vraťte se k rozvaděči s jističi a znovu zapněte napájení.
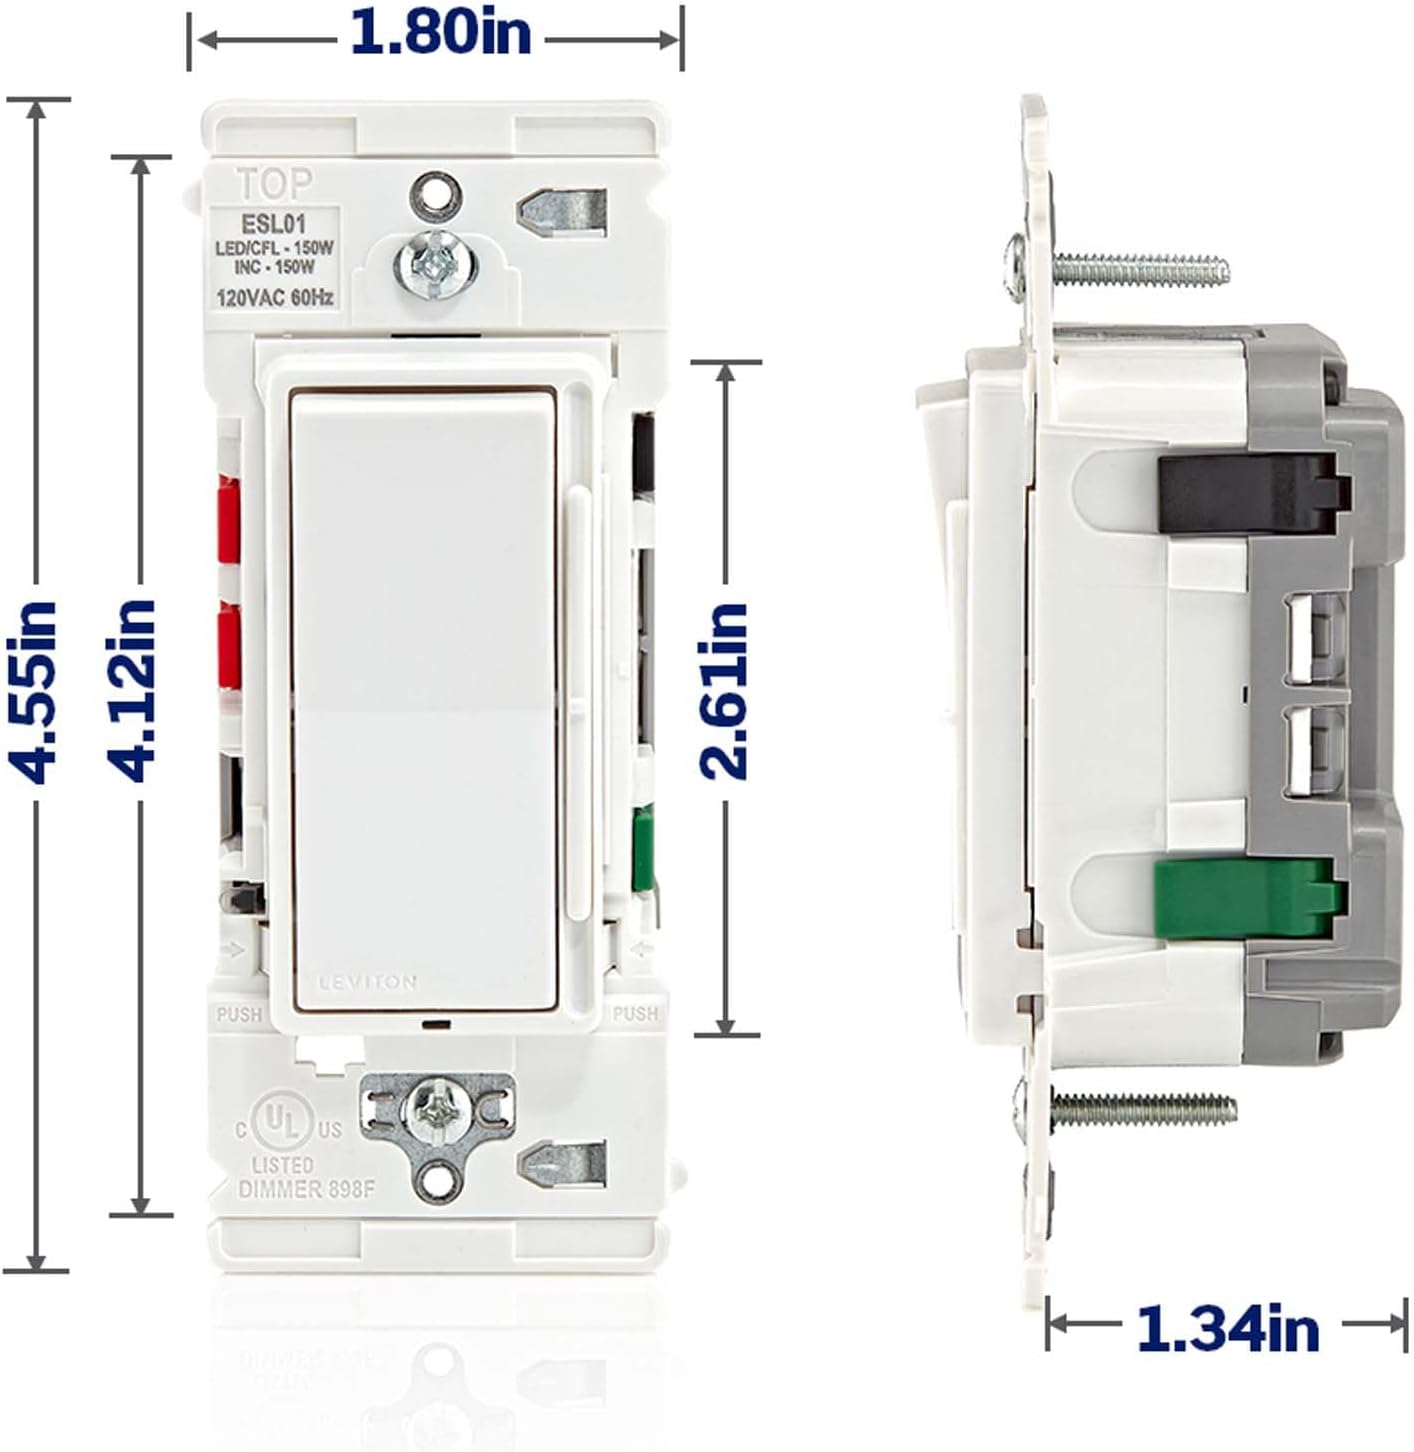
Image: This image illustrates the visual upgrade from a traditional toggle switch to the modern Leviton Lever Edge Rocker Slide Dimmer Switch.
6. Provoz
The Leviton ESL01-1LW dimmer switch provides both ON/OFF control and smooth dimming functionality.
- Zapnout/vypnout: Press the top of the rocker switch to turn the lights ON to the previously set brightness level. Press the bottom of the rocker switch to turn the lights OFF.
- Stmívání: Move the vertical slide control up to increase the light brightness. Move the slide control down to decrease the light brightness. The separate ON/OFF rocker switch ensures that your preferred dimming level is maintained when the lights are turned off and on again.

Image: This image highlights the key operational features of the dimmer switch, including the ON/OFF rocker, the integrated slider for dimming, and the setup button.
7. Adjusting Dimming Performance
The dimmer includes a setup button to fine-tune its performance with various dimmable LED/CFL bulbs, helping to prevent flickering and optimize the dimming range.
- Tlačítko nastavení: An easily accessible setup button allows for adjustments to customize performance, such as setting the minimum dim level and maximum bright levels. This ensures superior dimming performance and compatibility with a wide range of LED bulbs.
- Consult the detailed instructions provided with the dimmer for specific steps on adjusting these settings.
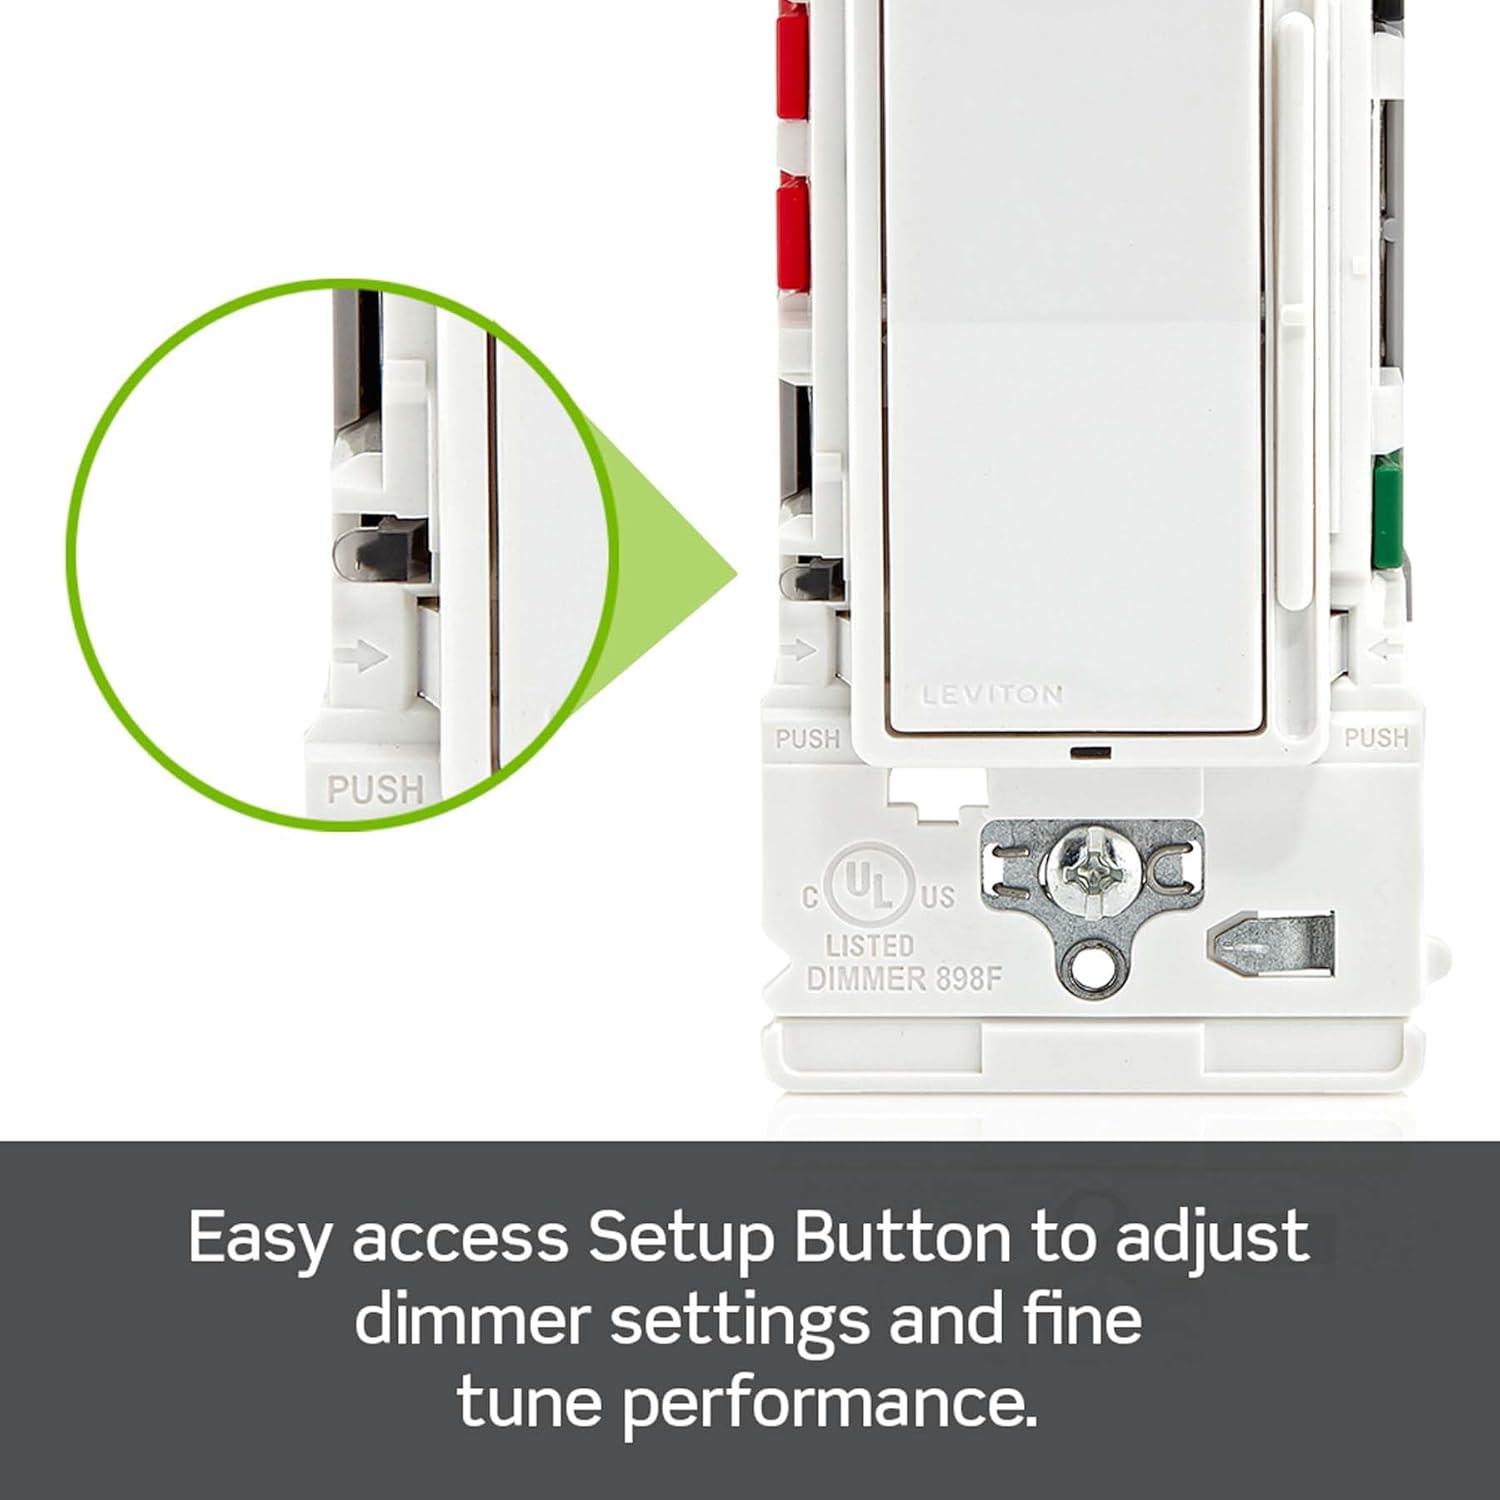
Image: This close-up image shows the location of the easy access setup button on the dimmer switch, used for adjusting dimming settings.
8. Schémata zapojení
8.1. Single Pole Installation
A single-pole installation controls lights from one location.
- Připojte Linka (horká) drát k ČERNÝ terminál.
- Připojte Zatížení drát k TRAV1 terminál.
- Připojte Země drát k ZELENÝ terminál.
- The TRAV2 terminal is not used in a single-pole configuration.

Image: This diagram illustrates the wiring connections for a single-pole installation, showing the dimmer controlling a light from one location.
8.2. 3-Way Installation
A 3-way installation controls lights from two separate locations. This requires the Leviton dimmer switch and a standard 3-way switch.
- At the dimmer location: Connect the Linka (horká) drát k ČERNÝ terminál. Připojte Zatížení drát k TRAV1 terminál. Připojte Země drát k ZELENÝ terminál.
- Spojte oba Cestovatel wires between the dimmer's TRAV1 a TRAV2 terminals and the corresponding traveler terminals on the standard 3-way switch.
- At the 3-way switch location: Connect the common terminal of the 3-way switch to either the Line or Load, depending on which box the power source enters. Connect the two traveler wires to the remaining two terminals. Connect the Ground wire.

Image: This diagram illustrates the wiring connections for a 3-way installation, showing the dimmer and a standard 3-way switch controlling a light from two locations.
9. Údržba
The Leviton ESL01-1LW dimmer switch requires minimal maintenance.
- Čištění: To clean the dimmer switch, gently wipe it with a soft, damp hadříkem. Nepoužívejte abrazivní čisticí prostředky, rozpouštědla ani agresivní chemikálie, protože by mohly poškodit povrchovou úpravu nebo vnitřní součásti.
- Inspekce: Periodically inspect the dimmer and wall plate for any signs of damage or loose connections. If any issues are found, turn off power at the circuit breaker before attempting to address them.
10. Řešení problémů
If you encounter issues with your dimmer switch, refer to the following troubleshooting guide:
| Problém | Možná příčina | Řešení |
|---|---|---|
| Světla se nerozsvítí | No power to the switch Nesprávné zapojení Bulbs are faulty or non-dimmable | Check circuit breaker and ensure power is restored. Verify all wiring connections are secure and correct (refer to Section 5 & 8). Replace bulbs with known working, dimmable types. |
| Lights flicker or hum | Nekompatibilní žárovky Dimming range not optimized Uvolněné spoje | Ensure bulbs are specifically designed for dimming and compatible with LED/CFL dimmers. Adjust the minimum and maximum dimming levels using the setup button (refer to Section 7). Turn off power and check all wire connections for tightness. |
| Dimmer does not respond to slide control | Vnitřní porucha Problém s napájením | If troubleshooting steps do not resolve the issue, contact Leviton customer support. Verify power is supplied to the switch. |
11. Záruka a podpora
For technical assistance, warranty information, or to inquire about replacement parts, please contact Leviton customer support directly. You can also visit the official Leviton webstránky s dalšími zdroji a informacemi o produktech.
Leviton Customer Support: Refer to the contact information provided in your product packaging or on the official Leviton webmísto.
Online zdroje: Visit the Leviton Store on Amazon


