1. Úvod
This manual provides detailed instructions for the installation, operation, and maintenance of your Eonon M3BLX6S Car Stereo Receiver. Designed specifically for 2010-2013 Mazda 3 models, this head unit integrates advanced features to enhance your in-car entertainment and navigation experience. Please read this manual thoroughly before use to ensure proper functionality and safety.
Video: Overview of the Eonon M3BLX6S car stereo, highlighting its key features and compatibility with Mazda 3.
2. Klíčové vlastnosti
- Vysoký výkon: Powered by Qualcomm QCM6225 8-core processor with 6GB RAM and 64GB ROM, utilizing 6nm Low-Power process technology for responsive performance.
- Bezdrátové připojení: Supports wireless Apple CarPlay and Android Auto via Bluetooth, along with screen mirroring for both iPhone and Android devices.
- Superior Display: Features a 9-inch QLED touchscreen with 1280x720 HD resolution, offering vivid colors, brightness, and high contrast with a 178° viewúhel.
- Pokročilý zvuk: Built-in DSP (Digital Signal Processing) with 15-band graphic equalizer and six preset EQ modes for an immersive sound experience. Includes 4x48W max output power and optical/coaxial HD audio output.
- Bezproblémová integrace: Plug & play design retains factory features such as steering wheel controls, door information, and driving data display.
- Communication & Navigation: Integrated Bluetooth 5.1 for hands-free calls, contact synchronization, and music playback. Supports offline/online GPS navigation and RDS/FM radio.
- Uživatelské rozhraní: Offers 4 built-in UI themes and a split-screen function for multitasking. New 3 Brightness Modes (Light, Dark, Auto) for comfortable driving.
- Aktualizace softwaru: Supports Over-The-Air (OTA) updates for software fixes and security enhancements (does not upgrade Android system).
- Rozšiřitelnost: Supports Eonon dashcam (A100) and DAB+ box (502) (not included). Includes Eonon rearview camera (A0127).
3. Co je v krabici
Balení obsahuje následující komponenty:
- M3BLX6S Head Unit (x1)
- A0127 Rearview Fotoaparát (x1)
- Napájecí kabel (x1)
- GPS anténa (x1)
- 4G anténa (x1)
- Adaptérový kabel USB (x2)
- Audio/Video Adapter Cable (x2)
- Reverse Video Input Cable (x1)
- 15A Fuse (x1)
- SIM Card Holder (x1)
- Externí mikrofon (x1)
- CANBUS Decoder (x1)
- Uživatelská příručka (x1)
- Double-sided Adhesive Sticker (x1)
- AUX Adapter Cable (x1)

Image: All components included in the Eonon M3BLX6S package, laid out for inspection.
4. Nastavení a instalace
The Eonon M3BLX6S is designed for a plug-and-play installation in compatible 2010-2013 Mazda 3 vehicles, retaining most factory features. Basic tools such as a trim removal tool and a screwdriver are recommended.
Video: Rozbalení a konecview of the Eonon M3BLX6S, detailing the included components and initial setup.
4.1. Removing the Factory Head Unit
- Carefully use a trim removal tool to pry around the edges of the factory radio bezel.
- Once the bezel is loose, gently pull it away from the dashboard.
- Locate and remove any screws securing the factory head unit.
- Carefully pull the factory head unit out and disconnect all wiring harnesses and antenna cables from the back.
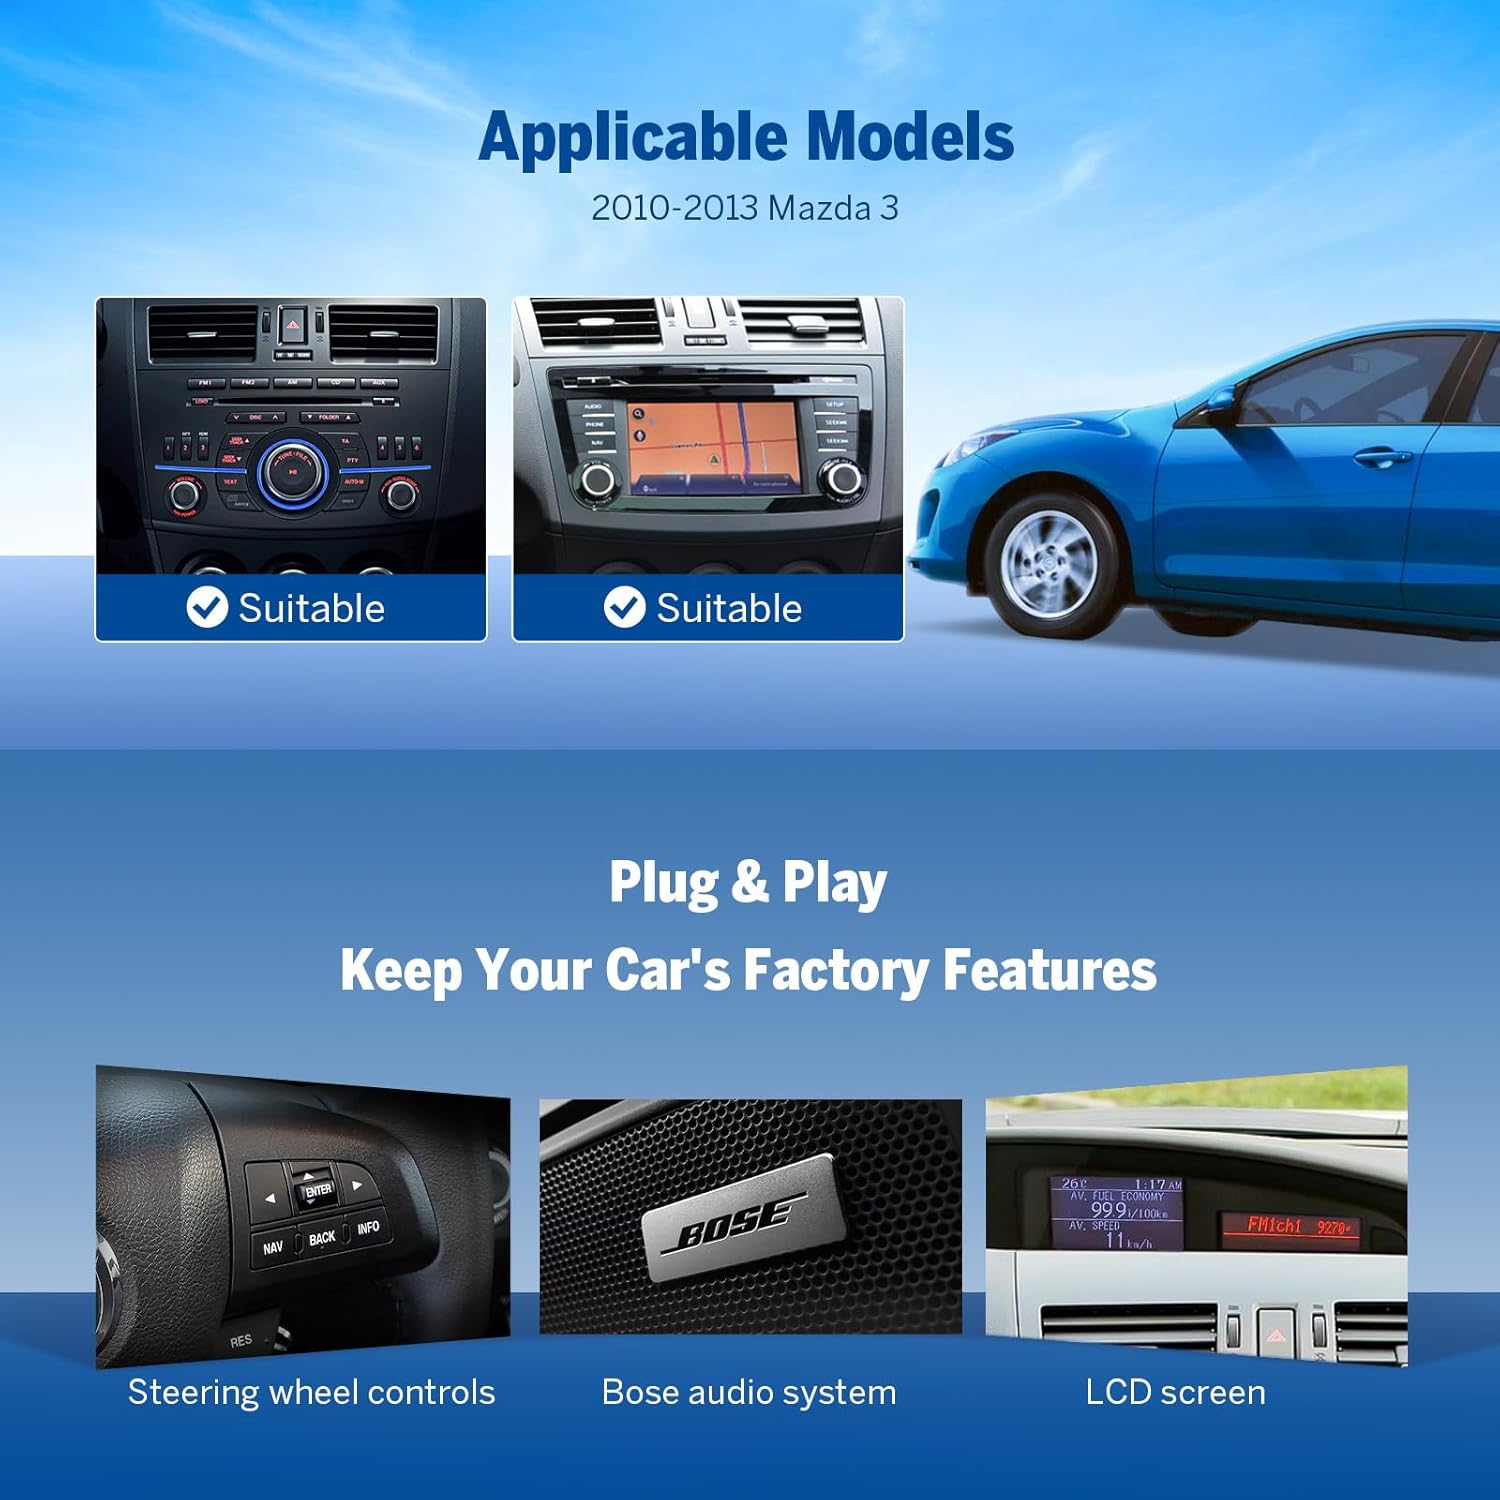
Image: The Eonon M3BLX6S car stereo seamlessly integrated into the dashboard of a Mazda 3.
4.2. Connecting the Eonon M3BLX6S
- Connect the main wiring harness from the Eonon unit to the vehicle's factory harness. Ensure all connections are secure.
- Attach the GPS antenna and 4G antenna to their respective ports on the Eonon unit. Position the antennas in a location with clear signal reception (e.g., dashboard).
- Connect the external microphone. Route the microphone cable to a suitable location for clear voice pickup (e.g., near the rearview mirror or steering column).
- If installing the rearview camera, connect its video input cable to the designated port on the Eonon unit. The red wire for +12V power for the backup camera should be connected to the reverse light power source.
- Connect any additional accessories such as USB cables, AUX cables, or external amplifier outputs as needed.

Image: Detailed wiring diagram illustrating all connection points for the Eonon M3BLX6S head unit.
4.3. Dokončení instalace
- Before fully reassembling the dashboard, turn on the vehicle's ignition to test the head unit's basic functions (power, audio, touchscreen, steering wheel controls).
- If all functions are working correctly, carefully tuck all excess wiring into the dashboard cavity.
- Align the Eonon M3BLX6S unit with the dashboard opening and gently push it into place until it clicks securely.
- Reinstall any screws removed earlier to secure the unit.
- Reattach the dashboard bezel, ensuring all clips are properly engaged.
5. Provoz
5.1. Initial Power On and UI
Upon first power-on, the unit will boot up. You can customize the user interface (UI) themes and wallpapers through the settings menu. The system supports OTA firmware updates to ensure you have the latest features and security patches.

Image: The Eonon M3BLX6S showcasing different user interface themes available for selection.
Video: Demonstration of the Eonon 2025 New UI, highlighting split-screen, media player, and settings.
5.2. Bezdrátové CarPlay a Android Auto
Connect your smartphone wirelessly via Bluetooth for seamless integration with Apple CarPlay or Android Auto. This allows access to navigation, music, calls, and messages directly from the head unit's display.
- Pro bezdrátové CarPlay: Ensure Bluetooth and Wi-Fi are enabled on your iPhone. Open the Zlink5 app on the car stereo, find "EONON" in your phone's Bluetooth device list, pair, and confirm "Use CarPlay."
- Pro bezdrátové připojení Android Auto: Ensure Bluetooth and Wi-Fi are enabled on your Android device. Open the Zlink5 app on the car stereo, find "EONON" in your phone's Bluetooth device list, pair, and confirm connection.

Image: The Eonon M3BLX6S screen showing both Wireless CarPlay and Android Auto interfaces in a car dashboard.
5.3. Screen Mirroring
Project your smartphone's screen onto the head unit for a larger view of apps and content.
- Pro iOS: Open the Zlink5 app, select iPhone wireless screen mirroring mode. Turn on your iPhone's hotspot and connect the car stereo to it. Then, enable screen mirroring on your iPhone and select "zj-airplay."
- Pro Android: Open the Zlink5 app, select Android wireless screen mirroring mode. Turn on your phone's hotspot and connect the car stereo to it. Install the Zplus app on your phone and select "wireless connection."
5.4. Nastavení zvuku (DSP)
Utilize the built-in Digital Signal Processor (DSP) to fine-tune your audio experience. Access the DSP settings to adjust the 15-band graphic equalizer, select preset EQ modes, and configure sound field settings for optimal sound quality.

Image: The Eonon M3BLX6S display showing the Digital Signal Processing (DSP) interface for audio adjustments.
5.5. Split-Screen Multitasking
The split-screen function allows you to view and operate two applications simultaneously on the 9-inch QLED display. For example, you can have navigation running on one side and music playback on the other.

Image: The Eonon M3BLX6S screen showing split-screen functionality with a navigation app and a music player running concurrently.
5.6. Zadníview Fotoaparát
When the vehicle is shifted into reverse, the connected rearview camera (A0127) will automatically display the rear view on the screen, complete with reversing guidelines for assistance.

Image: The Eonon M3BLX6S screen showing the rearview záznam z kamery s dynamickými parkovacími pokyny.
6. Údržba
- Aktualizace softwaru: Regularly check for and install Over-The-Air (OTA) firmware updates via the "Updater" app on the device. These updates provide software fixes and security enhancements. Note that OTA updates are for software improvements and do not upgrade the Android system version.
- Čištění obrazovky: Use a soft, lint-free cloth to clean the QLED touchscreen. For stubborn smudges, lightly dampen the cloth with a screen-safe cleaning solution. Avoid harsh chemicals or abrasive materials.
- Obecná péče: Ensure all connections remain secure. Avoid exposing the unit to extreme temperatures or direct sunlight for prolonged periods.
7. Řešení problémů
If you encounter issues with your Eonon M3BLX6S, refer to the following common solutions:
- Bez napájení: Check all power connections and ensure the 15A fuse is intact. Verify the vehicle's ignition is on.
- Žádný zvuk: Check speaker connections and audio output settings in the DSP. Ensure volume is not muted or set too low. Verify the factory Bose audio system is functioning correctly if retained.
- Problémy s připojením k CarPlay/Android Auto:
- Ensure Bluetooth and Wi-Fi are enabled on both the head unit and your smartphone.
- Restart both the head unit and your smartphone.
- Zapomeňte na zařízení v nastavení Bluetooth telefonu a znovu jej spárujte.
- Ensure the Zlink5 app is updated to the latest version.
- Ovládací prvky na volantu nereagují: Verify the CANBUS decoder is correctly connected. Check the steering wheel control settings within the head unit's menu.
- Zadníview Kamera se nezobrazuje: Check the reverse video input cable connection. Ensure the +12V trigger wire for the backup camera is correctly connected to the reverse light power.
- Pomalý výkon/zamrzání: Close unnecessary background applications. Perform a system restart. Ensure the latest OTA updates are installed.
8. Specifikace
| Číslo modelu | M3BLX6S-U |
| Procesor | Qualcomm QCM6225 8-core (6nm LPP) |
| BERAN | 6 GB |
| ROM | 64 GB |
| Zobrazit | 9-inch QLED Touchscreen, 1280x720 HD Resolution |
| Konektivita | Bluetooth 5.1, USB, Wi-Fi (Wi-Fi 6 ready) |
| Speciální funkce | Android Auto, Apple CarPlay, Built-In Bluetooth, Built-In Wi-Fi, DSP |
| Režim zvukového výstupu | Stereo (Optical + Coaxial + RCA) |
| Maximální výstupní výkon | 4 x 48W |
| Kompatibilní zařízení | Smartphone |
| Rozměry balení | 12.71 x 7.72 x 7.36 palce |
| Hmotnost položky | 4.4 libry |
9. Záruka a podpora
For warranty information, technical support, or service inquiries, please refer to the official Eonon webnebo se obraťte přímo na jejich zákaznický servis. Uschovejte si účtenku jako doklad o koupi pro případ reklamace.
Online resources and FAQs may also be available on the Eonon support page.


