1. Úvod
This manual provides detailed instructions for the setup, operation, and maintenance of your JoFomp 17.3" Large Digital Wall Clock. Please read this manual thoroughly before use to ensure proper functionality and longevity of the product.
2. Bezpečnostní informace
- Ensure the clock is connected to a stable power source (5V/2A adapter included).
- Nevystavujte zařízení extrémním teplotám, přímému slunečnímu záření nebo vysoké vlhkosti.
- Uchovávejte mimo dosah dětí.
- Nepokoušejte se zařízení sami rozebírat nebo opravovat. Požádejte o pomoc zákaznickou podporu.
- Dálkové ovládání vyžaduje 2 baterie AAA (nejsou součástí balení).
- A 1 AAA battery (not included) is required for the memory function to retain settings during power outages.
3. Obsah balení
Ověřte, zda jsou v balení přítomny všechny položky:
- JoFomp 17.3" Digital Wall Clock
- Dálkové ovládání
- 5V/1A DC napájecí adaptér
- Napájecí kabel
- Mounting Hooks (2)
- Mounting Template Ruler
- Uživatelská příručka (tento dokument)

Obrázek 3.1: Dodávané příslušenství a hlavní jednotka.
4. Konec produktuview
The JoFomp 17.3" Large Digital Wall Clock features a clear LED display and multiple functions for convenience.

Figure 4.1: Front display of the digital wall clock.
4.1 Funkce displeje
- Zobrazení času: Large 17.3" LED digits.
- Zobrazení data: Month and Day.
- Den v týdnu: Indicated by illuminated text (Mon-Sun).
- Teplota: Zobrazuje se ve stupních Celsia nebo Fahrenheita.
- Vlhkost: Displays relative humidity percentage.
- Duální budíky: Two independent alarm settings.
- Indikátor DST: Daylight Saving Time status.

Figure 4.2: Labeled display functions.
4.2 Back Panel and Buttons
The back of the clock houses control buttons and connection ports.

Figure 4.3: Back panel with labeled components.
- Tlačítka nastavení: Five buttons for manual adjustments (Light, SET, +, -, Alarm).
- Memory Battery Compartment: For 1 AAA battery (not included) to retain settings.
- Napájecí port: Pro připojení napájecího adaptéru.
- Montážní otvory: Pro instalaci na zeď.
5. Nastavení
5.1 Připojení napájení
- Connect the power cord to the clock's power port.
- Plug the 5V/2A power adapter into a standard electrical outlet. The clock will power on and display.
Poznámka: The clock requires continuous power to operate. It is not battery-powered for primary display.
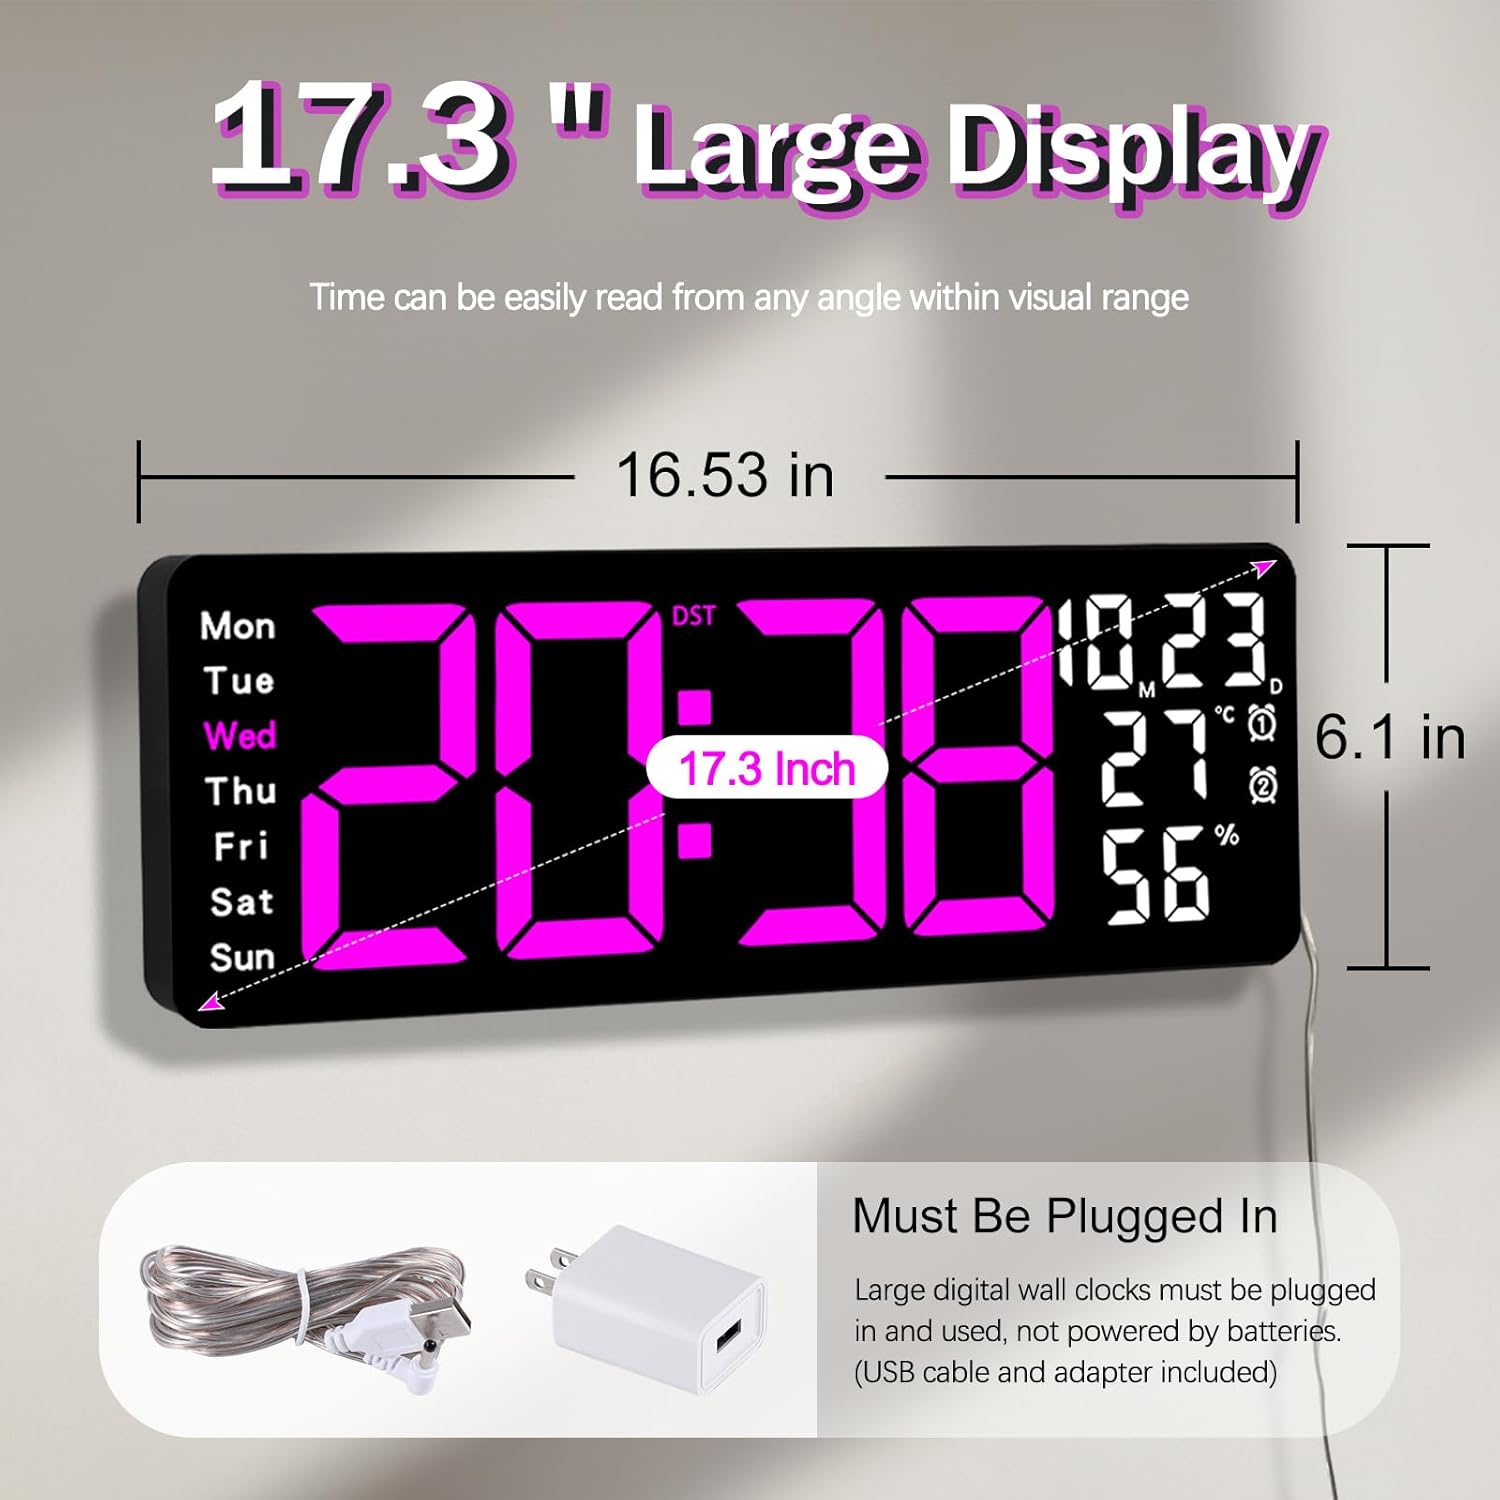
Figure 5.1: Power connection and dimensions.
5.2 Memory Battery Installation (Optional)
To retain time and settings during a power outage, install a 1 AAA battery (not included) into the memory battery compartment on the back of the clock.
- Locate the memory battery compartment on the back of the clock.
- Otevřete kryt přihrádky.
- Vložte jednu 1.5V baterii AAA a dbejte na správnou polaritu (+/-).
- Bezpečně zavřete kryt přihrádky.
5.3 Montáž na stěnu
Use the included mounting template ruler and hooks for easy wall installation.
- Determine the desired location for your clock.
- Place the mounting template ruler on the wall at the desired height.
- Mark the positions for the mounting hooks according to the ruler's indications.
- Install the mounting hooks into the wall at the marked positions.
- Carefully hang the clock onto the installed hooks, ensuring it is level and secure.
6. Návod k obsluze
The clock can be operated using either the remote control or the buttons on the back.
6.1 Nastavení času a data
Use the remote control or the "SET" button on the back of the clock.
- Stiskněte tlačítko SOUBOR button (on remote or back of clock) to enter setting mode.
- Použijte + a - tlačítka pro nastavení blikající hodnoty (např. hodina, minuta, rok, měsíc, den).
- Stiskněte SOUBOR again to confirm the current setting and move to the next parameter.
- Opakujte, dokud nebudou nakonfigurována všechna nastavení.
6.2 12/24 Hour Format Conversion
Přepínání mezi 12hodinovým a 24hodinovým formátem času:
- Stiskněte příslušné tlačítko 12/24 hod tlačítko na dálkovém ovladači.
- Alternatively, during time setting, the format option will appear.

Figure 6.1: 12/24H format conversion.
6.3 Převod teplotních jednotek (°C/°F)
Přepínání mezi jednotkami teploty Celsia a Fahrenheita:
- Stiskněte tlačítko ° C / ° F tlačítko na dálkovém ovladači.
6.4 Alarm Setting (Dual Alarms)
Hodiny podporují dva nezávislé budíky.
- Stiskněte tlačítko POPLACH button on the remote control or the back of the clock.
- Použití + a - pro nastavení požadovaného času budíku.
- Stiskněte POPLACH again to confirm and move to the next alarm or exit.
- To activate/deactivate an alarm, press the corresponding alarm button (e.g., AL1 or AL2) na dálkovém ovladači.
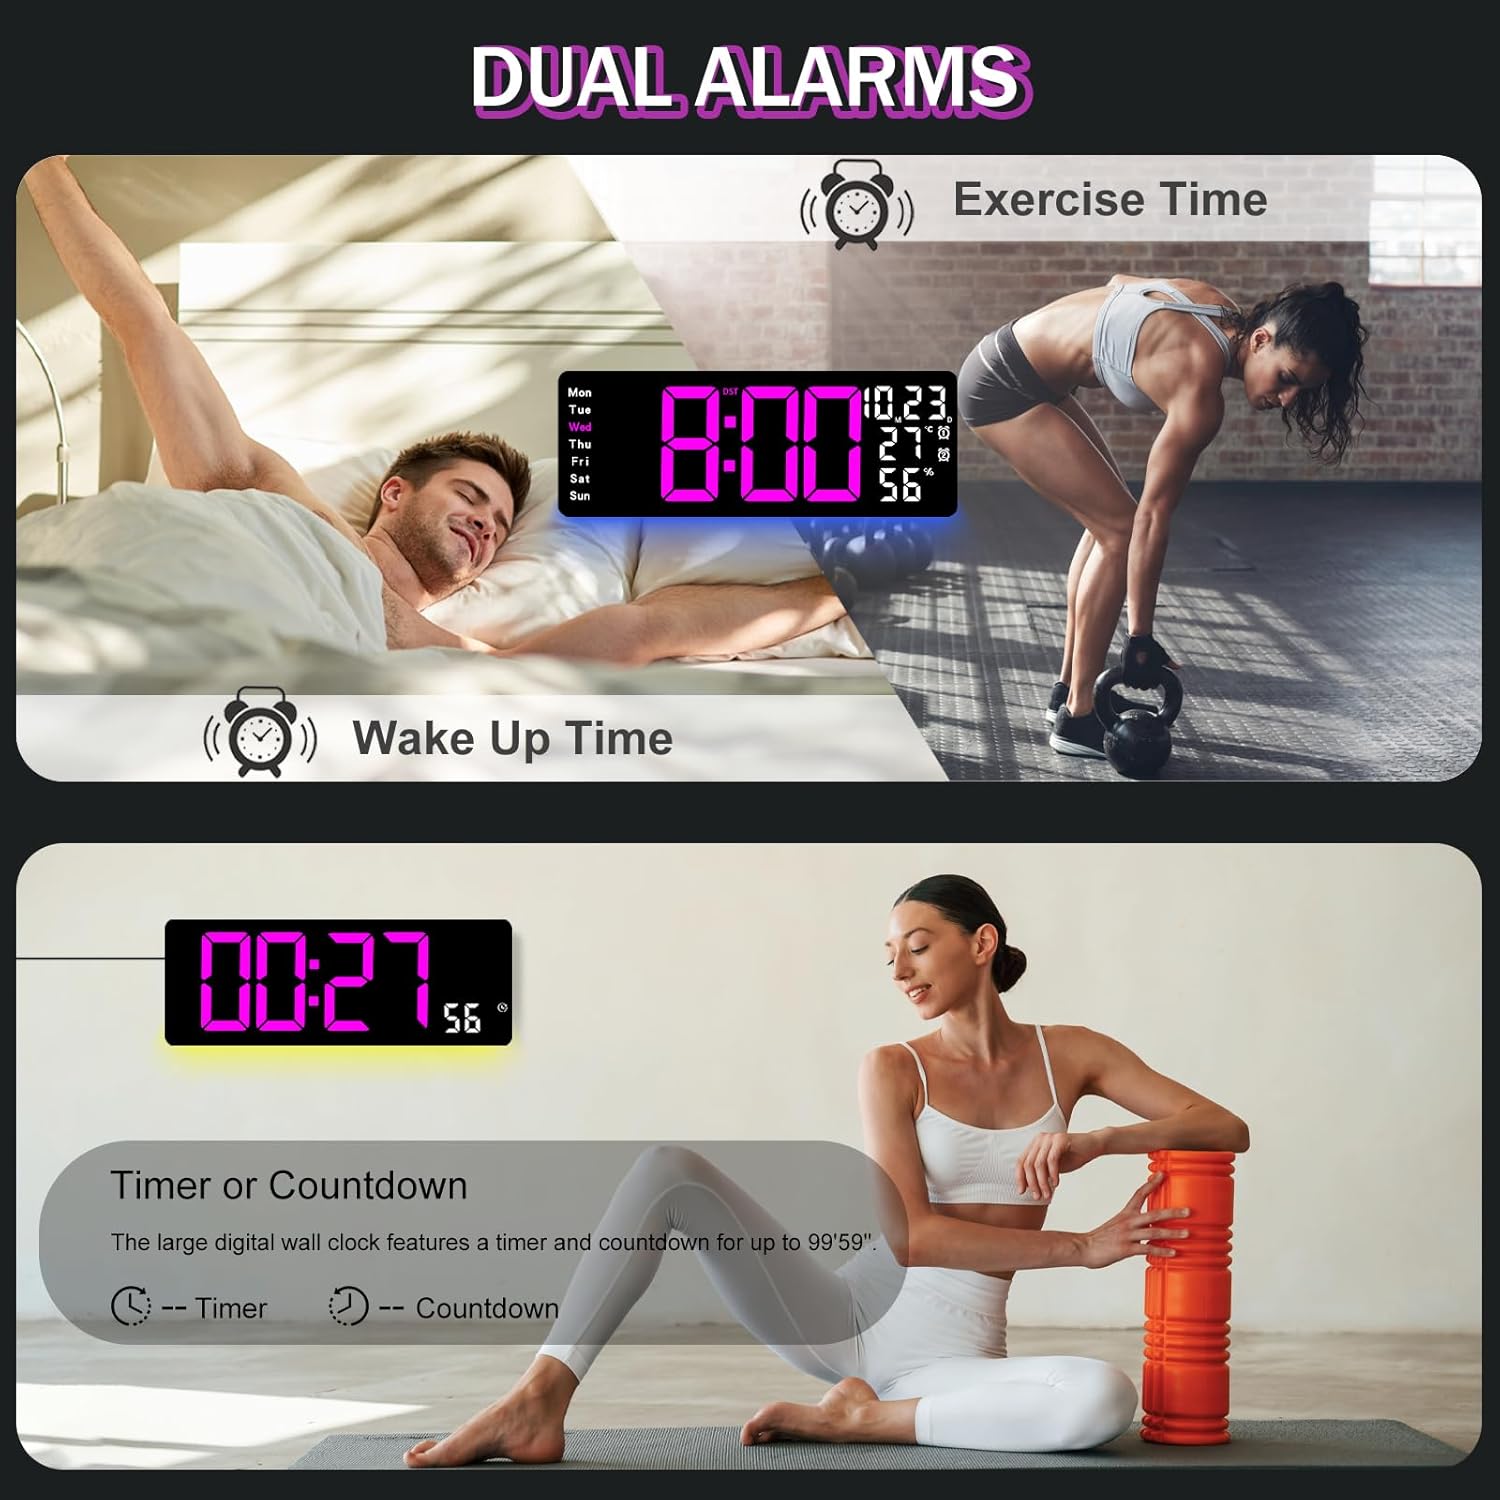
Figure 6.2: Dual alarm and timer functions.
6.5 Nastavení jasu
The clock offers 10 levels of brightness, adjustable manually or automatically.
- Automatický jas: The built-in light sensor adjusts brightness based on ambient light. Activate this mode by pressing the AUTO tlačítko na dálkovém ovladači.
- Manuální nastavení jasu: Stiskněte tlačítko JAS button on the remote, then use + a - to select one of the 10 levels.

Figure 6.3: Custom and auto-brightness settings.

Figure 6.4: Brightness regulator illustration.
6.6 Funkce okolního osvětlení
The clock includes a night light feature at the bottom with multiple color options.
- Stiskněte tlačítko SVĚTLO button on the remote control or the back of the clock to cycle through 8 fixed colors and 1 multi-color mode.
- In multi-color mode, the colors automatically convert. Press OK to fix a favorite color.
- Adjust the brightness of the ambient light using the + a - buttons when the ambient light is active.

Figure 6.5: Multiple ambient night light options.

Figure 6.6: 9 color ambient light options.
6.7 Timer and Countdown Function
The clock features a timer (count-up) and countdown function up to 99 minutes and 59 seconds.
- Stiskněte tlačítko ČASOVAČ tlačítko na dálkovém ovladači.
- Použití + a - to set the desired time for countdown.
- Stiskněte START/STOP to begin or pause the timer/countdown.
- Stiskněte RESETOVAT pro vymazání časovače.

Figure 6.7: Timing function (count-up/countdown).
Video 6.1: Demonstration of multi-functional features including night light change, brightness control, count-up, and countdown. This video also shows the time, date, day, alarm clock, temperature, and humidity displayed on the same screen, along with 12/24 hour conversion, Celsius/Fahrenheit conversion, and DST enablement. The back design and buttons are also briefly shown.
6.8 Letní čas (DST)
If DST is observed in your region, you can enable or disable it.
- Dlouze stiskněte - button on the remote control to enable or disable DST. The DST indicator will appear/disappear on the display.

Figure 6.8: Enabling and disabling Daylight Saving Time.

Figure 6.9: Daylight Saving Time (DST) functionality.
6.9 Použití dálkového ovládání
The remote control provides convenient access to all clock functions without needing to reach the clock directly.

Obrázek 6.10: Dálkové ovládání a jeho funkce.

Figure 6.11: Remote control in use.
- Ensure the remote control has 2 AAA batteries installed (not included).
- Point the remote control directly at the clock for optimal response.
- Each button on the remote corresponds to a specific function as described in this manual.
7. Údržba
- Clean the clock's display and body with a soft, dry cloth. Avoid abrasive cleaners or solvents.
- Ensure the power adapter and cord are free from damage.
- Replace the memory battery annually to ensure settings are retained during power interruptions.
8. Řešení problémů
| Problém | Možná příčina | Řešení |
|---|---|---|
| Zobrazení hodin je vypnuté. | Žádné napájení. | Check if the power adapter is securely plugged into the clock and the outlet. Ensure the outlet is functional. |
| Dálkové ovládání nefunguje. | Low or dead batteries in remote; obstruction; remote out of range. | Replace remote batteries (2 AAA). Ensure no obstructions between remote and clock. Point directly at the clock within effective range. |
| Nastavení ztraceno po výpadku napájenítage. | No memory battery or dead memory battery. | Install a fresh 1.5V AAA battery in the memory compartment. |
| Incorrect temperature/humidity reading. | Sensor interference or placement. | Ensure the clock is not placed near heat sources, direct sunlight, or in areas with extreme drafts. Allow time for the sensor to stabilize. |
| Ambient light not changing colors. | Stuck in fixed color mode. | Press the LIGHT button on the remote to cycle through modes. If stuck on a fixed color, press the OK button to release it from fixed mode. |
9. Specifikace
| Funkce | Detail |
|---|---|
| Značka | JoFomp |
| Číslo modelu | 6669 |
| Typ zobrazení | Digitální LED |
| Velikost displeje | 17.3 palců |
| Rozměry produktu | 16.5 cm Š x 6.7 cm V |
| Zdroj napájení | Elektrické napájení (adaptér 5V/2A je součástí balení) |
| Paměťová baterie | 1 x AAA (nejsou součástí balení) |
| Úrovně jasu | 10 (Auto/Manual) |
| Barvy okolního světla | 8 Fixed + 1 Multi-color |
| Speciální funkce | Large Display, Adjustable Brightness, Temperature Display, Humidity Display, Dual Alarms, Timer, Countdown, DST, Remote Control |
| Typ montáže | Držák na zeď |
| Hmotnost položky | 1.95 libry |
10. Záruka a podpora
JoFomp products are designed for reliability and performance. For warranty information or technical support, please refer to the contact details provided with your purchase or visit the official JoFomp webwebu. Uschovejte si účtenku jako doklad o koupi.


