Zavedení
The Nous D1T 16A Smart DIN Rail Switch is an advanced device designed for intelligent control and energy monitoring within your electrical system. Featuring Tasmota firmware, it offers extensive customization and seamless integration with various smart home platforms like Home Assistant, MQTT, and Matter. This manual provides essential information for safe installation, operation, and maintenance of your Nous D1T switch.

Figure 1: Nous D1T Smart DIN Rail Switch and its packaging.
This image displays the Nous D1T smart switch, a compact device designed for DIN rail mounting, alongside its product packaging. The switch features clear labeling for power and load connections, an indicator light, and a button for manual control and pairing. The packaging highlights key features such as "16A DIN Smart Switch D1T" and compatibility with Tasmota and MQTT.
Bezpečnostní informace
Vždy dodržujte následující bezpečnostní opatření:
- Instalaci by měl provádět pouze kvalifikovaný elektrikář.
- Před instalací nebo údržbou se ujistěte, že je hlavní jistič odpojen od napájení.
- Do not exceed the maximum load of 16A.
- Pracujte ve specifikovaném rozsahu teplot -25 °C až 70 °C.
- Do not expose the device to moisture or extreme environments.
Nastavení a instalace
1. Fyzická instalace
The Nous D1T is designed for mounting on a standard DIN rail within your electrical panel.
- Odpojit napájení: Before beginning, ensure the main power supply to your electrical panel is completely turned off. Verify with a voltage tester.
- Montáž: Clip the Nous D1T onto the DIN rail. Ensure it is securely fastened.
- Zapojení: Connect the live (L) and neutral (N) wires from your power source to the "N Power" and "L Power" terminals on the top of the device. Connect the neutral (N) and live (L) wires of your load (appliance/circuit) to the "N Load" and "L Load" terminals on the bottom. Refer to the wiring diagram below.

Figure 2: Nous D1T wiring diagram.
This image illustrates the Nous D1T smart switch with its electrical connection points clearly labeled. The top terminals are for incoming power (N Power, L Power), and the bottom terminals are for connecting to the load (N Load, L Load). The diagram also shows the maximum wire diameter of 2.5mm and the DIN rail mounting mechanism.
2. Initial Configuration (Tasmota)
The Nous D1T comes pre-flashed with Tasmota firmware, allowing for flexible configuration.
- Zapnutí: Restore power to your electrical panel. The device will create a Wi-Fi access point (AP) named "tasmota-XXXXXX".
- Connect to AP: Using a computer or smartphone, connect to the "tasmota-XXXXXX" Wi-Fi network.
- Přístup Web Rozhraní: Otevřete a web prohlížeč a přejděte do 192.168.4.1. This will open the Tasmota web rozhraní.
- Konfigurace Wi-Fi: In the Tasmota interface, go to Configuration > Configure Wi-Fi. Select your home Wi-Fi network (2.4 GHz only) and enter the password. Save the settings. The device will restart and connect to your network.
- Find Device IP: Once connected to your home network, the device will obtain a new IP address. You can find this IP address through your router's connected devices list or by using a network scanner tool.
- Přístupové zařízení: Otevřete a web browser and navigate to the device's new IP address to access its Tasmota interface.

Figure 3: Tasmota Web Interface - Main Status Page.
This image shows the main status page of the Tasmota web interface for the Nous D1T. It displays real-time data such as Voltage, Current, Frequency, and Power. It also includes energy consumption metrics (Energy Today, Energy Yesterday, Energy Total) and a manual pairing code for Matter integration. A toggle button for the relay is visible at the bottom.
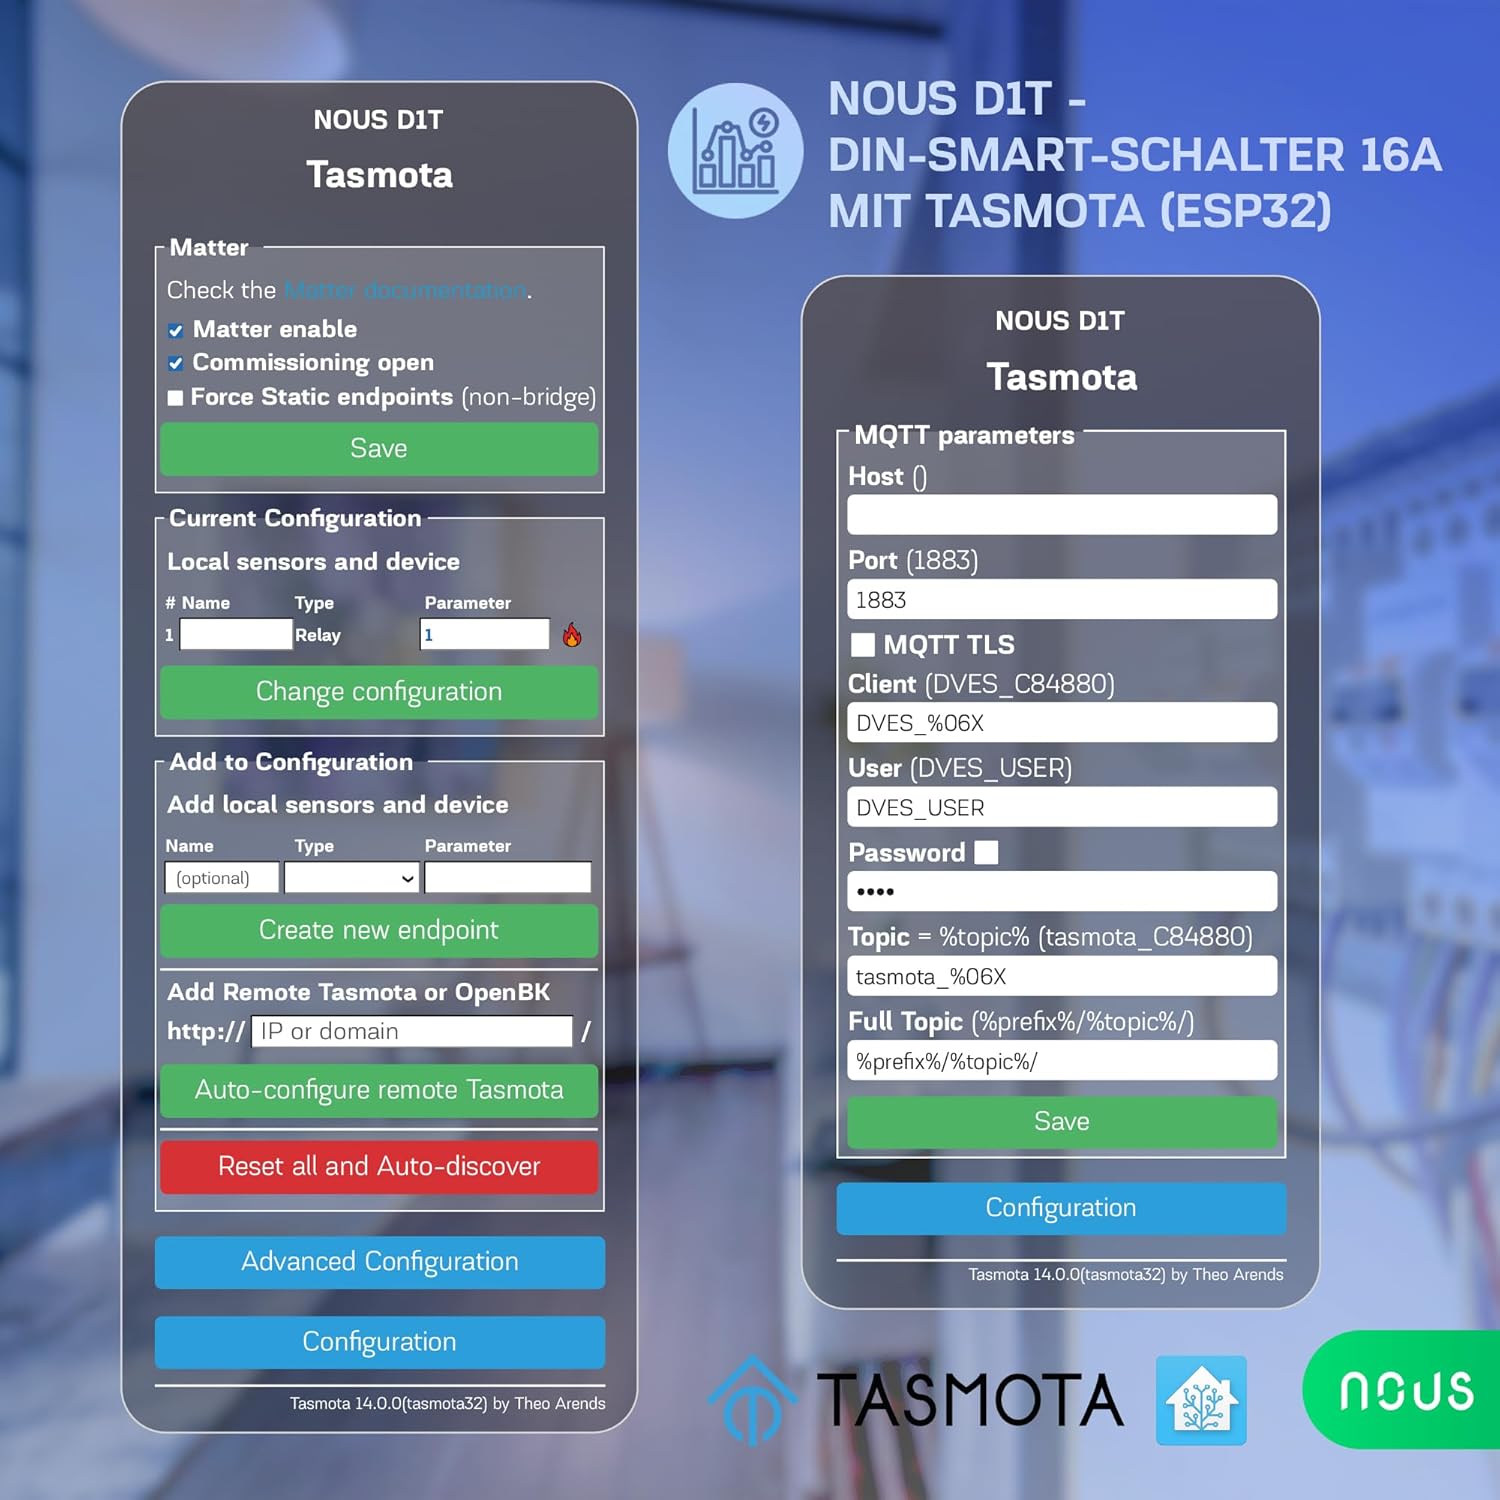
Figure 4: Tasmota Web Interface - Configuration Menu.
This image displays the comprehensive configuration menu within the Tasmota web interface. Options include configuring Wi-Fi, MQTT, Domoticz, Timer, KNX, Matter, Logging, and more. It also provides options to reset, backup, or restore the configuration, offering advanced control over the device's functionality.
Operating the Nous D1T
1 Základní ovládání zapnutí/vypnutí
- Ruční tlačítko: Press the physical button on the device to toggle the connected load On or Off.
- Web Rozhraní: Access the Tasmota web interface (Figure 3) and use the "Toggle 1" button to control the relay.
2. Energetický monitoring
The Nous D1T provides real-time and historical energy consumption data.
- Data v reálném čase: View current Voltage, Current, Frequency, and Power directly on the Tasmota main status page (Figure 3).
- Historická data: The interface also displays accumulated energy consumption for "Energy Today," "Energy Yesterday," and "Energy Total." This data can be used to analyze energy usage patterns and optimize consumption.
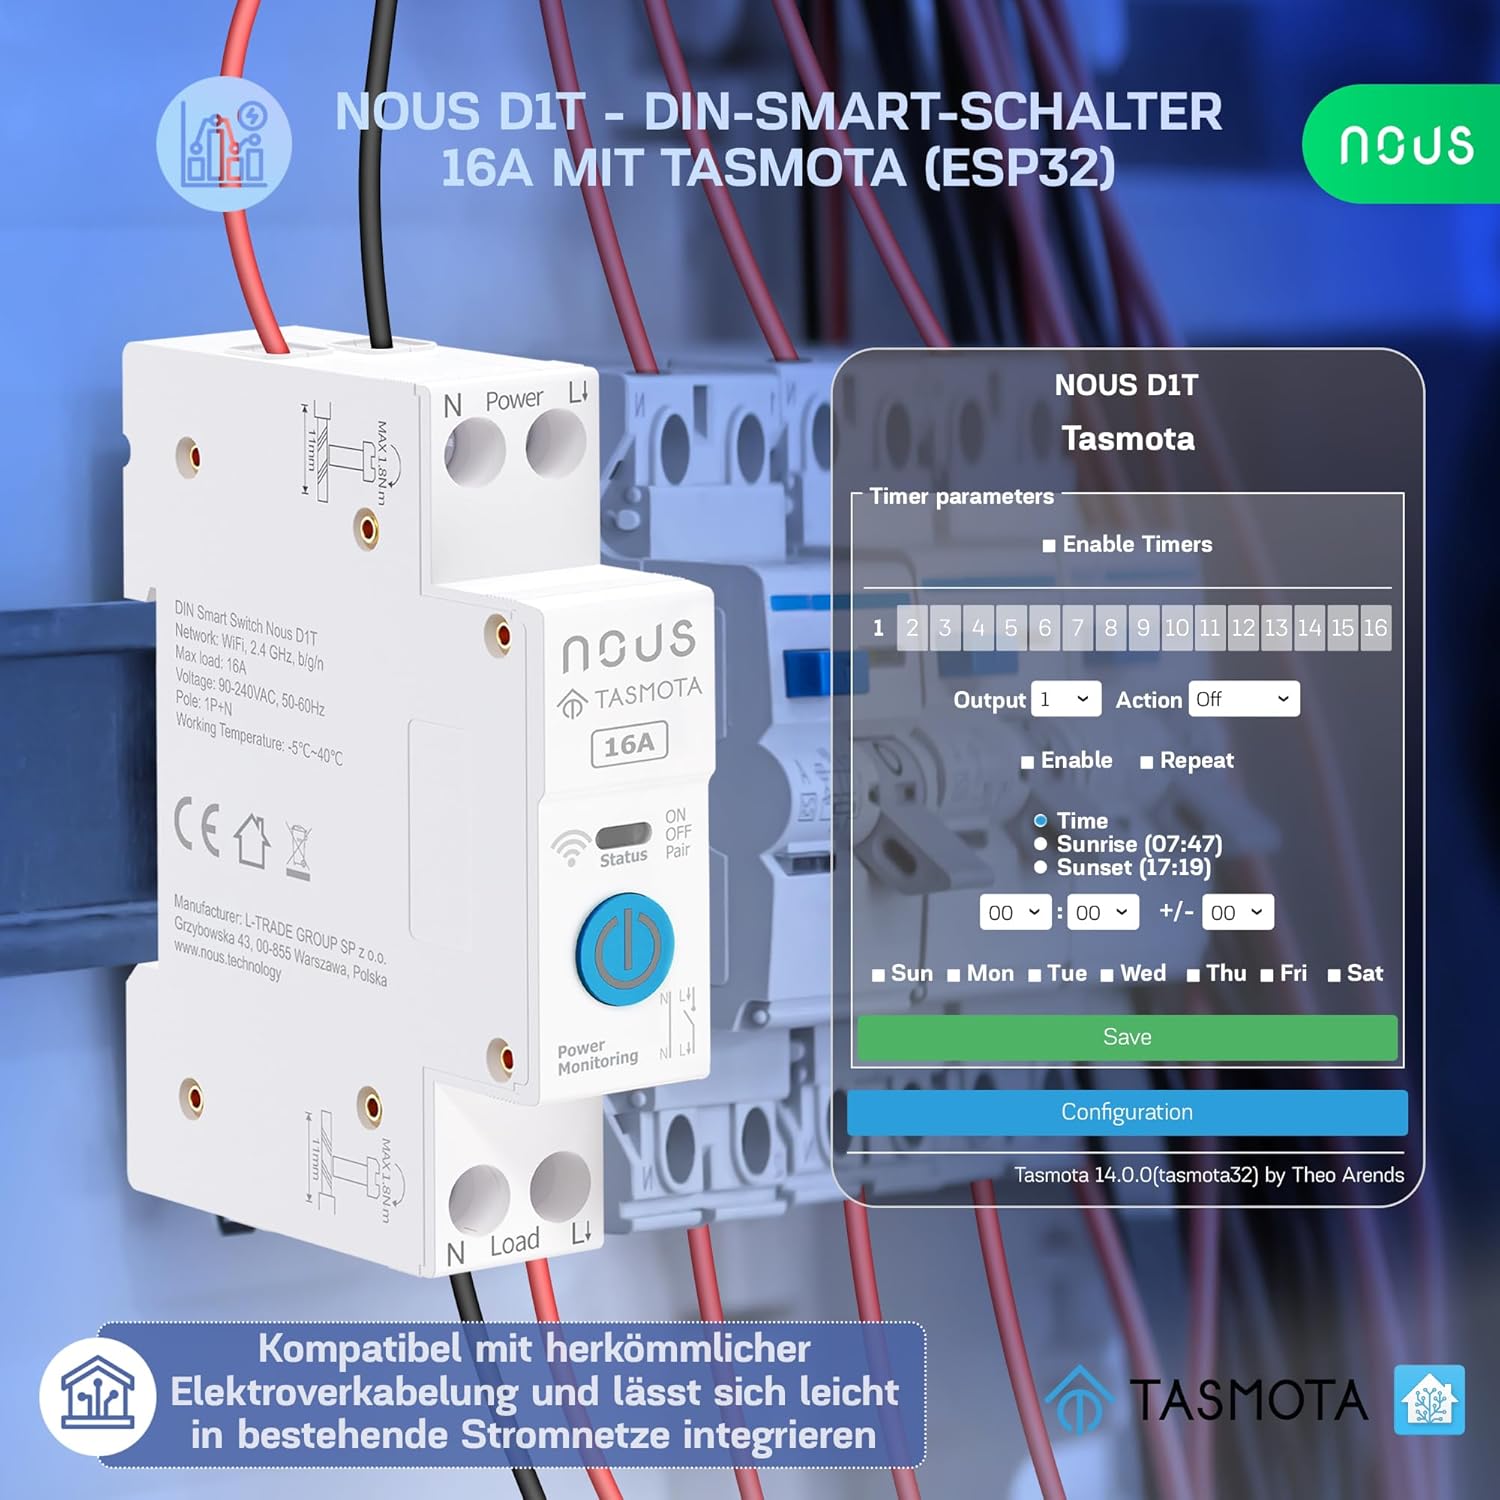
Figure 5: Tasmota Web Interface - Energy Monitoring.
This image highlights the energy monitoring capabilities of the Nous D1T via its Tasmota web interface. It shows various energy metrics including Voltage, Current, Frequency, Active Power, Apparent Power, Reactive Power, Power Factor, and accumulated energy usage for the current day, previous day, and total. This allows users to track and manage their power consumption effectively.
3. Smart Home Integration (MQTT, Matter, Home Assistant, Voice Control)
The Nous D1T is highly compatible with various smart home ecosystems:
- MQTT: Configure MQTT parameters (Host, Port, Client, User, Password, Topic) in the Tasmota interface (Configuration > Configure MQTT) to integrate with MQTT brokers for advanced automation.
- Hmota: Enable Matter support via the Tasmota interface (Configuration > Configure Matter) for seamless integration with Google Home, Amazon Alexa, and Apple HomeKit.
- Domácí asistent: The Tasmota firmware allows for easy discovery and integration with Home Assistant, providing a centralized control platform for your smart devices.
- Hlasové ovládání: Once integrated with Matter or Home Assistant, you can control the Nous D1T using voice commands via Amazon Alexa or Google Assistant.

Figure 6: Tasmota Web Interface - Matter and MQTT Configuration.
This image displays the configuration options for Matter and MQTT within the Tasmota web interface. For Matter, it shows checkboxes for enabling Matter, commissioning open, and forcing static endpoints. For MQTT, it provides fields to enter the Host, Port, Client, User, Password, and Topic, enabling robust integration with smart home systems.
Údržba
- Aktualizace firmwaru: Regularly check for and apply Tasmota firmware updates to ensure optimal performance, security, and access to new features. Updates can typically be performed via the Tasmota web rozhraní (Upgrade firmwaru sekce).
- Čištění: Ujistěte se, že je zařízení čisté a bez prachu. Před čištěním odpojte napájení. Použijte suchý, měkký hadřík. Nepoužívejte tekuté čisticí prostředky.
- Podmínky prostředí: Abyste předešli poškození, zajistěte, aby provozní prostředí zůstalo v rámci specifikovaného rozsahu teploty a vlhkosti.
Odstraňování problémů
Běžné problémy a řešení:
- Zařízení nereaguje:
- Zkontrolujte napájení zařízení.
- Verify Wi-Fi connectivity. Ensure the device is within range of your 2.4 GHz Wi-Fi network.
- Restartujte zařízení vypnutím a vypnutím napájení.
- Nelze přistupovat Web Rozhraní:
- Ensure your device (computer/smartphone) is on the same network as the Nous D1T.
- Verify the IP address of the Nous D1T. It might have changed if your router assigns dynamic IPs.
- Try accessing the device by its hostname (e.g., `tasmota-XXXXXX.local` if mDNS is enabled).
- Incorrect Energy Readings:
- The device may require calibration for accurate energy monitoring. Refer to Tasmota documentation for calibration procedures (e.g., using `PowerSet`, `VoltageSet`, `CurrentSet` commands in the console). This typically involves connecting a known load and adjusting parameters.
- Matter/MQTT Integration Issues:
- Double-check all configuration parameters (host, port, credentials, topics).
- Ensure your MQTT broker or Matter controller is running and accessible.
- Check Tasmota console logs for error messages related to MQTT or Matter connection.
Obnovení továrního nastavení:
If issues persist, a factory reset can restore the device to its default Tasmota configuration. This will erase all Wi-Fi and custom settings.
- Metoda 1 (tlačítko): Press and hold the physical button for approximately 40 seconds until the indicator light flashes rapidly, then release.
- Metoda 2 (Web Rozhraní): In the Tasmota web rozhraní, přejděte na Configuration > Reset Configuration and select the appropriate reset option (e.g., "Reset 1" for Wi-Fi and module settings).
Specifikace
| Funkce | Specifikace |
|---|---|
| Číslo modelu | D1T |
| Značka | NOUS |
| Rozměry (D x Š x V) | 8.2 x 5 x 1.5 cm (3.23 x 1.97 x 0.59 palce) |
| Hmotnost | 110 gramů (0.24 lb) |
| Provozní svtage | 240 voltů |
| Jmenovitý proud | 16 Amperes |
| Provozní režim | ZAPNUTO VYPNUTO |
| Typ kontaktu | Normálně otevřeno |
| Typ konektoru | Krimpování |
| Typ terminálu | Šroub |
| Typ obvodu | 1-cestný |
| Typ pohonu | Normální |
| Provozní teplota | -25 °C až 70 °C |
| Materiál | PC/ABS (V0) |
| Země původu | Čína |
Informace o záruce
Specific warranty information for the Nous D1T Smart DIN Rail Switch is not available in the provided product details. Please refer to the manufacturer's official website or contact your point of purchase for warranty terms and conditions.
Podpora
For technical assistance, troubleshooting beyond this manual, or general inquiries, please contact NOUS customer support. Visit the official NOUS webstránky s kontaktními údaji a dalšími zdroji.
You can also find extensive community support and documentation for Tasmota firmware online, which may assist with advanced configurations and troubleshooting.


