1. Úvod
Děkuji za nákupasing the Voyager Bluey 12V Electric Go Kart. This manual provides essential information for the safe assembly, operation, and maintenance of your new ride-on toy. Please read all instructions carefully before use and retain this manual for future reference. This product is designed for children aged 3 to 6 years.
2. Bezpečnostní informace
WARNING: Use as Directed. Adult supervision is required at all times.
- Always ensure the child wears a helmet and appropriate safety gear.
- Operate the go-kart only on flat, dry surfaces away from traffic, swimming pools, or steep inclines.
- Před každým použitím se ujistěte, že je bezpečnostní pás bezpečně zapnutý.
- Do not allow more than one rider at a time.
- Udržujte ruce, vlasy a oděv v dostatečné vzdálenosti od pohyblivých částí.
- Never modify the electrical system or components of the go-kart.

Image 2.1: The Voyager Bluey 12V Electric Go Kart, ready for use.
3. Obsah balení
Zkontrolujte prosím obsah balení, abyste se ujistili, že jsou přítomny všechny součásti:
- Bluey 12V Electric Go Kart body
- Volant
- Kola (4)
- Nápravy a upevňovací prvky
- 12V dobíjecí baterie
- Nabíječka baterií
- Návod k použití
- Australian Flag accessory
4. Montáž a nastavení
Assembly typically requires a Phillips head screwdriver and takes approximately 30-60 minutes. Follow these general steps:
- Připevněte kola: Securely attach all four wheels to the axles using the provided fasteners.
- Instalace volantu: Connect the steering wheel to the steering column, ensuring it clicks into place or is fastened according to specific instructions.
- Připojte baterii: Locate the battery compartment, typically under the seat. Connect the battery terminals (red to red, black to black).
- Attach Flag: Insert the Australian flag accessory into its designated slot at the rear of the go-kart.

Obrázek 4.1: Přední strana view of the go-kart highlighting key features like the 12V rechargeable battery, 4 mph max speed, rear drift wheels, and recommended age range of 3-7 years.
5. Nabíjení baterie
The go-kart is powered by a 12V rechargeable battery. For optimal performance and battery life, follow these charging instructions:
- Počáteční poplatek: Before first use, charge the battery for a full 10-12 hours. Do not overcharge for more than 18 hours.
- Pravidelné nabíjení: Po každém použití nabíjejte baterii po dobu 8–10 hodin.
- Nabíjecí port: Locate the charging port, usually near the battery compartment or on the dashboard. Plug the charger into the port and then into a standard wall outlet.
- Indikátor: Nabíječka může mít kontrolku, která indikuje stav nabíjení (např. červená pro nabíjení, zelená pro plné nabití).
- Bezpečnost: Always charge the battery in a dry, well-ventilated area. Do not allow children to handle the charger or battery.
6. Návod k obsluze
Familiarize yourself with the controls before allowing a child to operate the go-kart.
6.1. Ovládací prvky
- Vypínač: Located on the dashboard, this switch turns the go-kart on or off.
- Přepínač vpřed/vzad: Allows the go-kart to move forward or backward.
- Nožní pedál: Sešlápněte pedál pro akceleraci. Uvolněte pro brzdění.
- Světla: The go-kart is equipped with vibrant lights for enhanced visibility and fun.
- MP3 Jack: Connect an external audio device to play music through the go-kart's speakers.
- Musical Steering Wheel: Features integrated musical functions for added entertainment.

Image 6.1: Detail of the Forward/Reverse switch and power button for intuitive control.
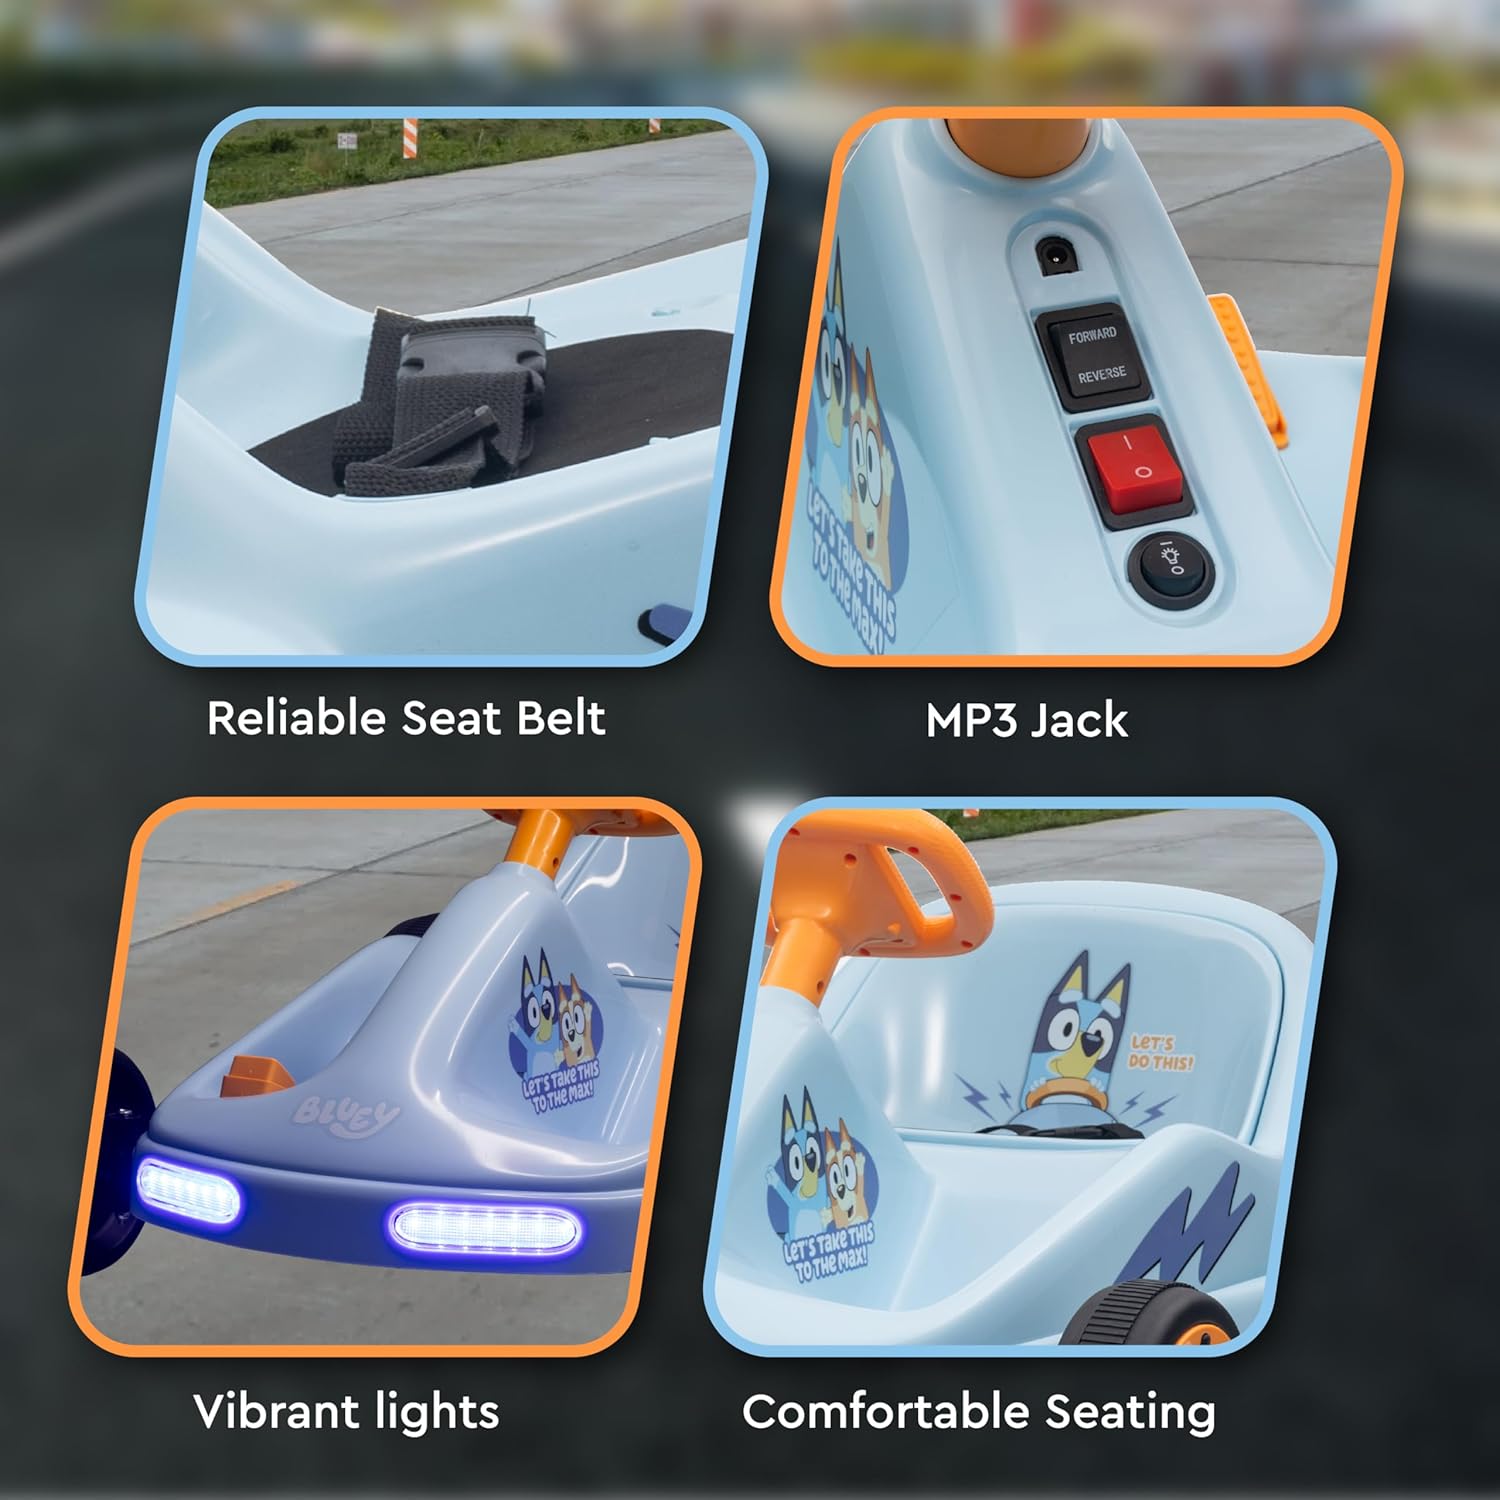
Obrázek 6.2: Detailní view of the reliable seat belt, MP3 jack, vibrant front lights, and comfortable seating area.
6.2. Driving the Go Kart
- Ensure the child is seated properly and the seat belt is fastened.
- Zapněte hlavní vypínač.
- Select 'Forward' or 'Reverse' using the switch.
- Press the foot pedal to move. Release the pedal to stop.
- Řízení pomocí volantu.

Image 6.3: The go-kart is suitable for operation on various surfaces including concrete, tile, asphalt roads, and wood floors.
7. Údržba
Pravidelná údržba zajistí dlouhou životnost a bezpečný provoz vaší motokáry.
- Čištění: Wipe the go-kart with a soft, damp tkanina. Nepoužívejte abrazivní čisticí prostředky nebo rozpouštědla.
- Péče o baterie: Always recharge the battery after each use. If storing for extended periods, charge the battery once a month to prevent deep discharge.
- Skladování: Store the go-kart in a dry, cool place away from direct sunlight and moisture.
- Inspekce: Pravidelně kontrolujte všechny šrouby, matice a spoje, zda jsou pevně utažené. Zkontrolujte kola a pneumatiky, zda nejsou opotřebované.
8. Řešení problémů
If you encounter issues, refer to this section before contacting support.
| Problém | Možná příčina | Řešení |
|---|---|---|
| Go-kart does not move | Battery is low or not connected; Power switch is off; Forward/Reverse switch is in neutral position; Loose wire connection. | Charge the battery; Turn on the power switch; Select Forward or Reverse; Check all wire connections. |
| Go-kart moves slowly | Battery is low; Overloaded; Operating on an uneven surface. | Recharge the battery; Reduce weight; Move to a flat, smooth surface. |
| Světla nefungují | Loose wire connection; Damaged bulb/LED. | Check wire connections to the lights; Contact customer support if damaged. |
9. Specifikace
- Číslo modelu: A12VGCLU241
- Rozměry produktu: 24.2 x 16.5 x 28 palce
- Hmotnost položky: 27.1 libry
- Baterie: 12V dobíjecí
- Maximální rychlost: Přibližně 4 km/h
- Doporučený věk: 3 years and up (typically 3-6 years)
- Stavební materiály: Durable PVC and Iron
- Výrobce: Sakar International
10. Záruka a podpora
For warranty information or technical support, please refer to the warranty card included with your product or contact the manufacturer, Sakar International, directly. Keep your proof of purchase for any warranty claims.
Pro další pomoc můžete navštívit Voyager Store on Amazon.


