1. Úvod
This manual provides detailed instructions for the AMIR WA143BKM-AMUS Indoor Outdoor Thermometer with 3 Wireless Sensors. Please read this manual thoroughly before use to ensure proper operation and to maximize the product's lifespan. This device allows you to monitor temperature and humidity in up to four different locations simultaneously (one main unit, three remote sensors).

Image: The AMIR Indoor Outdoor Thermometer main display unit and three wireless remote sensors.
2. Co je v krabici
Po vybalení ověřte, zda jsou přítomny všechny komponenty:
- Thermometer Main Unit x1
- Wireless Sensor x3
- Návod k obsluze x1

Image: The package contents, showing the main thermometer unit, three remote sensors, and the instruction manual.
3. Vlastnosti produktu
- Wide Range & High Accuracy: The thermometer features a 3-channel system with three transmitters for monitoring temperature and humidity in multiple locations. It offers an indoor temperature range of 0°C to 60°C (32°F to 140°F) and an outdoor temperature range of -40°C to 60°C (-40°F to 140°F). Humidity is measured from 10% to 99%. Accuracy is ±1°C (±1.8°F) for temperature and ±5% for humidity. The wireless transmission range between the main unit and sensors is up to 100 meters (328 feet).
- Maximální a minimální záznam: The device records maximum and minimum temperature and humidity values for the main unit and all three remote sensors. Data updates every 60 seconds. Users can switch between Celsius and Fahrenheit display modes. The main unit also includes time, alarm clock, calendar, and snooze/light functions.
- Přehledný LCD displej: The LCD screen provides clear readability. A humidity comfort indicator uses smiley icons to represent environmental conditions: 'DRY' for humidity below 45%, 'COMFORT' for humidity between 45% and 65%, and 'WET' for humidity above 65%.
- Funkce podsvícení: The display features a backlight for enhanced visibility in low-light conditions. Pressing the backlight button activates the illumination, which automatically turns off after 5 seconds.
- Snadná obsluha: The main unit can be placed on a surface using its integrated stand or mounted on a wall. Each remote sensor also supports wall mounting or standing. The main unit requires 3 AAA batteries, and each sensor requires 2 AAA batteries (batteries not included). A low battery indicator will appear on the display when sensor batteries need replacement.

Image: Visual representation of the thermometer's high precision and sensitivity, highlighting temperature and humidity accuracy.
4. Nastavení
4.1 Instalace baterie
- Hlavní jednotka: Otevřete přihrádku na baterie na zadní straně hlavní jednotky. Vložte 3 baterie typu AAA a dbejte na správnou polaritu (+/-). Přihrádku zavřete.
- Dálkové senzory: Open the battery compartment on the back of each remote sensor. Insert 2 AAA batteries into each sensor, observing correct polarity. Close the compartments.
Poznámka: Baterie nejsou součástí balení a je nutné je zakoupit samostatně.
4.2 Párování senzorů
After battery installation, the main unit will automatically begin searching for sensor signals. The receiving icon on the main unit will flash. To pair the sensors:
- Ensure all sensors have batteries installed and are powered on.
- The main unit will attempt to connect to the sensors for approximately 3 minutes.
- If a sensor does not connect automatically, press the 'CHANNEL' button on the main unit to cycle through channels until the desired sensor's data appears.
- For manual re-pairing, press and hold the 'CHANNEL' button on the main unit until the receiving icon flashes again, then press the 'TX' button inside the battery compartment of the remote sensor you wish to pair.
Video: Demonstrates the pairing process of the main unit with remote sensors, showing how to select channels and view MAX/MIN values.
4.3 Možnosti umístění
The main unit and remote sensors offer flexible placement:
- Hlavní jednotka: Features an integrated kickstand for desktop placement and a mounting hole for wall hanging.
- Dálkové senzory: Can be placed on a flat surface, mounted on a wall, or hung using the integrated hook.

Image: Illustrates different ways to place the main unit (desktop, wall mount) and remote sensors (stand, wall mount, hanging).
5. Návod k obsluze
5.1 Zobrazení nadview
LCD displej zobrazuje různé informace:
- Vnitřní teplota a vlhkost: Shown at the top of the display.
- Channel 1, 2, 3 Temperature & Humidity: Displayed for each remote sensor.
- Indikátor pohodlí: Smiley icons indicating humidity levels (Dry, Comfort, Wet).
- Šipka trendu: Ukazuje, zda teplota/vlhkost stoupá, klesá nebo je stabilní.
- Indikátor slabé baterie: Appears when sensor batteries need replacement.
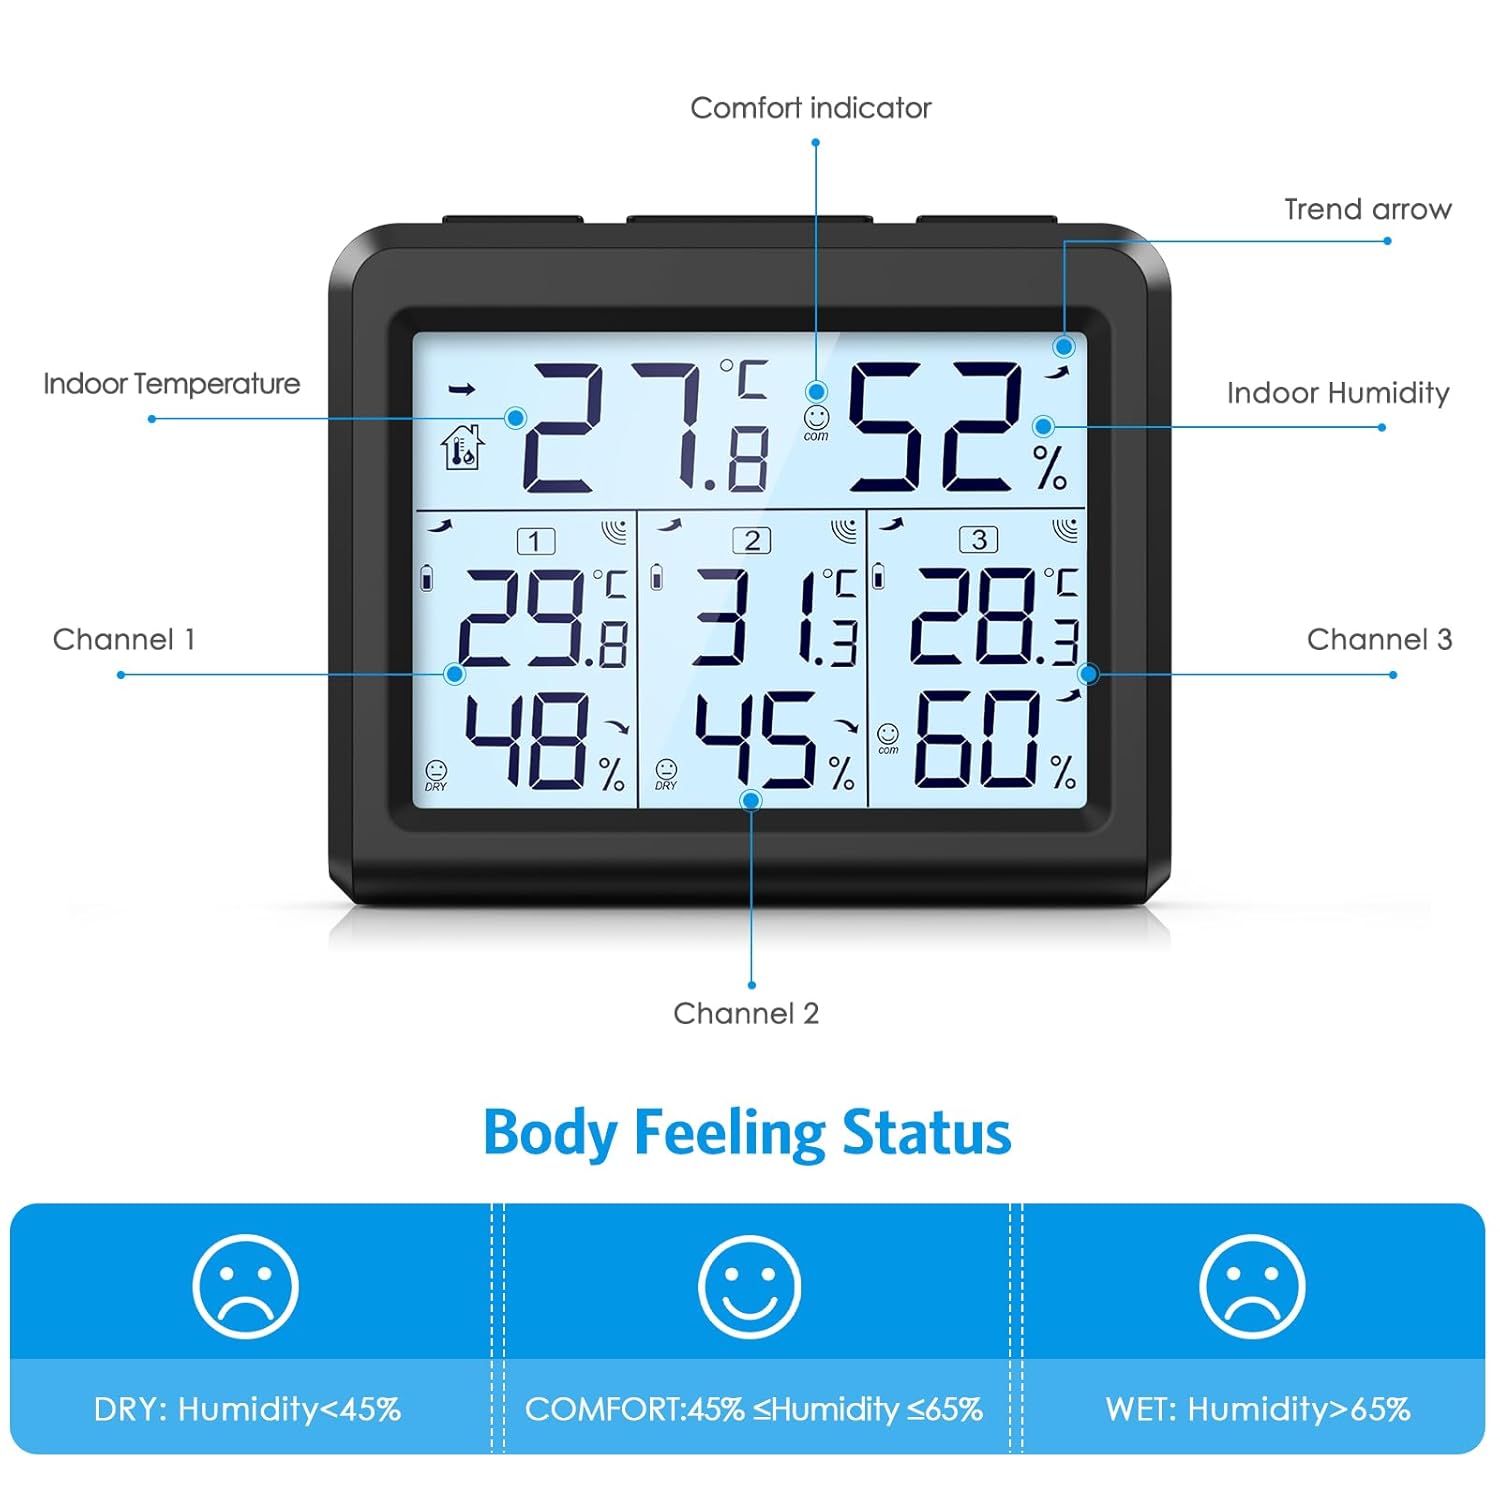
Obrázek: Podrobný view of the LCD screen, labeling the indoor temperature, indoor humidity, comfort indicator, trend arrow, and data for channels 1, 2, and 3.
5.2 Výběr teplotní jednotky (°C/°F)
Stiskněte tlačítko ° C / ° F button on the main unit to toggle between Celsius and Fahrenheit temperature displays.
5.3 MAX/MIN Record Function
The device stores maximum and minimum temperature and humidity readings. To access these records:
- V normálním režimu zobrazení stiskněte tlačítko MAX/MIN jedním stisknutím tlačítka view the maximum indoor and outdoor temperature/humidity values. The screen will show "MAX".
- Stiskněte tlačítko MAX/MIN button a second time to view the minimum indoor and outdoor temperature/humidity values. The screen will show "MIN".
- Stiskněte tlačítko MAX/MIN button a third time to return to the current temperature and humidity values.
- To manually clear the recorded MAX/MIN values, press and hold the MAX/MIN tlačítko po dobu přibližně 3 sekund.
5.4 Funkce podsvícení
To activate the display backlight, press the SVĚTLO button. The backlight will illuminate for 5 seconds and then automatically turn off.

Image: Shows the LCD screen's visibility in both bright and dark environments, demonstrating the effect of the backlight.
5.5 Indikátor komfortu
The comfort indicator provides a quick visual reference for humidity levels:
- SCHNOUT: Vlhkost pod 45 %
- POHODLÍ: Vlhkost mezi 45% a 65%
- MOKRÉ: Vlhkost nad 65 %
6. Údržba
6.1 Výměna baterie
When the low battery indicator appears on the main unit's display for a specific sensor, it is time to replace the batteries for that sensor. For the main unit, replace batteries when the display dims or functions become erratic.
- Otevřete přihrádku na baterie.
- Vyjměte staré baterie.
- Vložte nové baterie AAA a dbejte na správnou polaritu.
- Zavřete přihrádku na baterie.
Použité baterie vždy zlikvidujte zodpovědně v souladu s místními předpisy.
6.2 Čištění
Wipe the main unit and sensors with a soft, dry cloth. Do not use abrasive cleaners or immerse the devices in water.
7. Řešení problémů
If you encounter issues with your AMIR thermometer, refer to the following common problems and solutions:
- No Reading from Remote Sensor:
- Check if the sensor batteries are installed correctly and are not depleted. Replace if necessary.
- Ensure the sensor is within the 100m (328ft) transmission range of the main unit.
- Reduce obstacles between the sensor and the main unit (e.g., thick walls, electronic devices).
- Re-pair the sensor by pressing the 'CHANNEL' button on the main unit and the 'TX' button on the sensor.
- Nepřesná čtení:
- Ensure sensors are not exposed to direct sunlight, rain, or extreme temperature fluctuations.
- Place sensors away from heat sources or vents.
- Allow the devices to stabilize for 15-30 minutes after initial setup or relocation.
- Displej je tmavý nebo prázdný:
- Vyměňte baterie v hlavní jednotce.
8. Specifikace
| Funkce | Specifikace |
|---|---|
| Rozměry produktu | 3.5 x 3.5 x 3.9 palce; 9.44 unce |
| Číslo modelu položky | WA143BKM-AMUS |
| Výrobce | AMIR |
| Značka | AMIR |
| Zdroj napájení | Battery Powered (Main unit: 3x AAA, Sensors: 2x AAA each) |
| Speciální funkce | LCD Backlight, Large Display, Wireless, Max/Min Record, Comfort Indicator |
| Technologie připojení | Rádiová frekvence |
| Barva | Černý |
| Přesnost teploty | ±1 °C (±1.8 °F) |
| Přesnost vlhkosti | ±5 % |
| Rozsah vnitřní teploty | 0 °C až 60 °C (32 °F až 140 °F) |
| Rozsah venkovních teplot | -40 °C až 60 °C (-40 °F až 140 °F) |
| rozsah vlhkosti | 10 % až 99 % |
| Dosah bezdrátového přenosu | 100 metrů (328 stop) |
9. Záruka a podpora
For warranty information or technical support, please refer to the contact details provided with your purchase or visit the official AMIR webUschovejte si účtenku jako doklad o koupi pro případné reklamace.


