1. Úvod
This manual provides essential instructions for the installation, operation, and maintenance of your GLEDOPTO ESP32 WLED Digital LED Controller (Model GL-C-015WL-D). Please read this manual thoroughly before using the product to ensure proper function and safety.
2. Důležité bezpečnostní informace
- The controller chip is ESP32. Verify firmware version information carefully before upgrading. Incorrect firmware upgrades can damage the product.
- Zajistěte vstupní objtage (5-24V DC) matches your power supply and LED strip requirements.
- Do not exceed the maximum output current of 10A per channel or 15A total.
- Operate the device within the specified temperature range of -20 to 45 °C.
- Tento výrobek je určen pouze pro vnitřní použití.
- Před prováděním jakéhokoli zapojení nebo údržby odpojte napájení.
3. Konec produktuview
3.1 Obsah balení
- 1 x GLEDOPTO ESP32 WLED Digital LED Controller with Mic / UART (Model: GL-C-015WL-D)
- 1 x Uživatelská příručka
- 1 x 3cm Damper
3.2 Klíčové vlastnosti
- Čip ESP32: High-performance processing and stable network connectivity.
- Integrovaný mikrofon: Captures ambient sounds for music synchronization and dynamic lighting effects.
- UART Download Port: Facilitates firmware upgrades and debugging without complex hardware operations.
- Simple Wiring & Expandability: Easy connection ports and an added IO33 port for customization.
- Bohaté dynamické režimy: Over 100 dynamic lighting effects available.
- Široká kompatibilita: Supports various addressable LED strips including WS2811, WS2812, WS2812B, FL19038, SK6812, SM16703P, SM16703SP3, TM1814, WS2813, WS2815, and FCOB.
- Nízká spotřeba energie: Integrated switching regulator for ESP32 power and a MOSFET relay to disable output power when WLED is off.
4. Specifikace
| Číslo modelu | GL-C-015WL-D |
| Vstupní objemtage | DC 5-24V |
| Max Addressable ICs | 800 |
| Výstupní proud na kanál | 10A Max |
| Celkový výstupní proud | 15A Max |
| Rozměry | 108 x 45 x 18 mm |
| Provozní teplota | -20 až 45 °C |
| Supported LED Strip ICs | WS2811, WS2812, WS2812B, FL19038, SK6812, SM16703P, SM16703SP3, TM1814, WS2813, WS2815, FCOB, etc. |
| Konektivita | WiFi (ESP32) |
| Speciální funkce | Dimmable, Microphone Function, UART Port |
5. Nastavení a instalace
5.1 Uspořádání ovladače

5.2 Pokyny pro zapojení
Follow these steps for proper wiring of your LED strip to the controller:

- Connect the positive (+) terminal of your power supply to the V+ input on the controller.
- Connect the negative (-) terminal of your power supply to the V- input on the controller.
- Connect the VCC wire from your LED strip to the V output terminal on the controller.
- Connect the DATA wire from your LED strip to the D (GPIO16) output terminal on the controller. This is the default output. The other D (GPIO2) can be used after configuration in the app.
- Connect the GND wire from your LED strip to the G output terminal on the controller.
5.3 Konstrukce portu pro rychlé připojení
The controller features a quick connect port design for convenient wiring:

- Otevřete konektor směrem nahoru.
- Insert the stripped wire into the port.
- Zatlačte na konektor, abyste zajistili vodič.
6. Provoz
6.1 Funkce tlačítek
The controller has two physical buttons for basic control:

- Tlačítko Restart: Pressing this button will temporarily power off the controller module. Releasing it will power it back on. This is useful for restarting the controller after configuring the microphone or other settings.
- Tlačítko Volba:
- Krátký tisk: Zapne nebo vypne zařízení.
- Dlouhé stisknutí (1 sekunda): Switches between available colors or effects.
- Dlouhé stisknutí (10 sekundy): Resets the WLED controller and activates the WLED-AP hotspot for initial setup or re-configuration.
6.2 Ovládání aplikace
The GLEDOPTO controller is primarily managed through the WLED application, offering extensive control over your LED strips.
6.2.1 Dynamické efekty
The WLED app provides access to over 100 dynamic lighting effects, allowing for personalized ambiance.

6.2.2 Segmentované ovládání barev
Customize individual segments of your LED strip to display different colors simultaneously.

6.2.3 Microphone Function
The built-in microphone allows the LED lights to synchronize with music or ambient sounds, creating immersive audio-reactive lighting experiences.


6.3 Integrace s Alexou
The controller supports integration with Amazon Alexa for voice control. Follow these steps to connect:
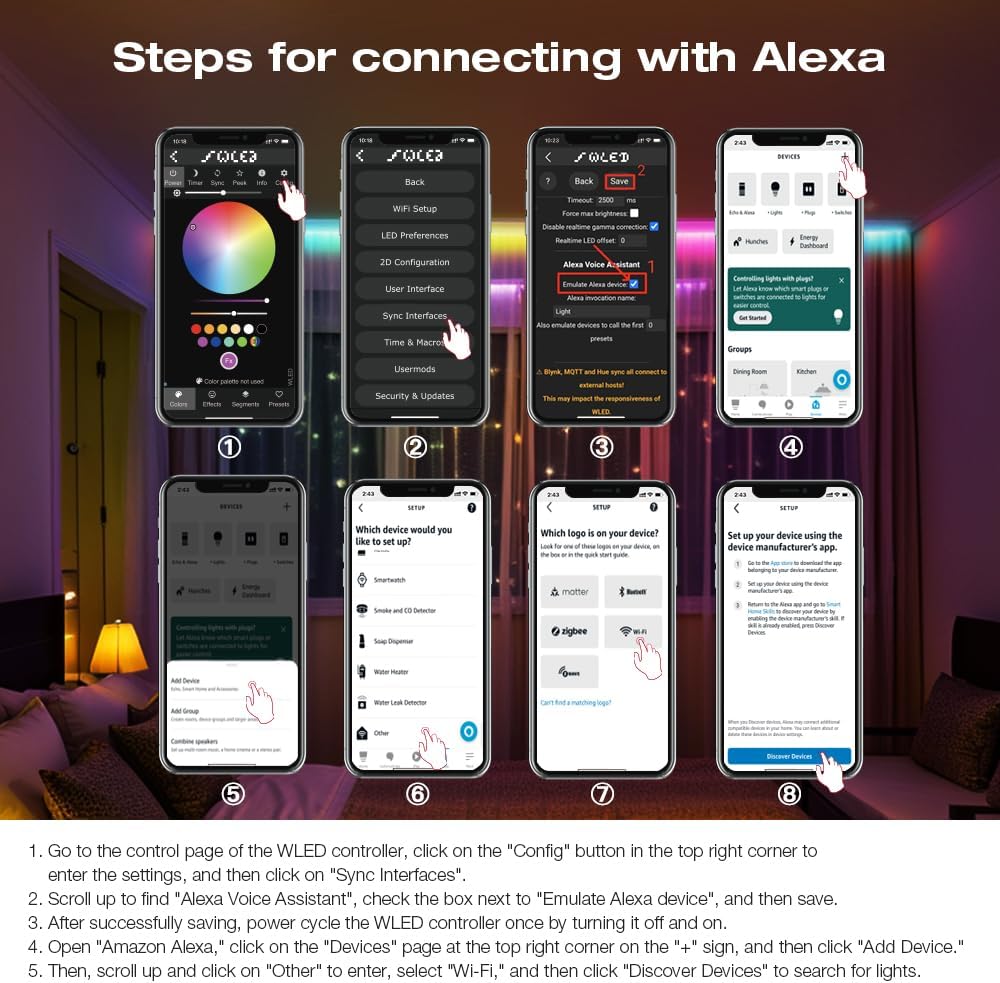
- Go to the control page of the WLED controller in the app, click on the "Config" button in the top right corner to enter the settings, and then click on "Sync Interfaces".
- Posuňte se nahoru a vyhledejte možnost „Alexa Voice Assistant“, zaškrtněte políčko vedle možnosti „Emulovat zařízení Alexa“ a poté uložte.
- Po úspěšném uložení jednou vypněte a zapněte ovladač WLED.
- Open the Amazon Alexa app, click on the "Devices" page at the top right corner on the "+" sign, and then click "Add Device".
- Poté přejděte nahoru a kliknutím na „Ostatní“ vstupte, vyberte „Wi-Fi“ a poté kliknutím na „Vyhledat zařízení“ vyhledejte světla.
7. Aktualizace firmwaru
The integrated UART port allows for convenient firmware updates. Refer to the official WLED documentation or GLEDOPTO support resources for detailed instructions on how to perform firmware updates. Always ensure you are using the correct firmware version for your ESP32 chip to prevent damage.
8. Údržba
- Udržujte ovladač čistý a bez prachu. K čištění používejte suchý, měkký hadřík.
- Nevystavujte regulátor vlhkosti nebo extrémním teplotám.
- Zajistěte dostatečné větrání kolem zařízení, aby nedošlo k přehřátí.
9. Řešení problémů
- Ovladač se nezapíná: Check power supply connections and ensure the input voltage je v rozsahu 5–24 V DC.
- LED pásek nesvítí: Verify all wiring connections (VCC, DATA, GND) are secure and correct. Ensure the LED strip type is supported by the controller.
- Žádné Wi-Fi připojení: Perform a long press (10 seconds) on the Opt button to reset the controller and activate the WLED-AP hotspot for re-configuration. Ensure your router is operating on a 2.4GHz band.
- Problémy s integrací Alexy: Double-check that "Emulate Alexa device" is enabled in the WLED app settings and that you have power cycled the controller after saving. Ensure the Alexa app is discovering devices on the correct network.
- Nesprávné barvy nebo efekty: Verify the LED strip type and IC settings in the WLED app.
10. Záruka a podpora
For warranty information and technical support, please refer to the GLEDOPTO official webnebo se obraťte na prodejce. Uschovejte si doklad o koupi pro případ reklamace.