1. Úvod
Thank you for choosing the Aigo Q2503 Mini-Tower PC Case. This manual provides detailed instructions for the proper installation, operation, and maintenance of your new computer chassis. Please read this guide thoroughly before beginning assembly to ensure optimal performance and longevity of your system components.
2. Konec produktuview
The Aigo Q2503 is a compact Mini-Tower PC case designed for M-ATX and ITX motherboards. It offers a streamlined design with essential features for building a functional and efficient computer system. Its robust construction provides a secure environment for your components.
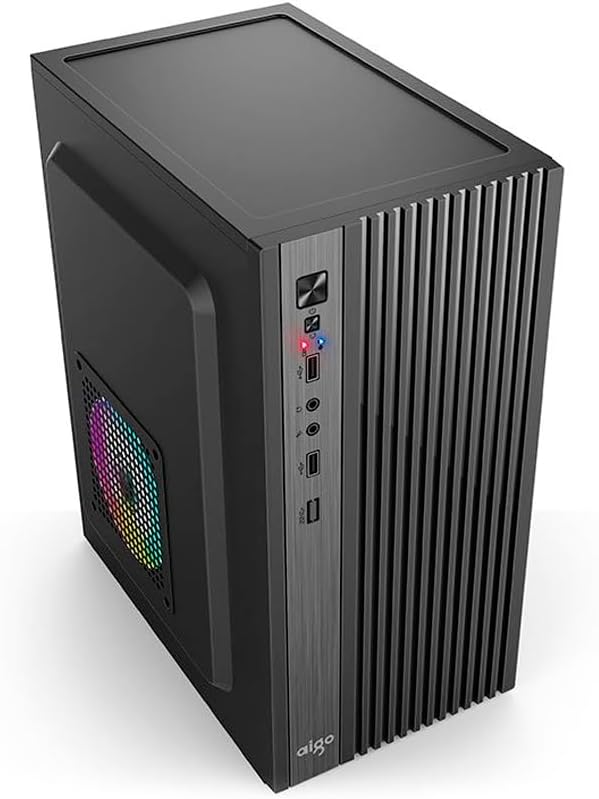
Obrázek 2.1: Přední strana view of the Aigo Q2503 Mini-Tower PC Case, showcasing its compact design and front panel I/O ports.
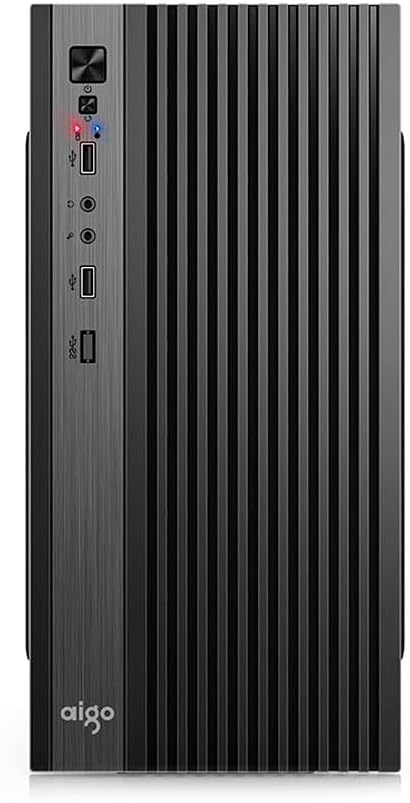
Obrázek 2.2: Přední strana view of the Aigo Q2503 Mini-Tower PC Case, highlighting the vertical ventilation slats and front panel controls.
3. Nastavení a instalace
Follow these steps for proper component installation within the Aigo Q2503 case.
3.1 Příprava případu
- Vybalte krabici a odstraňte veškerý balicí materiál.
- Carefully remove the side panels by unscrewing the thumbscrews at the rear of the case and sliding the panels backward.
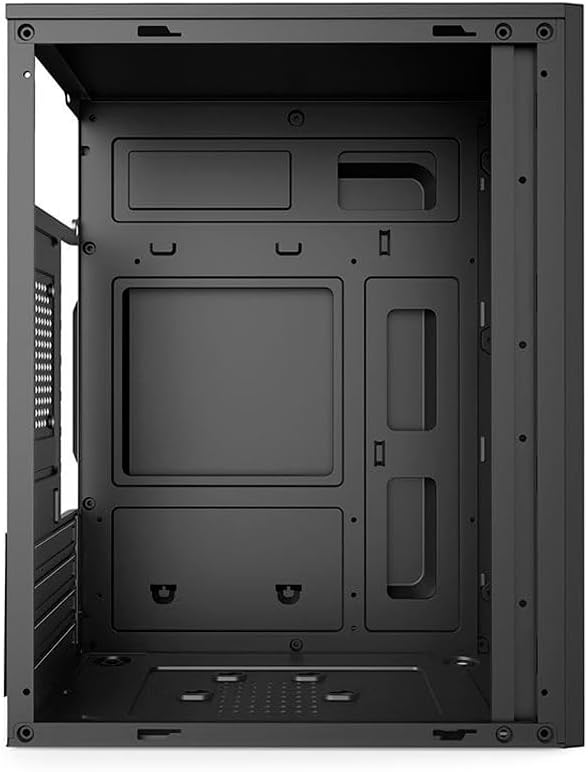
Obrázek 3.1: Vnitřní view of the Aigo Q2503 PC Case, showing the motherboard tray and drive mounting points.
3.2 Instalace základní desky
- Nainstalujte kryt I/O dodaný se základní deskou do zadního otvoru skříně.
- Align your M-ATX or ITX motherboard with the standoffs inside the case. Ensure all standoffs match the motherboard's mounting holes.
- Zajistěte základní desku příslušnými šrouby.
3.3 Instalace měniče
- SSD (1x): Locate the dedicated SSD mounting point (typically on the motherboard tray or behind it). Secure the SSD using screws.
- HDD (1x): Locate the HDD bay. Slide the HDD into the bay and secure it with screws.
3.4 Expansion Card Installation (VGA)
- Odstraňte potřebné kryty rozšiřujících slotů ze zadní strany skříně.
- Insert your graphics card (VGA) or other expansion cards into the PCIe slots on your motherboard.
- Secure the expansion cards with screws. Note the maximum VGA length supported is 150 mm.
3.5 CPU Cooler Installation
Install your CPU cooler according to its manufacturer's instructions. Ensure the cooler's height does not exceed the maximum supported height of 250 mm for this case.
3.6 Instalace napájecího zdroje
The Aigo Q2503 supports ATX power supplies. Mount your ATX power supply in the designated area, typically at the top or bottom rear of the case, and secure it with screws.
3.7 Instalace ventilátoru
The case supports the following fan configurations (fans are not included):
- Zadní: 1 x 80 mm fan
- Strana: 1 x 120 mm fan
Install fans in the specified locations to optimize airflow.
3.8 Připojení předního panelu
Connect the front panel cables (Power SW, Reset SW, HDD LED, Power LED, USB 2.0, Audio/Mic) to the corresponding headers on your motherboard. Refer to your motherboard manual for exact pin layouts.
4. Ovládání skříně počítače
Once all components are installed and connected, replace the side panels and secure them. Connect your monitor, keyboard, mouse, and power cable to your system. Press the power button on the front panel to start your computer.
Přední panel poskytuje pohodlný přístup k:
- Tlačítko napájení
- Tlačítko Reset
- 2 x USB 2.0 porty
- Audio Out (Headphone) Jack
- Mikrofon v Jacku
5. Údržba
Pravidelná údržba pomáhá zajistit optimální výkon a prodlužuje životnost komponent vašeho počítače.
5.1 Čištění
- Vnější: Použijte měkký, damp hadříkem k otření vnějších povrchů. Nepoužívejte abrazivní čisticí prostředky.
- Interiér: Periodically open the case and use compressed air to remove dust buildup from components, fans, and filters. Ensure the system is powered off and unplugged before cleaning the interior.
5.2 Proudění vzduchu
Ensure that the case's ventilation openings are not obstructed to maintain proper airflow and prevent overheating.
6. Řešení problémů
Pokud narazíte na problémy s sestavením počítače, zvažte následující obecné kroky pro řešení potíží:
- Bez napájení: Double-check all power connections, including the power supply to the wall, the power supply to the motherboard, and the front panel power switch cable to the motherboard.
- Přehřívání: Verify that all case fans and CPU cooler fans are spinning correctly. Ensure proper airflow within the case and that ventilation openings are clear.
- Porty na předním panelu nefungují: Confirm that the USB and Audio/Mic cables from the front panel are correctly connected to the motherboard headers.
- Problémy s přizpůsobením komponent: Ensure that all components, especially the graphics card and CPU cooler, are within the specified maximum dimensions for the case.
7. Specifikace
Below are the detailed specifications for the Aigo Q2503 Mini-Tower PC Case:
| Funkce | Specifikace |
|---|---|
| Značka | aigo |
| Model | Q2503-BK |
| Typ pouzdra | Mini-Tower |
| Podpora základní desky | M-ATX / ITX |
| Materiály | 0.4mm SPCC (Steel Alloy) |
| Drive Bays | 1 x SSD, 1 x HDD |
| Rozšiřující sloty | 4 |
| Přední I / O porty | 2 x USB 2.0, Audio/Mic |
| Maximální délka VGA | 150 mm |
| Maximální výška chladiče CPU | 250 mm |
| Podpora napájení | ATX |
| Supported Fans (not included) | Rear: 1 x 80 mm, Side: 1 x 120 mm |
| Rozměry (D x Š x V) | 265 x 165 x 340 mm |
| Barva | Černý |
8. Informace o záruce
The Aigo Q2503 Mini-Tower PC Case comes with a manufacturer's warranty of 12 měsíců from the date of purchase. This warranty covers defects in materials and workmanship under normal use. Please retain your proof of purchase for warranty claims. The warranty does not cover damage caused by improper installation, misuse, accidents, modifications, or unauthorized repairs.
9. Podpora
For technical assistance, troubleshooting, or warranty inquiries, please contact your retailer or the official Aigo support channels. Refer to the Aigo official webweb s nejaktuálnějšími kontaktními informacemi a zdroji podpory.
Before contacting support, please have your product model (Q2503-BK) and proof of purchase readily available.


