1. Konec produktuview
The Yottamaster M.2 NVMe SATA Enclosure is a high-performance external storage solution designed for M.2 NVMe PCIe and SATA M-Key / B+M SSDs. Featuring a 10Gbps USB 3.2 Gen2 USB-C interface and UASP acceleration protocol, it ensures rapid data transfer. Its tool-free design and aluminum alloy casing provide convenient installation and efficient heat dissipation. The enclosure supports various SSD sizes (2230, 2242, 2260, 2280) and is compatible with a wide range of devices.

Figure 1: Yottamaster M.2 NVMe SATA Enclosure. This image displays the sleek, gray aluminum enclosure, highlighting its compact and portable design.
2. Co je v krabici
- M.2 NVMe SATA Enclosure
- Datový kabel USB-C na USB-C
- USB-C to USB-A Adapter (integrated with cable)
- Tepelná podložka
- Silicone Screw/Fastener
- Uživatelská příručka
3. Nastavení a instalace
The Yottamaster M.2 NVMe SATA Enclosure features a tool-free design for quick and easy SSD installation.
- Otevřete kryt: Press the release button on the back of the enclosure and slide out the internal tray.
- Vložení SSD disku: Gently insert your M.2 NVMe or SATA SSD into the M.2 slot on the internal tray. Ensure the SSD is fully seated.
- Bezpečný SSD disk: Use the provided silicone screw/fastener to secure the end of the SSD to the tray. This prevents movement and ensures proper contact.
- Apply Thermal Pad (Optional but Recommended): Remove the protective film from the thermal pad and place it directly onto the SSD's chips. This aids in heat dissipation.
- Zavřete kryt: Zasuňte vnitřní přihrádku zpět do hliníkového krytuasing, dokud bezpečně nezacvakne na své místo.

Figure 2: Visual guide for the tool-free installation of an M.2 SSD into the enclosure. The image shows the steps: pressing the release button, sliding out the tray, inserting the SSD, and reassembling the enclosure.
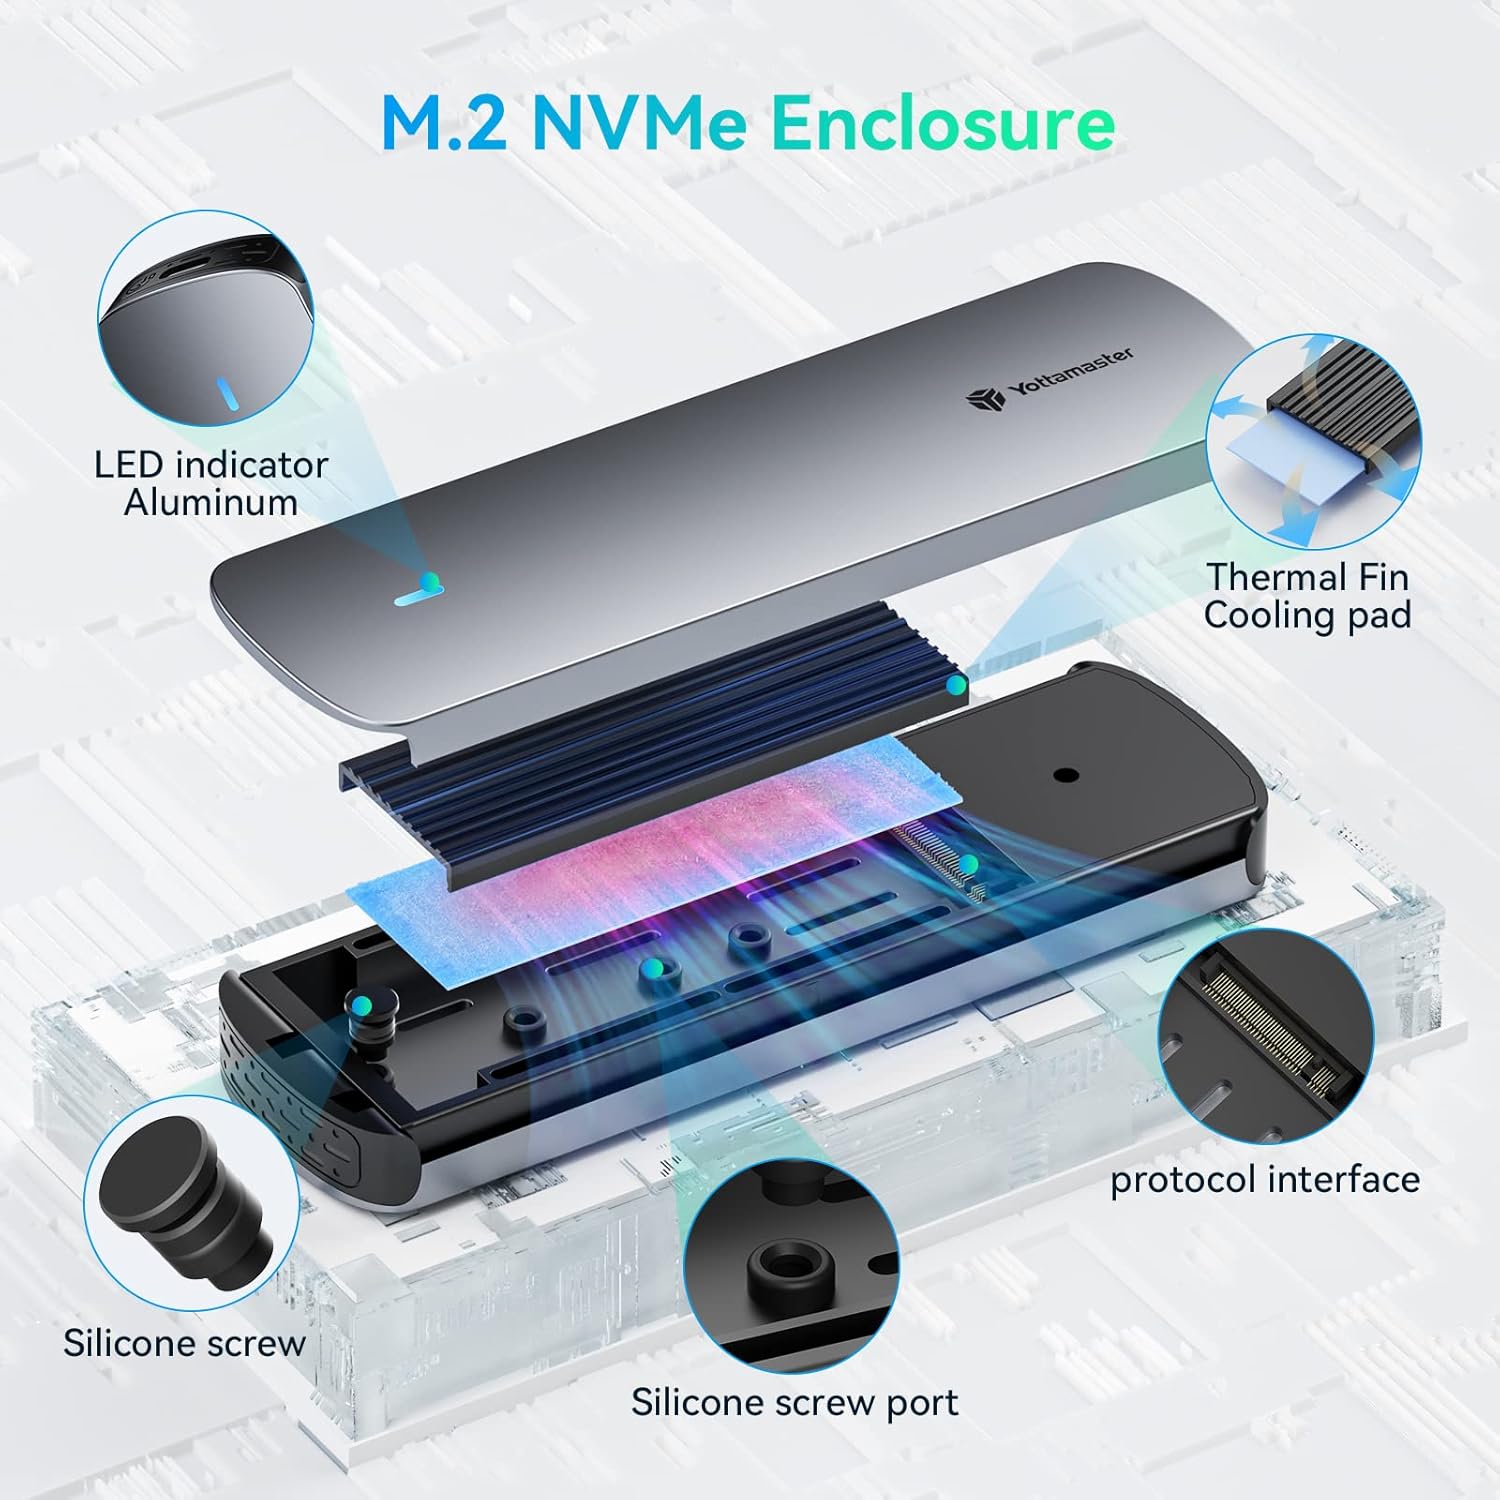
Obrázek 3: Rozložený view illustrating the internal components of the enclosure, including the aluminum top cover, LED indicator, thermal fin, cooling pad, protocol interface, silicone screw, and silicone screw port.
Video 1: Official Yottamaster video demonstrating the M.2 NVMe SATA Enclosure, including its features and ease of use. This video provides a visual overview of the product and its functionality.
4. Návod k obsluze
4.1 Konektivita
Connect the enclosure to your device (PC, smartphone, laptop, smart TV, router, gaming console) using the provided USB-C to USB-C data cable. The cable also includes a USB-A adapter for broader compatibility.

Figure 4: The included 2-in-1 USB-C to USB-C/USB-A data cable, along with examples of compatible devices such as smartphones, tablets, game consoles (Switch, PS5/PS4), and laptops (MacBook, ASUS, Lenovo).
4.2 Inteligentní funkce
- Intelligent Sleep Technology: The enclosure automatically enters sleep mode after 10 minutes of inactivity. This conserves energy and extends the lifespan of your SSD.
- LED indikátor: A built-in LED indicator provides clear visual monitoring of the SSD's status, allowing you to stay informed at a glance.
5. Kompatibilita
The enclosure is compatible with NVMe PCIe and SATA M-Key / B+M connectors M.2 SSDs. It supports SSD sizes of 2230, 2242, 2260, and 2280. It is suitable for use with PCs, smartphones, laptops, smart TVs, routers, and gaming consoles.

Figure 5: A detailed chart showing compatibility with NVMe M Key, NVMe B+M Key, and SATA B+M Key interfaces, as well as supported SSD sizes (2230, 2242, 2260, 2280).
6. Výkon
Equipped with a 10Gbps main control scheme and supporting the UASP acceleration protocol, this enclosure ensures rapid data transfer. The external USB 3.2 Gen2 USB-C output interface provides a maximum transfer rate of 10Gbps, delivering exceptional speed and efficiency for various tasks including working, shooting, and gaming.

Figure 6: Graphic illustrating the 10Gbps high-speed transfer capability of the enclosure, emphasizing its efficiency compared to slower USB standards.

Figure 7: Depiction of various usage scenarios for the enclosure, including working on a laptop, professional video shooting, and gaming, highlighting its versatility.
7. Specifikace
- Značka: Yottamaster
- Číslo modelu: nvme1
- Barva: Šedá
- Hardwarové rozhraní: USB typ C
- Rychlost přenosu dat: 10 Gb/s (USB 3.2 Gen2)
- Compatible SSD Types: NVMe PCIe M-Key / B+M, SATA B+M M.2 SSDs
- Supported SSD Sizes: 2230, 2242, 2260, 2280
- Speciální vlastnosti: Fast Data Transfer, Indicator Light, Lightweight, Plug and Play, Portable, Intelligent Sleep Technology
- Kompatibilní zařízení: Desktops, Laptops, Smartphones, Smart TVs, Routers, Gaming Consoles
- Hmotnost položky: 4.6 unce
- Rozměry balení: 7.24 x 4.25 x 1.1 palce
8. Řešení problémů
- Disk nebyl detekován:
- Ensure the SSD is correctly inserted and secured in the enclosure.
- Verify the USB cable is securely connected to both the enclosure and the host device.
- Try connecting to a different USB port or a different host device.
- For new SSDs, ensure they are initialized and partitioned in your operating system's Disk Management (Windows) or Disk Utility (macOS).
- Pomalé přenosové rychlosti:
- Ensure you are using a USB 3.2 Gen2 (10Gbps) compatible port on your host device. Older USB 2.0 or 3.0 ports will result in slower speeds.
- Verify your SSD itself supports 10Gbps speeds.
- Check the integrity of the USB cable.
- Ensure the thermal pad is correctly installed to prevent thermal throttling.
- Přehřátí skříně:
- Ensure the thermal pad is correctly installed between the SSD and the aluminum casing.
- Avoid prolonged heavy data transfers in poorly ventilated areas.
- LED indikátor nesvítí:
- Zkontrolujte všechna připojení kabelů.
- Ensure the host device is powered on and providing sufficient power to the USB port.
9. Záruka a podpora
For warranty information, technical support, or further assistance, please refer to the official Yottamaster webnebo se obraťte přímo na jejich zákaznický servis. Uschovejte si doklad o koupi pro případ reklamace.


