1. Úvod
This manual provides detailed instructions for the iTOMA Retro Alarm Clock Model 138. Please read thoroughly before use to ensure proper functionality and to maximize your product experience. This device combines time display, alarm functions, Bluetooth connectivity, and media playback options in a compact, vintage-inspirovaný design.
2. Obsah balení
Po otevření balení ověřte, zda jsou v něm obsaženy všechny následující položky:
- 1 x iTOMA Retro Alarm Clock (Model 138)
- 1 x nabíjecí kabel typu C
- 1 x Uživatelská příručka
Poznámka: An AC adapter is not included and must be supplied separately for power.
3. Vlastnosti produktu
The iTOMA Retro Alarm Clock Model 138 offers a range of functionalities:
- Zobrazení času: Clear LED display with 12/24-hour format options.
- Funkce alarmu: Multiple alarm settings with adjustable volume (1-16 levels) and a 9-minute snooze feature.
- Režimy budíku: Choose between everyday, weekdays only, or weekends only alarm activation.
- Bluetooth připojení: Bluetooth 5.1 for stable wireless audio streaming from compatible devices.
- Přehrávání médií: Supports TF (MicroSD) card slot and AUX jack for direct music playback.
- Hands-free volání: Integrated microphone for hands-free phone calls when connected via Bluetooth.
- Ovládání zvuku: Option to turn off the display and reactivate it by sound (tapping or clapping).
- Jas displeje: Adjustable display brightness for optimal viewza různých světelných podmínek.
- Baterie paměti: Internal battery to retain time and alarm settings during power outages (not for powering the device).

Figure 1: Key features of the iTOMA Retro Alarm Clock, including Bluetooth, AUX, hands-free calling, and TF card support.
4. Nastavení
- Připojení napájení: Connect the provided Type-C charge cable to the DC 5V port on the back of the alarm clock. Plug the other end of the cable into a compatible USB AC adapter (not included) and then into a power outlet. The display should illuminate.
- Počáteční nastavení času:
- Press and hold the "TIME" button on the back of the clock for 3 seconds. The year display will start flashing.
- Use the scroll wheel (or +/- buttons if applicable) to adjust the year.
- Press "TIME" again to move to month, then day, then hour, then minute. Adjust each setting using the scroll wheel.
- After setting the minute, press "TIME" one more time to select 12-hour or 24-hour format.
- Press "TIME" again to confirm and exit time setting mode.
- Memory Battery Activation: To ensure settings are saved during power interruptions, locate the memory battery switch on the back of the clock and slide it to the "ON" position.
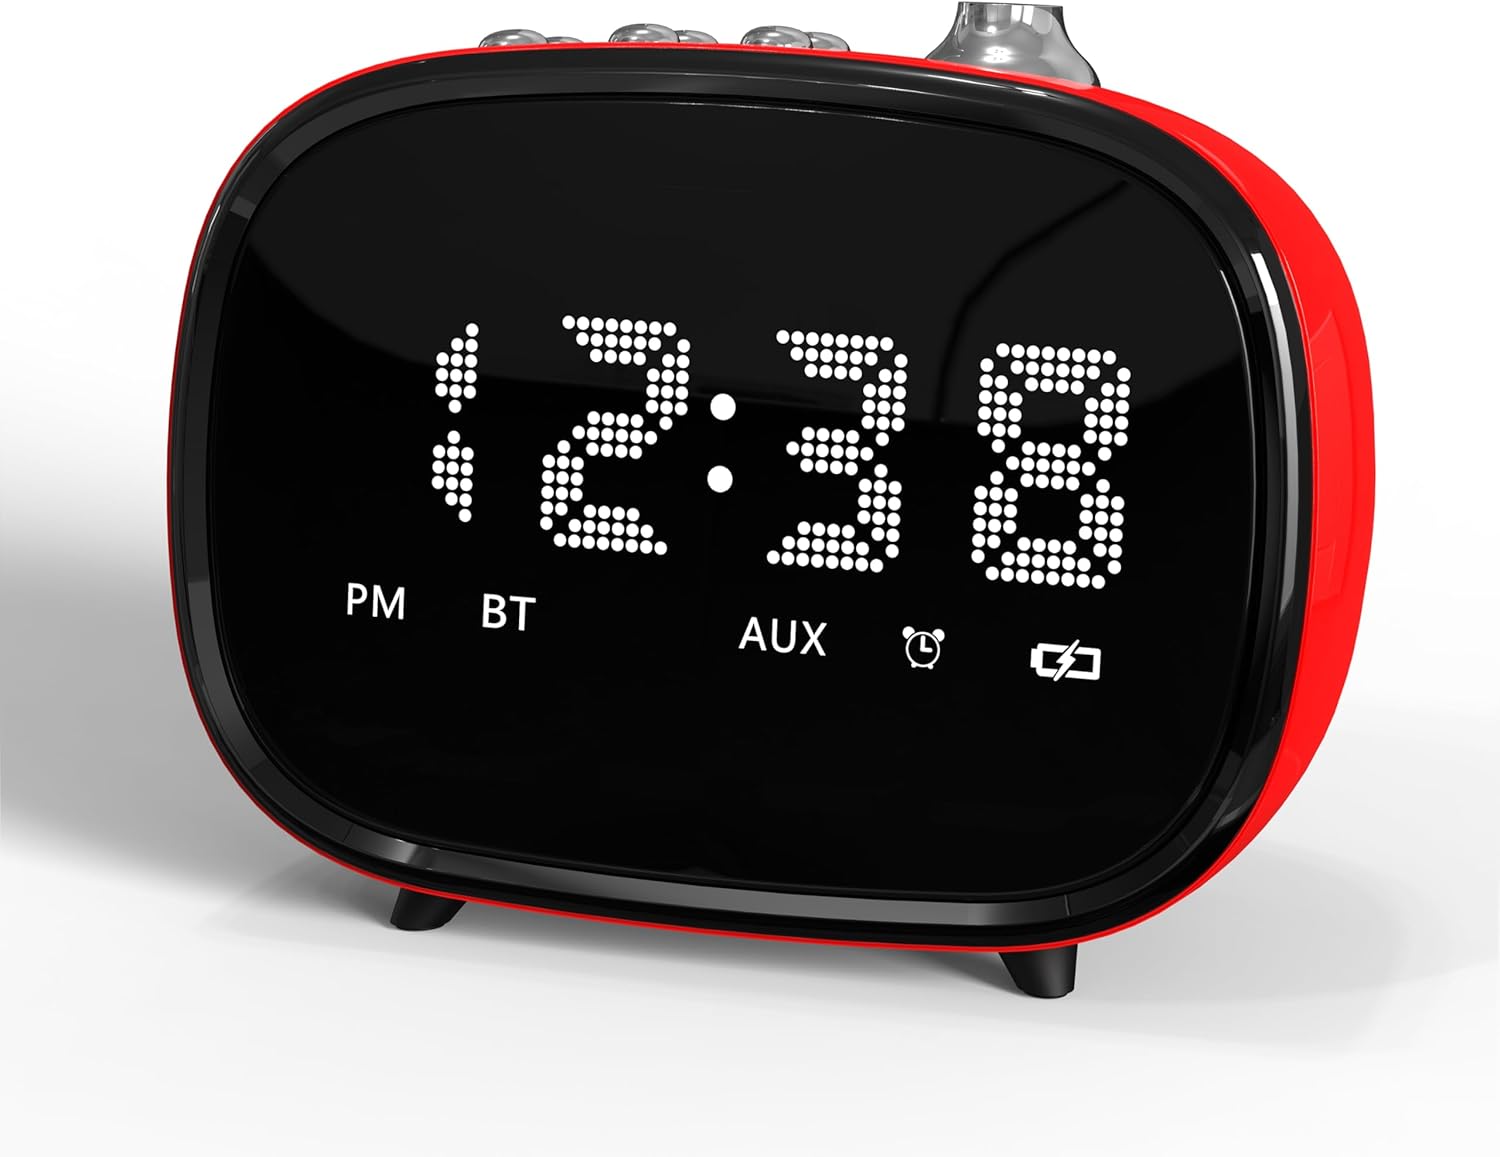
Obrázek 2: Přední strana view of the iTOMA Retro Alarm Clock, showing the LED time display.
5. Návod k obsluze
5.1. Nastavení alarmů
- Press and hold the "ALARM" button on the back of the clock for 3 seconds. "A1" (Alarm 1) will appear on the display.
- Press "ALARM" repeatedly to cycle through Alarm 1, Alarm 2, and Alarm 3 settings.
- When the desired alarm (e.g., A1) is displayed, use the scroll wheel to set the hour, then press "ALARM" to set the minute.
- After setting the minute, press "ALARM" again to choose the alarm mode:
- "--E": Alarm rings every day.
- "oNE": Alarm rings on weekdays only (Monday-Friday).
- "E": Alarm rings on weekends only (Saturday-Sunday).
- Press "ALARM" again to set the alarm volume (1-16 levels) using the scroll wheel.
- Press "ALARM" one last time to confirm and exit alarm setting.
- To activate/deactivate an alarm, use the corresponding ON/OFF switch on the bottom of the clock.
5.2. Funkce odložení buzení
When an alarm sounds, press the large "SNOOZE" button on the top of the clock to temporarily silence it for 9 minutes. The alarm will sound again after 9 minutes. This can be repeated up to 6 times.

Figure 3: The snooze function allows for an additional 9 minutes of rest after the alarm sounds.
5.3. Párování Bluetooth
- Ujistěte se, že je budík zapnutý.
- Aktivujte Bluetooth na svém mobilním zařízení nebo jiném zdroji zvuku.
- Hledat "iTOMA 138" (or similar) in your device's Bluetooth settings.
- Select the device to pair. A confirmation sound will indicate successful pairing.
- You can now stream audio to the alarm clock or use it for hands-free calling.
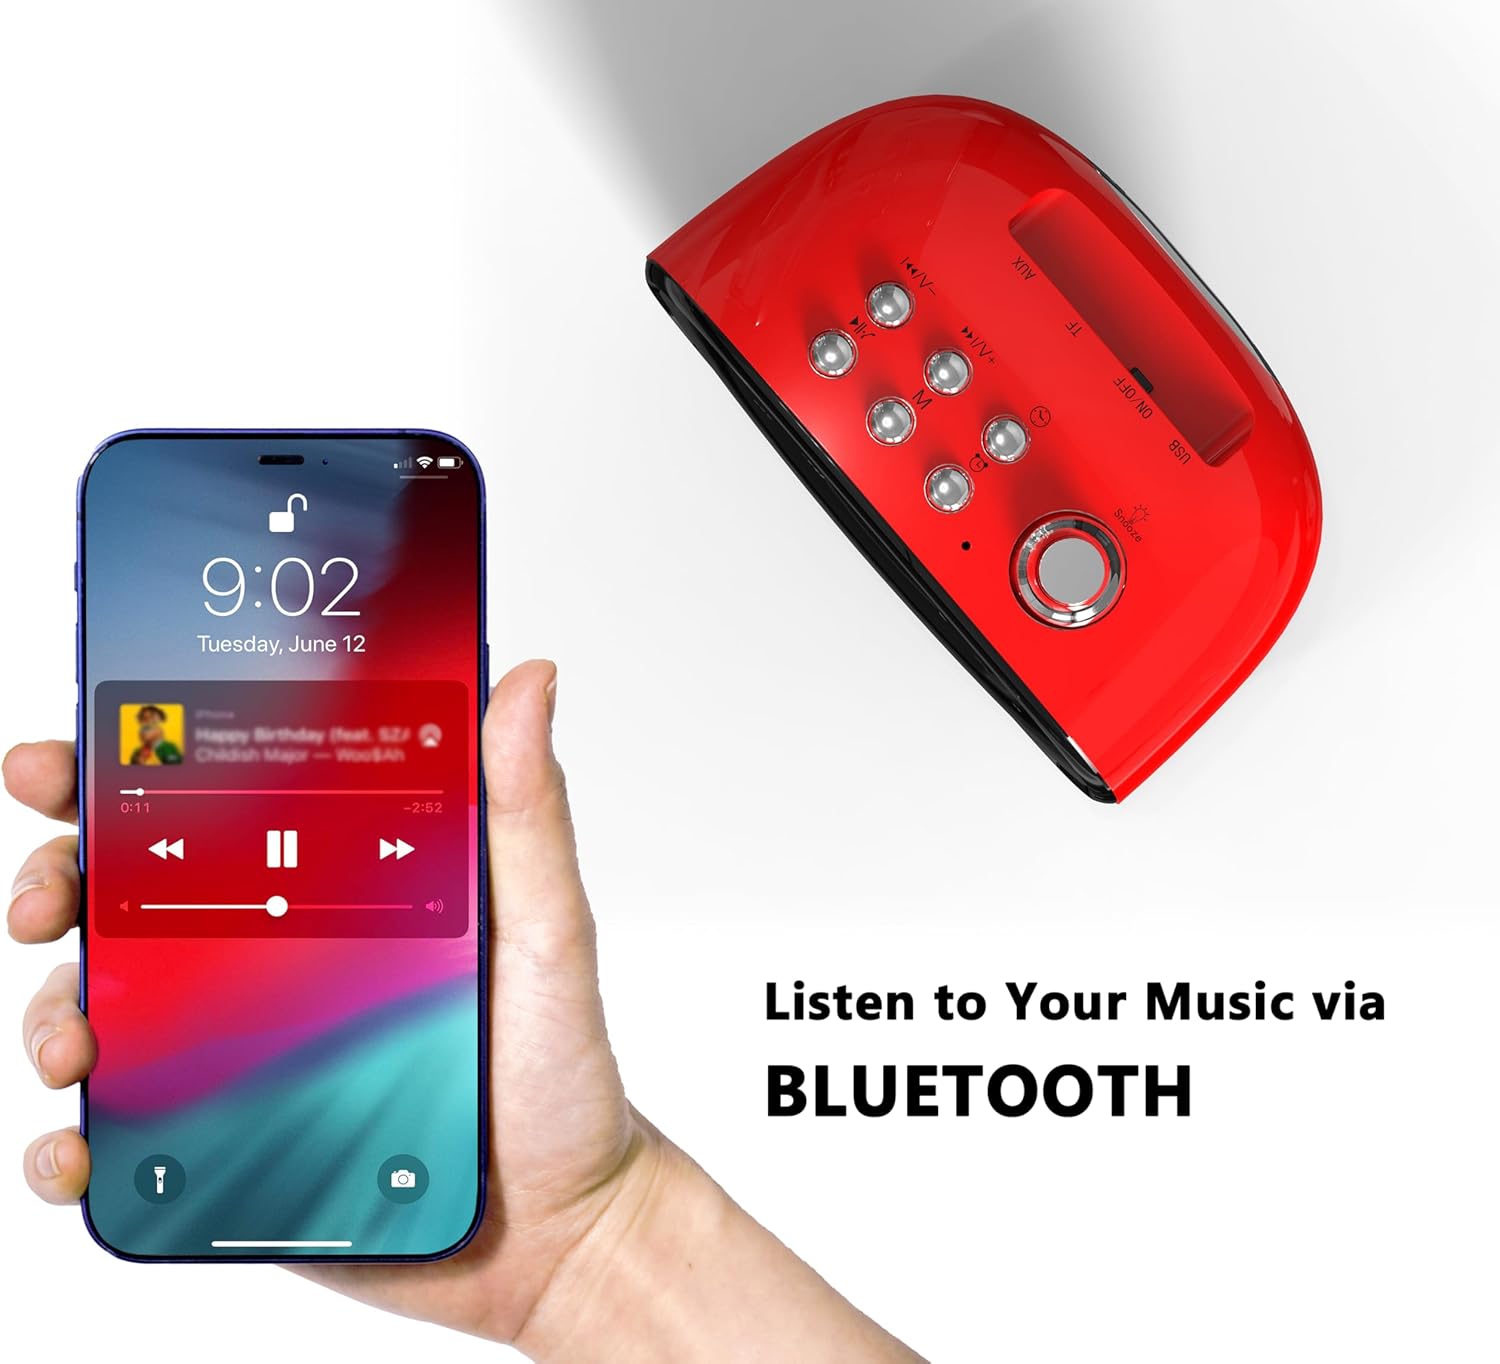
Figure 4: Connect your smartphone via Bluetooth to play music through the alarm clock's speaker.
5.4. TF Card and AUX Playback
- TF karta: Vložte kartu TF (MicroSD) se zvukem files into the designated slot on the back of the clock. The clock should automatically switch to TF card playback mode.
- AUX Jack: Connect an audio device using a 3.5mm AUX cable to the AUX jack on the back of the clock. The clock should automatically switch to AUX input mode.
5.5. Sound Control (Display On/Off)
To enable or disable the sound control feature, use the "SOUND CONTROL" ON/OFF switch on the back of the clock. When "ON", the display will turn off after a few seconds of inactivity. To reactivate the display, simply tap the clock, click a button, or make a sound (e.g., clap your hands).
5.6. Nastavení jasu displeje
The display brightness can be adjusted using the dedicated switch on the back of the clock. Slide the switch to your preferred brightness level (Off, Dim, Bright).
6. Údržba
- Čištění: Use a soft, dry cloth to clean the surface of the alarm clock. Avoid using abrasive cleaners or solvents.
- Umístění: Umístěte zařízení na stabilní, rovný povrch mimo dosah přímého slunečního záření, zdrojů tepla a vlhkosti.
- Moc: Always use the provided Type-C cable. Ensure the AC adapter used is compatible (DC 5V).
7. Řešení problémů
- Bez displeje/napájení: Ensure the Type-C cable is securely connected to both the clock and a working power outlet via a compatible AC adapter.
- Alarm nezní: Check if the alarm is activated using the ON/OFF switch on the bottom. Verify the alarm time and mode are correctly set. Ensure the alarm volume is not set to 0.
- Problémy s párováním Bluetooth: Ensure the clock is not already paired with another device. Turn off and on Bluetooth on your device and the clock, then try pairing again.
- Ztráta nastavení po výpadku napájenítage: Ensure the memory battery switch on the back is in the "ON" position.
- Resetting the Clock: If the clock malfunctions or settings are incorrect, locate the "RST" (Reset) button on the back. Use a thin object (like a toothpick) to press and hold the button for a few seconds to reset the device to factory defaults.
8. Specifikace
| Značka | iTOMA |
| Číslo modelu | 138 |
| Typ zobrazení | LED |
| Zdroj napájení | Type-C cable (AC Adapter not included) |
| Rozměry produktu | 4.72 cm Š x 3.74 cm V |
| Hmotnost položky | 13.1 unce |
| Materiál | Akrylonitrilbutadienstyren (ABS) |
| Technologie připojení | USB-C, Bluetooth 5.1 |

Figure 5: Dimensions of the iTOMA Retro Alarm Clock.
9. Záruka a podpora
The iTOMA Retro Alarm Clock Model 138 comes with a Záruka 365-Day. For any questions, missing accessories, or other issues, please contact iTOMA customer support.
Kontaktní email: ThreeDucksDirect@outlook.com
Please include your order ID when contacting support for warranty claims.


