1. Úvod
This manual provides essential instructions for the safe and efficient use of your GRECELL Level 2 EV Charger, Model EV-B10-US007. This portable electric vehicle charger delivers up to 32 Amps (7.4 KW) of power, compatible with all SAE J1772 electric vehicles and plug-in hybrid electric vehicles (PHEVs). It features a NEMA 14-50 plug for connection to a 240V outlet and includes multiple safety protections and smart functionalities like adjustable current and scheduled charging.
Před instalací a uvedením do provozu si prosím pečlivě přečtěte tento návod a uschovejte si jej pro budoucí použití.
2. Nastavení a instalace
2.1 Obsah balení
Ověřte, zda jsou v balení přítomny všechny položky:
- EV Charger (1 unit)
- Wall Hangings (1 set)
- Empty Seat Hooks (1 unit)
- Úložný vak (1 kus)
- Uživatelský manuál (1 jednotka)
- Expansion Screw φ8*60mm (3 units)
- Expansion Screw φ8*25mm (6 units)

Image: Contents included in the GRECELL EV Charger package.
2.2 Montáž nabíječky
The charger unit can be mounted on a wall using the provided wall hangings and screws. Choose a location that is dry, protected from direct sunlight and heavy rain, and within reach of your NEMA 14-50 outlet and your vehicle's charging port. Ensure the mounting surface is sturdy enough to support the charger's weight.
- Mark the desired drilling points for the wall hangings.
- Drill holes and insert the expansion screws.
- Secure the wall hangings to the wall.
- Mount the charger unit onto the wall hangings.
- Install the empty seat hook for the charging connector for convenient storage.
2.3 Připojení napájení
Connect the charger's NEMA 14-50 plug into a dedicated 240V NEMA 14-50 outlet. Ensure the outlet is properly installed and grounded by a qualified electrician. Do not use extension cords or adapters that are not rated for the charger's power requirements.

Obrázek: Overview of the GRECELL Level 2 EV Charger components.
3. Návod k obsluze
3.1 Základní postup nabíjení
- Ensure the charger is securely plugged into the NEMA 14-50 outlet. The LCD display will illuminate.
- Otevřete nabíjecí port vašeho elektromobilu.
- Insert the SAE J1772 charging connector firmly into your vehicle's charging port. A click indicates a secure connection.
- The charger will automatically begin charging. The LCD display will show charging status, and the LED indicator on the control box will change to green.
- To stop charging, first disconnect the connector from your vehicle, then unplug the charger from the wall outlet.

Image: Connecting the charger to an electric vehicle.
3.2 Nastavení nabíjecího proudu
The charger allows you to adjust the charging current to suit your needs. This can be done before connecting to the vehicle or when the charger is in standby mode.
- Stiskněte tlačítko Tlačítko „A“ on the control box to cycle through available current settings: 10A, 16A, 24A, and 32A.
- The selected current will be displayed on the LCD screen.
- Poznámka: Current adjustments are not possible during an active charging process.

Image: Intelligent touch LCD display for current adjustment and scheduled charging.
3.3 Scheduled Charging (Delay Start)
To utilize off-peak electricity rates, you can set a delay for charging to begin:
- With the charger in standby mode (or before connecting to the vehicle), press the 'H' button.
- Each press will increase the delay time by one hour, from 1 to 12 hours.
- After setting the desired delay, connect the charger to your vehicle. Charging will commence after the countdown ends.
- Poznámka: Time reservations are not possible during an active charging process.

Image: Scheduled charging feature for optimizing charging times.
3.4 Informace na LCD displeji
The LCD display provides real-time charging data:
- Teplota: Current operating temperature of the charger.
- Proud (A): Real-time charging current.
- svtage (V): Nabíjení v reálném čase objtage.
- Výkon (KW): Nabíjecí výkon v reálném čase.
- Energie (kWh): Total energy delivered during the current charging session.
- Čas: Duration of the current charging session or countdown for scheduled charging.
3.5 Stav indikátoru LED
The LED light on the control box indicates the charger's status:
- Modrý: Pohotovostní režim.
- Zelený: Probíhá nabíjení.
- Yellow/Red: Fault or error condition. Refer to the Troubleshooting section.
4. Údržba
4.1 Čištění
Regular cleaning helps maintain the charger's performance and longevity:
- Ensure the charger is unplugged from the power source before cleaning.
- Use a soft, dry cloth to wipe the exterior of the control box and cables.
- Nepoužívejte abrazivní čisticí prostředky, rozpouštědla ani agresivní chemikálie.
- Keep the charging connector free from dust, dirt, and moisture.
4.2 Skladování
Pokud se delší dobu nepoužívá:
- Disconnect the charger from the power outlet and your vehicle.
- Coil the cable neatly and store the charging connector in its empty seat hook.
- Place the charger in the provided storage bag.
- Skladujte na chladném a suchém místě, mimo dosah přímého slunečního záření a extrémních teplot.
5. Řešení problémů
If you encounter issues with your GRECELL EV Charger, refer to the following common problems and solutions:
| Problém | Možná příčina | Řešení |
|---|---|---|
| Charger not powering on / LCD display off | No power from outlet; Faulty outlet; Charger malfunction. | Check NEMA 14-50 outlet for power (e.g., by plugging in another appliance). Ensure charger is fully plugged in. If issue persists, contact customer support. |
| Nabíjení se nezačíná | Connector not fully inserted; Vehicle not ready to charge; Scheduled charging active; Fault condition. | Ensure J1772 connector is firmly seated. Check vehicle's charging settings. Verify no scheduled charging delay is set. Check LCD for error codes or LED indicator for fault status. |
| Pomalé nabíjení | Current setting is low; Vehicle's onboard charger limitation; Power supply issue. | Adjust current setting to a higher amperage (e.g., 32A) using the 'A' button. Consult your vehicle's manual for its maximum AC charging rate. Ensure the NEMA 14-50 outlet is providing stable 240V. |
| LED indicator shows yellow/red (Fault) | Various safety protection triggers (overvoltage, podpaltage, overcurrent, leakage, grounding, overheating). | Unplug the charger from both the vehicle and the wall. Wait a few minutes, then plug it back in. If the fault persists, note any error codes on the LCD and contact customer support. |
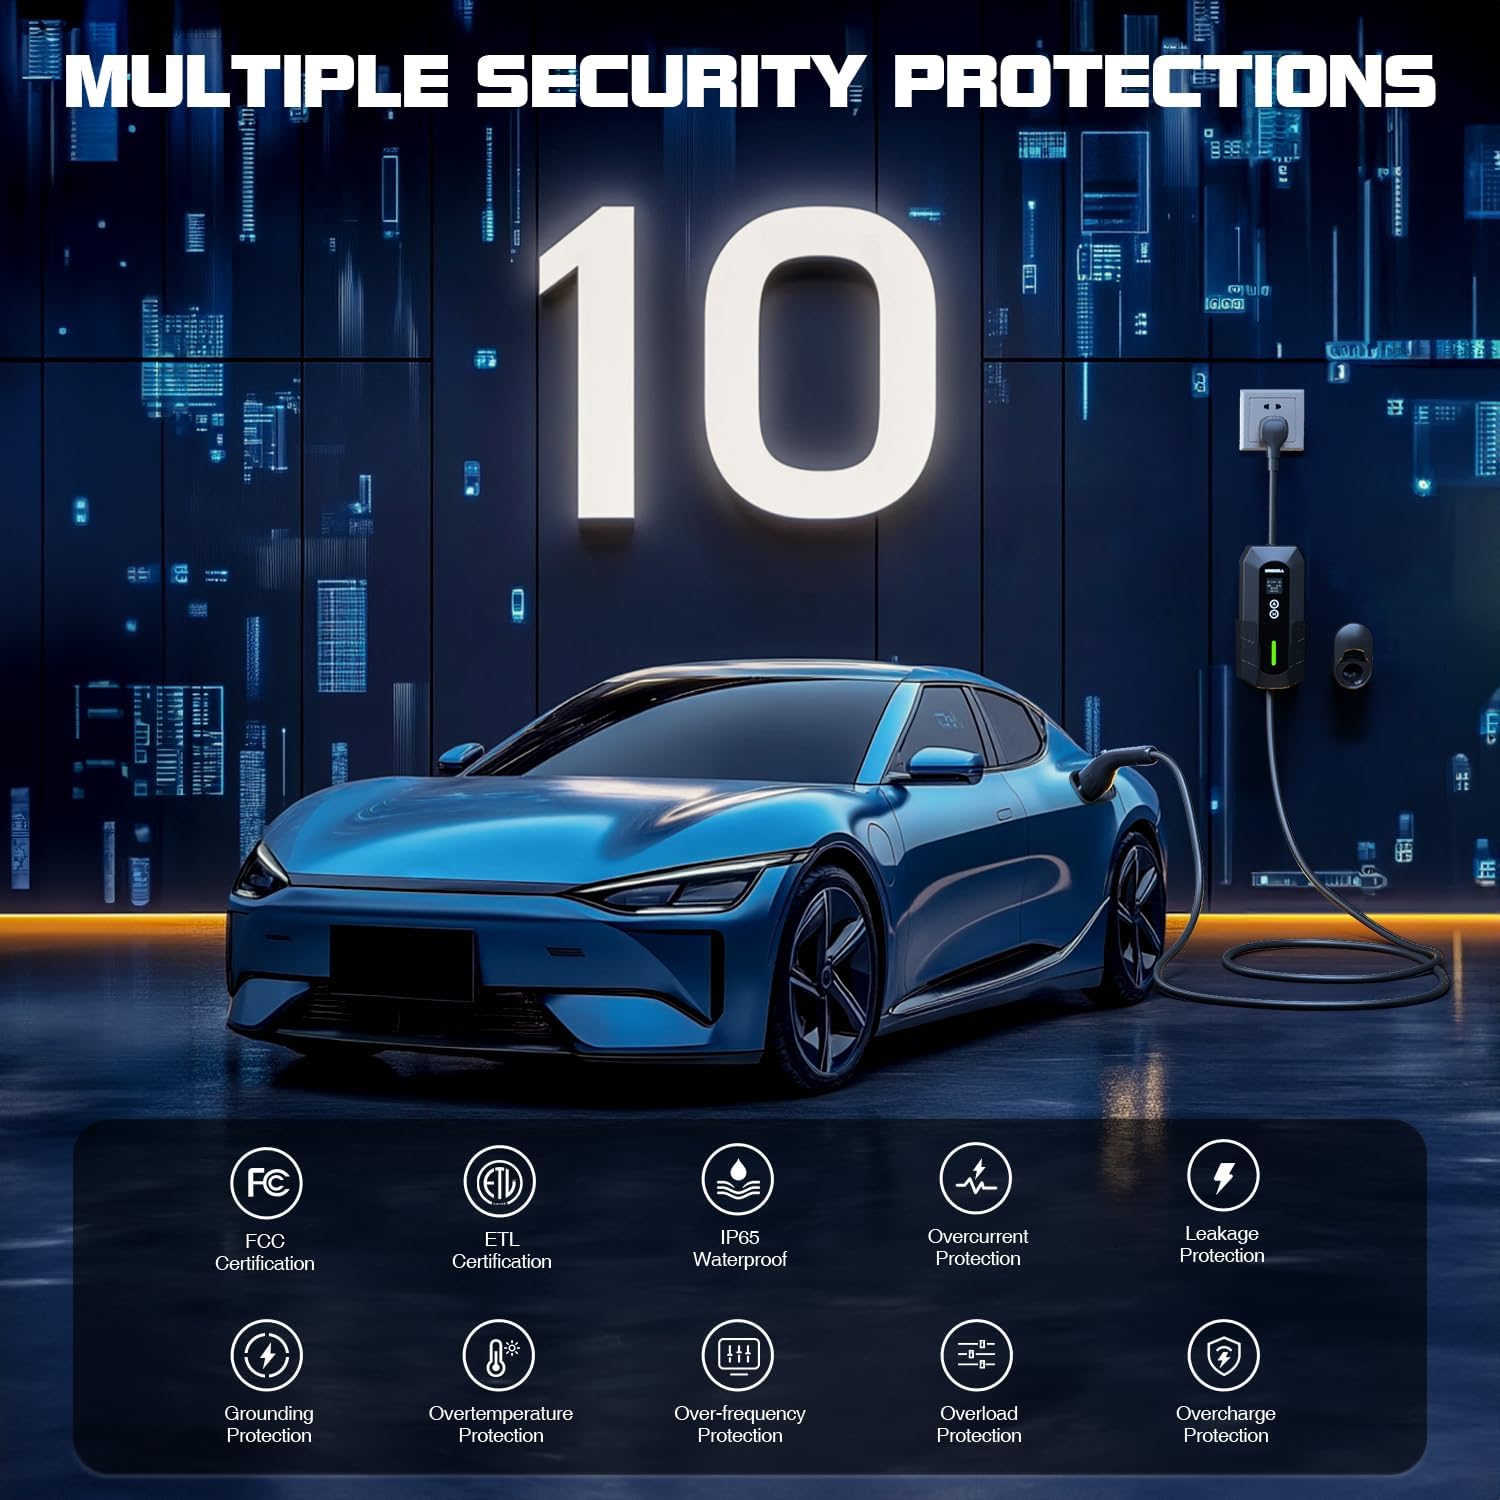
Obrázek: Overview of the GRECELL EV Charger's safety features.
6. Specifikace
| Funkce | Detail |
|---|---|
| Značka | GRECELL |
| Číslo modelu | EV-B10-US007 |
| Ampvymazat | 32 Amps (Adjustable: 10A/16A/24A/32A) |
| Wattage | 7.4 kW |
| Vstupní objemtage | 240 voltů |
| Výstupní objemtage | 240 voltů |
| Typ zástrčky | NEMA 14-50 |
| Typ konektoru | SAE J1772 |
| Délka kabelu | 25 stop |
| Certifikace | ETL, FCC, IP65 (Dustproof & Waterproof) |
| Speciální funkce | Fast Charging, LED Display, Lightweight Design, Travel-friendly, Weatherproof, Adjustable Current, Scheduled Charging |
| Hmotnost položky | 11.14 libry |
| Rozměry balení | 14.13 x 13.98 x 7.24 palce |

Image: Compatibility with SAE J1772 electric vehicles.

Image: Weather resistance features of the charger.
7. Záruka a podpora
GRECELL provides 24měsíční podpora for this EV charger. For any product-related inquiries, technical assistance, or warranty claims, please contact GRECELL customer service. Our team is available to provide friendly and helpful support.
Please refer to your purchase documentation or the GRECELL official webstránky s nejaktuálnějšími kontaktními informacemi.


