1. Úvod
This manual provides essential information for the safe operation, assembly, maintenance, and troubleshooting of your PowerSmart 80V 24-inch Cordless 2-Stage Self-Propelled Snow Blower, Model HB2805B. Please read this manual thoroughly before using the product to ensure proper function and to prevent injury.
2. Bezpečnostní informace
VAROVÁNÍ: Nedodržení těchto bezpečnostních pokynů může vést k vážnému zranění nebo smrti.
- Always keep hands and body away from the auger and chute area while operating. Never place your hands inside the auger or chute area.
- Always turn off the snow blower and wait for all moving parts to stop before unplugging or removing the battery.
- Be cautious when using the LED headlights to avoid blinding yourself or others.
- Always wear appropriate safety gear, including gloves and eye protection, when operating the snow blower.
- Před zahájením práce se ujistěte, že je pracovní prostor zbaven nečistot a překážek.
- Do not operate the snow blower on excessively steep slopes.
- Udržujte děti a domácí zvířata mimo provozní oblast.
3. Obsah balení
Po vybalení ověřte, zda jsou všechny položky přítomny a nepoškozené:
- PowerSmart 24-inch Snow Blower Unit
- Two (2) 6.0Ah 80V Batteries
- One (1) Battery Charger
- Sestava spodní rukojeti
- Upper Handle Assembly (with control panel)
- Sestava skluzu
- Skid Shoes (2) and mounting hardware
- Návod k použití

Obrázek 3.1: Zahrnuté součásti
4. Montážní návod
Follow these steps to assemble your PowerSmart snow blower. Refer to the accompanying video for visual guidance.
Video 4.1: PowerSmart 80V 2-Stage Self-Propelled Snow Blower Assembly and Features Overview
Step 1: Install the Lower Handle
- Attach the lower handle to the main unit using the provided bolts and nuts. Ensure it is securely fastened.

Figure 4.1: Lower Handle Installation
Step 2: Install the Upper Handle
- Connect the upper handle, which includes the control panel, to the lower handle. Secure with the appropriate hardware.
- Plug in and tighten the control signal cable to ensure proper communication between the controls and the snow blower.

Figure 4.2: Upper Handle Installation
Step 3: Install the Chute Assembly
- Attach the snow discharge chute to the main unit. Ensure all connections are firm and allow for smooth rotation.

Figure 4.3: Chute Assembly Installation
Step 4: Install Skid Shoes
- Mount the skid shoes to the sides of the auger housing. These are adjustable to control the clearing height.

Figure 4.4: Skid Shoe Installation
Krok 5: Instalace baterie
- Otevřete kryt bateriového prostoru.
- Insert fully charged 80V batteries into their slots. Ensure they click securely into place.
- Zavřete kryt prostoru pro baterie.

Obrázek 4.5: Instalace baterie
5. Návod k obsluze
Familiarize yourself with the controls and operating procedures before clearing snow.
5.1 Control Dashboard Overview
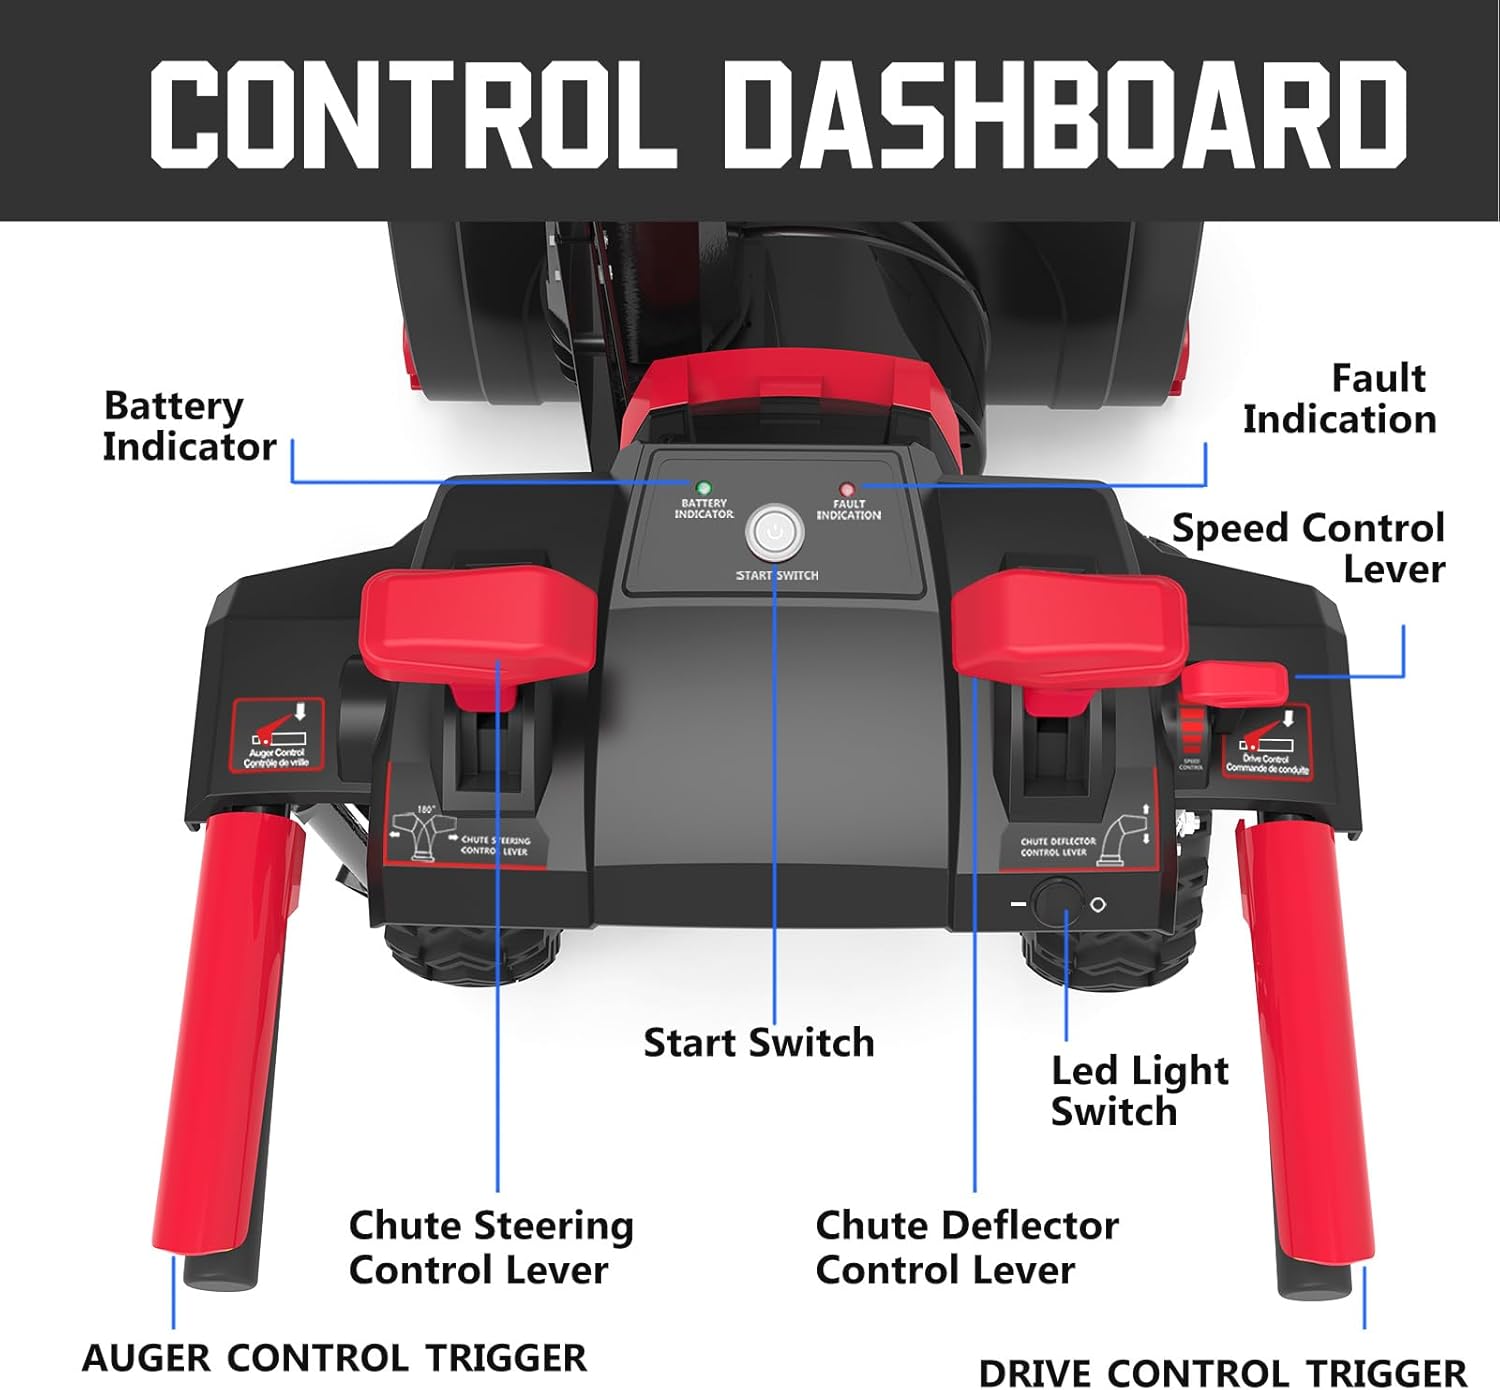
Figure 5.1: Control Dashboard
- Start Switch: Engages the snow blower.
- Indikátor baterie: Shows current battery charge level.
- Indikace poruchy: Illuminates if an operational fault occurs.
- Páka regulace rychlosti: Adjusts the self-propelled speed.
- Chute Steering Control Lever: Changes the direction of snow discharge (180-degree rotation).
- Chute Deflector Control Lever: Adjusts the height of the snow stream.
- LED vypínač: Turns the integrated LED headlights on/off.
- Auger Control Trigger: Engages the auger to clear snow.
- Drive Control Trigger: Engages the self-propelled drive system.
5.2 Starting the Snow Blower
- Ujistěte se, že jsou baterie plně nabité a správně nainstalované.
- Press the ON/OFF switch (Start Switch) on the control panel. The battery indicator light should illuminate.
- To engage the auger or drive, squeeze the respective trigger within 3 seconds after pressing the start switch. If more than 3 seconds pass, restart the process.
5.3 Odklízení sněhu
- The snow blower features a 24-inch clearing width and is ideal for snow depths up to 10 inches.
- 2-stage anti-clogging system with a heavy-duty steel auger is designed to cut through tough icy snow efficiently.
- Adjust the chute steering and deflector to direct snow up to 45 feet away.
- Utilize the self-propelled feature with variable speed and forward/reverse directions for easy maneuverability.
- For early morning or nighttime operation, activate the bright LED headlights for improved visibility.

Figure 5.2: Night Operation with LED Headlights

Figure 5.3: Maximum Snow Throwing Distance
6. Údržba
Pravidelná údržba zajišťuje optimální výkon a prodlužuje životnost vaší sněhové frézy.
- Péče o baterie: Always store batteries in a cool, dry place. Charge them fully before long-term storage and periodically during off-season to maintain battery health.
- Čištění: After each use, clear any snow or ice buildup from the auger, chute, and housing. Ensure the unit is off and batteries are removed before cleaning.
- Inspekce: Regularly check all bolts, nuts, and screws for tightness. Inspect the auger blades and skid shoes for wear or damage. Replace worn parts as needed.
- Mazání: Consult the full product manual for specific lubrication points and recommended lubricants.
7. Řešení problémů
This section addresses common issues you might encounter with your snow blower.
- Snow Blower Does Not Start:
- Check if batteries are fully charged and properly seated in the compartment.
- Ensure the start switch is pressed, and the auger/drive triggers are engaged within 3 seconds.
- Check for any fault indications on the control panel.
- Reduced Snow Clearing Performance:
- Inspect the auger and chute for clogs or obstructions. Always turn off the unit and remove batteries before clearing.
- Check for worn auger blades or impeller.
- Self-Propelled Drive Not Engaging:
- Ensure the drive control trigger is fully squeezed.
- Verify that the speed control lever is set to a desired speed.
For issues not covered here, please contact PowerSmart customer support.
8. Specifikace
| Funkce | Specifikace |
|---|---|
| Značka | PowerSmart |
| Zdroj napájení | Napájení z baterie |
| svtage | 80 voltů |
| Typ motoru | Electric (Brushless Motor) |
| Vymazání šířky | 24 palce |
| Ideální hloubka sněhu | 10 Inches (up to 12 Inches) |
| Snow Throwing Distance | Až 45 stop |
| Runtime (per charge with 2x 6.0Ah batteries) | Přibližně 25 minut |
| Rozměry produktu (DxŠxV) | 43.3"H x 40.35"Š x 25.4"V |
| Hmotnost položky | 112.4 libry |
| Číslo modelu | HB2805B |

Figure 8.1: Performance Specifications

Figure 8.2: Cordless vs. Gas Comparison
9. Záruka a podpora
PowerSmart products are designed for reliability and performance. For warranty information, please refer to the warranty card included with your product or visit the official PowerSmart website. For technical support, replacement parts, or service inquiries, please contact PowerSmart customer service. PowerSmart has over 500 certified repair centers in the U.S. and provides full replacement parts through its Illinois headquarters.


