Zavedení
This manual provides detailed instructions for the installation, configuration, and operation of your ASRock B760M PG Riptide WiFi Micro-ATX Motherboard. Please read this manual thoroughly before attempting to install or use the motherboard to ensure proper setup and to prevent damage to the components.
The ASRock B760M PG Riptide WiFi motherboard supports 14th, 13th, and 12th Generation Intel Core Processors (LGA1700 socket) and features DDR5 memory support up to 7200MHz (OC), WiFi 6E, and 2.5G LAN for high-performance computing.
Bezpečnostní informace
- Always disconnect the power cord from the power supply before handling any components inside the computer case.
- Wear an anti-static wrist strap or frequently touch a grounded metal object to discharge static electricity before touching the motherboard or other components.
- Základní desku držte za okraje, abyste se nedotkli citlivých součástek.
- Před zapnutím systému se ujistěte, že jsou všechny kabely správně a bezpečně připojeny.
- Chraňte základní desku a její komponenty před vlhkostí a extrémními teplotami.
Obsah balení
Ověřte, zda jsou v balení základní desky přítomny všechny položky. Pokud některé položky chybí nebo jsou poškozené, obraťte se na prodejce.
- ASRock B760M PG Riptide WiFi Motherboard
- I/O Shield (Pre-installed)
- Datové kabely SATA
- WiFi Antenna(s)
- Šrouby/distanční sloupky M.2
- Uživatelská příručka / Průvodce rychlou instalací
- Support CD/DVD (may include drivers and utilities)
Rozložení základní desky
Seznamte se s různými komponenty a konektory na základní desce.

Obrázek 1: Shora dolů view of the ASRock B760M PG Riptide WiFi motherboard, showing the CPU socket, RAM slots, PCIe slots, M.2 slots, and various headers.

Figure 2: Diagram highlighting key features and ports of the ASRock B760M PG Riptide WiFi motherboard, including I/O shield, power connectors, VRM design, DDR5 slots, M.2 sockets, SATA ports, and audio components.
Nastavení
1. Instalace procesoru
- Otevřete páčku patice procesoru a zvedněte nosnou desku.
- Carefully align the notches on your Intel LGA1700 processor with the socket and gently place the CPU into the socket. Do not force it.
- Zavřete nakládací desku a zatlačte páku dolů, dokud nezapadne na místo.
- Naneste na procesor teplovodivou pastu a nainstalujte chladič procesoru podle pokynů výrobce.
2. Instalace paměti (RAM)
This motherboard supports DDR5 memory. Refer to your motherboard manual for specific dual-channel configurations.
- Otevřete klipy na obou koncích slotu DIMM.
- Zarovnejte zářez na paměťovém modulu DDR5 s výstupkem ve slotu DIMM.
- Pevně zatlačte na oba konce paměťového modulu, dokud klipsy nezacvaknou na místo.
3. Instalace úložiště (M.2 a SATA)
The motherboard features 2 Hyper M.2 (PCIe Gen4 x4) slots and 4 SATA3 ports.
Instalace M.2 SSD:
- Locate the M.2 slots (often under heatsinks). Remove the M.2 heatsink if present.
- Vložte disk M.2 SSD do slotu pod úhlem 30 stupňů.
- Gently push the SSD down and secure it with the provided M.2 screw or standoff.
- V případě potřeby znovu nainstalujte chladič M.2.
Instalace SATA disku:
- Připojte jeden konec datového kabelu SATA k portu SATA3 na základní desce.
- Připojte druhý konec datového kabelu SATA k pevnému disku SATA nebo SSD.
- Připojte napájecí kabel SATA ze zdroje napájení k disku.
4. Instalace rozšiřující karty (PCIe)
The motherboard has 1 PCIe 4.0 x16 slot and 1 PCIe 4.0 x1 slot.
- Remove the corresponding expansion slot cover from your computer case.
- Align your expansion card (e.g., graphics card) with the PCIe slot and press down firmly until it is seated correctly.
- Kartu připevněte k pouzdru šroubem.
- Připojte všechny potřebné napájecí kabely PCIe od zdroje napájení ke grafické kartě.
5. Připojení napájení
- Connect the 24-pin ATX power connector from your power supply to the motherboard's 24-pin power socket.
- Connect the 8-pin (or 4+4-pin) CPU power connector from your power supply to the motherboard's 8-pin 12V power socket.
6. Připojení na předním panelu
Connect the cables from your computer case's front panel (USB, audio, power button, reset button, LED indicators) to the corresponding headers on the motherboard. Refer to the motherboard layout diagram and the small labels on the motherboard for correct pin alignment.
- USB 3.2 Gen1 Type-C (Front): Connect your case's front USB-C cable.
- USB 3.2 Gen1 Type-A (Front): Connect your case's front USB 3.0/3.1 cables.
- USB 2.0 (Front): Connect your case's front USB 2.0 cables.
- HD zvuk: Connect your case's front panel audio cable.
- System Panel Header: Connect power switch, reset switch, power LED, and HDD LED cables. Pay close attention to polarity for LEDs.
Provozní
1. Nastavení systému BIOS
The BIOS (Basic Input/Output System) is firmware that initializes hardware during the booting process. To enter BIOS Setup, press the Del or F2 key repeatedly during system startup.
- Pořadí spouštění: Configure the boot device priority (e.g., USB drive for OS installation, then SSD/HDD).
- XMP/EXPO: Povolit XMP (Extreme Memory Pro)file) or EXPO for optimal DDR5 memory performance.
- Ovládání ventilátoru: Adjust fan curves for CPU and chassis fans.
- RGB osvětlení: Configure or disable onboard RGB lighting (ASRock Polychrome RGB).
2. Instalace ovladače
After installing your operating system, install the necessary drivers for optimal performance. Drivers can be found on the included support CD/DVD or downloaded from the ASRock webmísto.
- Ovladače čipové sady
- LAN Drivers (Dragon 2.5G LAN)
- WiFi/Bluetooth Drivers (Killer 802.11ax WiFi 6E)
- Ovladače zvuku (Realtek ALC897)
- Graphics Drivers (for integrated graphics, if applicable, or discrete GPU drivers from the GPU manufacturer)
ASRock Auto Driver Installer can simplify this process by automatically detecting and installing required drivers.
3. Konfigurace sítě
Kabelová LAN:
Connect an Ethernet cable from your router/modem to the 2.5G LAN port on the motherboard's rear I/O panel. Ensure the Dragon 2.5G LAN driver is installed.
Wireless (WiFi 6E):
Attach the included WiFi antennas to the connectors on the rear I/O panel. Ensure Killer 802.11ax (WiFi 6E) drivers are installed. Connect to your wireless network through your operating system's network settings.
4. Konfigurace zvuku
The motherboard features Realtek ALC897 7.1 CH HD Audio with Nahimic Audio support. Connect your speakers or headphones to the appropriate audio jacks on the rear I/O panel. Install the audio drivers for full functionality and access to Nahimic Audio software.
5. RGB Lighting (ASRock Polychrome RGB)
The motherboard includes built-in RGB illumination and onboard RGB headers for compatible LED devices. You can synchronize RGB LED devices using ASRock Polychrome RGB software or configure settings directly in the BIOS.

Obrázek 3: Přample of ASRock Polychrome RGB lighting effects on the motherboard and compatible components.
Údržba
1. Aktualizace BIOSu
Pravidelně kontrolujte ASRock website for BIOS updates. BIOS updates can improve system stability, add support for new CPUs, or fix bugs. Follow the instructions provided by ASRock carefully when updating the BIOS to avoid system damage.
2. Čištění
Pravidelně čistěte vnitřek počítače, abyste zabránili hromadění prachu, který může vést k přehřátí a snížení výkonu. K odstranění prachu z ventilátorů, chladičů a součástí základní desky použijte stlačený vzduch. Před čištěním se ujistěte, že je systém vypnutý a odpojený od sítě.
Odstraňování problémů
Pokud narazíte na problémy se základní deskou, zvažte následující běžné kroky pro řešení problémů:
- Žádné napájení/žádné spuštění:
- Zkontrolujte všechna napájecí připojení (24pinový ATX, 8pinový CPU).
- Ujistěte se, že je zapnutý napájecí zdroj.
- Zkontrolujte připojení vypínače na předním panelu.
- Zkuste bootovat s minimálním počtem komponent (CPU, jedna RAM karta, GPU, pokud nemáte integrovanou grafiku).
- Bez displeje:
- Ensure your monitor is connected to the correct graphics output (discrete GPU or motherboard's HDMI/DisplayPort).
- Znovu vložte grafickou kartu a moduly RAM.
- Zkontrolujte výběr vstupu monitoru.
- Nestabilita/pády systému:
- Zkontrolujte teploty CPU a GPU.
- Ensure RAM is properly seated and running at stable speeds (disable XMP/EXPO to test if it's memory related).
- Update all drivers and BIOS to the latest versions.
- Spusťte nástroje pro diagnostiku paměti.
- Problémy se sítí:
- Verify LAN cable connection or WiFi antenna attachment.
- Reinstall LAN/WiFi drivers.
- Zkontrolujte stav routeru/modemu.
For more specific troubleshooting, consult the ASRock support website or the full motherboard manual available for download.
Specifikace
| Funkce | Specifikace |
|---|---|
| Název modelu | B760M PG RIPTIDE WIFI |
| Zásuvka CPU | LGA 1700 |
| Kompatibilní procesory | 14th/13th/12th Gen Intel Core Processors |
| Čipová sada | Intel B760 |
| Technologie paměti RAM | DDR5 |
| Max Memory Speed (OC) | 7200MHz+ |
| Power Phase Design | 14+1+1 |
| PCIe sloty | 1× PCIe 4.0 x16, 1× PCIe 4.0 x1 |
| Grafický výstup | HDMI, DisplayPort |
| Audio kodek | Realtek ALC897 7.1CH HD Audio, Nahimic Audio |
| SATA porty | 4x SATA3 |
| M.2 Sloty | 2 x Hyper M.2 (PCIe Gen4 x4) |
| USB 3.2 Gen1 typu C | 1 vzadu, 1 vpředu |
| USB 3.2 Gen1 Type-A | 3 vzadu, 2 vpředu |
| USB 2.0 | 4 vzadu, 2 vpředu |
| LAN | Dragon 2.5G LAN |
| Bezdrátové připojení | Killer 802.11ax (WiFi 6E) + Bluetooth 5.3 |
| Form Factor | Micro-ATX |
| Rozměry | 10.63 x 10.24 x 2.36 palce |
| Hmotnost položky | 3.01 libry |
CPU Support List
This motherboard supports a range of Intel 12th, 13th, and 14th generation processors. Always refer to the latest CPU support list on the ASRock website for the most up-to-date compatibility information and recommended BIOS versions.

Figure 4: Partial CPU Support List for ASRock B760M PG Riptide WiFi, showing Intel Core i9, i7, and i5 processors (Raptor Lake-S Refresh).

Figure 5: Continuation of the CPU Support List, including more Intel Core i5 and i3 processors (Raptor Lake-S).
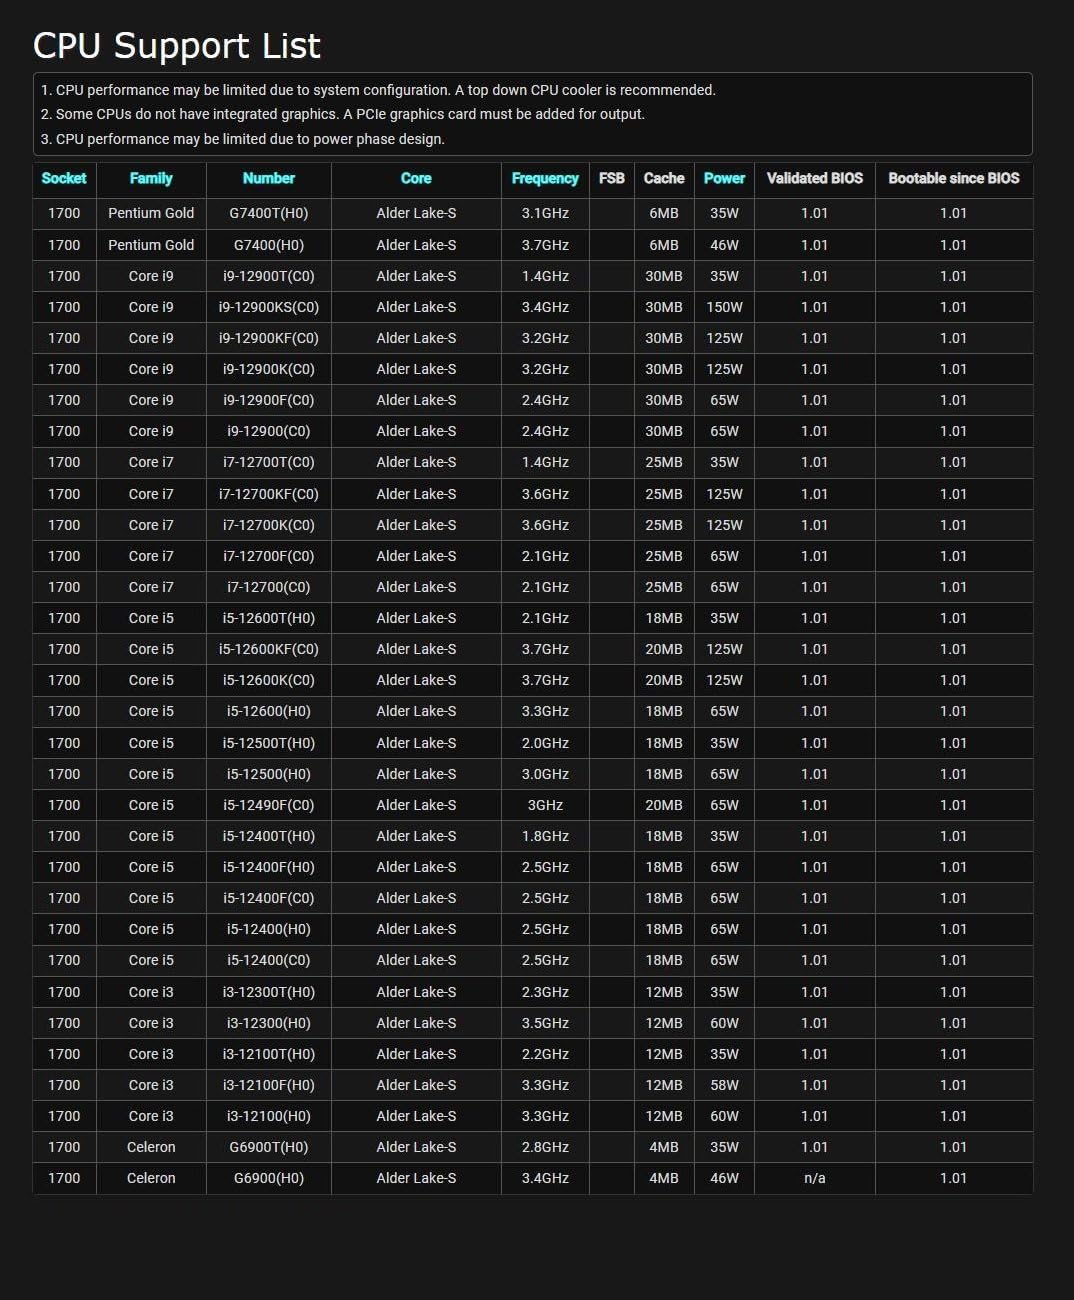
Figure 6: Further continuation of the CPU Support List, including Intel Pentium Gold and Celeron processors (Alder Lake-S).
Note: CPU performance may be limited by system configuration. A top-down CPU cooler is recommended. Some CPUs do not have integrated graphics. A PCIe graphics card may be needed for output. CPU performance may be limited due to power phase design.
Záruka a podpora
Informace o záruce naleznete v záruční kartě dodané s vaším produktem nebo navštivte oficiální webové stránky společnosti ASRock. website. ASRock provides technical support and driver downloads through their official webmísto.
- Oficiální produkt ASRock Webmísto: www.asrock.com
- Technická podpora: Refer to the support section on the ASRock webmísto pro často kladené otázky, průvodce řešením problémů a kontaktní informace.


