1. Úvod
The Veise Smart Deadbolt VE33A offers advanced security and convenience for your home. This 6-in-1 keyless entry door lock features app control, multiple user PIN codes, auto-lock functionality, and a durable, waterproof design. This manual provides detailed instructions for installation, operation, maintenance, and troubleshooting to ensure optimal performance of your smart deadbolt.

Image: The Veise Smart Deadbolt VE33A shown alongside a smartphone displaying its control application. The lock features a circular keypad with numbers 0-9 and a central button, all in a matte black finish.
2. Seznam dílů
Před zahájením instalace ověřte, zda jsou v balení přítomny všechny komponenty:
- Sestavení exteriéru
- Montáž interiéru
- Montážní deska
- Západka
- Úderová deska
- Reinforcement Plate (optional)
- Drive-In Collar (optional)
- 2 Záložní klíče
- Šrouby montážní desky
- Vnitřní montážní šrouby
- Exterior Assembly Screw (optional)
- Západkové šrouby
- Šrouby protiplechu
- Nástroj Reset

Image: An illustration detailing the various components included with the Veise Smart Deadbolt VE33A, such as the exterior and interior assemblies, mounting plate, latch, strike plate, backup keys, and various screws.
3. Instalace
The Veise Smart Deadbolt is designed for easy installation, typically requiring only a screwdriver. Follow these steps carefully.
Video: Official installation guide for the Veise Smart Deadbolt VE33A. This video demonstrates the step-by-step process of installing the lock on a door, including preparing the door, installing the latch, and assembling the interior and exterior components.
3.1 Prepare the Door and Check Dimensions
Pro správnou instalaci se ujistěte, že vaše dveře splňují následující specifikace:
- Tloušťka dveří: 1-3/8" to 2" (35mm-50mm)
- Průměr otvoru: 1-1/2" (38 mm) nebo 2-1/8" (54 mm)
- Zadní část: 2-3/8" nebo 2-3/4" (60 mm nebo 70 mm)
- Latch Hole: Compatible with both chiseled and not chiseled latch holes.
- Kompatibilita dveří: Suitable for single cylinder deadbolts. Not compatible with mortise/integrated locks.
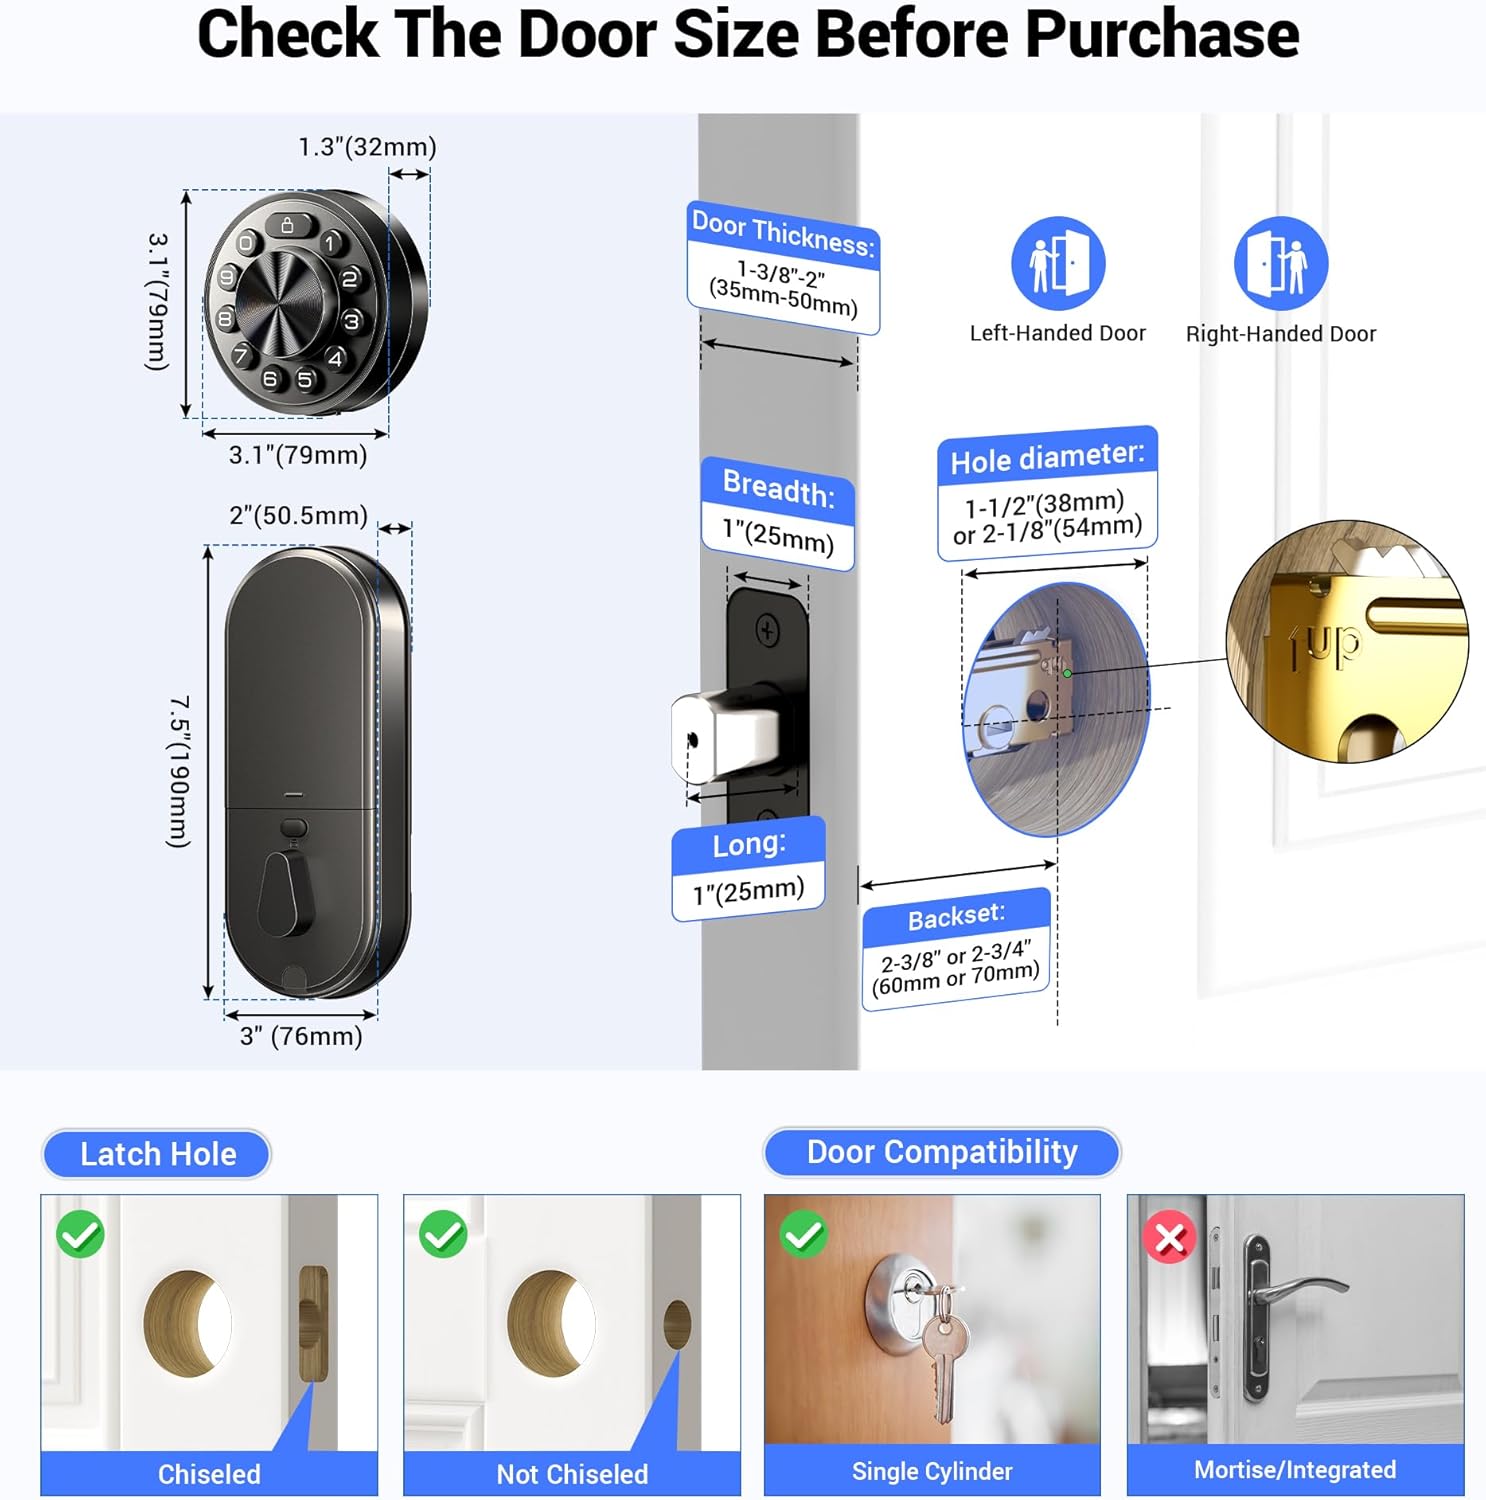
Image: A detailed diagram illustrating the required door dimensions, including thickness, hole diameter, and backset. It also shows compatibility with different latch hole types (chiseled and not chiseled) and clarifies that the lock is for single cylinder deadbolts.
3.2 Install the Latch and Strike
Install the latch into the door edge. Ensure the latch face is flush with the edge of the door. Secure it with the provided latch screws. Install the strike plate on the door frame, aligning it with the latch bolt.
3.3 Nainstalujte vnější sestavu
Route the cable from the exterior assembly through the door hole, ensuring the latch is fully retracted. Secure the mounting plate to the door, making sure it is perpendicular to the floor and parallel to the door. Do not overtighten the screws.
3.4 Nainstalujte sestavu interiéru
Keep the thumb turn in the vertical position. Connect the cable from the exterior assembly to the socket on the interior assembly. Carefully tuck the cable into the designated channel. Attach the interior assembly to the mounting plate and tighten the three screws.
3.5 Door Handing
After installing the interior assembly, install four new AA alkaline batteries. Use the Reset Tool to press and hold the Reset Button for more than 5 seconds until you hear a long "BEEP". If the reset is successful, the latch bolt will extend on its own to learn the handing orientation of the door (left-handed or right-handed).
4. Návod k obsluze
4.1 App Control (KK Home App)
Manage your Veise Smart Deadbolt effortlessly using the KK Home App. Download the app, create an account, and pair your lock via Bluetooth. Keep your phone within 2 meters of the lock during pairing.
Video: This video demonstrates the process of pairing the Veise Smart Deadbolt VE33A with the KK Home App. It covers downloading the app, creating an account, turning on Bluetooth, and connecting the device.
Pomocí aplikace můžete:
- Set and send passcodes.
- Manage access rights and view access logs in real-time.
- Share access with family, visitors, or tenants.
- Dostávejte upozornění na nízký stav baterie.
- Control the lock remotely when paired with a G1 WiFi gateway (sold separately).
- Integrate with Alexa and Google Assistant for voice control (G1 Gateway required).

Image: A smartphone screen displaying the KK Home App interface, highlighting features such as sharing access, managing users, local event history, low battery alerts, compatibility with Alexa, and the ability to grant access without an internet connection.
4.2 Multiple User PIN Codes
The keyless entry system supports up to 20 users with four types of PIN codes:
- Permanent PIN Code: For long-term access.
- Duration PIN Code: Valid for a specific time period.
- Jednorázový PIN kód: For single use by visitors.
- Recurring PIN Code: For regular access, e.g., cleaners.
Unwanted passcodes can be deleted via the app with a single tap.
4.3 Auto Lock & One-Tap Lock
The deadbolt offers an auto-lock feature with an adjustable time delay from 10 to 180 seconds via the app. For immediate locking, press any button on the keypad for 2 seconds to activate the one-tap lock function.

Image: The Veise Smart Deadbolt installed on a door, with an arrow indicating the automatic locking mechanism engaging. This illustrates the auto-lock feature of the deadbolt.
4.4 Physical Key Usage
The lock includes two backup physical keys for emergency access, such as when batteries are depleted or in case of technical failure. The keyhole is discreetly hidden within the exterior assembly.
Video: This video demonstrates how to use the physical backup key for the Veise Smart Deadbolt VE33A. It shows how to access the hidden keyhole and manually unlock the deadbolt.
5. Údržba
5.1 Výměna baterie
The Veise Smart Deadbolt requires four AA alkaline batteries (not included). The app will provide low battery alerts. To replace batteries, remove the interior assembly cover, replace the old batteries with new ones, and reattach the cover.
5.2 Obecná péče
Očistěte vnější stranu zámku měkkým hadříkemamp cloth. Avoid using abrasive cleaners or solvents that could damage the finish or electronic components. Ensure the keypad remains free of debris for optimal performance.
6. Řešení problémů
Běžné problémy a jejich řešení naleznete v následující tabulce:
| Problém | Řešení |
|---|---|
| Po instalaci západka nefunguje správně. |
|
| Zámek se při otáčení palcem nezamyká nebo neodemyká plynule. | Ujistěte se, že jsou nainstalovány správné montážní šrouby. |
| Lock setup failed. |
|
| Klávesnice nereaguje. |
|
| Hlavní PIN kód nelze změnit. | Informace o resetování zámku a přeprogramování všech kódů PIN naleznete ve Stručném návodu k obsluze. |
| Zapomněl jsem svůj hlavní PIN kód. | Chcete-li vymazat všechny kódy PIN, proveďte obnovení továrního nastavení. Po dokončení resetování budou všechny PIN kódy vymazány a hlavní PIN kód bude resetován na výchozí hlavní PIN kód 12345678. |
| Auto Lock nefunguje. | Pokud indikátor baterie nepřetržitě bliká, jsou baterie slabé. Vyměňte je za čtyři nové baterie, abyste dosáhli nejlepšího výkonu (pouze alkalické baterie). Informace o aktivaci funkce Auto Lock naleznete v části Rychlé nastavení. |
Video: This video provides instructions on how to reset the Veise Smart Deadbolt VE33A. It details the steps to perform a factory reset, which can resolve various operational issues.
7. Specifikace
- Značka: Veise
- Název modelu: Veise Smart Deadbolt (VE33A)
- Typ zámku: Závora, Klávesnice
- Materiál: Hliník, kov
- Barva: Matná černá
- Rozměry produktu: 9 x 2.2 x 3.8 palce
- Hmotnost položky: 2.86 libry
- Protokol připojení: Bluetooth, WiFi (vyžaduje WiFi bránu Veise G1)
- Typ ovladače: Ovládání aplikací
- Zdroj napájení: 4 AA baterií (nejsou součástí balení)
- Speciální vlastnosti: APP Remote Control, Easy to Install, Keyless Entry Smart Lock, Multiple Passwords, Work with Alexa and Google (G1 Gateway Required)
- Doporučená použití: Front Door, Back Door, Side Door, Bedroom Door, Inside, Short-term Rental Room, Apartment, Garage Door, Laundry Door, Outside

Image: The Veise Smart Deadbolt with a blue shield graphic, emphasizing its triple robust protection features: Data Encryption (Bank-level 128-bit AES encryption), Subzero Survivors (withstands temperatures from -31°F to 158°F), and ANSI/BHMA Grade 3 (aluminum & alloy body, strength up to 4000N).
8. Záruka a podpora
Veise offers a minimum 1-year warranty for the Smart Deadbolt VE33A. For any product issues or questions, please contact Veise customer support:
- Online telefonická podpora: Monday to Friday, 9 AM to 5 PM PST (Lifetime support)
- After-Sales Email Service: 24/7
It is recommended to contact customer support first if you encounter any issues not covered in this manual.


