Zavedení
Thank you for choosing the GEARSTONE Foldable Magnetic Exercise Bike. This manual provides essential information for the safe assembly, operation, and maintenance of your exercise bike. Please read this manual thoroughly before use and keep it for future reference.
Důležité bezpečnostní informace
- Před zahájením jakéhokoli cvičebního programu se poraďte se svým lékařem.
- Před cvičením se vždy zahřejte a po něm se ochlaďte.
- Před každým použitím se ujistěte, že jsou všechny šrouby a matice bezpečně utažené.
- Umístěte rotoped na rovný a stabilní povrch.
- Během používání udržujte děti a domácí zvířata mimo dosah zařízení.
- Maximální nosnost tohoto kola je 120 kg (264 liber).
- Pokud pocítíte mdloby, závratě nebo bolest, okamžitě přestaňte cvičit.
- Noste vhodné oblečení a obuv na cvičení.
Obsah balení
Carefully unpack the box and ensure all parts are present. Refer to the diagram below for a visual representation of the components.

Obrázek 1: Package Contents. This image displays the various components and tools included with your exercise bike, such as the main frame, pedals, seat, backrest, and assembly tools.
Balíček by měl obsahovat:
- Sestava hlavního rámu
- Levý a pravý pedál
- Seat and Backrest
- Handlebar with LCD Monitor
- Stabilizační tyče (přední a zadní)
- Sada spojovacího materiálu (šrouby, matice, podložky)
- Montážní nářadí (klíč, imbusový klíč)
- Uživatelská příručka
Nastavení a montáž
Follow these steps to assemble your GEARSTONE Foldable Magnetic Exercise Bike. It is recommended to have two people for assembly.
- Připevnění stabilizačních tyčí: Připevněte přední a zadní stabilizační tyče k hlavnímu rámu pomocí dodaných šroubů a matic. Pro zajištění stability se ujistěte, že jsou pevně utaženy.
- Instalace pedálů: Určete levý (L) a pravý (R) pedál. Levý pedál se šroubuje proti směru hodinových ručiček a pravý pedál se šroubuje ve směru hodinových ručiček. Zašroubujte je do klik a pevně utáhněte.
- Montáž sedáku a opěradla: Insert the seat post into the main frame and adjust to your desired height. Secure it with the locking pin. Attach the backrest to the seat support.
- Připevnění řídítek a monitoru: Connect the handlebar assembly to the main frame. Ensure all cables for the LCD monitor and pulse sensors are properly connected. Secure the handlebar with the designated bolts.
- Závěrečná kontrola: Before first use, double-check all connections and ensure all bolts and nuts are tightened.

Obrázek 2: Assembly Steps. This diagram illustrates the key stages of assembling the exercise bike, from attaching the base supports to installing the seat and pedals.
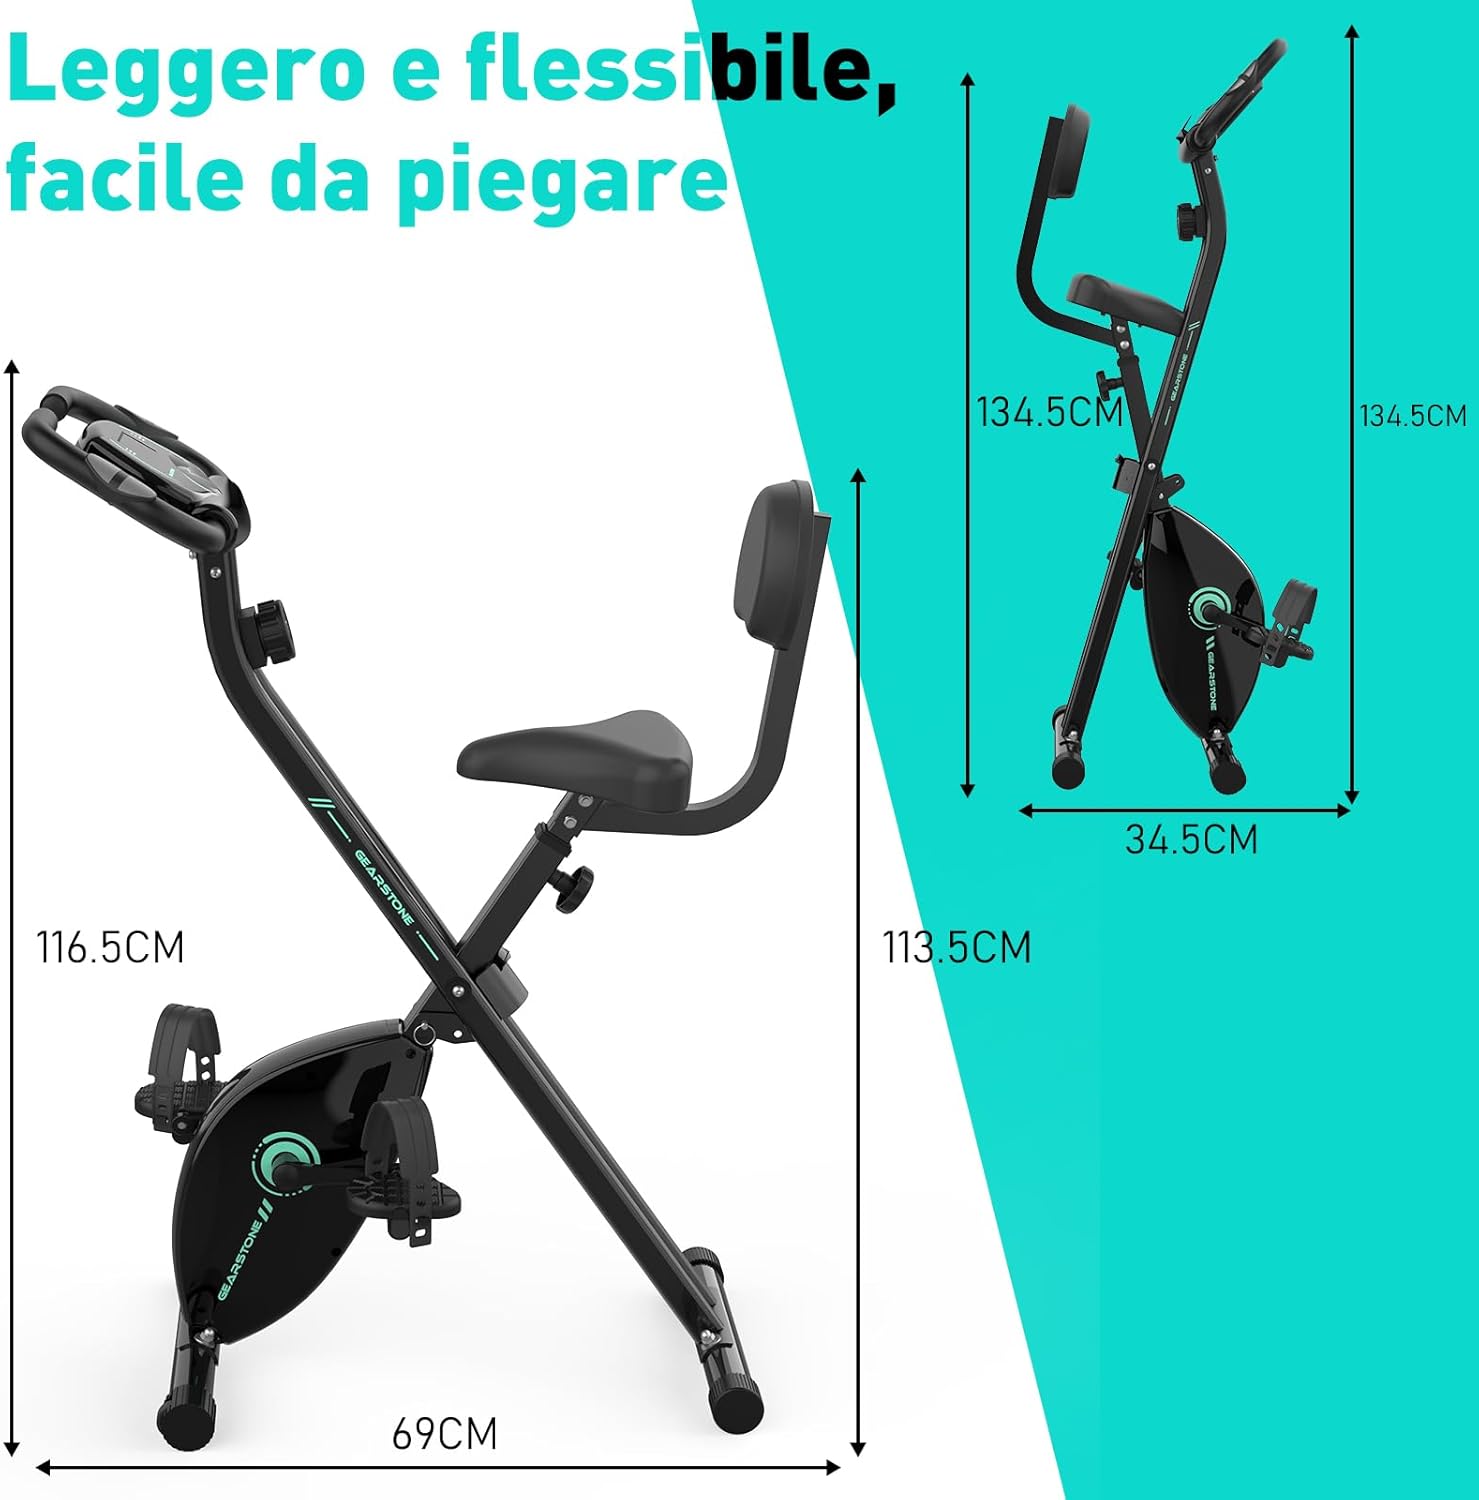
Obrázek 3: Assembled Bike Dimensions. This image shows the fully assembled exercise bike with its dimensions, highlighting its compact and foldable nature.
Návod k obsluze
Nastavení výšky sedadla
The seat height can be adjusted to five different levels to accommodate various user heights. Loosen the adjustment knob located on the seat post, slide the seat to the desired height, and then tighten the knob securely. Ensure your knees have a slight bend at the bottom of the pedal stroke.

Obrázek 4: Seat and Resistance Adjustment. This image highlights the knob for adjusting magnetic resistance and the mechanism for adjusting seat height.
Nastavení odporu
The bike features 8 levels of magnetic resistance. Turn the resistance knob, located below the LCD monitor, clockwise to increase resistance and counter-clockwise to decrease it. Start with a lower resistance and gradually increase as your fitness improves.
Používání LCD monitoru
The LCD monitor displays key workout data. It is battery-powered. The monitor automatically turns on when you start pedaling or press a button.
- SKENOVAT: Automaticky se přepíná mezi všemi funkcemi displeje každých několik sekund.
- ČAS: Zobrazuje dobu trvání vašeho tréninku.
- RYCHLOST: Zobrazuje vaši aktuální rychlost jízdy na kole.
- VZDÁLENOST: Zobrazuje ušlou vzdálenost během aktuálního tréninku.
- KALORIE: Odhaduje spálené kalorie během tréninku.
- ODOMETER (ODO): Zobrazuje celkovou nashromážděnou vzdálenost.
- PULS: Shows your heart rate when holding the pulse sensors on the handlebars.
To reset the monitor, press and hold the button for a few seconds, or remove and reinsert the batteries.

Obrázek 5: LCD Monitor Display. This image provides a detailed view of the LCD monitor and its various data display functions.

Obrázek 6: Resistance Control and Monitor Interaction. This image illustrates how to adjust the resistance level and interact with the LCD monitor's buttons.
Použití držáku telefonu
A phone holder is integrated into the LCD monitor panel. Place your smartphone or tablet securely in the holder to enjoy videos or music during your workout.
Folding the Bike for Storage
To fold the bike, loosen the main folding knob (usually located near the base of the frame). Carefully fold the frame inwards until it locks into its compact position. This design allows for easy storage and space-saving.
Údržba
- Čištění: Otřete kolo reklamouamp Po každém použití otírejte hadříkem, abyste odstranili pot a prach. Nepoužívejte abrazivní čisticí prostředky.
- Inspekce: Pravidelně kontrolujte utažení a opotřebení všech šroubů, matic a pohyblivých částí. Utáhněte všechny uvolněné upevňovací prvky.
- Mazání: The magnetic resistance system and belt drive are generally maintenance-free. Do not lubricate internal components unless specifically instructed by customer support.
- Skladování: Kolo skladujte na chladném a suchém místě mimo dosah přímého slunečního záření a extrémních teplot.
- Výměna baterie: Replace the LCD monitor batteries when the display becomes dim or unresponsive.
Odstraňování problémů
| Problém | Možná příčina | Řešení |
|---|---|---|
| Žádné zobrazení na LCD monitoru | Baterie jsou vybité nebo nesprávně nainstalované. | Vyměňte baterie nebo se ujistěte, že jsou vloženy se správnou polaritou. |
| Nepřesný odečet pulsu | Hands not firmly on sensors; sensors are dirty. | Ensure firm contact with both pulse sensors. Clean sensors with a dry cloth. |
| Kolo je nestabilní nebo se kymácí | Uvolněné šrouby; nerovný povrch. | Check and tighten all assembly bolts. Move the bike to a flat, level surface. |
| Odpor se nemění | Odporový kabel je odpojený nebo poškozený. | Inspect the resistance cable connection. If damaged, contact customer support. |
| Neobvyklý hluk během provozu | Loose parts; friction from moving components. | Check all bolts and nuts for tightness. Ensure no foreign objects are caught in moving parts. If noise persists, contact customer support. |
Specifikace
| Funkce | Detail |
|---|---|
| Název modelu | cyclette pieghevole |
| Značka | PŘEVODOVÝ KÁMEN |
| Mechanismus odporu | Magnetický |
| Úrovně odporu | 8 nastavitelné úrovně |
| Systém pohonu | Pás |
| Hlavní materiál | Steel, Metal, Foam/Leather |
| Maximální nosnost | 120 kilogramů (264 liber) |
| Rozměry produktu (D x Š x V) | 69 x 39 x 116.5 cm (27.2 x 15.4 x 45.9 palce) |
| Hmotnost položky | 15.6 kilogramů (34.4 liber) |
| Zdroj napájení (monitor) | Napájeno bateriemi (baterie nejsou součástí balení) |
| Speciální funkce | Foldable design, LCD monitor, Pulse sensors, Phone holder, Adjustable seat (5 levels) |
Záruka a podpora
GEARSTONE provides a jednoletá záruka for this product from the date of purchase. This warranty covers manufacturing defects and material faults under normal use.
If you encounter any issues with your exercise bike or have questions regarding its operation or maintenance, please do not hesitate to contact our customer support team. Provide your purchase details and a description of the issue for prompt assistance.
Kontaktujte podporu: Viz dokumentace k nákupu nebo informace od prodejce. website for the most up-to-date contact information (e.g., email address or support portal).
Další informace
For more information about GEARSTONE products and fitness tips, visit our official webstránky nebo kanály sociálních médií.


