1. Úvod
This manual provides essential information for the proper installation, operation, and maintenance of your ENDORFY Arx 500 ARGB ATX Computer Case. Please read this manual thoroughly before beginning installation to ensure optimal performance and safety.
The ENDORFY Arx 500 ARGB is a high-performance ATX computer case designed for efficient cooling and spacious component compatibility. Key features include:
- Tempered glass side panel for showcasinvnitřní součásti.
- Spacious interior for easy component installation and cable management.
- Compatibility with various radiator sizes for advanced cooling solutions.
- Airy and easily accessible front panel for optimal airflow.
- Efficient cooling design to maintain low component temperatures.
- Convenient cable management features for a clean build.
2. Bezpečnostní informace
Dodržujte prosím následující bezpečnostní opatření, abyste předešli poškození produktu nebo zranění.
- Odpojení napájení: Always disconnect the power supply from the wall outlet before installing or removing any components inside the computer case.
- Statická elektřina: Před manipulací s vnitřními součástmi noste antistatický náramek nebo se často dotýkejte uzemněného kovového předmětu, abyste vybili statickou elektřinu.
- Ostré hrany: Během instalace dávejte pozor na ostré hrany uvnitř pouzdra.
- Tvrzené sklo: Handle the tempered glass side panel with care. It is fragile and can break if dropped or subjected to impact. Place it on a soft, flat surface when removed.
- Větrání: Ensure adequate ventilation around the case to prevent overheating. Do not block air vents.
- Kontakt s kapalinou: Keep the computer case away from liquids and moisture.
3. Obsah balení
Ověřte, zda jsou v balení všechny položky. Pokud některé položky chybí nebo jsou poškozené, kontaktujte prodejce.
- ENDORFY Arx 500 ARGB ATX Computer Case
- 4 x 140 mm ARGB Fans (pre-installed)
- Accessory Box (containing screws, cable ties, and other mounting hardware)
- Uživatelská příručka (tento dokument)

Obrázek 3.1: Rozložené view showing the computer case, fans, and various panels.
4. Nastavení a instalace
Follow these steps to install your components into the ENDORFY Arx 500 ARGB case.
4.1 Příprava případu
- Odstraňte boční panely: Carefully remove the tempered glass side panel and the solid metal side panel. Place them on a soft, non-abrasive surface to prevent scratches.
- Krabice s příslušenstvím: Uvnitř pouzdra vyhledejte krabici s příslušenstvím, která obsahuje všechny potřebné šrouby a montážní materiál.
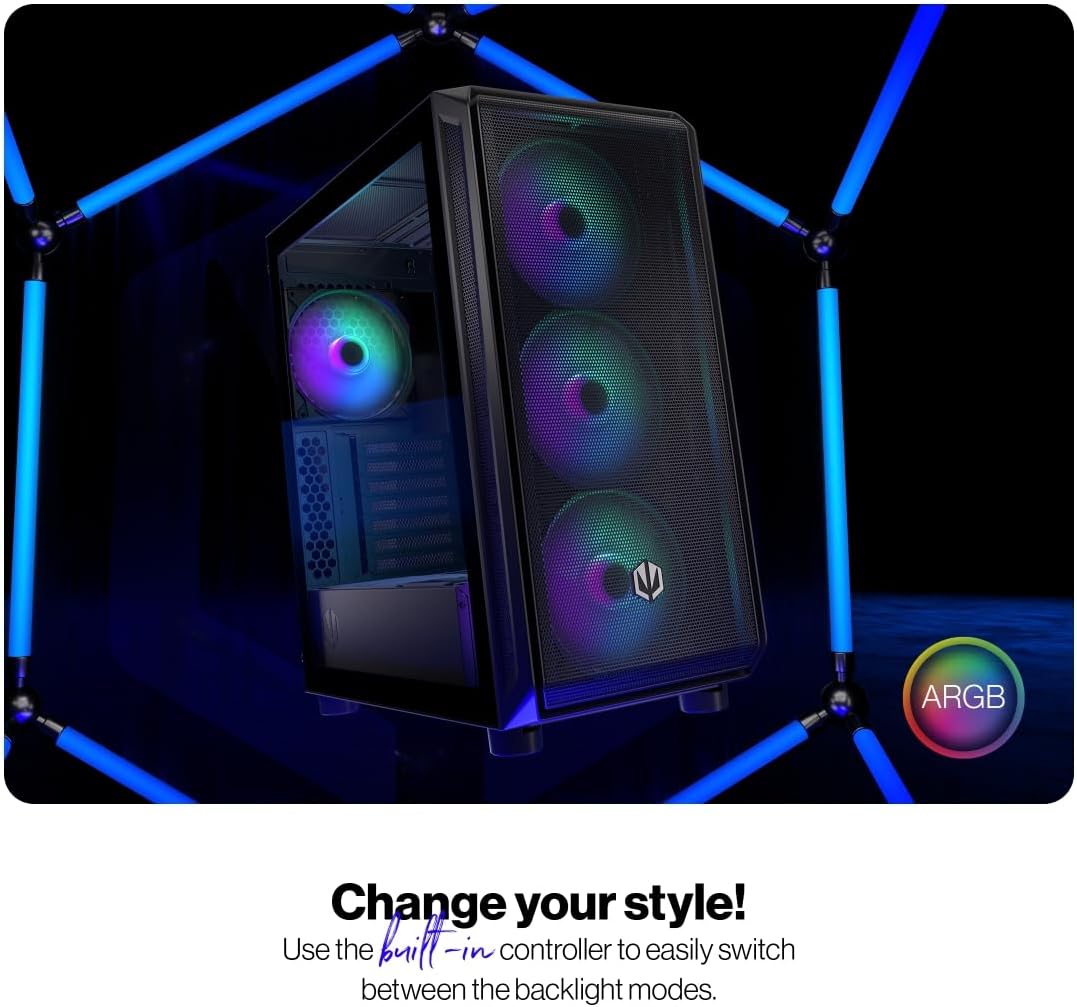
Figure 4.1: The tempered glass side panel allows for a clear view vnitřních součástí.
4.2 Instalace základní desky
- Nainstalujte Standoffs: Ensure the correct standoffs are installed for your ATX motherboard. The case supports ATX motherboards.
- Montáž základní desky: Carefully place your motherboard onto the standoffs and secure it with the provided screws.

Obrázek 4.2: Prostorný interiér poskytuje ample room for motherboard and other component installation.
4.3 Power Supply and Storage Installation
- Napájení: Install your power supply unit (PSU) into the dedicated bottom mount area. Secure it with screws from the rear of the case.
- Úložné jednotky: Install your 2.5" SSDs or 3.5" HDDs into the designated drive bays. Refer to the case's internal structure for specific mounting points.
4.4 Grafická karta a rozšiřující karty
- Odstraňte kryty slotů: Odstraňte potřebné kryty slotů PCI-E ze zadní strany skříně.
- Instalace karet: Insert your graphics card and other expansion cards into the motherboard's PCI-E slots and secure them with screws.
4.5 Cooling System (Fans and Radiators)
The case comes with 4 pre-installed 140mm ARGB fans. Additional fans or radiators can be installed for enhanced cooling.
- Kapacita ventilátoru: The case accommodates up to 7 fans.
- Kompatibilita radiátorů: The design supports various radiator sizes for liquid cooling solutions.

Figure 4.3: The case features pre-installed 140mm ARGB fans for optimal airflow.

Figure 4.4: Perforated front and top panels ensure maximum airflow and dust protection.
4.6 Správa kabelů
Utilize the dedicated cable management space and tie-down points behind the motherboard tray to route and secure cables for a clean build and improved airflow.
4.7 Připojení předního I/O panelu
Connect the front panel cables (USB, audio, power, reset, LEDs) to the corresponding headers on your motherboard. Refer to your motherboard manual for header locations.

Figure 4.5: Front I/O panel with USB-C, USB-A, headphone, microphone, reset, and power buttons/LEDs.
- Port USB-C: Connects to a USB 3.x Type-C header on your motherboard.
- Porty USB-A: Connects to USB 3.x and USB 2.0 headers on your motherboard.
- Headphones Port: Connects to the audio header on your motherboard.
- Port mikrofonu: Connects to the audio header on your motherboard.
- Resetovací tlačítko: Connects to the reset header on your motherboard.
- LED napájení: Connects to the power LED header on your motherboard.
- Storage Activity LED: Connects to the HDD LED header on your motherboard.
- Vypínač: Connects to the power switch header on your motherboard.
5. Návod k obsluze
Jakmile jsou všechny komponenty nainstalovány a připojeny, můžete systém zapnout.
- Zapnutí: Press the Power Button on the front I/O panel to turn on your computer. The Power LED will illuminate.
- Ovládání ventilátoru ARGB: The pre-installed ARGB fans can be controlled via a built-in controller or synchronized with compatible motherboard software. Use the built-in controller to switch between various backlight modes.

Figure 5.1: The ARGB fans offer customizable lighting effects, controlled via the built-in controller.
6. Údržba
Pravidelná údržba pomáhá zajistit optimální výkon a dlouhou životnost počítačové skříně a jejích součástí.
- Prachové filtry: Periodically remove and clean the dust filters located on the front, top, and bottom of the case. Use compressed air or a soft brush to remove accumulated dust.
- Čištění exteriéru: Otřete vnější povrchy pouzdra měkkým,amp hadříkem. Nepoužívejte abrazivní čisticí prostředky ani rozpouštědla.
- Čištění interiéru: With the system powered off and unplugged, use compressed air to gently remove dust from internal components and fan blades.
- Tvrzené sklo: Clean the tempered glass panel with a microfiber cloth and a glass cleaner designed for electronics.
7. Řešení problémů
If you encounter issues with your computer case, refer to the following common troubleshooting steps.
- Systém se nezapíná:
- Ujistěte se, že je zdroj napájení správně připojen k zásuvce ve zdi a zapnutý.
- Ověřte, zda jsou všechny napájecí kabely z napájecího zdroje správně připojeny k základní desce a jejím součástem.
- Zkontrolujte, zda je kabel tlačítka napájení na předním panelu správně připojen k napájecímu konektoru základní desky.
- Fans Not Spinning/ARGB Not Lighting Up:
- Ensure fan power cables are securely connected to the fan hub or motherboard headers.
- Verify ARGB cables are connected to the built-in controller or motherboard ARGB header.
- Check the built-in controller or motherboard software for fan speed and lighting settings.
- Front USB/Audio Ports Not Working:
- Confirm that the front panel USB and audio cables are correctly connected to the corresponding headers on your motherboard.
- Ensure motherboard drivers for USB and audio are installed.
If problems persist, consult your motherboard manual or contact ENDORFY customer support.
8. Specifikace
| Funkce | Detail |
|---|---|
| Značka | ENDORFY |
| Série | Arx 500 ARGB |
| Číslo modelu | EY2A011 |
| Typ pouzdra | Midi věž |
| Kompatibilita základní desky | ATX |
| Rozměry (DxŠxV) | 16.89 x 8.98 x 19.13 palce (429 x 228 x 486 mm) |
| Hmotnost položky | 16.5 libry |
| Materiál | Tvrzené sklo (boční panel) |
| Způsob chlazení | Vzduch |
| Zahrnuté ventilátory | 4 x 140 mm ARGB fans |
| Velikost ventilátoru | 140 milimetrů |
| Typ montáže napájecího zdroje | Spodní montáž |
| Přední I / O porty | 2x USB 2.0, 1x USB-C, 1x Headphone, 1x Microphone, Reset Button, Power Button |

Figure 8.1: Front dimensions (228 mm width).

Figure 8.2: Side dimensions (429 mm depth, 486 mm height).
9. Záruka a podpora
For warranty information, technical support, or further assistance, please visit the official ENDORFY webwebu nebo se obraťte na svého místního prodejce.


