Zavedení
Thank you for choosing the Jimmy Mattress Vacuum Cleaner. This manual provides essential information for the safe and efficient operation, maintenance, and troubleshooting of your new appliance. Please read it thoroughly before first use and keep it for future reference.

Image: The Jimmy Mattress Vacuum Cleaner, showcasing its sleek design and dustbin.
Důležité bezpečnostní pokyny
Při používání elektrických spotřebičů vždy dodržujte základní bezpečnostní opatření, abyste snížili riziko požáru, úrazu elektrickým proudem nebo zranění.
- Před použitím spotřebiče si přečtěte všechny pokyny.
- Nepoužívejte venku nebo na mokrém povrchu.
- Nedovolte, aby byl používán jako hračka. Při používání dětmi nebo v jejich blízkosti je nutná zvýšená pozornost.
- Používejte pouze tak, jak je popsáno v tomto návodu. Používejte pouze příslušenství doporučené výrobcem.
- Nepoužívejte s poškozeným kabelem nebo zástrčkou. Pokud spotřebič nefunguje, jak má, byl upuštěn, poškozen, ponechán venku nebo spadl do vody, vraťte jej do servisního střediska.
- Netahejte ani nepřenášejte za kabel, nepoužívejte kabel jako rukojeť, nezavírejte na kabel dvířka ani netahejte za kabel kolem ostrých hran nebo rohů. Nepřejíždějte spotřebičem přes kabel. Udržujte kabel mimo dosah horkých povrchů.
- Neodpojujte tahem za kabel. Při odpojování uchopte zástrčku, nikoli kabel.
- Nemanipulujte se zástrčkou nebo spotřebičem mokrýma rukama.
- Do otvorů nevkládejte žádné předměty. Nepoužívejte se zablokovaným otvorem; chraňte před prachem, žmolky, vlasy a vším, co by mohlo omezit proudění vzduchu.
- Udržujte vlasy, volné oblečení, prsty a všechny části těla v dostatečné vzdálenosti od otvorů a pohyblivých částí.
- Před odpojením vypněte všechny ovládací prvky.
- Při čištění na schodech dbejte zvýšené opatrnosti.
- Nepoužívejte k vysávání hořlavých nebo hořlavých kapalin, jako je benzín, ani je nepoužívejte v oblastech, kde se mohou vyskytovat.
- Nesbírejte nic, co hoří nebo kouří, jako jsou cigarety, zápalky nebo horký popel.
- The UV light will only turn on when the UV mode is activated and both micro switches are pressed. Ensure the machine is on a flat surface during use for UV light activation. The UV light automatically turns off if tilted or lifted.
- The heating function only works when the machine is in contact with the mattress. It will automatically stop heating if lifted.
Konec produktuview a Komponenty
Familiarize yourself with the main components and features of your Jimmy Mattress Vacuum Cleaner.
- Výkonné sání: 480W power and 16Kpa suction for effective dust and pet hair removal.
- Intelligent Dust Sensor: Automatically calculates dust amount, displayed by LED lights (Red: Dirty, Green: Clean).
- Technologie UV světla: 245nm UV light for allergen removal.
- Ultrazvuková technologie: Emits ultrasonic waves to assist in mite removal.
- Quick Heating Function: Heats to 140℉ (60℃) in 5 seconds to eliminate allergens.
- Dual Cyclone Filter System: Patented technology to separate dust and pet hair, reducing clogs.
- Wide Suction Port: 245mm wide for efficient large-scale cleaning.
- Dlouhý napájecí kabel: 5m (16ft) cord for extended reach.
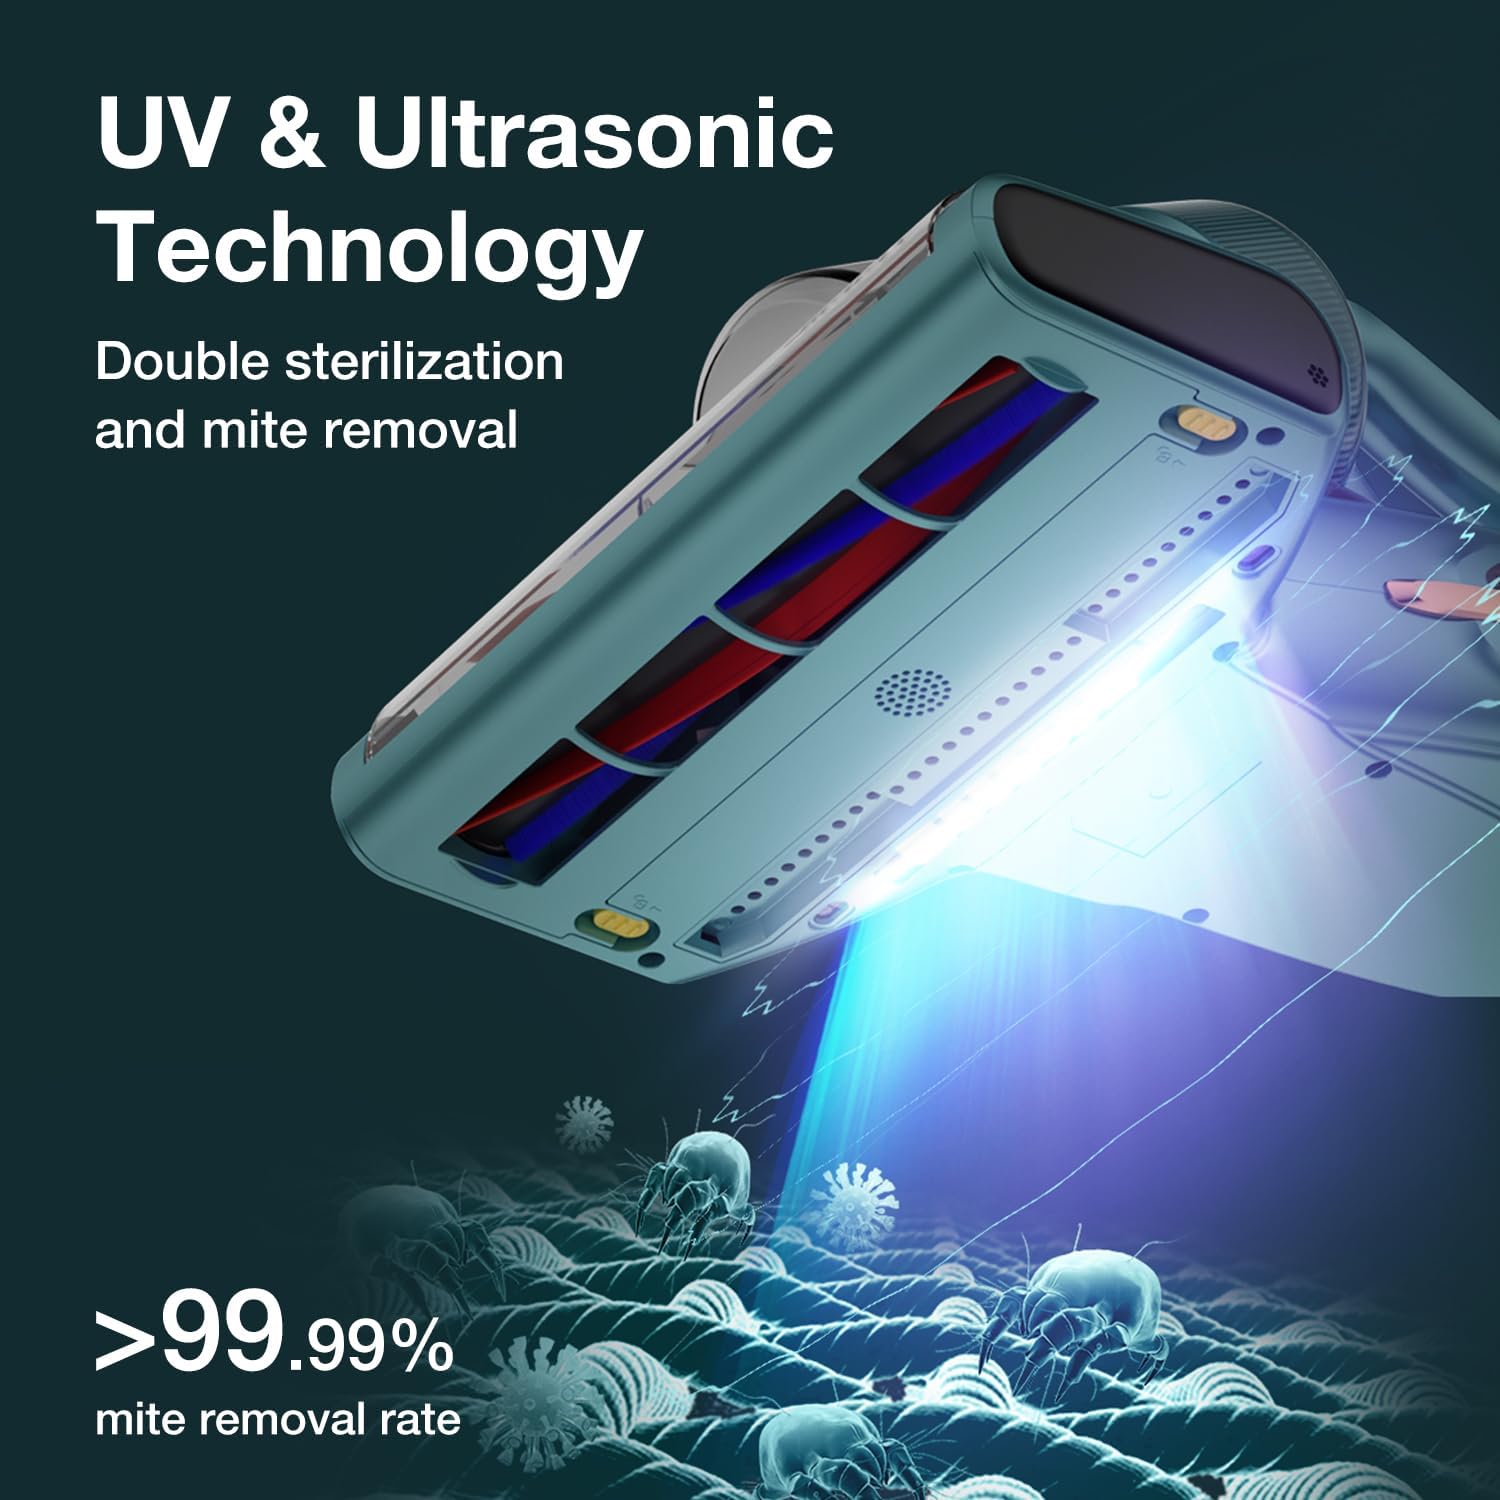
Image: Depiction of UV and Ultrasonic technology at work, showing double sterilization and mite removal.

Image: Close-up of the smart dust sensor display, indicating dust concentration with red (very dirty), red to blue (dirty), and blue (clean) lights.

Image: Illustration of the 60°C high temperature function penetrating the mattress to eliminate dust mites.

Image: Visual representation of the strong and high-frequency tapping mechanism dislodging dust mites from deep within the mattress.

Image: A hand operating the vacuum, showing the LED display screen which monitors real-time cleaning performance and indicates modes like Vacuum + UV, Vacuum + Tap, Vacuum + Tap + UV, and Cleanness indicator.

Image: Diagram illustrating the dual cyclone filtration system, which separates dust and pet hair to prevent clogging and maintain consistent vacuuming performance.

Image: Graphic showing ultrasonic waves penetrating fabric for deep cleaning, highlighting that the technology effectively cleans harmful substances without being harmful to humans.

Image: Illustration of 140°F hot wind technology deeply penetrating mattresses to provide moisture protection and make them softer, while eliminating allergens.

Image: Depiction of high-penetration UV light activating when both casters are pressed down, and turning off when lifted, ensuring safe operation.
Nastavení
Before first use, ensure all packaging materials are removed and the appliance is free from damage. Connect the power cord securely to the vacuum cleaner and a suitable power outlet.
- Vybalte všechny součásti z krabice.
- Ensure the dust cup is properly installed and locked into place.
- Check that the HEPA filter is correctly seated inside the dust cup.
- Plug the 5m (16ft) power cord into a standard electrical outlet.
Návod k obsluze
Your Jimmy Mattress Vacuum Cleaner offers multiple cleaning modes for optimal performance.
- Zapnutí: Stisknutím tlačítka napájení zapněte vysavač.
- Vyberte režim: Pomocí tlačítka pro výběr režimu můžete procházet dostupné režimy čištění:
- Vacuum + UV
- Vacuum + Tap
- Vacuum + Tap + UV
- Indikátor senzoru prachu: Observe the LED lights on the display screen:
- Červené světlo: Indicates a very dirty area with high dust concentration.
- Red to Blue Light: Indicates a dirty area.
- Modré světlo: Indicates a clean area.
- Použití UV světla: The UV light will activate only when the UV mode is selected and the vacuum head is pressed firmly against a flat surface, ensuring both micro switches are engaged. If the vacuum is lifted or tilted, the UV light will automatically turn off for safety.
- Using Heating Function: The heating function will activate when the vacuum head is in contact with the mattress and will reach 140℉ (60℃) in approximately 5 seconds. It will automatically stop heating if the machine is lifted from the surface.
- Čištění: Move the vacuum cleaner slowly and steadily across the surface (mattress, sofa, carpet) to allow the suction, tapping, UV, and heat functions to work effectively.
Údržba
Pravidelná údržba zajišťuje optimální výkon a prodlužuje životnost vašeho vysavače.
Vyprázdnění nádoby na prach
The dust cup is transparent, allowing you to easily monitor dust levels. Empty it regularly to maintain suction power.
- Ujistěte se, že je vysavač vypnutý a odpojený od sítě.
- Locate the dust cup release button and press it to detach the dust cup.
- Hold the dust cup over a trash bin and press the release button to open the bottom flap and empty the contents.
- Close the flap securely and reattach the dust cup to the vacuum cleaner until it clicks into place.

Image: A hand emptying the dust cup, demonstrating the one-click release mechanism.

Image: The dust cup and filter being rinsed under running water, indicating they are washable.
Čištění filtrů
The HEPA filter and dust cup are washable. Clean them regularly to maintain suction and filtration efficiency.
- Odstraňte protiprachový kryt, jak je popsáno výše.
- Carefully remove the HEPA filter from the dust cup.
- Rinse the dust cup and HEPA filter under running water until clean.
- Allow both the dust cup and HEPA filter to air dry completely for at least 24 hours before reassembling. Do not use the vacuum with wet filters.
Cleaning the Dust Sensor Window
If the dust sensor light is always red or green, the dust sensor windows may be dirty. Clean them to ensure accurate readings.
- Ujistěte se, že je vysavač vypnutý a odpojený od sítě.
- Locate the dust sensor windows on the underside of the vacuum head. There is one on the left and one on the right.
- Using a clean, dry cloth or cotton swab, gently wipe both dust sensor windows clean.
- After cleaning, turn on the machine and touch the dust sensor window with a non-conductive object (like a pen) to check if the dust sensor light is working properly. The light should change when the sensor is obstructed.
Image: Close-up showing the location of the dust sensor windows on the vacuum head.
Video: Demonstrates how to clean the dust sensor windows and verify their functionality. This video addresses the common issue of the dust sensor not working correctly.
Odstraňování problémů
V této části naleznete běžné problémy a jejich řešení.
| Problém | Možná příčina | Řešení |
|---|---|---|
| Vakuum se nezapíná. | Napájecí kabel není bezpečně zapojený; ze zásuvky není proud. | Zkontrolujte připojení napájecího kabelu. Vyzkoušejte zásuvku s jiným spotřebičem. |
| Nízký sací výkon. | Full dust cup; clogged filters; blocked suction port. | Empty dust cup. Clean or replace filters. Check for and remove any blockages in the suction path. |
| Dust sensor light always red or green. | Dust sensor windows are dirty. | Clean the dust sensor windows on both sides of the vacuum head as described in the Maintenance section. |
| UV světlo se neaktivuje. | UV mode not selected; vacuum not on a flat surface; micro switches not pressed. | Ensure UV mode is selected. Press the vacuum head firmly against the surface to engage both micro switches. |
| Funkce vytápění nefunguje. | Vacuum not in contact with the mattress. | Ensure the vacuum head is firmly pressed against the mattress surface. The heating function is designed to only work when in contact. |
Specifikace
| Funkce | Detail |
|---|---|
| Značka | Jimmy |
| Název modelu | BX7 Pro |
| Speciální funkce | Bezsáčkové |
| Typ filtru | HEPA filtr |
| Je Cordless? | Žádný |
| Maximální sání | 16Kpa |
| Doporučená použití | Bed, Carpet, Sofa |
| Form Factor | Ruční |
| Barva | Modrý |
| Rozměry produktu | 16.14 cm D x 12.99 cm Š x 9.84 cm V |
| Ampvymazat | 4 Amps |
| Výkon motoru | 480 wattů |
| Kontrolní metoda | Dotykové / stiskací tlačítko |
| Počet úrovní výkonu | 3 |
| Hmotnost položky | 8.68 libry |
Záruka a podpora
For warranty information, product support, or to inquire about replacement parts, please refer to the official Jimmy webnebo se obraťte přímo na jejich zákaznický servis. Uschovejte si účtenku jako doklad o koupi pro případ reklamace.
As per manufacturer information, a new machine replacement or refund is offered for any quality problem within 1 year. Beyond 1 year, contact support for parts or repair.


