1. Konec produktuview
The SwitchBot Smart Switch Pusher (Model: SwitchBot-S1) is a compact device designed to automate existing light switches and other button-operated appliances. It provides a simple, no-wiring solution to integrate your traditional devices into a smart home ecosystem, allowing for app control, remote operation, and voice commands when paired with a SwitchBot Hub Mini.

Image: The SwitchBot Smart Switch Pusher (Bot) shown alongside the SwitchBot Hub Mini and a smartphone displaying the control app. The Bot is a small white cube with a movable arm.
2. Co je v krabici
- SwitchBot Smart Switch Pusher (Bot)
- Uživatelská příručka
- Extra 3M Adhesive Stickers
- Fish Line (for pull mode on rocker switches)
- SwitchBot Hub Mini (if purchased as a bundle, otherwise sold separately)
- Micro USB to USB-A Cable (for Hub Mini)
3. Nastavení a instalace
3.1 Initial Setup (App Pairing)
- Stáhněte si aplikaci SwitchBot z obchodu s aplikacemi ve vašem zařízení.
- Vytvořte si účet nebo se přihlaste.
- Klepnutím na ikonu „+“ v pravém horním rohu aplikace přidáte nové zařízení.
- Select 'Bot' from the list of devices.
- Follow the on-screen instructions to pair your SwitchBot Bot via Bluetooth. Ensure your phone is close to the Bot during pairing.
- Po spárování můžete svého bota pojmenovat a přiřadit ho do místnosti.
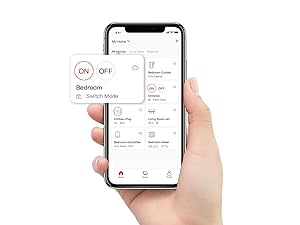
Image: A smartphone screen displaying the SwitchBot app, showing a list of connected devices and options for adding new ones. This illustrates the app interface for device management.
3.2 Fyzická instalace
The SwitchBot Bot can be installed in two primary modes: Stiskněte tlačítko Mode for push buttons and Přepnout režim for rocker switches. It is compatible with most standard rocker switches and push buttons. It is generally not suitable for classic toggle switches.

Image: A visual guide illustrating which types of light switches are compatible (rocker, push-button) and incompatible (classic toggle) with the SwitchBot Bot.
3.2.1 Press Mode (for Push Buttons)
- Clean the surface where the Bot will be attached.
- Peel off the protective film from the 3M adhesive on the back of the Bot.
- Align the Bot so its arm is directly above the button you wish to press. Ensure the Bot is positioned firmly and securely.
- Press firmly for 30 seconds to ensure good adhesion. Allow 24 hours for optimal bond strength.
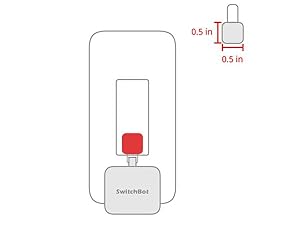
Image: A diagram illustrating the SwitchBot Bot positioned above a push button, ready to operate in "Press Mode".
3.2.2 Switch Mode (for Rocker Switches)
- For rocker switches, attach the included fish line accessory to the Bot's arm.
- Clean the surface around the switch.
- Peel off the protective film from the 3M adhesive on the back of the Bot.
- Position the Bot below the rocker switch. The fish line should loop around the bottom of the rocker switch.
- Ensure the Bot is securely attached and the fish line allows for full movement of the switch.
- In the SwitchBot app, change the Bot's mode to 'Switch Mode' in the settings.
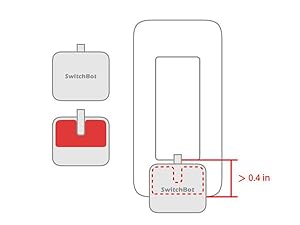
Image: A diagram illustrating the SwitchBot Bot installed on a rocker switch using the included fish line accessory for "Switch Mode".
4. Operating the SwitchBot Bot
4.1 Ovládání aplikace
Once paired, you can control the SwitchBot Bot directly from the SwitchBot app. Simply tap the ON/OFF button next to the Bot's name in the device list to activate it. The app also allows for advanced settings and customization.

Image: A hand holding a smartphone showing the SwitchBot app interface, which allows for remote control of various SwitchBot devices, including the Bot.
4.2 Remote Control (Requires SwitchBot Hub Mini)
For remote control outside of Bluetooth range, or to integrate with smart home platforms, a SwitchBot Hub Mini (sold separately) is required. Once the Hub Mini is set up and connected to your Wi-Fi network, the Bot can be controlled from anywhere via the internet.

Image: A visual representation of how the SwitchBot Bot can be controlled remotely through the SwitchBot Hub Mini, connecting the device to cloud services.
4.3 Voice Control (Requires SwitchBot Hub Mini)
With the SwitchBot Hub Mini, the Bot can be integrated with popular voice assistants like Amazon Alexa, Google Home, and IFTTT. This allows for hands-free control of your devices.
- Link your SwitchBot account to your preferred voice assistant app (e.g., Alexa app).
- Objevte zařízení v aplikaci hlasového asistenta.
- Use voice commands such as "Alexa, turn on the light" or "Hey Google, activate coffee maker."

Image: A bedroom scene showing an Amazon Echo Dot on a nightstand, with a speech bubble indicating a voice command to turn on the light, demonstrating voice control via the SwitchBot Hub Mini.
4.4 Scheduling and Custom Modes
The SwitchBot app allows you to set schedules for your Bot to activate automatically at specific times. You can also create custom modes for more complex actions, such as pressing a button for a specific duration (0-60 seconds) or performing multiple actions in sequence.
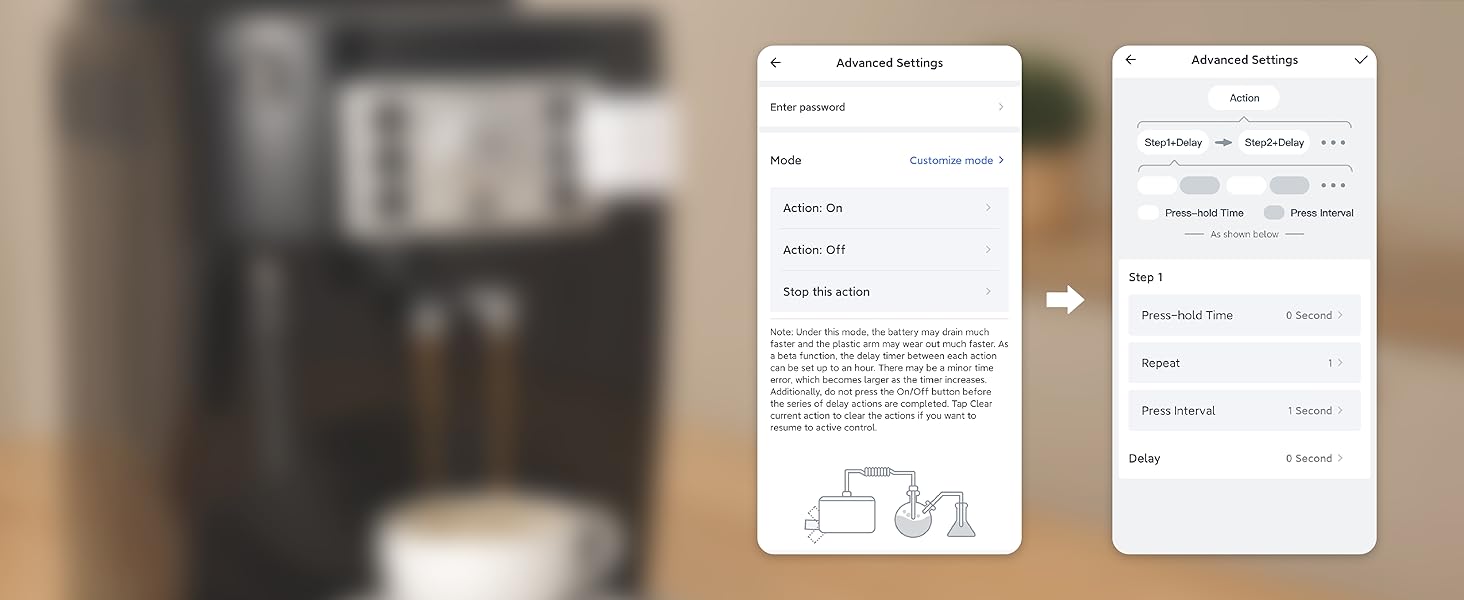
Image: A coffee machine with a SwitchBot Bot attached, and a smartphone screen showing the scheduling interface within the SwitchBot app, allowing users to set automated routines.
5. Údržba
The SwitchBot Bot is powered by a CR2 battery, which typically lasts for approximately 600 days (about 20 months) with average use. The app will notify you when the battery level is low. To replace the battery, gently open the Bot's casing a vložte novou baterii CR2 a dbejte na správnou polaritu.
Keep the device clean and free from dust. If re-attaching the Bot, ensure the surface is clean and dry for optimal adhesive performance. Replacement 3M adhesive stickers are included in the package.
6. Řešení problémů
- Bot not responding: Ensure the battery is not depleted. Check Bluetooth connection (if controlling directly) or Wi-Fi connection of the Hub Mini (if controlling remotely). Restart the app and/or the Bot.
- Bot not sticking: Ensure the surface is clean, dry, and smooth. Apply firm pressure for 30 seconds during installation and allow 24 hours for the adhesive to fully cure. Use a fresh 3M adhesive sticker if re-installing.
- Switch/Button not fully activated: Adjust the position of the Bot to ensure the arm has a clear path and sufficient travel to fully press the button or flip the switch. For rocker switches, ensure the fish line is correctly looped and taut. Adjust "Press hold time" in app settings if a longer press is needed.
- Problémy s připojením k Hub Mini: Ensure the Hub Mini is powered on and connected to your Wi-Fi network. Check router settings for any interference or firewall restrictions.
7. Specifikace
| Funkce | Detail |
|---|---|
| Číslo modelu | SwitchBot-S1 |
| Rozměry produktu | 3.58 x 1.34 x 7.48 palce; 5.29 unce |
| Zdroj napájení | 1 lithiová kovová baterie (součástí balení) |
| Protokol připojení | Bluetooth (direct), Wi-Fi (via Hub Mini) |
| Kontrolní metoda | App, Remote, Voice (via Hub Mini) |
| Compatible Assistants | IFTTT, Google Assistant, Amazon Alexa (via Hub Mini) |
8. Záruka a podpora
For detailed warranty information and technical support, please refer to the official SwitchBot website or contact their customer service. A digital version of the user manual is also available for download at tento odkaz.


