1. Úvod
The ASUS ROG STRIX X670E-A GAMING WIFI motherboard is engineered to deliver exceptional performance and style for high-end AMD Ryzen™ 9000, 8000, and 7000 Series processors. Its design features a black PCB with contrasting white accents and silver heatsinks, highlighting its premium power delivery capabilities. This motherboard incorporates exclusive ROG overclocking utilities, supports PCIe 5.0, and is compatible with DDR5 memory, providing a robust foundation for a tailored gaming and high-performance computing experience.
2. Co je v krabici
Po otevření balení najdete následující součásti:

Obraz: The image displays the ASUS ROG Strix X670E-A Gaming WiFi motherboard alongside its packaging and included accessories. These accessories typically include the WiFi 6E antenna, user manual, ROG Strix stickers, a thank you card, SATA cables, and a spare M.2 thermal pad, all essential for setup and customization.
- ASUS ROG Strix X670E-A Gaming WiFi Motherboard
- Anténa WiFi 6E
- Uživatelská příručka
- ROG Strix Stickers & Thank You Card
- SATA kabely
- Náhradní tepelná podložka M.2
3. Klíčové vlastnosti
- Patice AMD AM5 (LGA 1718): Designed for AMD Ryzen 7000 Series Desktop Processors, ensuring compatibility with the latest generation of AMD CPUs.
- Robustní řešení napájení: Nabízí týmovou sílu 16+2tages with 8+8 pin ProCool II power connectors, high-quality alloy chokes, and durable capacitors to support multi-core processors and stable power delivery.
- Optimalizovaný tepelný design: Equipped with massive VRM heatsinks, an integrated aluminum I/O cover, a high-conductivity thermal pad, four onboard M.2 heatsinks, and one M.2 backplate for the M.2_1 slot, ensuring efficient heat dissipation.
- Technologie přetaktování: Includes Dynamic OC Switcher, Ryzen Core Flex, and PBO Enhancement for advanced performance tuning. Bundled with a 60-day free trial of AIDA64 Extreme and an intuitive UEFI BIOS dashboard for comprehensive system control.
- Vysoce výkonné sítě: Integrated Onboard WiFi 6E, Intel 2.5 Gb Ethernet, and ASUS LANGuard provide fast and reliable network connectivity for gaming and data transfer.
4. Průvodce nastavením
4.1. Kontrolní seznam před instalací
- Ensure you have all necessary components: CPU, RAM, storage (M.2 SSDs recommended), power supply, graphics card (if not using integrated graphics), and a compatible PC case.
- Gather tools: Phillips head screwdriver, anti-static wrist strap (recommended).
- Read the full manual before beginning installation.
4.2. Základní deska přesview: Built for Speed and Expansion
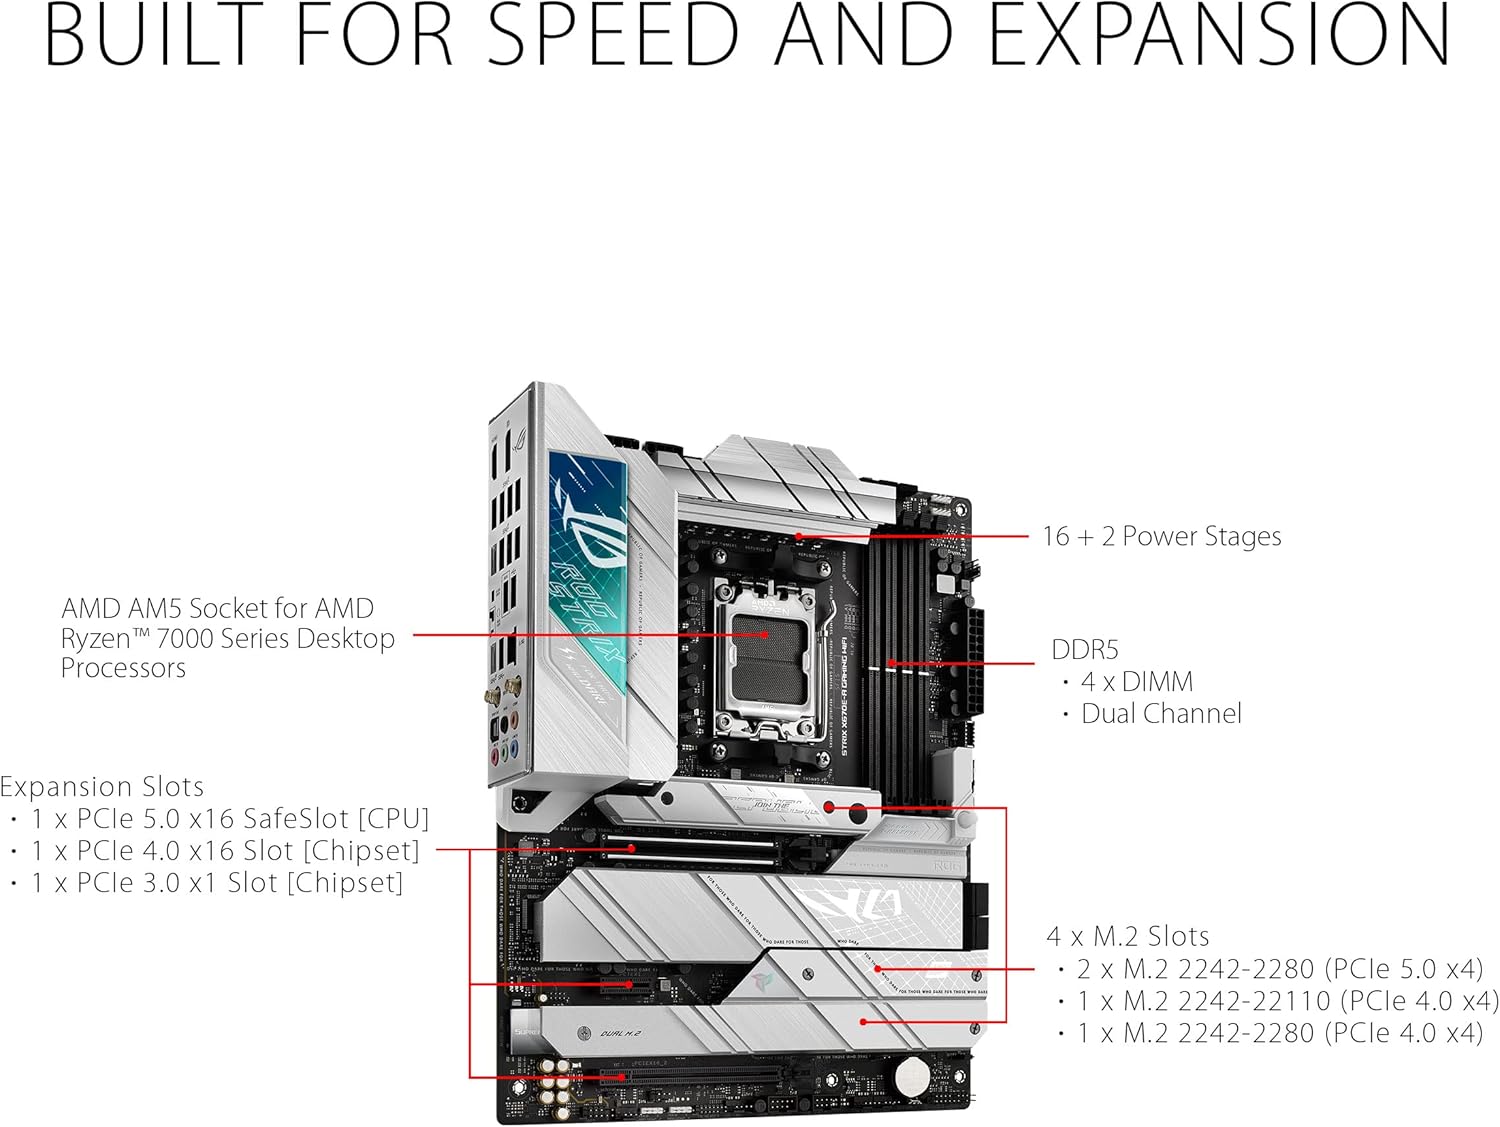
Obraz: This diagram illustrates the layout of the ASUS ROG Strix X670E-A Gaming WiFi motherboard, emphasizing its core components for performance and expandability. It points out the AMD AM5 Socket for Ryzen 7000 Series processors, the robust 16+2 power stages, four DDR5 DIMM slots for dual-channel memory, and multiple M.2 slots (PCIe 5.0 and 4.0) for high-speed storage. Additionally, it highlights the PCIe 5.0 x16 SafeSlot for the CPU and PCIe 4.0 x16 and x1 slots for chipset-based expansion.
Familiarize yourself with the motherboard's layout, including the CPU socket, DDR5 memory slots, PCIe 5.0 and 4.0 expansion slots, and the four M.2 slots for high-speed storage. The 16+2 power stages ensure stable power delivery for demanding components.
4.3. Instalace procesoru
- Opatrně otevřete páčku patice procesoru.
- Align the CPU with the socket, ensuring the triangle marker on the CPU matches the one on the socket.
- Opatrně vložte procesor do patice. Netlačte na něj silou.
- Zavřete páčku patice procesoru, abyste zajistili procesor.
4.4. Instalace paměti (RAM)
- Otevřete klipy na obou koncích slotů DDR5 DIMM.
- Zarovnejte zářez na paměťovém modulu se zářezem ve slotu DIMM.
- Pevně zatlačte na oba konce paměťového modulu, dokud klipsy nezacvaknou na místo.
- For optimal performance, install memory modules in the recommended dual-channel configuration (refer to your specific memory kit's instructions or the motherboard manual for slot priority).
4.5. Instalace úložiště (M.2 SSD)

Obraz: This image demonstrates the process of installing an M.2 Solid State Drive onto the motherboard. It shows the M.2 slot, often covered by a heatsink, and the necessary steps to remove the heatsink, insert the M.2 drive, and then re-secure the heatsink for optimal thermal performance.
- Locate the M.2 slots. Some slots may be covered by heatsinks.
- Unscrew and remove the M.2 heatsink (if present).
- Vložte disk M.2 SSD do slotu pod mírným úhlem.
- Gently push down the M.2 SSD and secure it with the provided screw or Q-Latch mechanism.
- Reattach the M.2 heatsink, ensuring proper contact with the thermal pad.
4.6. Instalace grafické karty (GPU)
- Locate the primary PCIe 5.0 x16 slot (usually the top one).
- Otevřete pojistku na konci slotu.
- Zarovnejte grafickou kartu se slotem a pevně ji zatlačte, dokud nezacvakne na místo.
- Připevněte grafickou kartu k skříni počítače pomocí šroubů.
4.7. Připojení napájení
- Připojte 24pinový ATX napájecí konektor ze zdroje k základní desce.
- Connect the 8+8 pin ProCool II CPU power connectors to the motherboard.
- Connect SATA power cables to your SATA storage devices (if any).
4.8. Front Panel & Peripheral Connections
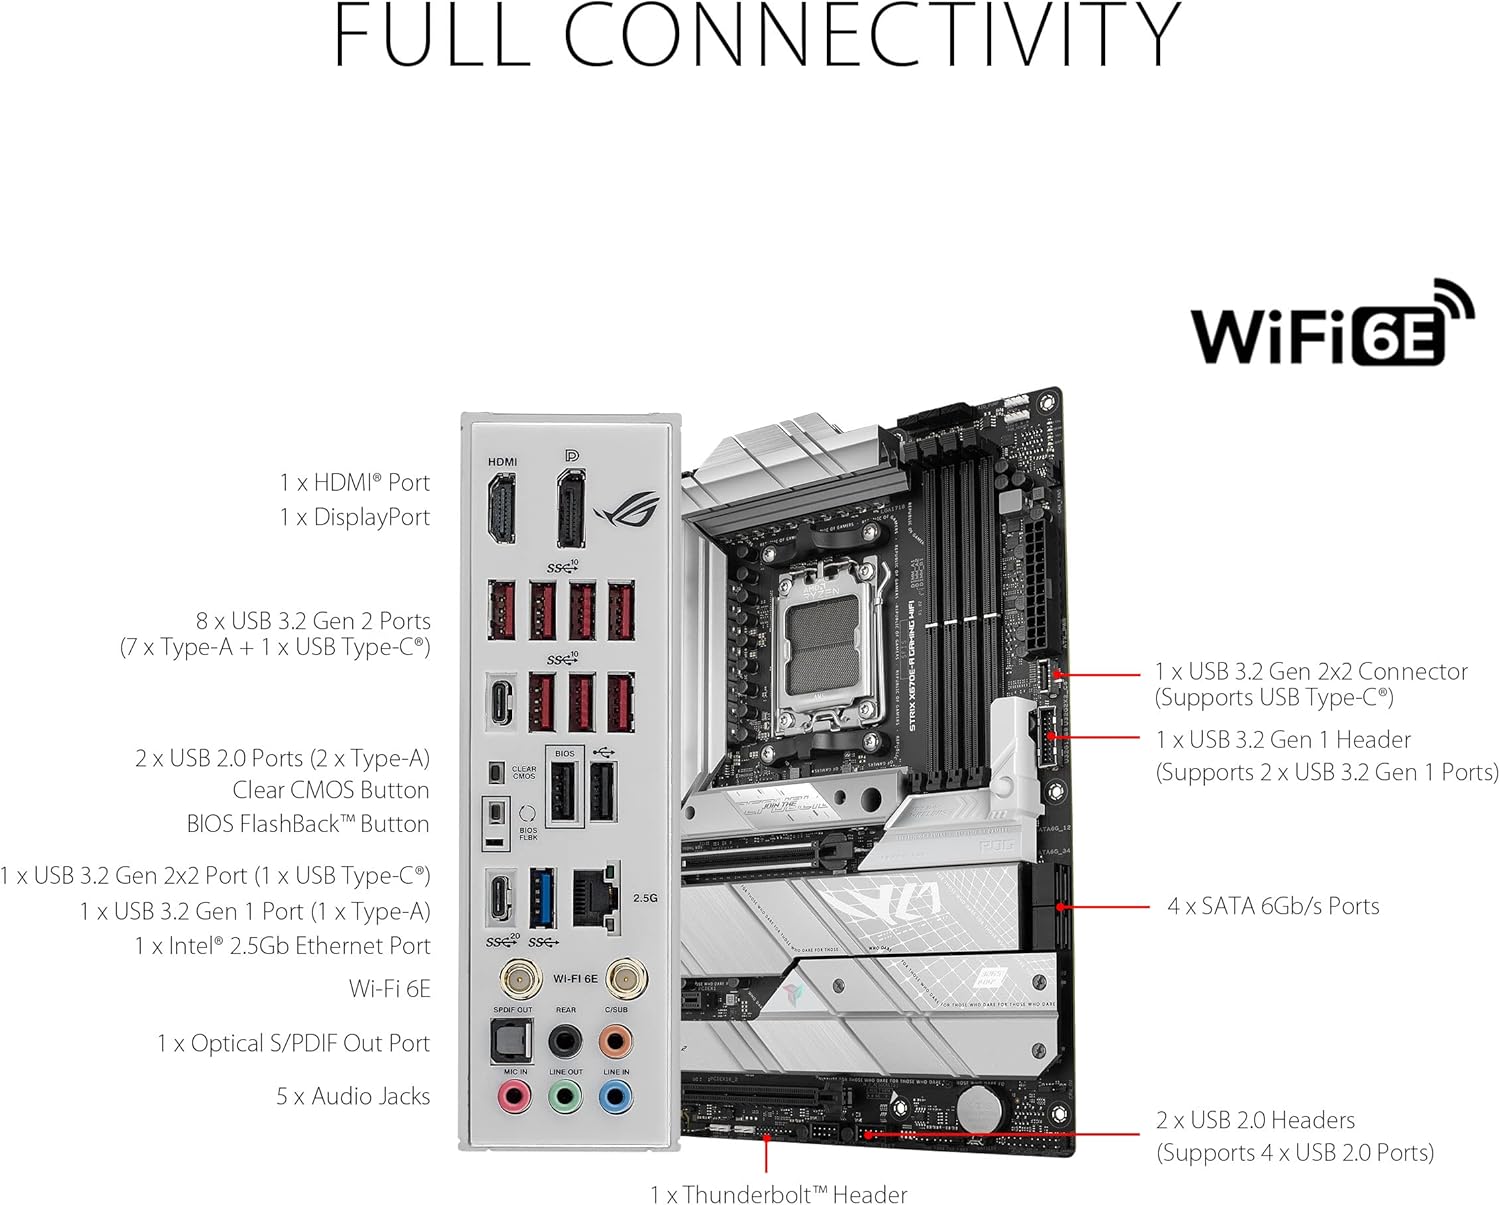
Obraz: Tento obrázek poskytuje detailní view of the rear I/O panel of the ASUS ROG Strix X670E-A Gaming WiFi motherboard, illustrating its comprehensive connectivity options. It highlights multiple USB ports, including USB 3.2 Gen 2x2 (Type-C), USB 3.2 Gen 2 (Type-A and Type-C), and USB 2.0. Display outputs include HDMI and DisplayPort. Networking is handled by an Intel 2.5 Gb Ethernet port and WiFi 6E antenna connectors. Audio connectivity is provided by an optical S/PDIF out port and five audio jacks. Internal headers for additional USB 3.2 Gen 2x2, USB 3.2 Gen 1, and USB 2.0 are also indicated.
- Connect your case's front panel connectors (power button, reset button, HDD LED, power LED) to the appropriate headers on the motherboard.
- Connect USB 2.0, USB 3.2 Gen 1, and USB 3.2 Gen 2x2 front panel headers.
- Connect the audio front panel header.
- Install the WiFi 6E antenna to the rear I/O panel connectors.
5. Návod k obsluze
5.1. První spuštění a nastavení BIOSu
- After assembling your PC, connect a monitor, keyboard, and mouse.
- Zapněte systém. Stiskněte tlačítko DEL or F2 key repeatedly during startup to enter the UEFI BIOS.
- In the BIOS, set the correct date and time, enable XMP/EXPO for your DDR5 memory (if applicable), and configure boot order.
- Save changes and exit the BIOS. Your system will restart.
5.2. Instalace operačního systému
Vložte instalační médium operačního systému (USB disk nebo DVD) a postupujte podle pokynů na obrazovce k instalaci preferovaného operačního systému.
5.3. Instalace ovladače
After OS installation, install the latest drivers for your motherboard chipset, audio, LAN, WiFi, and any other components. Drivers can be found on the ASUS support webweb pro váš konkrétní model.
5.4. Thermal Control

Obraz: This image focuses on the thermal management features of the ASUS ROG Strix X670E-A Gaming WiFi motherboard. It clearly labels the VRM Heatsinks, three M.2 Heatsinks, and the Chipset Heatsink, all designed to dissipate heat from critical components. Additionally, it indicates the AIO Pump Header for liquid cooling solutions and five 4-pin PWM Chassis Fan Headers, providing extensive control over system cooling.
The motherboard features extensive thermal solutions including VRM heatsinks, M.2 heatsinks, and a chipset heatsink. Utilize the 5x 4-pin PWM Chassis Fan Headers and the AIO Pump Header to manage your system's cooling effectively. Fan curves can be adjusted in the UEFI BIOS or through ASUS software like Armoury Crate.
5.5. Audio Visual Experience

Obraz: This image highlights the audio and visual customization capabilities of the ASUS ROG Strix X670E-A Gaming WiFi motherboard. It points out the SupremeFX ALC4080 CODEC paired with a Savitech SV3H712 AMP, detailing features like impedance sensing, high SNR playback and recording, and SupremeFX shielding. Software enhancements like Sonic Studio III, Sonic Radar III, DTS Sound Unbound, and Two-Way AI Noise Cancellation are also noted. For visual customization, it shows the Aura Lighting zones and the presence of three 3-pin Addressable Gen 2 RGB Headers and one 4-pin Aura RGB Header for connecting RGB devices.
Experience high-fidelity audio with the SupremeFX ALC4080 CODEC and Savitech SV3H712 AMP. Customize your system's aesthetics using Aura Lighting and connect compatible RGB devices to the onboard 3-pin Addressable Gen 2 RGB Headers and 4-pin Aura RGB Header.
6. Technické specifikace
| Funkce | Specifikace |
|---|---|
| Značka | ASUS |
| Série | ROG STRIX X670E-A HERNÍ WIFI |
| Číslo modelu položky | ROG STRIX X670E-A HERNÍ WIFI |
| Hardwarová platforma | PC |
| Zásuvka CPU | LGA 1718 |
| Kompatibilní procesory | AMD 7000 Series Desktop Processors (Ryzen 9000, 8000, 7000) |
| Typ čipové sady | AMD X670 |
| Technologie paměti RAM | DDR5 |
| Rychlost paměti | Až 6400 MHz (přetaktování) |
| Kapacita paměti | 64 GB (Max supported) |
| Bezdrátový typ | 802.11a/b/g/n/ac, 802.11ax (WiFi 6E) |
| Ethernet | Intel 2.5Gb Ethernet |
| USB porty | USB 3.2 Gen 2x2, USB 3.2 Gen 2, USB 2.0 |
| Rozměry produktu (DxŠxV) | 10.8 x 2.8 x 13.3 palce |
| Hmotnost položky | 4.9 libry |
| Barva | BLACK (with white accents) |
| svtage | 12 voltů |
7. Řešení problémů
7.1. Žádné napájení / Žádné spuštění
- Zkontrolujte připojení napájení: Ensure the 24-pin ATX and 8+8 pin CPU power connectors are securely seated on the motherboard.
- Test napájecího zdroje: Verify your power supply is functioning correctly.
- Připojení předního panelu: Double-check that the power button header is correctly connected.
- Minimální bootování: Remove all non-essential components (GPU, extra storage, etc.) and try booting with only CPU, one RAM stick, and necessary power connections.
7.2. Žádný displej
- Připojení monitoru: Ensure your monitor is connected to the graphics card (or motherboard if using integrated graphics) and is powered on.
- Osazení grafické karty: Reseat the graphics card firmly in its PCIe slot.
- Sedadla RAM: Reseat all RAM modules. Incorrectly seated RAM is a common cause of no display.
- Reset BIOSu: Clear the CMOS by removing the CMOS battery for 5-10 minutes or using the Clear CMOS button/jumper (refer to motherboard manual).
7.3. Instability / Crashes
- Aktualizace BIOSu: Ensure your BIOS is updated to the latest stable version.
- Problémy s ovladači: Install the latest drivers for all components from the ASUS support webmísto.
- Přetaktování: If you have overclocked your CPU or RAM, revert to default settings to check for stability.
- Thermal Throttling: Monitor CPU and GPU temperatures. Ensure adequate cooling and proper application of thermal paste.
7.4. Network Connectivity Issues (WiFi/LAN)
- Instalace ovladače: Ensure WiFi and LAN drivers are correctly installed.
- Připojení antény: For WiFi, ensure the antenna is securely connected to the rear I/O ports.
- Kontrola kabelu: For LAN, verify the Ethernet cable is properly connected to both the motherboard and your router/modem.
- Router/Modem Restart: Restartujte síťové zařízení.
8. Údržba
- Odstranění prachu: Pravidelně čistěte prach ze skříně počítače a komponent základní desky pomocí stlačeného vzduchu. Před čištěním se ujistěte, že je systém vypnutý a odpojený od sítě.
- Aktualizace BIOSu: Pravidelně kontrolujte podporu ASUS website for BIOS updates. Updates can improve stability, performance, and add support for new hardware.
- Aktualizace ovladačů: Keep your chipset, audio, LAN, and other drivers updated to ensure optimal performance and compatibility.
- Správa kabelů: Ensure cables inside your PC case are neatly managed to improve airflow and prevent obstruction.
- Teplovodní pasta: If you replace your CPU cooler, reapply thermal paste to the CPU.
9. Záruka a podpora
This ASUS ROG Strix X670E-A Gaming WiFi motherboard comes with a manufacturer's warranty. Please refer to the warranty card included in your product packaging for specific terms, conditions, and duration. For technical support, driver downloads, and further assistance, please visit the official ASUS support webmísto:
Oficiální podpora ASUSu Webmísto
When contacting support, please have your product model number (ROG STRIX X670E-A GAMING WIFI) and serial number ready.


