1. Úvod
This manual provides instructions for the YAOHUIMI Replacement Remote Control, designed for use with various Fujitsu AC Air Conditioner models. This remote control offers essential functions for managing your air conditioning unit.
Důležitá poznámka:
This is a replacement remote control and is not a universal remote. Please verify compatibility with your specific Fujitsu air conditioner model or original remote control model before use. Refer to the compatibility list below.
1.1 Kompatibilita
This remote control is compatible with a wide range of Fujitsu AC Air Conditioner models and remote control models, including but not limited to:
- Fujitsu AC Models: ASYG07KETA, ASYG07KETA-B, ASYG09KETA, ASYG09KETA-B, ASYG12KETA, ASYG12KETA-B, ASYG14KETA, ASYG14KETA-B, ASHG14KGTA, ASYG12KMTA, and many others listed in the product description.
- Original Remote Control Models: AR-RED1U, AR-REF1U, AR-REG1U, AR-REM1U, AR-REY1U, AR-REA1E, AR-REA2E, AR-REB1E, AR-REB2E, AR-REF1E, AR-REF2E, AR-REF3E, AR-REF4E, AR-REJ1E, AR-REM1E, AR-REM2E, AR-REM3E, AR-REM4E, AR-REM5E, AR-REM6E, AR-REM7E, AR-REW1E, AR-REW2E, AR-REW3E, AR-REW4E.
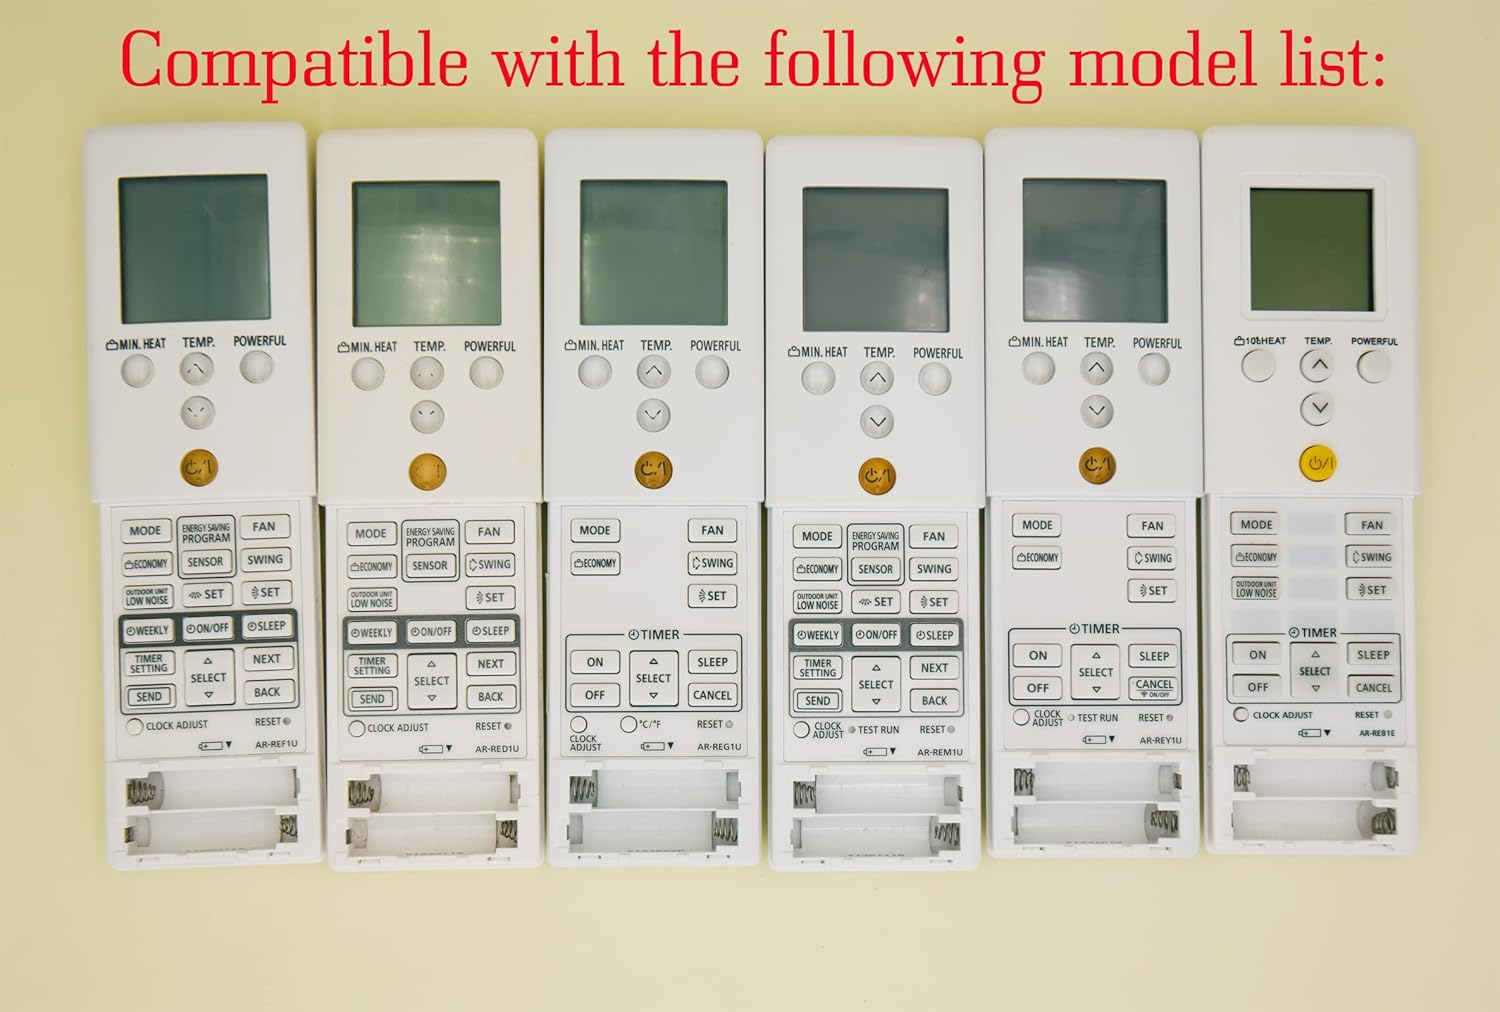
Image 1.1: Various compatible remote control models.
2. Nastavení
2.1 Instalace baterie
To begin using your remote control, you must install batteries. The remote requires two AAA batteries (not included).
- Najděte kryt prostoru pro baterie na zadní straně dálkového ovladače.
- Posuňte kryt dolů nebo stiskněte západku (pokud je k dispozici) a otevřete přihrádku.
- Vložte dvě baterie typu AAA a ujistěte se, že kladný (+) a záporný (-) pól správně shodují s označením uvnitř přihrádky.
- Zasuňte kryt přihrádky na baterie zpět na místo, dokud bezpečně nezacvakne.
Pozor:
- Nekombinujte staré a nové baterie.
- Nekombinujte alkalické, standardní (uhlíkovo-zinkové) nebo dobíjecí (nikl-kadmiové) baterie.
- Pokud dálkový ovladač nebudete delší dobu používat, vyjměte baterie, abyste zabránili vytečení.

Obrázek 2.1: Zadní strana view dálkového ovladače s přihrádkou na baterie.
3. Návod k obsluze
This section details the functions of the buttons on your replacement remote control.

Obrázek 3.1: Konecview tlačítek dálkového ovladače.
3.1 Základní funkce
- Power Button (⑁/⑀): Press to turn the air conditioner ON or OFF. This button is typically yellow and located centrally.
- Tlačítko MODE: Cycles through operating modes such as AUTO, COOL, DRY, FAN, and HEAT.
- Tlačítka TEMP. (▲/▼): Adjusts the desired temperature setting. Press ▲ to increase and ▼ to decrease the temperature.
- Tlačítko FAN: Upravuje rychlost ventilátoru (např. Automaticky, Nízká, Střední, Vysoká).
- Tlačítko SWING: Activates or deactivates the air swing function, which moves the air outlet louvers.

Obrázek 3.2: Detailní view tlačítek dálkového ovládání.
3.2 Pokročilé funkce
- MIN. HEAT Button: Activates a minimum heat setting, often used to prevent freezing in unoccupied rooms.
- Tlačítko VÝKONNÝ: Engages a powerful operation mode for rapid cooling or heating.
- ENERGY SAVING PROGRAM Button: Activates a pre-set energy-saving mode.
- Tlačítko SENSOR: May activate a temperature sensor function within the remote itself.
- Tlačítko ECONOMY: Engages an economic operation mode to reduce power consumption.
- OUTDOOR UNIT LOW NOISE Button: Reduces the noise level of the outdoor unit.
- WEEKLY Button: Accesses weekly timer settings.
- ON/OFF Button (Timer): Nastavuje časovač ZAP/VYP pro plánovaný provoz.
- Tlačítko SLEEP: Activates sleep mode, which adjusts temperature gradually for comfortable sleep.
- TIMER SETTING Button: Used to configure various timer functions.
- SELECT (▲/▼) Button: Used for navigating and selecting options within timer or program settings.
- Tlačítko ODESLAT: Confirms and sends timer or program settings to the AC unit.
- Tlačítko Zpět: Returns to the previous menu or cancels a setting.
- CLOCK ADJUST Button: Slouží k nastavení aktuálního času na displeji dálkového ovladače.
- Tlačítko reset: Resets the remote control to its factory default settings.
3.3 Funkce displeje
- Zelené podsvícení: The remote control features a green backlight for easy visibility and operation in low-light conditions or at night.
- Fahrenheit and Celsius Display: The remote can display temperature in both Fahrenheit (℉) and Celsius (℃). Use the ℃/℉ button to toggle between the two units.

Image 3.3: Green backlight and Fahrenheit/Celsius display toggle.
4. Údržba
4.1 Čištění dálkového ovladače
Pro zachování vzhledu a funkčnosti dálkového ovladače:
- Otřete povrch měkkým suchým hadříkem.
- Na odolné nečistoty lehce damphadřík vodou a jemným čisticím prostředkem a poté ihned otřete dosucha.
- Do not use abrasive cleaners, alcohol, or chemical solvents, as these can damage the remote's finish or internal components.
4.2 Výměna baterie
Replace the batteries when the remote's display becomes dim or if the remote becomes unresponsive. Typically, batteries should be replaced every 6-12 months, depending on usage. Follow the battery installation steps in Section 2.1.
5. Řešení problémů
- Dálkové ovládání nereaguje:
- Zkontrolujte, zda jsou baterie správně vloženy a zda jsou dostatečně nabité. V případě potřeby je vyměňte.
- Ujistěte se, že mezi dálkovým ovladačem a přijímačem klimatizace nejsou žádné překážky.
- Ujistěte se, že se nacházíte v efektivním provozním dosahu klimatizace.
- Incorrect temperature display (Fahrenheit/Celsius):
- Press the ℃/℉ button on the remote control to toggle between Fahrenheit and Celsius display modes.
- Remote functions are erratic:
- Try resetting the remote control by removing the batteries for a few minutes, then reinserting them.
- If the issue persists, replace the batteries with new ones.
6. Specifikace
| Funkce | Popis |
|---|---|
| Značka | YAOHUIMI |
| Číslo modelu | A420220127-8IN1-18 |
| Technologie připojení | Infračervený |
| Speciální funkce | Replacement Remote (Not Universal) |
| Kompatibilní zařízení | Fujitsu AC Air Conditioners (various models, see Section 1.1) |
| Zdroj napájení | 2 x AAA baterie (nejsou součástí balení) |
7. Záruka a podpora
For warranty information or technical support, please refer to the documentation provided with your purchase or contact the seller directly. Keep your purchase receipt as proof of purchase.


