1. Úvod
This manual provides essential information for the safe and efficient operation, maintenance, and troubleshooting of your Profile GE Automatic Espresso Machine + Milk Frother. Please read these instructions thoroughly before first use and retain for future reference.

Image 1.1: The Profile GE Automatic Espresso Machine with a prepared espresso and a latte.
2. Bezpečnostní informace
Při používání elektrických spotřebičů vždy dodržujte základní bezpečnostní opatření, abyste snížili riziko požáru, úrazu elektrickým proudem a zranění osob.
- Ensure the appliance is connected to a grounded outlet.
- Neponořujte stroj, kabel ani zástrčku do vody nebo jiných kapalin.
- Vytáhněte zástrčku ze zásuvky, když ji nepoužíváte a před čištěním.
- Neprovozujte žádné zařízení s poškozeným kabelem nebo zástrčkou.
- Udržujte ruce a kabely v dostatečné vzdálenosti od horkých povrchů.
- Používejte pouze příslušenství doporučené výrobcem.
3. Konec produktuview
Profile GE Automatic Espresso Machine is designed for convenience and quality, featuring an integrated grinder, milk frother, and smart connectivity.
3.1 Komponenty
- Ovládací panel: Touch-sensitive buttons for various drink selections and functions.
- Zásobník na fazole: Stores whole coffee beans for grinding.
- Vodní nádrž: Odnímatelná nádrž pro přívod vody.
- Výpust kávy: Připravuje uvařenou kávu.
- Parní tryska: Pro napěnění mléka.
- Odkapávač: Collects excess liquids.
- Nádoba na sedlinu: Sbírá použitou kávovou sedlinu.

Image 3.1: The top control panel with buttons for Espresso, Americano, My Brew, Steam, and Hot Water.

Image 3.2: The integrated bean hopper with whole coffee beans and grind size adjustment knob.

Image 3.3: The removable water reservoir being lifted from the machine.
4. Nastavení
4.1 Vybalení a počáteční umístění
- Opatrně odstraňte veškerý obalový materiál.
- Place the machine on a stable, level surface away from heat sources and direct sunlight.
- Zajistěte kolem stroje dostatečný prostor pro větrání a přístup ke komponentům.
4.2 Počáteční čištění
Before first use, clean all removable parts with warm water and mild detergent. Rinse thoroughly and dry. Wipe the exterior of the machine with a damp tkanina.
4.3 Naplnění vodní nádrže
- Remove the water reservoir from the machine (refer to Image 3.3).
- Fill with fresh, cold drinking water up to the MAX line.
- Replace the reservoir securely into the machine.
4.4 Přidávání kávových zrn
- Open the lid of the bean hopper (refer to Image 3.2).
- Pour whole coffee beans into the hopper. Do not overfill.
- Bezpečně zavřete víko.
4.5 Zapnutí a počáteční opláchnutí
- Zapojte napájecí kabel do uzemněné elektrické zásuvky.
- Press the power button on the control panel. The machine will perform an initial rinse cycle.
- Umístěte pod výpust kávy nádobu na zachycení vody z oplachování.
4.6 SmartHQ App Connection
For enhanced customization and software updates, connect your espresso machine to the SmartHQ app.
- Download the SmartHQ app from your device's app store.
- Follow the in-app instructions to pair your espresso machine.
- Customize drink preferences, volume, and strength through the app.

Image 4.1: Using the SmartHQ app to control and customize the espresso machine.
5. Návod k obsluze
5.1 Vaření kávy
The machine offers Espresso, Americano, Lungo, and Hot Water options. The 'My Cup' setting is pre-set to Ristretto and can be adjusted via the SmartHQ app.
- Ensure the water reservoir is filled and the bean hopper contains coffee beans.
- Umístěte šálek pod výpust kávy.
- Select your desired drink (Espresso, Americano, Lungo, My Cup) from the control panel.
- Stroj automaticky namele kávová zrna, uvaří a připraví kávu.

Image 5.1: The espresso machine dispensing a fresh shot of espresso.
5.2 Nastavení hrubosti mletí
The integrated conical burr grinder allows for 5 levels of grind size adjustment, from coarsest to finest, to optimize flavor extraction.
- Locate the grind size adjustment knob inside the bean hopper (refer to Image 3.2).
- Turn the knob to select your desired grind setting. Finer grinds are suitable for espresso, while coarser grinds are better for longer coffee types.
5.3 Using the Steam Frother
The steam frother creates various milk textures for cappuccinos, lattes, and more.
- Fill the included stainless steel frothing pitcher with cold milk.
- Vložte parní trysku do mléka.
- Stiskněte tlačítko „Pára“ na ovládacím panelu.
- Move the pitcher to achieve desired foam texture.
- Once finished, press the 'Steam' button again to stop.
- Immediately clean the steam wand after each use to prevent milk residue buildup.
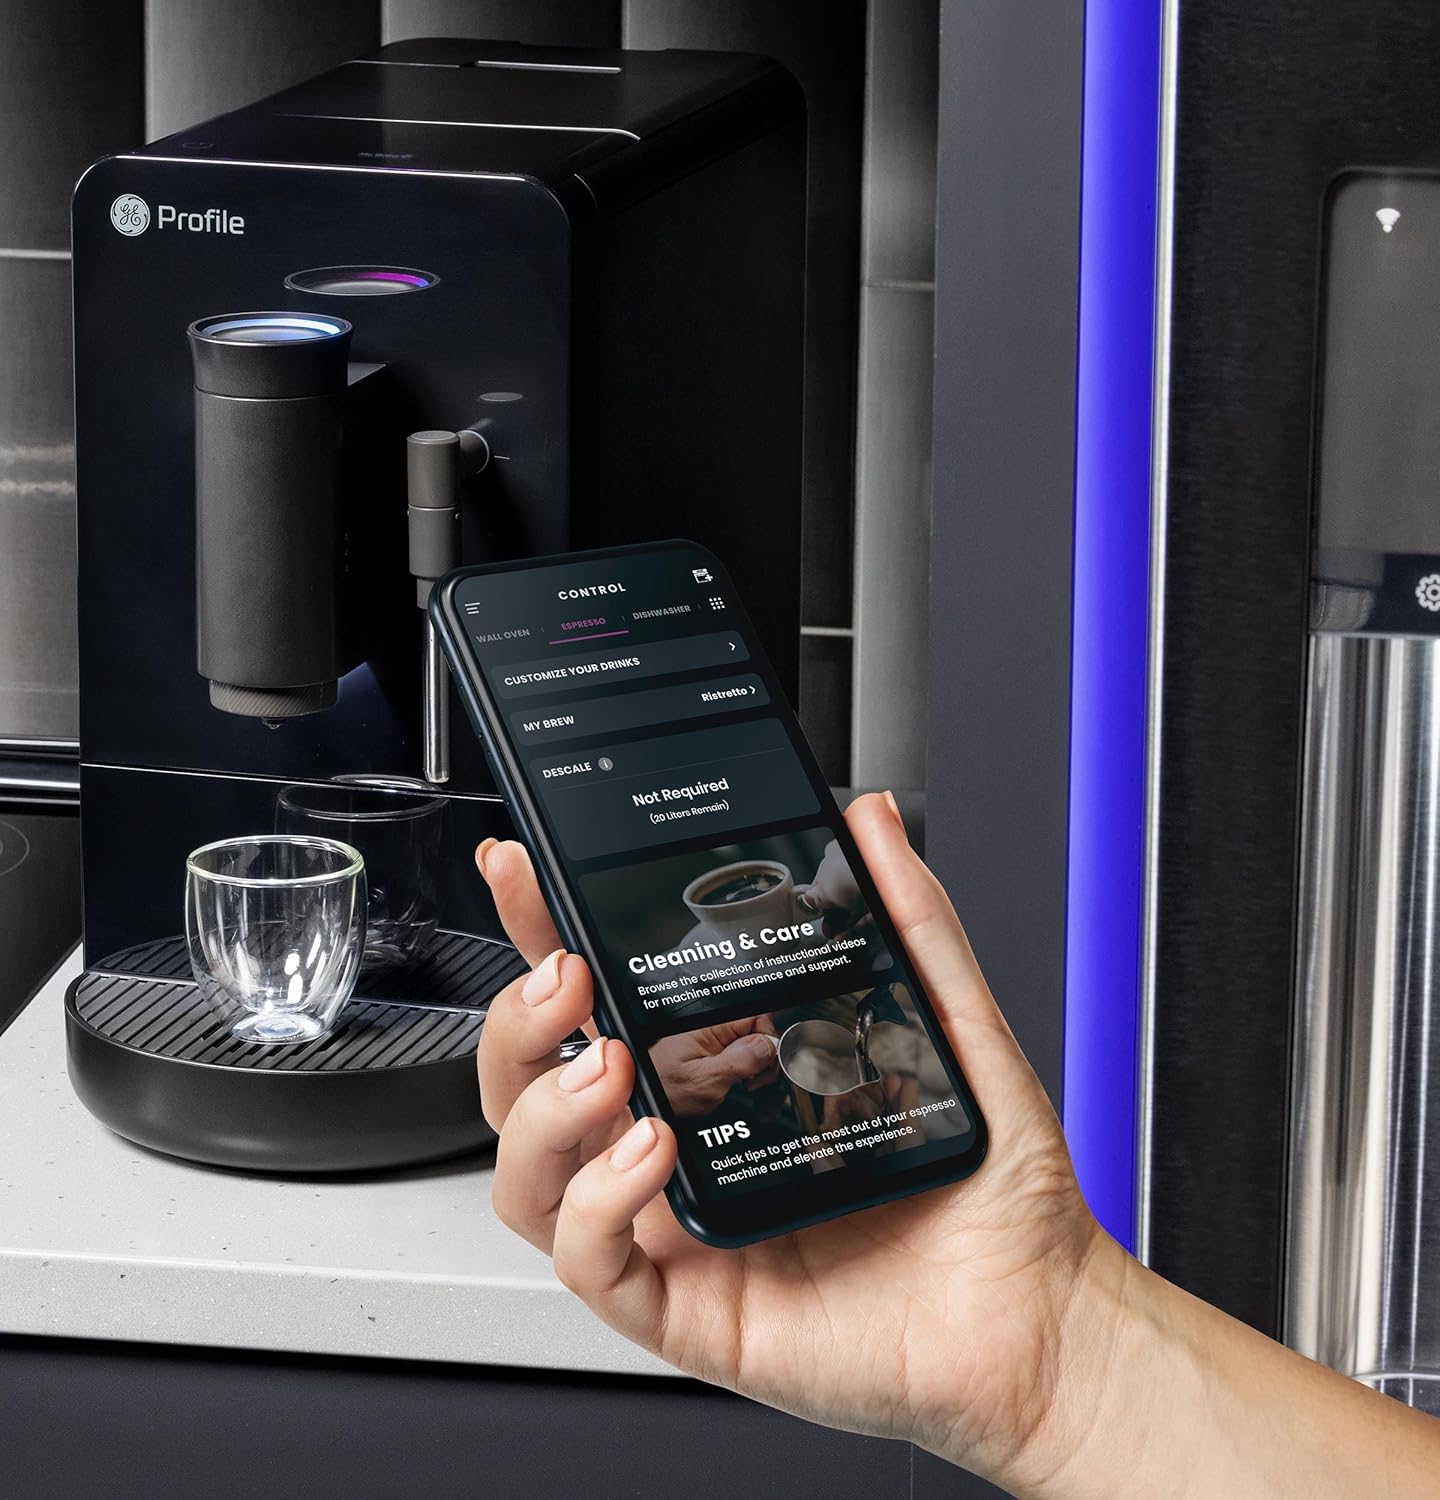
Image 5.2: A hand using the steam wand to froth milk in a stainless steel pitcher.
6. Údržba
Pravidelné čištění a údržba zajistí optimální výkon a dlouhou životnost vašeho espresso kávovaru.
6.1 Denní čištění
- Parní tryska: Po každém použití otřete parní tryskuamp hadříkem. Krátce propusťte páru, abyste z trysky odstranili zbytky mléka.
- Odkapávací miska a nádoba na sedlinu: Denně vyprázdněte a opláchněte nádobu na sedlinu. Stroj vás upozorní, kdy je třeba nádobu na sedlinu vyprázdnit.
- Vodní nádrž: Denně oplachujte a doplňujte čerstvou vodou.
6.2 Týdenní úklid
- Spařovací jednotka: The brew unit is typically removable for rinsing under running water. Refer to the included cleaning kit instructions for detailed steps.
- Zásobník na fazole: Periodically clean out any oil residue or old beans.
6.3 Odvápnění
The machine will prompt you when descaling is required. Use a descaling solution specifically designed for espresso machines and follow the instructions provided with the descaling agent or in the SmartHQ app.
7. Řešení problémů
Tato část se zabývá běžnými problémy, se kterými se můžete setkat při používání espresso kávovaru.
| Problém | Možná příčina | Řešení |
|---|---|---|
| No coffee dispensed / "Add Beans" message | Bean hopper empty or beans not feeding correctly. | Refill bean hopper. Gently stir beans to ensure they feed into the grinder. |
| Káva je příliš slabá nebo vodnatá | Grind size too coarse, insufficient coffee dose, or descaling needed. | Adjust grind size to a finer setting. Check SmartHQ app for strength settings. Perform descaling if prompted. |
| Mléko se správně nenapěňuje | Steam wand clogged, milk type unsuitable, or insufficient steam pressure. | Clean steam wand thoroughly. Use fresh, cold milk. Ensure machine is heated to steam temperature. |
| Stroj se nezapíná | Není zapojeno, výpadek napájenítage, or circuit breaker tripped. | Check power connection. Verify power outlet functionality. Reset circuit breaker if necessary. |
| SmartHQ app connectivity issues | Incorrect Wi-Fi password, network interference, or app bug. | Verify Wi-Fi credentials. Ensure machine is within Wi-Fi range. Restart app and machine. Check for app updates. |
8. Specifikace
- Značka: Profile
- Název modelu: GE Profile Automatic Espresso Machine + Frother
- Číslo modelu položky: P7CEBBS6RBB
- Barva: Černý
- Rozměry produktu: 7"H x 16"Š x 12.5"V
- Hmotnost položky: 16 libry
- svtage: 120V
- Provozní režim: Plně automatické
- Speciální vlastnosti: Built-In Bean Hopper, Built-In Conical Burr Grinder & Adjustable Grind Size, Programmable My Brew Setting, Steam Frother & Frothing Pitcher, WiFi Connected
- Zahrnuté komponenty: Cleaning Kit, Coffee Bean Container, Espresso Machine, Steam Wand, Milk Pitcher, Water Tank
- Typ vstupu kávy: Celé fazole
- Vstup lidského rozhraní: Dotyková obrazovka

Obrázek 8.1: Rozměry espresso kávovaru.
9. Záruka a podpora
This product is covered by a manufacturer's warranty. For specific warranty details, registration, or technical support, please refer to the warranty card included with your product or visit the official GE Profile website. You may also contact customer service through the SmartHQ app for assistance.


