1. Úvod
This manual provides detailed instructions for the installation, operation, and maintenance of your PowMr 80A PWM Solar Charge Controller, Model L80. This controller is designed to manage the power flow from your solar panels to your battery bank and DC loads, ensuring efficient and safe charging. It supports 12V and 24V DC input systems and features an LCD display for monitoring system status, a 5V USB output, and adjustable charge/discharge parameters.
2. Vlastnosti produktu
- PWM Charging: Utilizes Pulse Width Modulation technology for efficient battery charging.
- System Voltage: Automatic identification for 12V/24V DC systems.
- Vysoká proudová kapacita: Supports up to 80A charge and discharge current.
- LCD displej: Provides real-time data display and system status monitoring.
- USB výstup: External 5V USB port for charging small electronic devices.
- Chytrá ochrana: Built-in protections against short circuit, overcharge, overcurrent, and reverse connection.
- Teplotní kompenzace: Automatic temperature compensation for optimal charging.
- Nastavitelné parametry: User-adjustable charge and discharge control parameters.
- Odolná konstrukce: Anti-fall ABS housing with high-efficiency aluminum alloy heat sink.

Image 2.1: The PowMr L80 Solar Charge Controller highlighting its six main functions, including reset, easy setting, dual timer & light control, full battery protection, friendly interface, and USB 5V 1A output.
3. Komponenty a rozhraní produktu
Familiarize yourself with the various components and connection points of the PowMr L80 Solar Charge Controller.
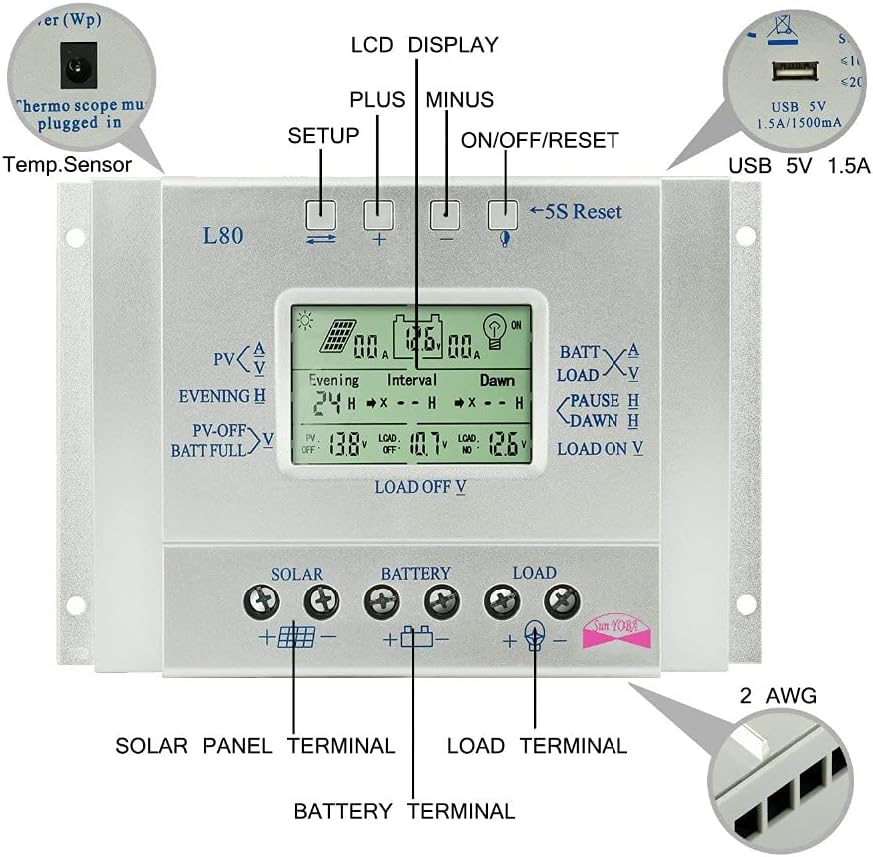
Image 3.1: This diagram illustrates the front panel of the PowMr L80 controller, identifying the LCD display, Setup button, Plus button, Minus button, ON/OFF/Reset button, 5S Reset function, USB 5V 1.5A port, and the Solar Panel, Battery, and Load terminals at the bottom. A temperature sensor port is also indicated.
- LCD displej: Shows real-time system parameters and status.
- tlačítka:
- Setup Button (Leftmost): Used to enter and navigate through setting menus.
- Tlačítko Plus (+): Increases values or moves forward in menus.
- Tlačítko mínus (-): Decreases values or moves backward in menus.
- ON/OFF/Reset Button (Rightmost): Controls load output, and a 5-second press initiates a reset.
- Port USB 5V 1.5A: For charging compatible USB devices.
- Port teplotního senzoru: For connecting an external temperature sensor (must be plugged in for accurate temperature compensation).
- Solar Panel Terminals (+/-): Connect your solar panel array here.
- Svorky baterie (+/-): Connect your battery bank here.
- Zatěžovací svorky (+/-): Connect your DC loads here.
4. Nastavení a instalace
Správná instalace je zásadní pro bezpečný a efektivní provoz vašeho solárního regulátoru nabíjení. Pečlivě dodržujte tyto kroky.
4.1 Bezpečnostní opatření
- Ensure all connections are tight to avoid loose connections that can cause excessive heat.
- Regulátor instalujte v dobře větraném prostoru, mimo dosah přímého slunečního záření a vlhkosti.
- Vždy nejdříve připojte baterii, poté solární panel a nakonec zátěž. Odpojení proveďte v opačném pořadí.
- Používejte vodiče vhodné pro proud vašeho systému, abyste zabránili přehřátí.
- Ujistěte se, že objem baterietage matches the controller's supported voltage (12V/24V).
4.2 Schéma zapojení a postup připojení
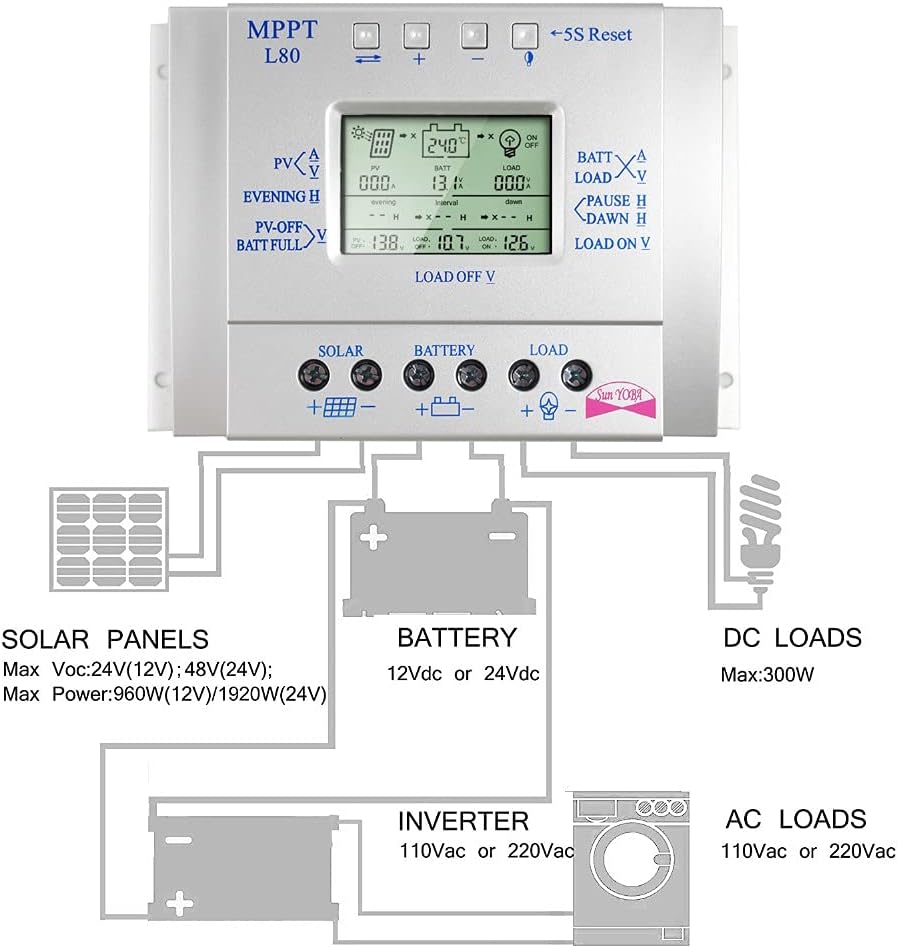
Image 4.1: This diagram illustrates the correct wiring sequence for the PowMr L80 Solar Charge Controller. It shows solar panels connected to the controller's solar input, the controller connected to a 12Vdc or 24Vdc battery, and the controller's load output connected to DC loads. An inverter can be connected to the battery for AC loads.
- Připojte baterii: Connect the positive and negative terminals of your battery to the corresponding battery terminals on the controller. The controller will automatically detect the system voltage (12V nebo 24V).
- Připojte solární panel: Connect the positive and negative terminals of your solar panel array to the corresponding solar panel terminals on the controller. Ensure correct polarity.
- Připojení stejnosměrné zátěže: Connect your DC loads (e.g., LED lights, fans) to the corresponding load terminals on the controller. Ensure correct polarity.
- Connect Temperature Sensor (Optional but Recommended): If using an external temperature sensor, plug it into the designated port for accurate battery temperature compensation.
Důležité: Vždy nejprve připojte baterii, aby ovladač mohl rozpoznat objem systémutage. Connecting the solar panel or load first may damage the controller.
5. Návod k obsluze
Once installed, the controller will begin operating automatically. The LCD display provides various screens to monitor your system and adjust settings.
5.1 LCD displej Overview
The LCD displays real-time information such as solar panel voltage (PV), battery voltage (BATT), load current (LOAD), battery state of charge, temperature, and various charging/discharging parameters. Use the Setup button to cycle through different display screens.
5.2 Funkce tlačítek
- Tlačítko nastavení: Short press to cycle through display screens. Long press (5 seconds) to enter parameter setting mode.
- Tlačítko plus (+): In setting mode, increases the selected value. In display mode, may show additional information or switch modes depending on the screen.
- Tlačítko mínus (-): In setting mode, decreases the selected value. In display mode, may show additional information or switch modes depending on the screen.
- ON/OFF/Reset Button: Short press to manually turn the DC load output ON or OFF. Long press (5 seconds) to reset the controller to factory default settings.
5.3 Nastavení parametrů
To adjust charging and discharging parameters, long press the Setup button until the display enters setting mode. Use the Plus (+) and Minus (-) buttons to change values, and the Setup button to confirm and move to the next parameter. The controller will automatically save settings after a few seconds of inactivity or by pressing the Setup button until you exit the setting mode.
Video 5.1: This video demonstrates the basic operation of the PowMr L80 Solar Charge Controller, including navigating through the LCD display screens and adjusting parameters using the control buttons. It shows how to view solar input, battery status, and load output, as well as how to change settings like evening and dawn load timers.
Common adjustable parameters include:
- Evening Hours: Sets the duration for the load to be ON after sunset.
- Interval Hours: Sets a pause duration for the load.
- Dawn Hours: Sets the duration for the load to be ON before sunrise.
- PV Off Voltage: Voltage at which the solar charging stops.
- Baterie Plná Voltage: Voltage indicating a full battery.
- Load Off Voltage: Nízký objemtage disconnect point for the load.
- Load On Voltage: Voltage at which the load reconnects after low voltage odpojit.
6. Údržba
Pravidelná údržba zajišťuje dlouhou životnost a optimální výkon vašeho solárního regulátoru nabíjení.
- Kontrola připojení: Periodically check all wiring connections for tightness and corrosion. Tighten any loose connections.
- Vyčistěte ovladač: Keep the controller clean and free from dust and debris. Use a dry cloth for cleaning. Ensure the heat sink fins are clear for proper ventilation.
- Zkontrolujte stav baterie: Sledujte stav a objem baterietage regularly. Ensure it is not overcharged or deeply discharged.
- Podmínky prostředí: Zajistěte, aby teplota a vlhkost vzduchu v instalačním prostředí zůstaly v doporučených rozmezích.
7. Řešení problémů
If you encounter issues with your PowMr L80 Solar Charge Controller, refer to the following common problems and solutions:
| Problém | Možná příčina | Řešení |
|---|---|---|
| Ovladač se nezapíná / LCD displej je prázdný | Není připojena baterie nebo je baterie příliš vybitátagPříliš nízké e. Zapojení s obrácenou polaritou. | Nejprve se ujistěte, že je baterie připojena a má dostatečné napětítage. Zkontrolujte polaritu baterie. |
| Baterie se nenabíjí | Solar panel not connected or insufficient sunlight. Reverse polarity of solar panel. Faulty solar panel or wiring. | Zkontrolujte připojení a polaritu solárního panelu. Zajistěte dostatečné sluneční světlo. Otestujte výkon solárního panelu. |
| Zatížení nefunguje | Load output turned off. Low battery voltage (LVD activated). Overcurrent/short circuit on load. Reverse polarity of load. | Press ON/OFF button to activate load. Charge battery. Check load for short circuits or excessive current draw. Check load polarity. |
| Nepřesný údaj o teplotě | External temperature sensor not connected or faulty. | Ensure temperature sensor is properly connected. Replace if faulty. |
Pokud problém přetrvává i po vyzkoušení těchto řešení, kontaktujte prosím zákaznickou podporu PowMr.
8. Specifikace
The following table outlines the technical specifications for the PowMr 80A PWM Solar Charge Controller L80.
| Funkce | Specifikace |
|---|---|
| Model | L80 |
| Jmenovitý nabíjecí proud | 80A |
| System Voltage | 12V / 24V Auto |
| Max Solar Panel Voltage | 50V |
| Max Solar Panel Power (12V) | 960W |
| Max Solar Panel Power (24V) | 1920W |
| USB výstup | 5V/1.5A |
| Provozní teplota | -35°C až +60°C |
| Rozměry | 0.39 x 0.39 x 0.39 palce |
| Hmotnost | 1.63 libry |
| Materiál bydlení | ABS |
9. Záruka a podpora
PowMr products are designed for reliability and performance. For warranty information or technical support, please refer to the documentation included with your purchase or visit the official PowMr website. If you encounter any problems during use, contact PowMr customer service for assistance.
PowMr is committed to providing excellent after-sales support and will provide technical answers within 24 hours.