Zavedení
Děkuji za nákupasing the Explore Scientific Radio Controlled Projection Clock. This device offers precise timekeeping through radio control, an internal temperature display, and a convenient projection feature to display the time on your wall or ceiling. This manual provides detailed instructions for setup, operation, and maintenance to ensure optimal performance of your clock.
Bezpečnostní informace
- Před použitím si pečlivě přečtěte všechny pokyny.
- Nevystavujte jednotku extrémním teplotám, přímému slunečnímu záření nebo vysoké vlhkosti.
- Zabraňte pádu jednotky na zem nebo jejímu vystavení silným nárazům.
- Nepokoušejte se jednotku rozebírat ani opravovat sami. Veškerý servis svěřte kvalifikovanému personálu.
- Používejte pouze určený napájecí adaptér (pokud je k dispozici) a baterie.
- Uchovávejte mimo dosah dětí.
Obsah balení
- Explore Scientific Radio Controlled Projection Clock (Model RDP1001GYE000)
- Baterie (součástí balení)
- AC Power Adapter (Optional, not explicitly stated as included but mentioned in features)
- Uživatelská příručka (tento dokument)
Konec produktuview
Familiarize yourself with the various parts and controls of your projection clock.

Obrázek 1: Přední strana view of the clock, displaying time, date, and temperature, with control buttons below the screen.
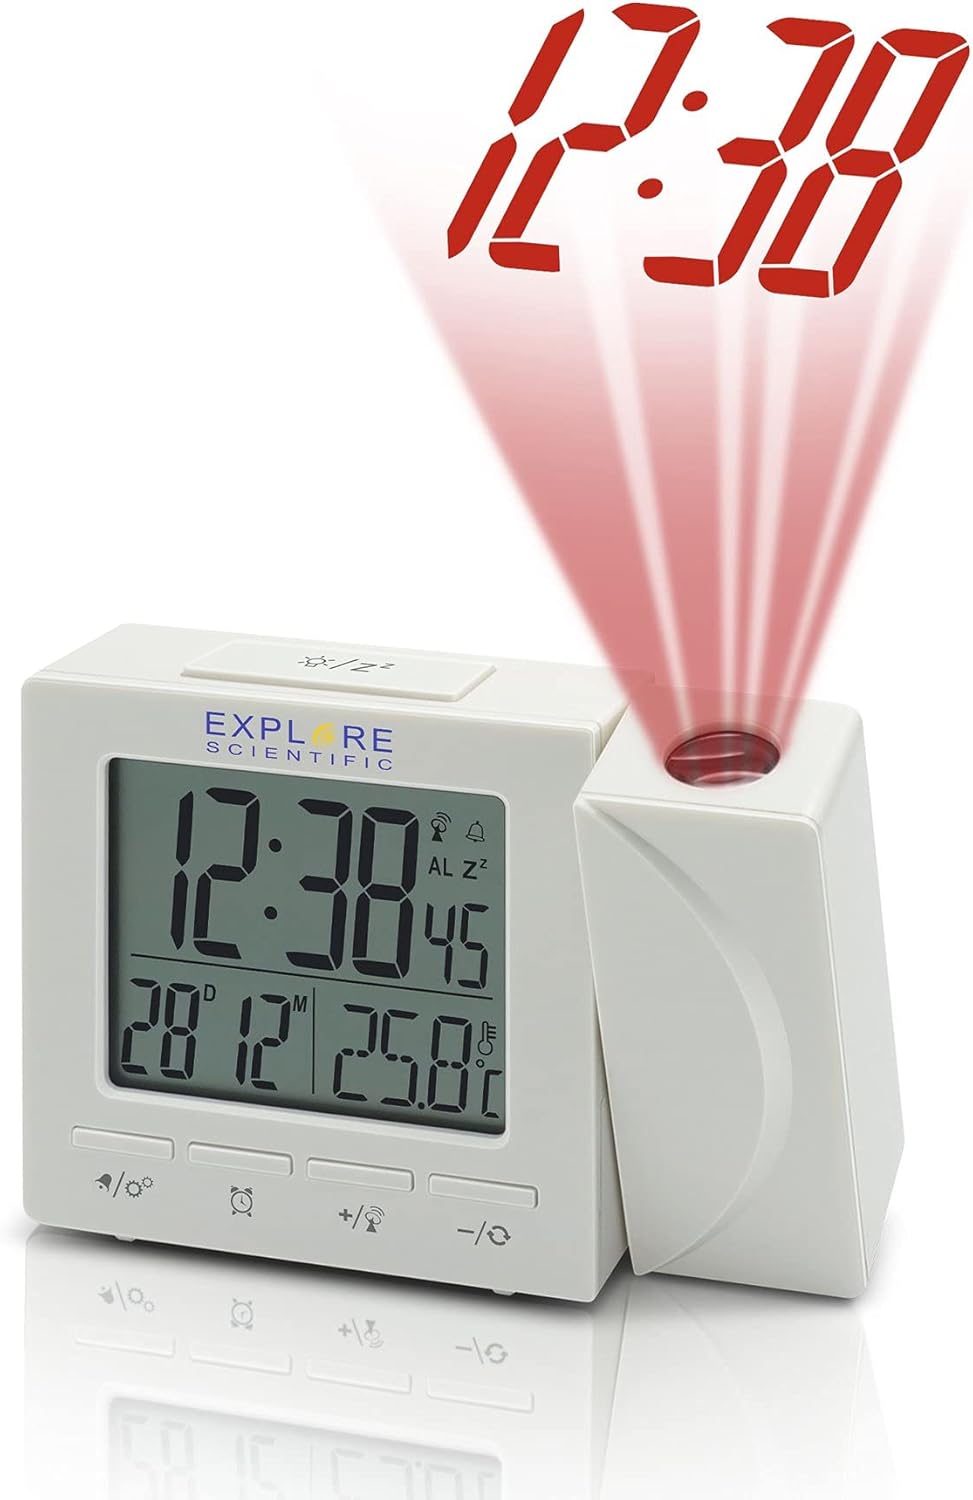
Obrázek 2: Strana view of the clock, illustrating the time projection feature with red digits.
Komponenty:
- Digitální displej: Shows time, date, day of the week, and indoor temperature.
- Projekční čočka: Projects the time onto a wall or ceiling.
- Ovládací tlačítka:
- MODE/SET: To switch display modes and enter setting mode.
- ALARM/SNOOZE: To set alarms and activate snooze.
- +/°C/°F: To adjust values up and switch temperature units.
- -/12/24: To adjust values down and switch time format.
- PROJECTION ON/OFF/FLIP: To control projection and flip its orientation.
- Přihrádka na baterie: Located at the back/bottom for backup batteries.
- DC IN Jack: Pro připojení síťového adaptéru.
Nastavení
1. Powering the Unit:
The clock can be powered by batteries for backup or continuously by the AC power adapter.
- Instalace baterie: Open the battery compartment cover. Insert the included batteries, observing the correct polarity (+ and -). Close the cover. Batteries provide backup power and allow for temporary use without the adapter.
- AC Power Adapter (Optional): For continuous display and projection, connect the AC power adapter to the DC IN jack on the back of the unit and plug it into a standard wall outlet.
2. Initial Setup and Radio Control Synchronization:
Upon first power-up or after a reset, the clock will attempt to synchronize with the NIST WWVB radio signal for accurate time.
- Place the clock near a window for better reception.
- The radio control icon will flash during synchronization. This process may take several minutes or even hours depending on signal strength and location.
- Once synchronized, the icon will become solid, and the time will be automatically set.
- If synchronization fails, you may need to manually set the time (see Operating section).
3. Setting Temperature Unit (°F/°C):
Stiskněte tlačítko +/°C/°F tlačítko pro přepínání mezi zobrazením teploty ve stupních Celsia a Fahrenheita.
4. Setting 12/24 Hour Format:
Stiskněte tlačítko -/12/24 button to switch between 12-hour (with AM/PM indicator) and 24-hour time formats.
Provozní
1. Manual Time and Date Setting:
If radio control synchronization is not desired or fails, you can manually set the time and date.
- Stiskněte a podržte MODE/SET tlačítko, dokud displej nezačne blikat.
- Použijte + or - tlačítka pro nastavení blikající hodnoty (např. hodina, minuta, rok, měsíc, den).
- Stiskněte MODE/SET again to confirm the setting and move to the next parameter.
- Repeat until all settings are complete. The clock will exit setting mode automatically after a few seconds of inactivity.
2. Alarm Function:
The clock features a dual alarm and snooze function.
- Nastavení času budíku: Stiskněte tlačítko ALARM/SNOOZE button once to display Alarm 1 time. Press and hold ALARM/SNOOZE to enter Alarm 1 setting mode. Use + or - to adjust hour/minute, then press ALARM/SNOOZE to confirm. Repeat for Alarm 2.
- Aktivace/deaktivace alarmu: Zatímco viewpro nastavení času budíku stiskněte ALARM/SNOOZE repeatedly to toggle Alarm 1 ON/OFF, Alarm 2 ON/OFF, or both ON/OFF. An alarm icon will appear on the display when active.
- Funkce odložení: Když zazní alarm, stiskněte ALARM/SNOOZE button to activate snooze. The alarm will temporarily stop and sound again after approximately 5-10 minutes.
- Zastavení alarmu: To stop the alarm completely, press any other button (except ALARM/SNOOZE for snooze) or let it ring for its duration.
3. Projection Control:
The projection feature allows you to display the time on a surface.
- Projekce ZAP/VYP: Stiskněte tlačítko PROJECTION ON/OFF/FLIP tlačítko pro zapnutí nebo vypnutí projekce.
- Otočení o 180°: Stiskněte a podržte PROJECTION ON/OFF/FLIP button to rotate the projected image 180 degrees, useful for ceiling projection or different viewing úhly.
- Nastavení zaostření: Rotate the focus ring on the projection lens (if available) to sharpen the projected image.
4. Weekday Display Language:
The clock supports five language options for the weekday display: German (GE), English (EN), French (FR), Italian (IT), and Dutch (DU).
To change the language, enter the manual time setting mode (as described above) and cycle through the options when the weekday language setting appears.
Údržba
- Čištění: Otřete přístroj měkkým, suchým hadříkem. Nepoužívejte abrazivní čisticí prostředky ani rozpouštědla.
- Výměna baterie: Replace batteries when the display dims or the clock functions become erratic. Always replace all batteries at the same time with new ones of the same type. Dispose of old batteries responsibly.
- Skladování: Pokud hodiny skladujete delší dobu, vyjměte baterie, abyste zabránili vytečení.
Odstraňování problémů
| Problém | Možná příčina | Řešení |
|---|---|---|
| Displej je prázdný nebo tmavý. | Low or dead batteries; AC adapter not connected or faulty. | Replace batteries. Ensure AC adapter is securely connected and working. |
| Čas je nesprávný nebo se nenastavuje automaticky. | Poor radio signal reception; manual setting required. | Move the clock closer to a window or to a different location. Manually set the time if radio control is consistently poor. |
| Projekce je rozmazaná. | Rozostřené. | Adjust the focus ring on the projection lens. |
| Alarm se nespustí. | Budík není aktivován; nastavený nesprávný čas budíku. | Ensure the alarm icon is displayed. Verify the alarm time is set correctly. |
Specifikace
- Model: RDP1001GYE000
- Typ displeje: Digitální
- Formát času: 12/24 Hour Selectable
- Jednotka teploty: ° F/° C přepínatelné
- Rádiové ovládání: NIST WWVB Receiver
- Projekce: 180 Degree Rotatable Projection Head
- Poplach: Dual Alarm with Snooze Function
- Weekday Display Languages: GE, EN, FR, IT, DU
- Podsvícení: Modrý
- Zdroj napájení: Batteries (Included), AC Adaptor (Optional)
- Rozměry: Přibližně 7 x 5 x 2 cm (rozměry balení)
- Hmotnost: Přibližně 8 unce
- Materiál: Akrylonitril-butadien-styren
- UPC: 811803033214
Záruka a podpora
Explore Scientific products are designed for quality and reliability. For specific warranty information, please refer to the warranty card included with your purchase or visit the official Explore Scientific website. If you encounter any issues or require technical assistance, please contact Explore Scientific customer support.
For general inquiries or support, you may visit the Explore Scientific brand page on Amazon or the seller's page if purchased from a third-party seller.


