1. Bezpečnostní informace
Please read and understand all safety information and operating instructions before using this multimeter. Failure to follow these instructions may result in electric shock, fire, or damage to the meter.
- Always ensure the test leads are properly connected and the function switch is set to the correct range before making any measurements.
- Nepokoušejte se měřit objemtages or currents exceeding the maximum rated values for this meter.
- Při práci s obvody pod napětím buďte mimořádně opatrní. Vysoké napětítages může být nebezpečný.
- Never open the meter casing unless specifically instructed for battery or fuse replacement. Ensure test leads are disconnected before opening.
- Vyměňte baterii, když se zobrazí indikátor slabé baterie, abyste zajistili přesné měření.
- Nepoužívejte měřicí přístroj, pokud se jeví poškozený nebo pokud je narušena izolace měřicích vodičů.
Obrázek 1: Zadní view of the Rebel MIE-RB-830 Multimeter, showing the battery compartment cover and a warning label. The label advises removing test leads before opening the case to avoid electrical shock and to install fuses with correct amp/volt ratings. It also indicates the power supply is a 9V battery, type NEDA 1604 9V 6F22.
2. Konec produktuview
The Rebel MIE-RB-830 is a compact, battery-operated digital multimeter designed for measuring DC/AC voltage, DC current, resistance, diode, and transistor (hFE) values. It is suitable for general electrical testing and troubleshooting.
2.1. Součásti
- Digitální multimetr
- Měřicí kabely (červený a černý)
- 9V baterie (může být součástí balení nebo se prodávat samostatně)
- Uživatelská příručka (tento dokument)

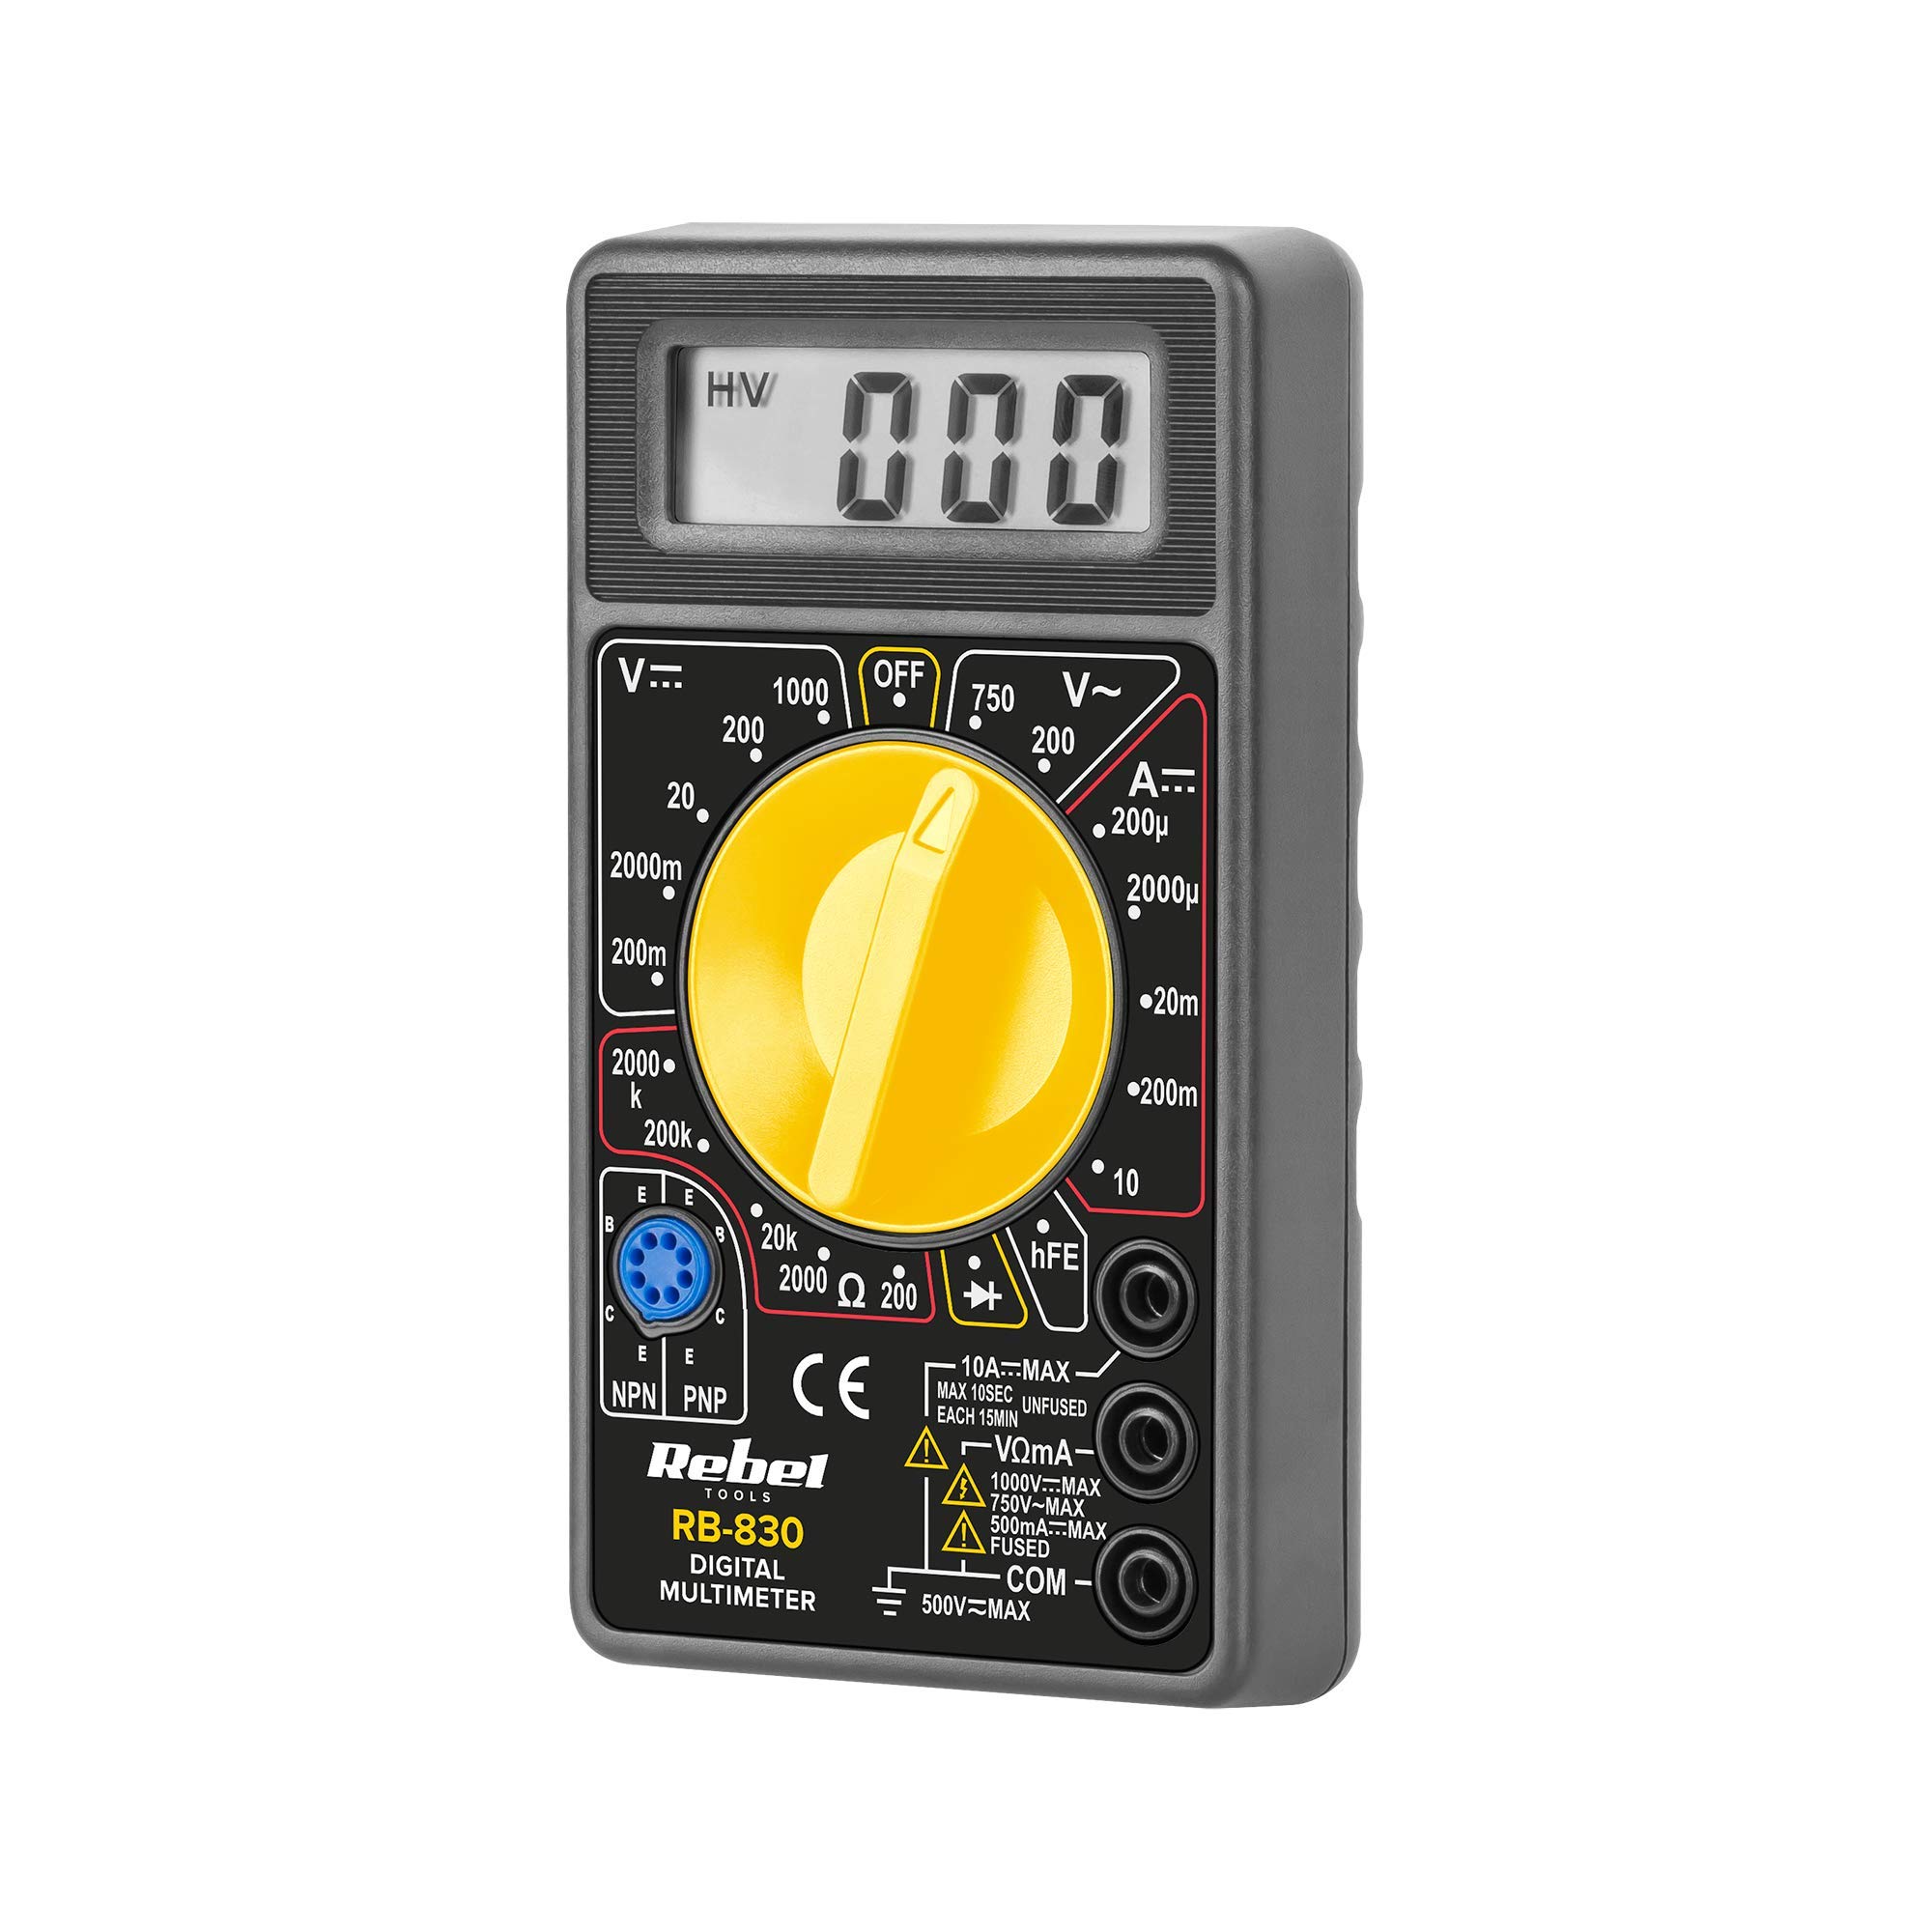
Obrázek 2: The Rebel MIE-RB-830 Digital Multimeter shown with its accompanying red and black test leads. The multimeter features a large LCD display and a rotary function switch.

Obrázek 3: Detailní záběr view of the red and black test leads. These leads are essential for connecting the multimeter to the circuit under test.
3. Nastavení
3.1. Instalace baterie
- Ujistěte se, že je multimetr VYPNUTÝ a všechny měřicí vodiče jsou odpojené.
- Locate the battery compartment cover on the back of the meter (refer to Figure 1).
- Odšroubujte upevňovací šroub(y) a opatrně sejměte kryt.
- Insert a new 9V battery (NEDA 1604 or 6F22 type), observing the correct polarity (+ and -).
- Nasaďte kryt prostoru pro baterie a zajistěte jej šroubem (šrouby).
3.2. Připojení testovacích vodičů
- Připojte červený test lead to the "VΩmA" input jack.
- Připojte černý test lead to the "COM" (common) input jack.
- For current measurements exceeding 200mA (up to 10A), connect the red test lead to the "10A" input jack.
4. Návod k obsluze
4.1. Volba funkce
Turn the rotary switch to the desired measurement function and range. Always start with a higher range if the approximate value is unknown to prevent overloading the meter.
4.2. Měření stejnosměrného napětí (DC Vol)tage (V–)
- Nastavte otočný přepínač na požadovanou hlasitost DCtage (V–) range (e.g., 20V, 200V).
- Připojte červený měřicí vodič ke kladnému (+) pólu obvodu a černý měřicí vodič k zápornému (-) pólu.
- Přečtěte si svtage hodnota na LCD displeji.
4.3. Měření AC Voltage (V∼)
- Nastavte otočný přepínač na požadovanou hlasitost střídavého proudutage (V∼) range (e.g., 200V, 750V).
- Připojte měřicí vodiče k AC napětítage zdroj.
- Přečtěte si svtage hodnota na LCD displeji.
4.4. Measuring DC Current (A–)
Pozor: To measure current, the meter must be connected in series with the circuit. Never connect the meter in parallel with a voltage source when in current mode, as this can damage the meter and the circuit.
- Set the rotary switch to the desired DC Current (A–) range (e.g., 20mA, 200mA, 10A).
- For currents up to 200mA, ensure the red lead is in the "VΩmA" jack. For currents up to 10A, move the red lead to the "10A" jack.
- Otevřete obvod, kde má být měřen proud, a zapojte měřič do série.
- Odečtěte aktuální hodnotu na LCD displeji.
4.5 Měření odporu (Ω)
Pozor: Před měřením odporu se ujistěte, že testovaný obvod nebo součástka je bez napětí.
- Set the rotary switch to the desired Resistance (Ω) range (e.g., 200Ω, 2kΩ, 200kΩ).
- Připojte měřicí vodiče k měřené součástce nebo obvodu.
- Odečtěte hodnotu odporu na LCD displeji.
4.6. Diode Test (→|–)
- Set the rotary switch to the Diode Test (→|–) position.
- Připojte červený měřicí vodič k anodě diody a černý měřicí vodič ke katodě.
- Na displeji se zobrazí hlasitost vpředtagpokles napětí (obvykle 0.5 V až 0.8 V u křemíkových diod).
- Prohoďte vodiče. Na displeji by se mělo zobrazit „OL“ (otevřená smyčka), pokud je dioda v pořádku.
4.7. Test tranzistoru (hFE)
- Nastavte otočný přepínač do polohy hFE.
- Určete, zda je tranzistor NPN nebo PNP.
- Insert the transistor's emitter, base, and collector leads into the corresponding sockets on the hFE test socket.
- Read the hFE (DC current gain) value on the display.
5. Údržba
5.1. Výměna baterie
When the low battery indicator appears on the display, replace the 9V battery as described in Section 3.1. Using a low battery can lead to inaccurate readings.
5.2. Výměna pojistky
If the current measurement function stops working, the fuse may need replacement. This operation should only be performed by qualified personnel.
- Ujistěte se, že je multimetr VYPNUTÝ a všechny měřicí vodiče jsou odpojené.
- Otevřete zadní casing of the meter (this may involve more screws than just the battery compartment).
- Locate the blown fuse and replace it with a fuse of the exact same type and rating (e.g., F200mA/250V for mA range, F10A/250V for 10A range). Refer to the internal markings or specifications for precise fuse ratings.
- Carefully reassemble the meter, ensuring all screws are tightened.
5.3. Čištění
Otřete měřič reklamouamp cloth and mild detergent. Do not use abrasives or solvents. Keep the meter dry.
6. Řešení problémů
| Problém | Možná příčina | Řešení |
|---|---|---|
| Žádný nebo slabý displej | Vybitá nebo vybitá baterie | Vyměňte 9V baterii. |
| Nesprávné údaje | Low battery; Incorrect range selection; Poor test lead connection | Replace battery; Select appropriate range; Ensure leads are firmly connected. |
| Měření proudu nefunguje | Blown fuse; Incorrect lead connection for current | Replace fuse (see Section 5.2); Ensure red lead is in "VΩmA" or "10A" jack as appropriate. |
| Zobrazuje se „OL“ (přetížení) | Measured value exceeds selected range; Open circuit (for resistance/continuity) | Select a higher range; Check circuit for breaks. |
7. Specifikace
| Funkce měření | Rozsah | Přesnost |
|---|---|---|
| DC svtage (V–) | 200mV, 2V, 20V, 200V, 1000V | ± (0.5 % + 2 číslic) |
| AC svtage (V∼) | 200V, 750V | ± (1.2 % + 10 číslic) |
| DC Current (A–) | 200µA, 2mA, 20mA, 200mA, 10A | ± (1.0 % + 2 číslic) |
| Odpor (Ω) | 200Ω, 2kΩ, 20kΩ, 200kΩ, 2MΩ | ± (0.8 % + 2 číslic) |
| Test diod | Ano | Vpřed svtage pokles |
| Test tranzistoru (hFE) | Ano | hFE value |
| Napájení | 9V Battery (NEDA 1604 or 6F22) | |
| Zobrazit | 3½ Digit LCD, Max. 1999 | |
| Rozměry | Cca. 13.5 x 10 x 4 cm | |
| Hmotnost | Approx. 107 grams (without battery) | |
| Provozní teplota | 0 °C až 40 °C (32 °F až 104 °F) | |
| Skladovací teplota | -10 °C až 50 °C (14 °F až 122 °F) | |
| Bezpečnostní normy | CE, RoHS |
8. Záruka a podpora
This Rebel MIE-RB-830 Digital Multimeter is covered by a standard manufacturer's warranty against defects in materials and workmanship. Please refer to the warranty card included with your purchase or contact your retailer for specific warranty terms and conditions.
For technical support or service inquiries, please contact the point of purchase or visit the official Rebel webstránky pro kontaktní informace.


