1. Konec produktuview
This manual provides comprehensive instructions for the installation, operation, and maintenance of your Akia Screens 104-inch Motorized Electric Remote Controlled Drop Down Projector Screen. Designed for optimal viewing experience, this screen features a MaxWhite 2 material, 1.1 gain, and is compatible with 4K Ultra HD and Active 3D projection. It is suitable for both ceiling and wall mounting in various environments such as offices and home theaters.

Image: The Akia Screens 104-inch motorized projector screen, showcasing its sleek design and compatibility with 4K, 8K, 3D, and HDR content.
2. Bezpečnostní informace
- Před instalací a provozem si pečlivě přečtěte všechny pokyny.
- Ensure the power supply matches the requirements specified on the product label.
- Do not attempt to disassemble or modify the screen. Refer all servicing to qualified personnel.
- Keep the screen away from heat sources, direct sunlight, and moisture.
- Use caution when mounting. Ensure ladders or step stools are on solid footing. Two people are recommended for hoisting the screen overhead.
3. Obsah balení
Před zahájením instalace ověřte, zda jsou všechny komponenty přítomny:
- Motorized Projector Screen Unit
- Infračervené (IR) dálkové ovládání
- Nástěnný ovladač s vestavěným infračerveným senzorem
- RJ50 Port for wired 12-volt trigger feature
- Installation Kit (mounting hardware for wall or ceiling)
- Uživatelská příručka (tento dokument)
4. Nastavení a instalace
Follow these steps for proper installation of your projector screen. For a visual guide, please refer to the official installation video below.
Video: Official Akia Electric Motorized Projector Screen Installation Guide. This video demonstrates the unboxing, measuring, hardware installation, hanging, and initial operation of the screen.
4.1 Rozbalení
Carefully open the packaging and remove the screen unit and accessories. Inspect for any visible damage before proceeding.
Obrázek: A view of the projector screen components after unboxing, including the screen unit and accessories.
4.2 Measuring and Mounting Points
Determine the desired location for your screen. The screen can be mounted on a wall or ceiling. Identify the flush wall mounting points and ceiling suspended loops on the screen casing. Measure the distance between these points to accurately mark your installation location.

Image: Close-up of the screen casing showing flush wall mounting points and ceiling suspended loops, along with a tape measure indicating dimensions.
4.3 Install Hardware
Using the provided installation kit, securely attach the mounting hardware to your wall or ceiling at the marked locations. Ensure the hardware is firmly anchored to studs or appropriate structural supports.
4.4 Hanging the Screen
With assistance, carefully lift the screen unit and attach it to the installed mounting hardware. Ensure the screen is level and securely fastened. Two people are recommended for this step to prevent injury or damage to the screen.
4.5 Připojení napájení
Plug the screen's power cord into a standard electrical outlet. The screen is designed for plug-and-play operation.
4.6 Initial Screen Lowering
Using the remote control, press the 'down' button to fully lower the screen for the first time. This will set the initial lower limit. The screen features user-friendly programmable vertical drop position for easy adjustment.
5. Návod k obsluze
5.1 Obsluha dálkového ovladače
The screen comes with an Infrared (IR) remote control and a wall box controller. Use the remote to raise or lower the screen. The wall box controller has a built-in IR sensor for convenient control.

Image: The remote control and wall box controller for the projector screen, illustrating the control system.
5.2 12-Volt Trigger Feature
The 12V trigger feature allows the screen's UP/DOWN operation to synchronize with your projector's power cycle via the wall box controller. Connect your projector's 12V trigger output to the RJ50 port on the wall box controller using a compatible cable (not included). When the projector powers on, the screen will automatically lower; when it powers off, the screen will retract.

Image: Diagram illustrating the 12-volt trigger feature, showing how the screen's movement synchronizes with the projector's power state.
6. Vlastnosti a součásti
- Materiál obrazovky: MaxWhite 2, 1.1 Gain. Multi-layer weave with a 180-degree wide viewing angle. Fully black-backed front projection screen with a textured surface.
- Podpora rozlišení: 4K Ultra HD and Active 3D Projection Ready.
- certifikace: GreenGuard and GreenGuard GOLD Certified | UL 2818.
- Casing: Durable metal housing for wall or ceiling installations.
- Masking Borders: Standard black-masking borders provide an increase in picture contrast.
- Motorový systém: Tubular motor for swift operation and product longevity.

Obrázek: Podrobný view of the screen's casing and black masking borders, highlighting the 4:3 aspect ratio.

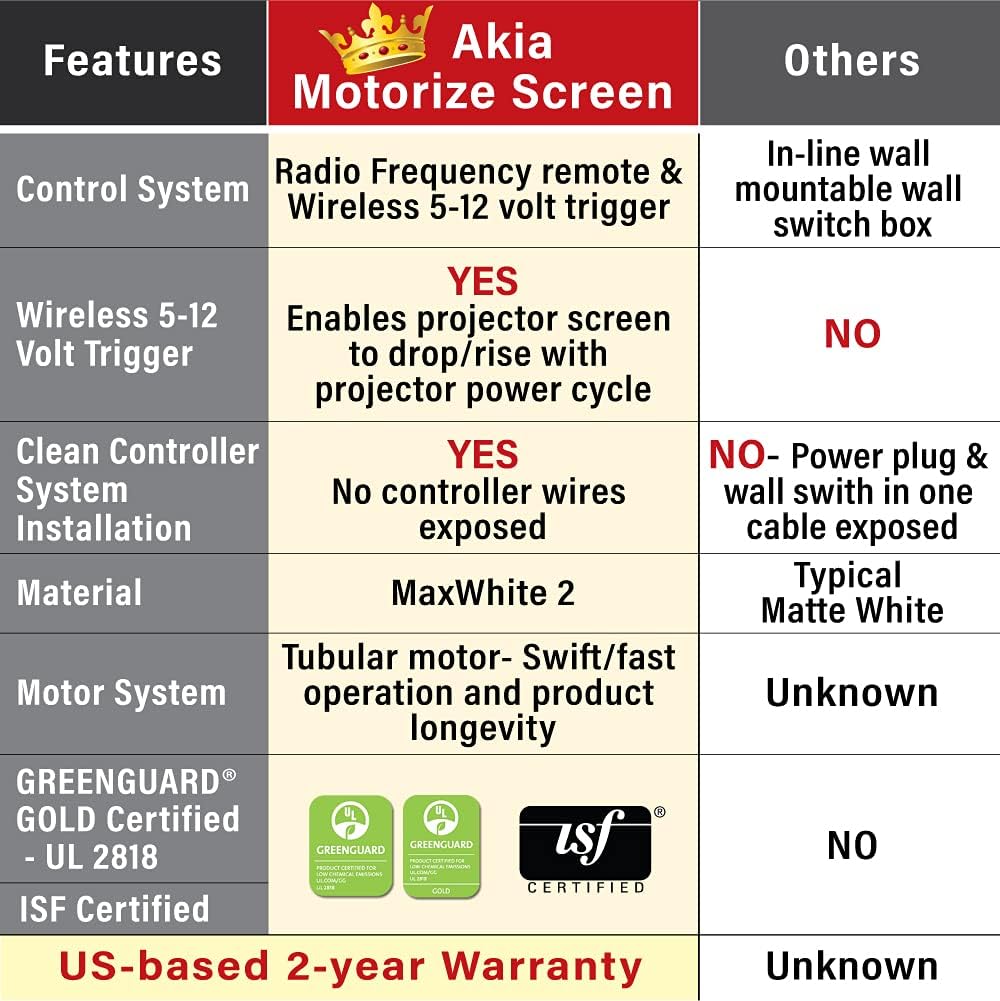
Image: A comparison table highlighting key features of the Akia Motorize Screen, including control system, 12-volt trigger, material, motor system, and certifications.
7. Údržba
To ensure the longevity and optimal performance of your projector screen, follow these maintenance guidelines:
- Čištění: The screen surface is easy to clean with mild soap and water. Use a soft, damp cloth and gently wipe the surface. Avoid abrasive cleaners or harsh chemicals.
- Utírat prach: Regularly dust the screen casing and surface with a soft, dry cloth to prevent dust buildup.
- Skladování: When not in use for extended periods, ensure the screen is fully retracted into its casing to protect the screen material.
8. Řešení problémů
If you encounter issues with your projector screen, consider the following common troubleshooting steps:
- Obrazovka nereaguje:
- Zkontrolujte, zda je napájecí kabel bezpečně zapojený do zásuvky pod napětím.
- Ujistěte se, že baterie v dálkovém ovladači nejsou vybité.
- Verify that the IR sensor on the wall box controller is not obstructed.
- Screen Not Fully Extending/Retracting:
- Check for any physical obstructions preventing the screen's movement.
- The screen has a programmable vertical drop position. If it's not extending fully, you may need to reset or adjust the lower limit setting (refer to specific instructions in the full product manual if available).
- Wrinkles or Creases on Screen:
- Minor creases from shipping may naturally smooth out over time with regular use.
- Ensure the screen is properly installed and tensioned.
For persistent issues, please contact customer support as detailed in the Warranty & Support section.
9. Specifikace
| Funkce | Detail |
|---|---|
| Velikost úhlopříčky | 104-palcový |
| ViewRozměry (V x Š) | 62.2-inch H x 83.1-inch W |
| Poměr stran | Formát 4:3 HD |
| Overall Extended Size (H x W) | 71.7-inch H x 94.5-inch W (with Black Metal Housing) |
| Hmotnost produktu | 19.07 libry |
| Materiál | Metal (casing), MaxWhite 2 (screen) |
| Typ montáže | Montáž na stěnu a na strop |
| Kompatibilita | Not compatible with UST (Ultra Short Throw) Projectors |
Image: Diagram showing the overall and viewing dimensions of the 104-inch Akia motorized projector screen.
10. Záruka a podpora
Akia Screens provides comprehensive support for its products:
- Záruka: 2-Year Manufacturer's Warranty by ISO9001 manufacturer since 2004.
- Technická podpora: Lifetime Technical Support available via Email, Web Chat, or Toll-Free phone call by a U.S. Based Professional Service Team.
For assistance, please visit the official Akia Screens webwebu nebo se přímo obraťte na jejich tým podpory.

Image: Visual representation of Akia Screens' US-based stock, service, and lifetime tech support, along with the 2-year warranty badge.


