1. Úvod a konecview
The Docooler JINGSHA X99-8D3 is a high-performance ATX gaming motherboard designed for LGA2011 V3 processors. It features four-channel DDR3 memory support, an M.2 NVME slot for high-speed storage, and multiple PCI-E expansion slots, making it suitable for demanding computing tasks and gaming setups. This manual will guide you through the installation, configuration, and maintenance of your motherboard.
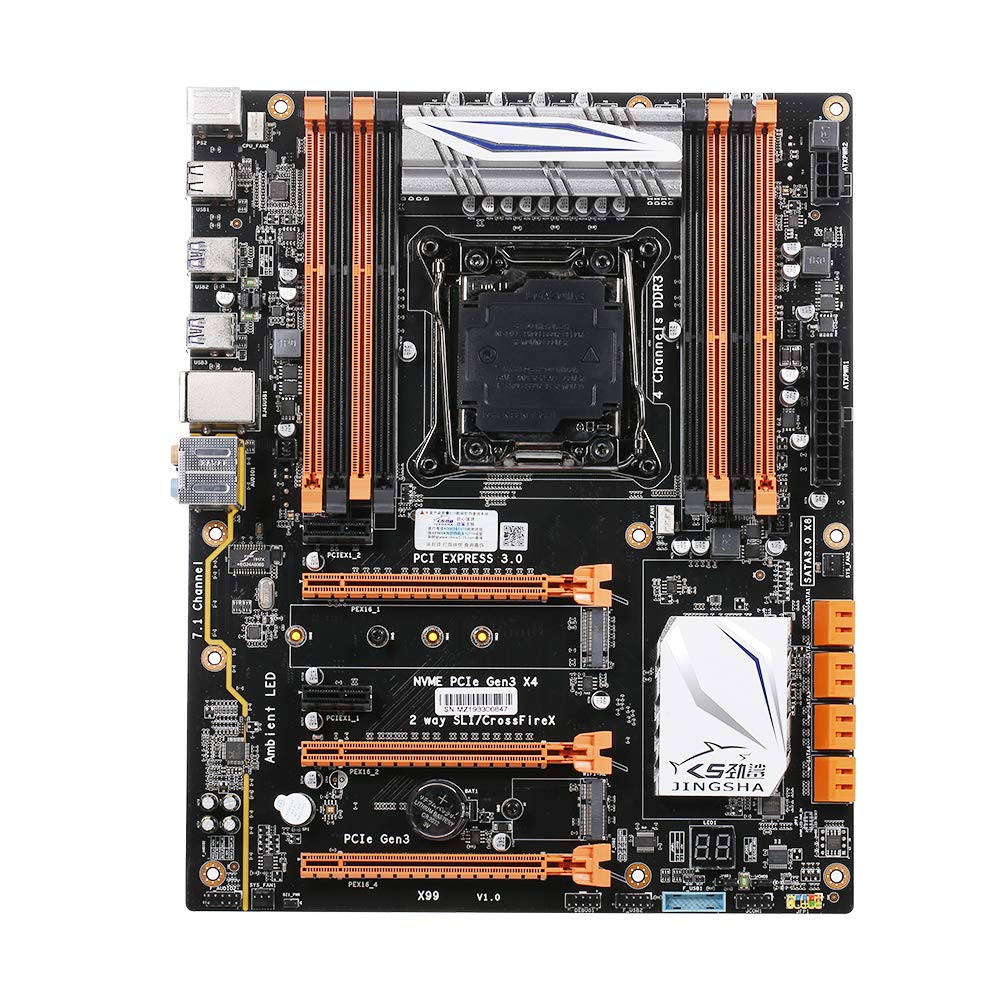
Obrázek 1.1: Shora dolů view of the Docooler JINGSHA X99-8D3 Motherboard, showcasing its layout with CPU socket, RAM slots, and various expansion slots.
2. Klíčové vlastnosti
- M.2 NVME Support: Equipped with an M.2 hard disk port, supporting high-speed PCI-E NVME X4 for optimal operating system and application driver performance.
- Quad-Channel DDR3 Memory: Features 8 DDR3 memory slots across 4 channels, significantly improving capacity and performance, supporting up to 256GB.
- Digital Diagnostic Card: Integrated digital diagnostic card automatically tests hardware devices to ensure proper operation and assist in troubleshooting.
- Multiple PCI-E Expansion Slots: Provides 3 PCI-E expanded slots, configurable as X16/X8 to handle various workloads and multi-GPU setups.
- Odolná konstrukce: Built with a 10-layer PCB and high-quality capacitors for enhanced stability and heat resistance.

Figure 2.1: Diagram illustrating the six core technologies and features of the motherboard, including 4-channel DDR3*8, M.2 hard disk interface, digital diagnostic card, 7.1 channel audio, SATA3.0*8 interface, and Crossfire support.
3. Obsah balení
Zkontrolujte prosím, zda jsou ve vašem balení přítomny všechny níže uvedené položky:
- 1x Docooler JINGSHA X99-8D3 Motherboard
- 1x SATA kabel
- 1x I/O Baffle (Backplate)
- 1x CPU Fan Board
- A bag of screws
4. Specifikace
| Funkce | Specifikace |
|---|---|
| Model | X99-8D3 |
| Form Factor | ATX |
| Graphic Slot | PCIE3.0 16X*3 |
| Síťová karta | Gigabitová síťová karta |
| Zvukový kanál | 7.1 kanál |
| CPU Type Support | LGA2011 V3 (2629V3/2649V3/2669V3/2678V3/2696V3/2676V3/2673V3) |
| Vrstvy PCB | 10 vrstev |
| Paměťový slot | DDR3*8 |
| Maximální kapacita paměti | 256 GB |
| Rozhraní SATA | SATA3.0*8, M.2 NVME |
| PS/2 Interface | Myš / klávesnice |
| Napájení | 8 PIN*1, 24 PIN*1 |
| Rozhraní USB | USB 3.0*6, USB 2.0*6 |
| Rozšířené rozhraní | PCIE 1X*2, M.2 WIFI*1 |
| Velikost položky | 30.2 x 24.4 cm (11.89 x 9.61 palce) |
| Hmotnost položky | 930.5 g (32.82 oz) |

Obrázek 4.1: Detailní view of the motherboard's rear I/O panel, showing PS/2 ports, USB 2.0, USB 3.0, Gigabit Network Port, and 7.1 Audio Ports.
5. Nastavení a instalace
Před zahájením instalace se ujistěte, že je systém vypnutý a odpojený ze zásuvky. Základní desku držte za okraje, abyste zabránili statickému výboji.
5.1 Instalace CPU
- Locate the LGA2011 V3 CPU socket on the motherboard.
- Gently push down the CPU retention lever and swing it open.
- Align the triangular mark on your CPU with the corresponding mark on the socket. Carefully place the CPU into the socket without forcing it.
- Zavřete zajišťovací páčku, abyste zajistili procesor.
- Naneste tenkou, rovnoměrnou vrstvu teplovodivé pasty na horní část procesoru.
- Install the CPU cooler according to its manufacturer's instructions, ensuring proper contact and pressure.

Obrázek 5.1: Detail view of the LGA2011 V3 CPU socket on the motherboard, ready for CPU installation.
5.2 Installing RAM Modules
- Otevřete klipy na obou koncích slotů pro paměti DDR3.
- Zarovnejte zářez na modulu RAM s výstupkem v paměťovém slotu.
- Pevně zatlačte na oba konce modulu RAM, dokud klipsy nezacvaknou na místo a modul tak zajistí.
- For optimal performance, install RAM modules in matching pairs across the four channels as indicated in the motherboard manual or silkscreen.

Obrázek 5.2: View of the eight DDR3 RAM slots on the motherboard, showing their arrangement for quad-channel memory configuration.
5.3 Installing Storage Devices (M.2 NVME & SATA)
- SSD disk M.2 NVME: Vyhledejte slot M.2. Vložte disk M.2 SSD pod úhlem do slotu, poté jej jemně zatlačte dolů a zajistěte jej dodaným šroubem.
- SATA disky: Connect your SATA SSDs or HDDs to the SATA 3.0 ports using SATA data cables. Ensure the power supply SATA power connectors are also attached to the drives.

Figure 5.3: Close-up of the M.2 interface on the motherboard, highlighting its position and the PCI-E Gen3 X4 connection for high-speed data transfer.
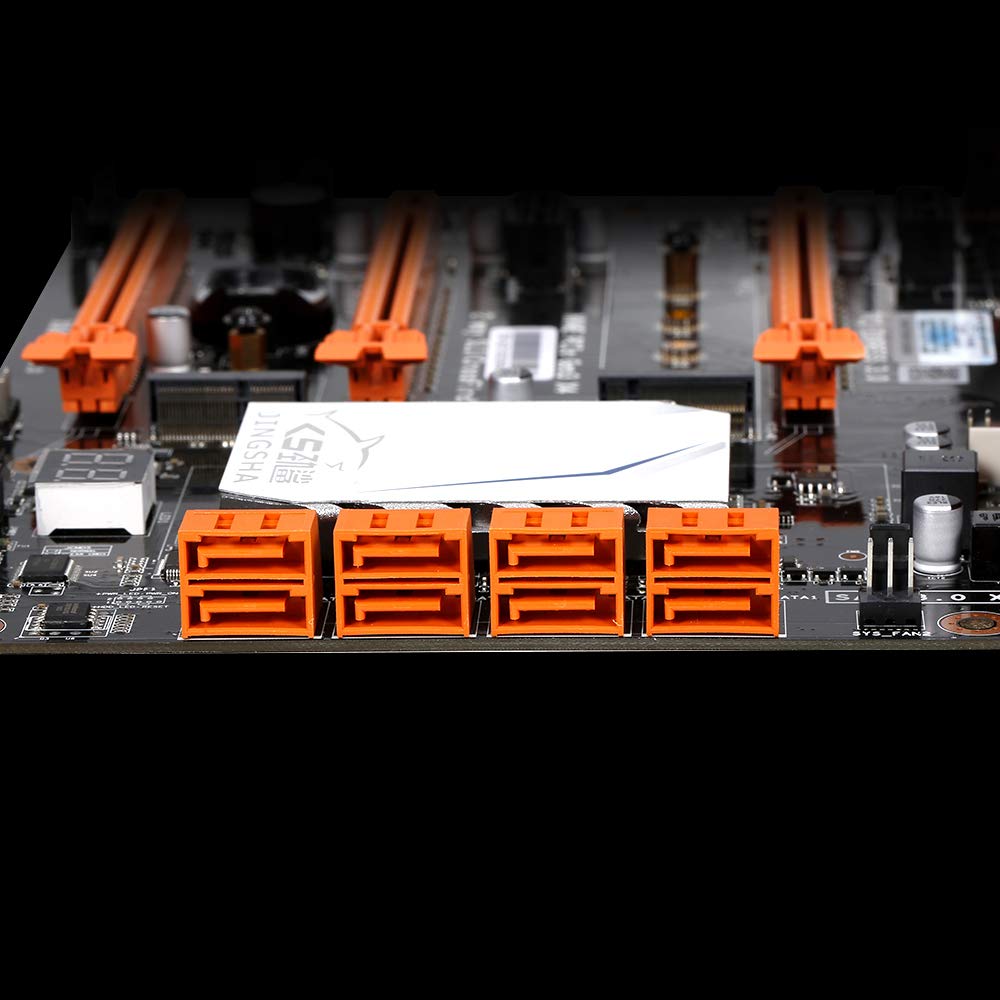
Obrázek 5.4: View of the eight orange SATA 3.0 ports on the motherboard, providing ample connectivity for storage devices.
5.4 Připojení napájecího zdroje
- Připojte 24pinový konektor napájení ATX z vašeho napájecího zdroje (PSU) k odpovídajícímu portu na základní desce.
- Connect the 8-pin CPU power connector (EPS12V) from your PSU to the 8-pin port near the CPU socket.
5.5 Instalace rozšiřujících karet (PCIe)
- Locate the desired PCI-E 3.0 x16 or x1 slots.
- Sejměte příslušný kryt rozšiřujícího slotu z pouzdra počítače.
- Align the expansion card with the slot and press down firmly until it is fully seated. Secure the card with a screw to the case.

Obrázek 5.5: Úhlové view of the motherboard, highlighting the three PCI Express 3.0 x16 slots and the smaller PCIe x1 slots, ready for graphics cards and other expansion cards.
6. Obsluha základní desky
6.1 První spuštění a nastavení BIOSu
- Po sestavení všech komponent připojte monitor, klávesnici a myš.
- Power on your system. During the initial boot sequence, repeatedly press the DEL or F2 key (common for JINGSHA motherboards) to enter the BIOS/UEFI setup utility.
- V systému BIOS ověřte, zda jsou všechny nainstalované komponenty (CPU, RAM, úložiště) správně detekovány.
- Nakonfigurujte pořadí spouštění tak, aby upřednostňovalo instalační médium operačního systému (jednotka USB nebo DVD).
- Uložte změny a ukončete BIOS. Systém se restartuje.
6.2 Instalace operačního systému
Follow the instructions provided with your operating system (e.g., Windows, Linux) to complete the installation process. Ensure you install all necessary drivers for the motherboard's chipsets, network, audio, and other components from the manufacturer's website or included driver disc.
7. Údržba
Správná údržba zajistí dlouhou životnost a stabilní provoz vaší základní desky.
- Odstranění prachu: Pravidelně čistěte prach ze základní desky a jejích součástí pomocí stlačeného vzduchu. Před čištěním se ujistěte, že je systém vypnutý a odpojený od sítě.
- Aktualizace BIOSu: Periodically check the Docooler or JINGSHA official website for BIOS updates. BIOS updates can improve compatibility, stability, and performance. Follow update instructions carefully to avoid damaging the motherboard.
- Aktualizace ovladačů: Udržujte ovladače systému aktualizované, abyste zajistili optimální výkon a kompatibilitu s novým softwarem a hardwarem.
- Podmínky prostředí: Operate the motherboard in a well-ventilated environment with stable temperature and humidity to prevent overheating and component degradation.
8. Řešení problémů
Tato část se zabývá běžnými problémy, se kterými se můžete setkat.
8.1 Žádné napájení / Žádné spuštění
- Ensure the 24-pin ATX and 8-pin CPU power connectors are securely plugged into the motherboard.
- Check if the power supply unit (PSU) is switched on and connected to a working power outlet.
- Verify that the front panel power button cable is correctly connected to the motherboard's header.
8.2 Žádný výstup na displej
- Ensure your graphics card (if dedicated) is properly seated in its PCI-E slot and has all necessary power cables connected.
- Check that your monitor cable is securely connected to the graphics card or motherboard (if integrated graphics are used, though X99 typically requires a dedicated GPU).
- Try reseating your RAM modules. Incorrectly seated RAM is a common cause of no display.
8.3 POST Code Display (Digital Diagnostic Card)
The motherboard is equipped with a digital diagnostic card (POST code display) that shows a two-digit code during boot-up. Refer to the motherboard's detailed technical documentation (often available on the manufacturer's website) for a list of POST codes and their meanings. This can help pinpoint the exact component causing a boot failure.

Obrázek 8.1: Detail view showing the integrated digital diagnostic card (POST code display) on the motherboard, which assists in identifying hardware issues during boot.
9. Záruka a podpora
For warranty information and technical support, please refer to the documentation provided with your purchase or visit the official Docooler or JINGSHA webUschovejte si doklad o koupi pro případ reklamace.


