1. Úvod
This manual provides essential instructions for the safe and effective operation of your AOPUTTRIVER AP-770D Digital Multimeter. Please read this manual thoroughly before use and retain it for future reference. This device is designed for accurate measurement of various electrical parameters in a wide range of applications.
Bezpečnostní informace
- Vždy dodržujte místní a národní bezpečnostní předpisy.
- Nepoužívejte měřicí přístroj, pokud se jeví poškozený nebo pokud je narušena izolace měřicích vodičů.
- Před měřením se ujistěte, že je vybrána správná funkce a rozsah.
- Avoid making measurements on circuits with voltages exceeding the meter's rated limits.
- Vyměňujte baterie a pojistky pouze za baterie s předepsaným typem a jmenovitou hodnotou.
2. Obsah balení
Ověřte, zda jsou v balení přítomny všechny níže uvedené položky:
- AOPUTTRIVER AP-770D Digital Multimeter
- Měřicí kabely (červený a černý)
- K-Type Thermocouple (Temperature Probe)
- 9V baterie
- Uživatelská příručka
- Pouzdro na přenášení
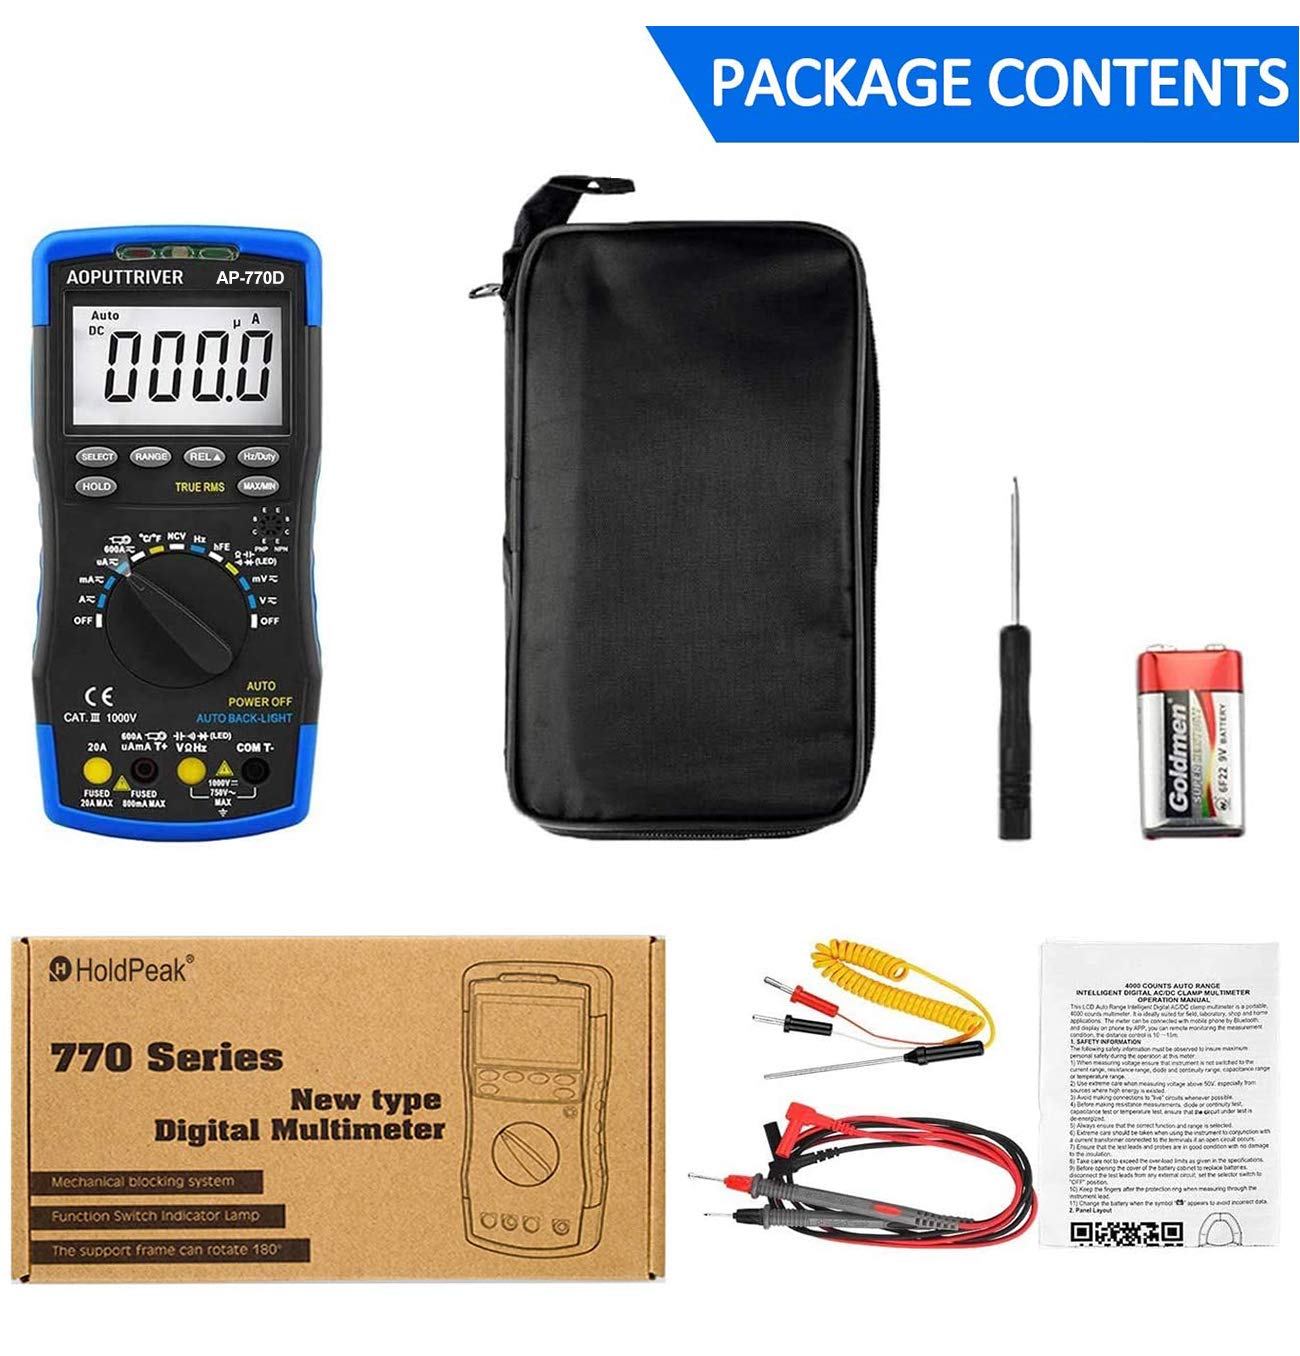
Figure 2.1: Contents of the AP-770D package, including the multimeter, test leads, temperature probe, battery, manual, and carrying pouch.
3. Konec produktuview
Familiarize yourself with the components of your AP-770D Digital Multimeter:

Obrázek 3.1: Přední strana view of the AP-770D with key functions labeled.
- NCV Red Light: Indicates non-contact voltage detekce.
- Snímač CDS: Light sensor for auto backlight.
- NCV Green Light: Indicates non-contact voltage detekce.
- Oblast detekce NCV: Point for non-contact voltage snímání.
- Zobrazit: Large LCD for reading measurements.
- Klávesa SELECT: Toggles between functions within a rotary switch position.
- Tlačítko HOLD: Zmrazí aktuální údaj na displeji.
- RANGE Key: Přepíná mezi automatickým a manuálním přepínáním rozsahu.
- REL ▲ Key: Aktivuje režim relativního měření.
- Hz/Duty Key: Selects frequency or duty cycle measurement.
- Tlačítko MAX/MIN: Zaznamenává maximální a minimální hodnoty.
- Transistor hFE Test Input Jack: Pro testování zesílení tranzistoru.
- Otočný přepínač: Vybere požadovanou funkci měření.
- Vstup VΩHz: Vstupní svorka pro objtage, měření odporu, frekvence, kapacity, diod a vodivosti.
- COM vstup: Společný (záporný) pól pro všechna měření.
- Vstupní konektor 20A: Input terminal for high AC/DC current measurements (up to 20A).
- µA mA T+ Input: Input terminal for microampere/milliampere current and temperature measurements.

Figure 3.2: Dimensions of the AP-770D and its 180° swivel stand.
4. Nastavení
4.1 Instalace baterie
The AP-770D requires one 9V battery for operation. To install or replace the battery:
- Ujistěte se, že je multimetr vypnutý a měřicí vodiče odpojené.
- Vyhledejte kryt přihrádky na baterie na zadní straně jednotky.
- Pomocí šroubováku povolte šroub, který zajišťuje kryt baterie.
- Remove the cover and insert the 9V battery, observing correct polarity.
- Vraťte zpět kryt baterie a utáhněte šroub.
4.2 První zapnutí
Turn the rotary switch from the 'OFF' position to any desired measurement function. The display will illuminate. The meter features an auto backlight that activates in low-light conditions.
5. Provozní režimy
The AP-770D offers a variety of measurement functions. Always ensure the correct function is selected and test leads are connected to the appropriate input jacks.
5.1 svtagMěření (AC/DC)
K měření objtage:
- Nastavte otočný přepínač do polohy „V~“ (AC Volumetage) or 'V∓' (DC Voltage) pozice.
- Connect the red test lead to the 'VΩHz' input jack and the black test lead to the 'COM' input jack.
- Připojte měřicí sondy k měřenému obvodu nebo součástce.
- Přečtěte si svtage hodnota na displeji.
5.2 Měření proudu (AC/DC)
Pro měření proudu:
- Set the rotary switch to the appropriate current range (µA, mA, or A). Use the 'SELECT' button to toggle between AC and DC current if applicable.
- Connect the red test lead to the 'µA mA T+' or '20A' input jack (depending on expected current) and the black test lead to the 'COM' input jack.
- Connect the test probes in series with the circuit to be measured.
- Odečtěte aktuální hodnotu na displeji.
5.3 Měření odporu
Pro měření odporu:
- Nastavte otočný přepínač do polohy „Ω“ (odpor).
- Connect the red test lead to the 'VΩHz' input jack and the black test lead to the 'COM' input jack.
- Connect the test probes across the component to be measured. Ensure the circuit is de-energized.
- Odečtěte hodnotu odporu na displeji.
5.4 Měření kapacity
Chcete-li měřit kapacitu:
- Set the rotary switch to the '––||––' (Capacitance) position.
- Connect the red test lead to the 'VΩHz' input jack and the black test lead to the 'COM' input jack.
- Připojte měřicí sondy ke kondenzátoru. Před měřením se ujistěte, že je kondenzátor vybitý.
- Odečtěte hodnotu kapacity na displeji.
5.5 Měření frekvence a pracovního cyklu
To measure frequency or duty cycle:
- Set the rotary switch to the 'Hz' position.
- Connect the red test lead to the 'VΩHz' input jack and the black test lead to the 'COM' input jack.
- Připojte měřicí sondy ke zdroji signálu.
- Press the 'Hz/Duty' button to toggle between frequency and duty cycle readings.
5.6 Test diod
Provedení testu diod:
- Set the rotary switch to the '→|–' (Diode) position.
- Connect the red test lead to the 'VΩHz' input jack and the black test lead to the 'COM' input jack.
- Připojte červenou sondu k anodě a černou sondu ke katodě diody.
- Přední svazektage drop will be displayed for a good diode. Reverse the probes; the display should show 'OL' (Open Loop).
5.7 Test kontinuity
Chcete-li provést test kontinuity:
- Set the rotary switch to the '▪))' (Continuity) position.
- Connect the red test lead to the 'VΩHz' input jack and the black test lead to the 'COM' input jack.
- Připojte měřicí sondy k obvodu nebo součástce.
- If continuity exists (resistance below a certain threshold), the buzzer will sound.
5.8 Měření teploty
Pro měření teploty:
- Set the rotary switch to the '°C/°F' (Temperature) position.
- Connect the K-type thermocouple to the 'µA mA T+' and 'COM' input jacks, observing polarity.
- Place the thermocouple tip on or in the object whose temperature is to be measured.
- Read the temperature value on the display. Use the 'SELECT' button to switch between Celsius and Fahrenheit.

Figure 5.1: Measuring temperature of a liquid using the AP-770D's temperature probe.
5.9 Nekontaktní svtage (NCV) Detekce
Pro detekci hlasitosti střídavého proudutage bez kontaktu:
- Nastavte otočný přepínač do polohy „NCV“.
- Move the NCV detection area (top of the meter) close to the conductor being tested.
- The NCV red and green lights will flash, and the buzzer will sound, indicating the presence of AC voltage. The intensity of the indication increases with stronger voltage.

Figure 5.2: Using the NCV function to detect live wires without direct contact.
5.10 hFE Test (Transistor Gain)
To test transistor hFE:
- Set the rotary switch to the 'hFE' position.
- Insert the transistor leads (Emitter, Base, Collector) into the corresponding holes in the 'Transistor hFE Test Input Jack'.
- Odečtěte hodnotu hFE na displeji.
6. Specifikace
| Funkce | Hodnota |
|---|---|
| Počet zobrazení | 40,000 počtů |
| Skutečné RMS | Ano |
| Automatický rozsah | Ano |
| NCV | Ano |
| AC/DC Voltage | Až 1000V |
| AC / DC proud | Až 20A |
| Odpor | Až 60 MΩ |
| Kapacita | Až 60 mF |
| Frekvence | Až 10 MHz |
| Teplota | Yes (with K-type thermocouple) |
| Test diod | Ano |
| Test kontinuity | Ano (s bzučákem) |
| hFE test | Ano |
| Automatické podsvícení | Ano |
| Automatické vypnutí | Ano |
| Bezpečnostní standard | IEC-1010, CAT III 1000V |
| Zdroj napájení | 9V baterie |
| Rozměry | 20 cm x 9 cm x 4 cm (přibližně) |
| Hmotnost | 350 gramů |
7. Údržba
7.1 Čištění
Otřete c měřičeasing s reklamouamp hadříkem a jemným čisticím prostředkem. Nepoužívejte abrazivní prostředky ani rozpouštědla. Před použitím se ujistěte, že je měřič zcela suchý.
7.2 Výměna baterie
Když se na displeji zobrazí symbol baterie, vyměňte 9V baterii podle pokynů v části 4.1.
7.3 Výměna pojistky
If the current measurement function fails, the fuse may need replacement. Refer to the full user manual for detailed instructions on fuse replacement. Always use fuses with the specified ratings (e.g., Fused 20A MAX, Fused 500mA MAX).

Figure 7.1: The mechanical blocking system helps prevent incorrect lead insertion, enhancing safety during use.
8. Řešení problémů
- Bez displeje: Check battery installation and charge level. Replace battery if necessary.
- 'OL' na displeji: Indicates an over-range condition or open circuit. Select a higher range or check connections.
- Nesprávné čtení: Ensure correct function and range are selected. Verify test lead connections and integrity.
- Selhání měření proudu: Zkontrolujte pojistku. Pokud je spálená, vyměňte ji (viz kapitola 7.3).
9. Záruka a podpora
For warranty information or technical support, please refer to the contact details provided in your product packaging or visit the AOPUTTRIVER official website. Do not attempt to repair the device yourself, as this may void the warranty and pose a safety risk.


