Zavedení
This manual provides detailed instructions for the assembly, operation, and maintenance of your Sunnydaze 10x13 Soft Top Patio Gazebo. Please read all instructions carefully before beginning assembly and retain this manual for future reference.

Image: Fully assembled Sunnydaze 10x13 Soft Top Patio Gazebo in tan.
Bezpečnostní informace
VAROVÁNÍ: Nedodržení těchto bezpečnostních pokynů může vést ke zranění nebo poškození produktu.
- Always assemble the gazebo with at least two people.
- Před použitím se ujistěte, že jsou všechna připojení zabezpečená.
- Do not use the gazebo in strong winds, heavy rain, or snow. Disassemble or secure the canopy during adverse weather conditions to prevent damage.
- Udržujte veškeré zdroje ohně a tepla v dostatečné vzdálenosti od látky altánu. Látka není nehořlavá.
- Nezavěšujte těžké předměty na rám.
- Supervise children around the gazebo.
- Periodically check all nuts and bolts for tightness.
- This gazebo is designed for temporary shade and shelter. It is not intended as a permanent structure.
Obsah balení
Před montáží ověřte, zda jsou všechny níže uvedené součásti přítomny a nepoškozené. Pokud některé součásti chybí nebo jsou poškozené, kontaktujte zákaznickou podporu.
- 4x Nohy
- 4 x chodidla
- 8 x Beams
- 13 x Trusses
- 4 x Boční stěny
- 4 x Screens (Mosquito Netting)
- 2 x Peak Hubs
- 1 x Main Canopy
- 1 x Upper Canopy
- 4 x Long Net Poles
- 4 x Short Net Poles
- 1 x Hardware Kit (includes nuts, bolts, wrenches, etc.)
Montážní návod
Assembly requires two people. Please follow these steps carefully. Refer to the diagrams for visual guidance.
Krok 1: Sestavte základní rám
- Lay out the 4 legs and 4 feet on a flat, level surface.
- Attach the feet to the bottom of each leg using the provided hardware.
- Connect the 8 beams to the top of the legs to form the rectangular base structure. Ensure all bolts are finger-tight at this stage.
Obrázek: Podrobný view of the steel frame structure.
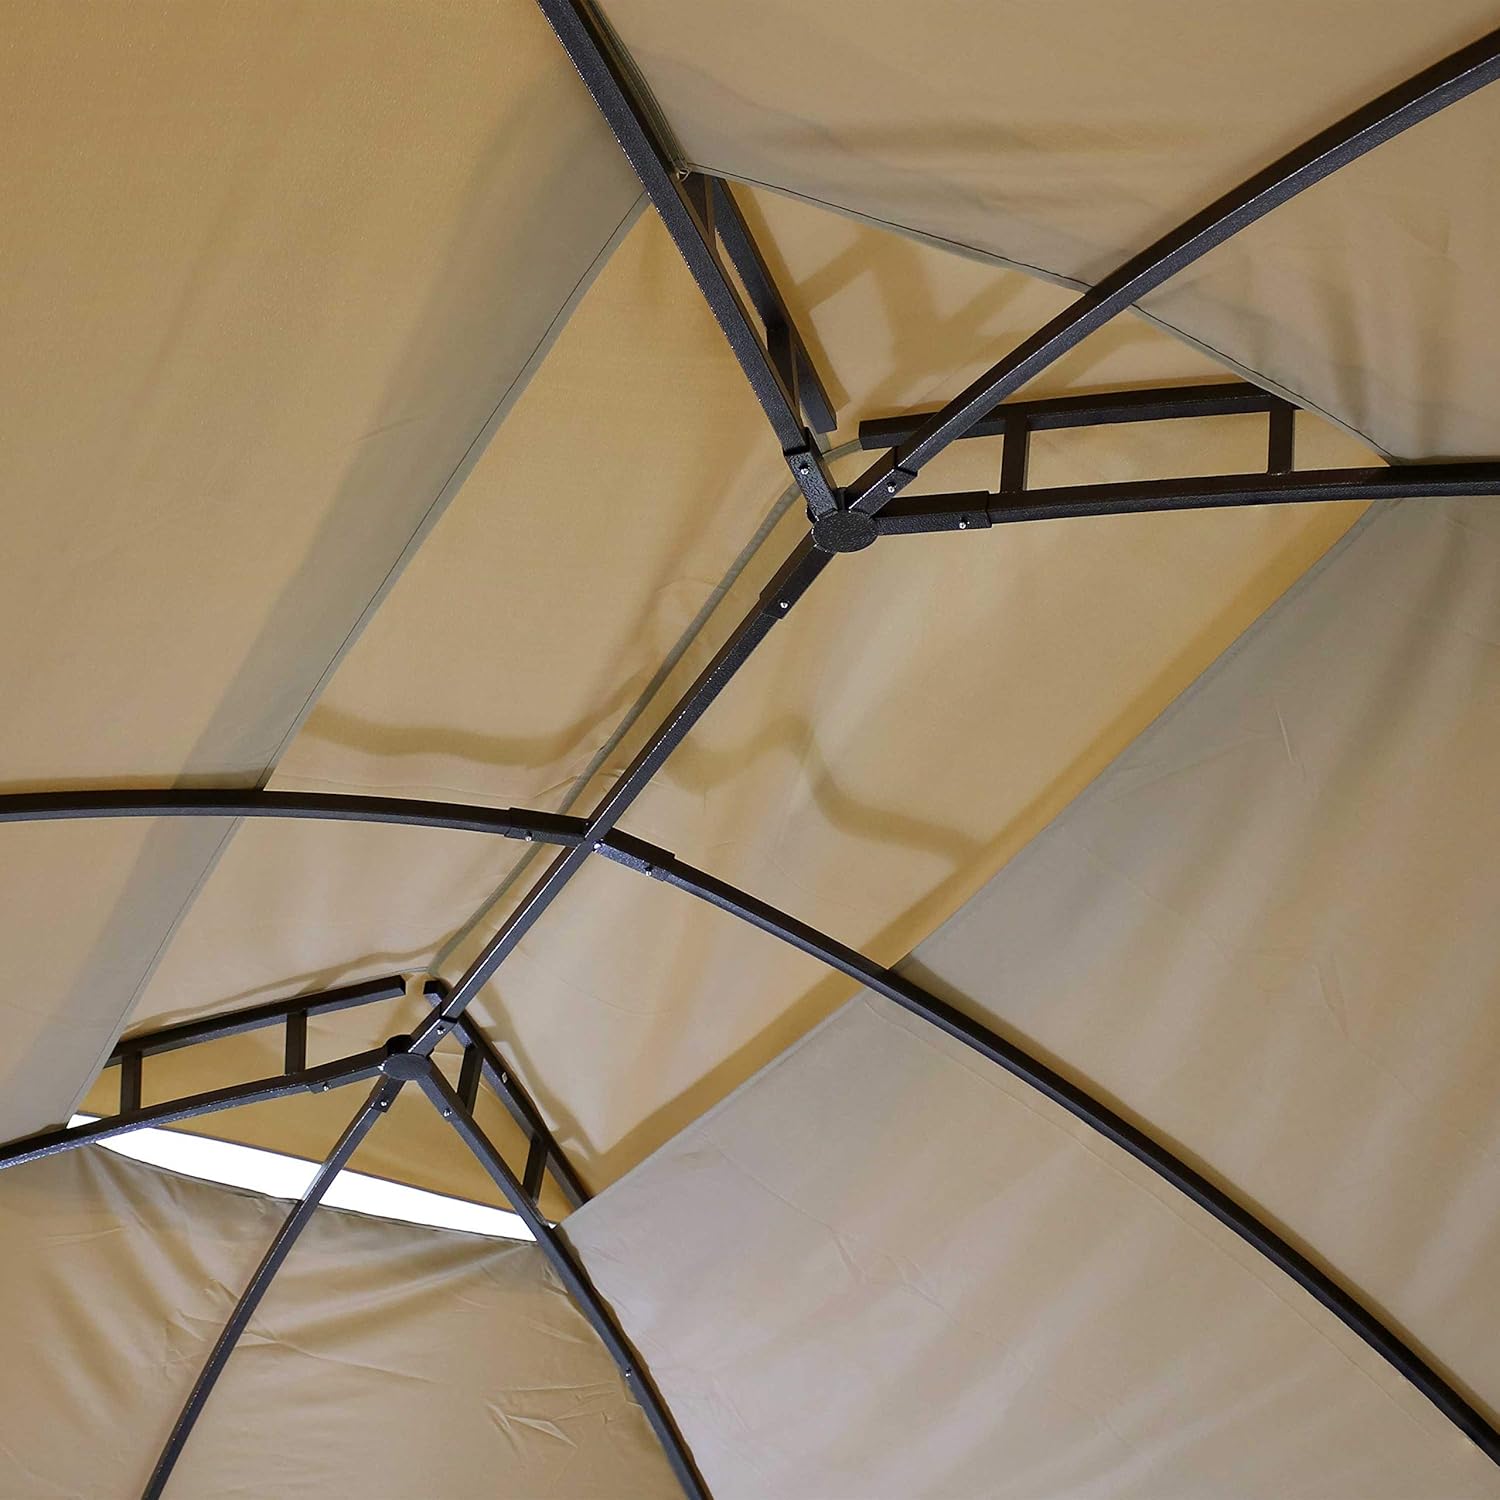
Step 2: Install the Roof Trusses and Peak Hubs
- Attach the 13 trusses to the beams and connect them to the 2 peak hubs to form the roof structure.
- Ujistěte se, že jsou všechna připojení bezpečná.
Step 3: Attach the Canopies
- Carefully place the main canopy over the assembled roof frame. Ensure it is centered and all corners are aligned.
- Secure the main canopy to the frame using the integrated fasteners.
- Install the upper canopy onto the smaller top frame, ensuring it is properly seated for ventilation.

Image: Canopy fabric secured to the frame.
Step 4: Install Sidewalls and Screens
- Attach the long and short net poles to the frame as indicated in the diagram.
- Hang the 4 screens (mosquito netting) from the designated tracks or hooks on the frame.
- Hang the 4 sidewalls (privacy curtains) over the screens. The double zippers allow independent operation of screens and sidewalls.
- Use the fabric hook-and-loop fasteners to secure the sidewalls to the legs or tie them back when not in use.
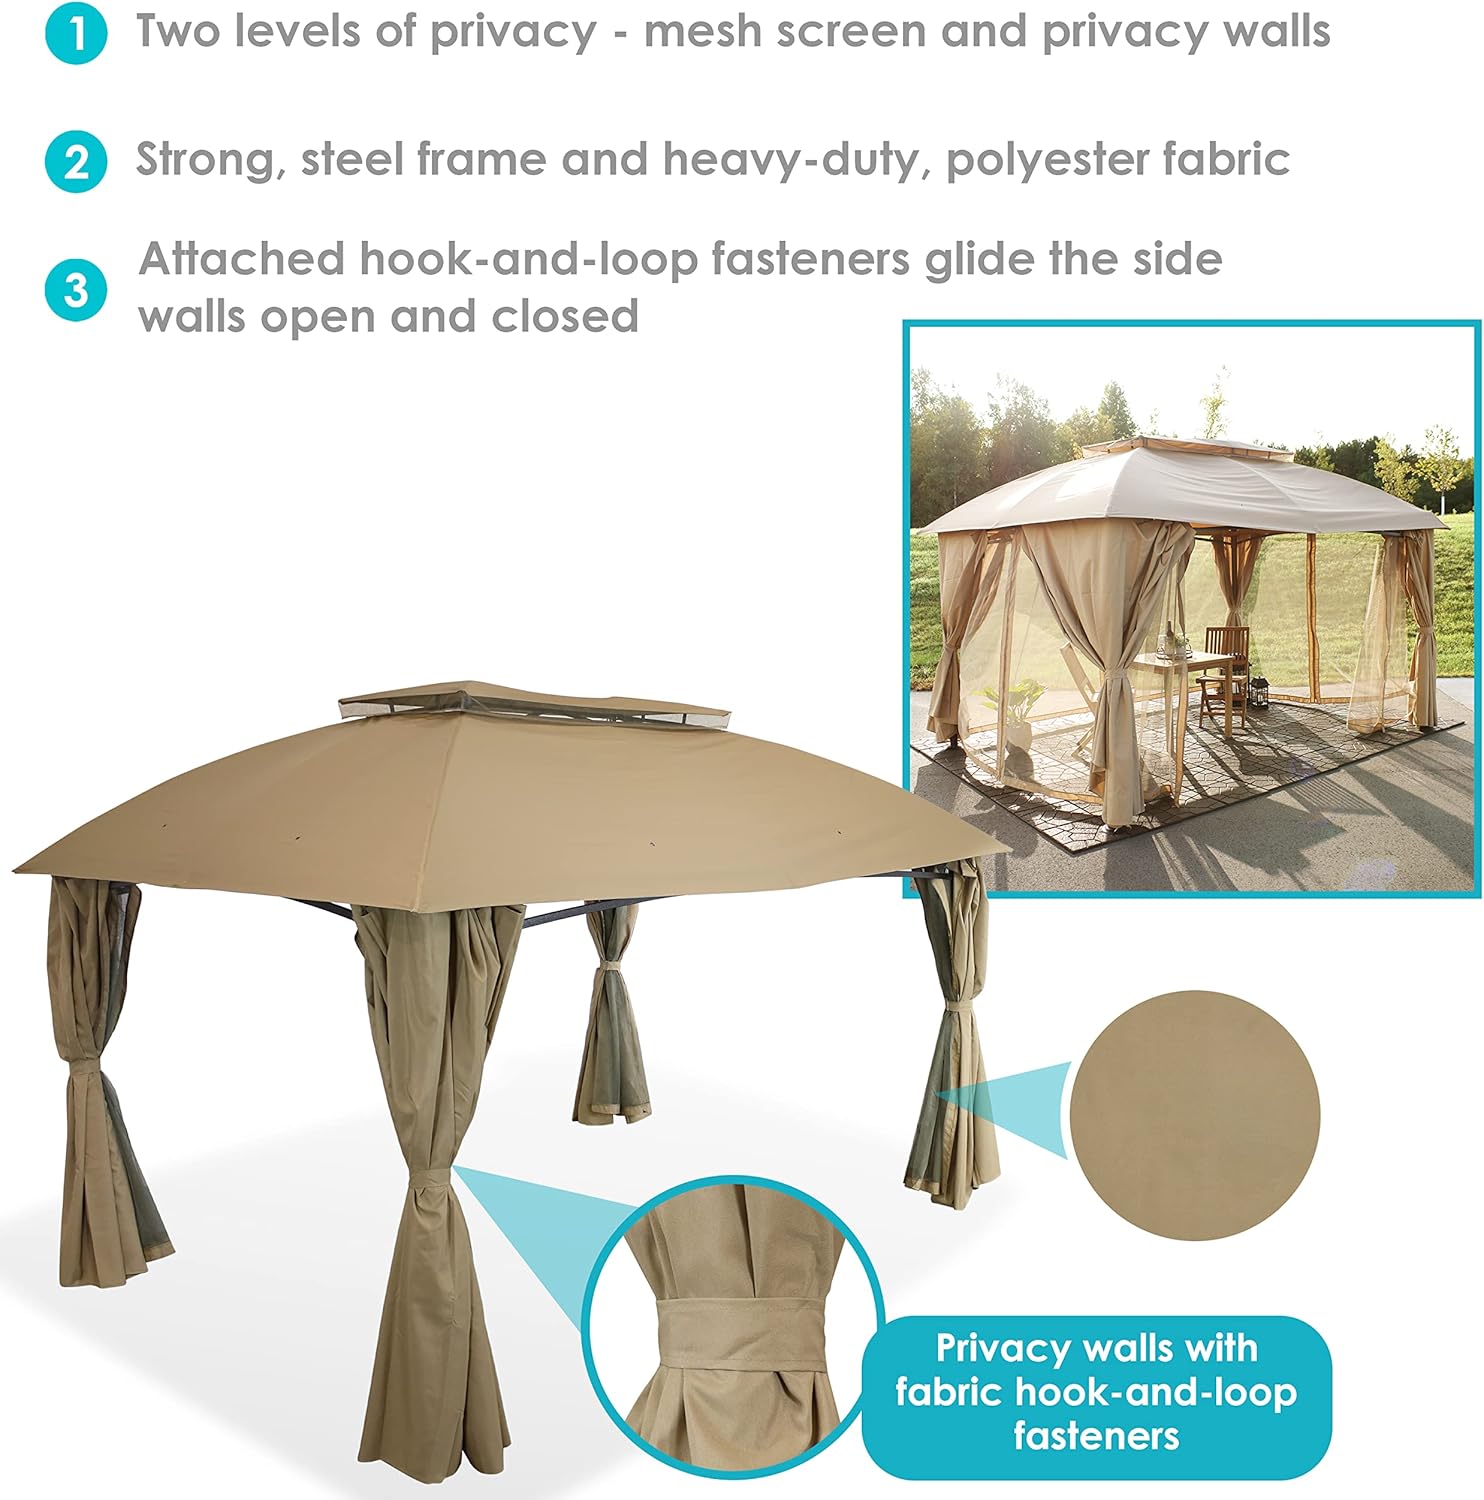
Image: Features of the gazebo including mesh screens and privacy walls.

Image: Detail of privacy wall with fabric hook-and-loop fastener.

Image: Visual comparison of screens versus privacy walls.
Krok 5: Konečné utažení
Once all components are in place, go back and fully tighten all nuts and bolts using the provided tools. Do not overtighten.
Návod k obsluze
Using the Mosquito Netting
The mesh screens are designed to provide ventilation while keeping insects out. They can be zipped closed for full enclosure or tied back to allow open access.
Using the Privacy Curtains
The privacy curtains offer additional shade and privacy. They can be pulled closed over the mesh screens and secured with zippers, or tied back to the gazebo legs using the integrated fabric fasteners when not needed.
Zabezpečení altánku
For added stability, especially in moderate weather, consider using stakes or weights (not included) to secure the gazebo feet to the ground.
Údržba
Péče o baldachýn
- Clean the polyester canopy fabric with mild soap and water. Do not use harsh chemicals or abrasive cleaners.
- Allow the canopy to air dry completely before folding and storing to prevent mildew.
- Remove the canopy during strong winds or heavy precipitation to prolong its lifespan.
Péče o rám
- Otřete ocelový rám reklamouamp hadříkem k odstranění nečistot a nečistot.
- Inspect the frame periodically for any signs of rust or damage. Touch up any scratches with rust-inhibiting paint if necessary.
- Ensure all bolts and connections remain tight.
Sezónní skladování
For prolonged periods of non-use or during winter months, it is recommended to disassemble the gazebo and store all components in a dry, protected area to prevent damage and extend product life.
Odstraňování problémů
| Problém | Možná příčina | Řešení |
|---|---|---|
| Canopy does not fit or is too tight. | Incorrect assembly of frame; canopy not stretched evenly; fabric shrinkage. | Ensure frame is assembled correctly and square. Try loosening frame connections slightly, fitting the canopy, then re-tightening. Allow fabric to stretch over time. |
| Hromadění vody na korunách stromů. | Canopy not taut enough; improper installation of upper canopy; heavy rainfall. | Ensure canopy is stretched tightly over the frame. Verify upper canopy is correctly positioned for drainage. Remove canopy during heavy rain. |
| Altán působí nestabilně. | Loose connections; not properly anchored. | Check and tighten all bolts and connections. Use ground stakes or weights to secure the gazebo legs. |
| Zippers on sidewalls/screens stick or break. | Dirt or debris in zipper teeth; excessive force. | Clean zipper teeth with a small brush. Apply a zipper lubricant. Operate zippers gently. |
Specifikace

Image: Dimensional diagram of the gazebo.
| Funkce | Detail |
|---|---|
| Značka | Sunnydaze |
| Číslo modelu | CRE-168 |
| Product Dimensions (Overall/Roof) | 156" D x 116.5" Š x 106.5" V |
| Frame Dimensions (Base) | 140" Š x 105" H |
| Světlost hlavy | 75.25" (103.5" at frame peak) |
| Stínovaná oblast | Až 126.2 XNUMX čtverečních stop |
| Hmotnost položky | 106 libry |
| Materiál rámu | Alloy Steel (60mm) |
| Materiál stříšky | 100 GSM Polyester |
| Barva | Opálení |
| Úroveň odolnosti proti vodě | Není odolný vůči vodě |
| UV ochrana | UPF 30 |
| Montáž Vyžadována | Yes (Two people recommended) |
Záruka a podpora
Záruka výrobce
Sunnydaze Decor backs its products with a 1letá záruka výrobce od data nákupu. Tato záruka se vztahuje na vady materiálu a zpracování při běžném používání.
Zákaznická podpora
For questions, missing parts, or warranty claims, please contact Sunnydaze Decor customer service. Refer to your purchase documentation or the official Sunnydaze Decor webstránky s aktuálními kontaktními informacemi.
Online zdroje: You may find additional support and product information on the Sunnydaze Decor Brand Store.


