1. Úvod
This manual provides detailed instructions for the installation, operation, and maintenance of your Vibe Powerbox Micro Mono Amplifier, model POWERBOX400.1M-V7. Please read this manual thoroughly before attempting installation or operation to ensure proper use and to prevent damage to the unit or your vehicle's audio system.
The Vibe Powerbox Micro Mono Amplifier is a compact, high-performance Class D amplifier designed for car audio systems. It delivers up to 400W RMS, making it suitable for powering subwoofers. Its small footprint allows for flexible installation options.
2. Bezpečnostní informace
- Před zahájením jakýchkoli elektrických prací vždy odpojte záporný pól baterie vozidla.
- Ensure all wiring is correctly routed and secured to prevent damage from moving parts or sharp edges.
- Use appropriate gauge wiring for power and speaker connections as specified in this manual to prevent overheating and potential fire hazards.
- Nemontujte ampUchovávejte zařízení na místech vystavených přímému slunečnímu záření, nadměrnému teplu, vlhkosti nebo prachu.
- Pokud si nejste jisti některou částí procesu instalace, poraďte se s profesionálním instalatérem autorádií.
- Obsluha amplifier at excessively high volumes for prolonged periods can cause hearing damage.
3. Obsah balení
Před zahájením instalace ověřte, zda jsou v balení přítomny všechny položky:
- Vibe Powerbox Micro Mono Amplifier (POWERBOX400.1M-V7)
- Remote Gain Control Unit
- RCA audio kabely
- Mounting Hardware (screws, connectors)
- Uživatelská příručka

4. Vlastnosti produktu
- Class D Micro Amplifier design for high efficiency and compact size.
- Ultra-compact footprint for easy and discreet installation.
- Output: 1 x 400W RMS at 1 ohm, with a maximum output of 800W.
- Dimensions: 37 x 157 x 82mm (approximately 1.46 x 6.18 x 3.23 inches).
- Compatible with Critical Link Rapid kits for simplified integration.
- Features Deltabox™ Connectivity auto turn-on.
- VIBE Sound Studio™ Active crossovers.
- 1 Ohm Stable operation.
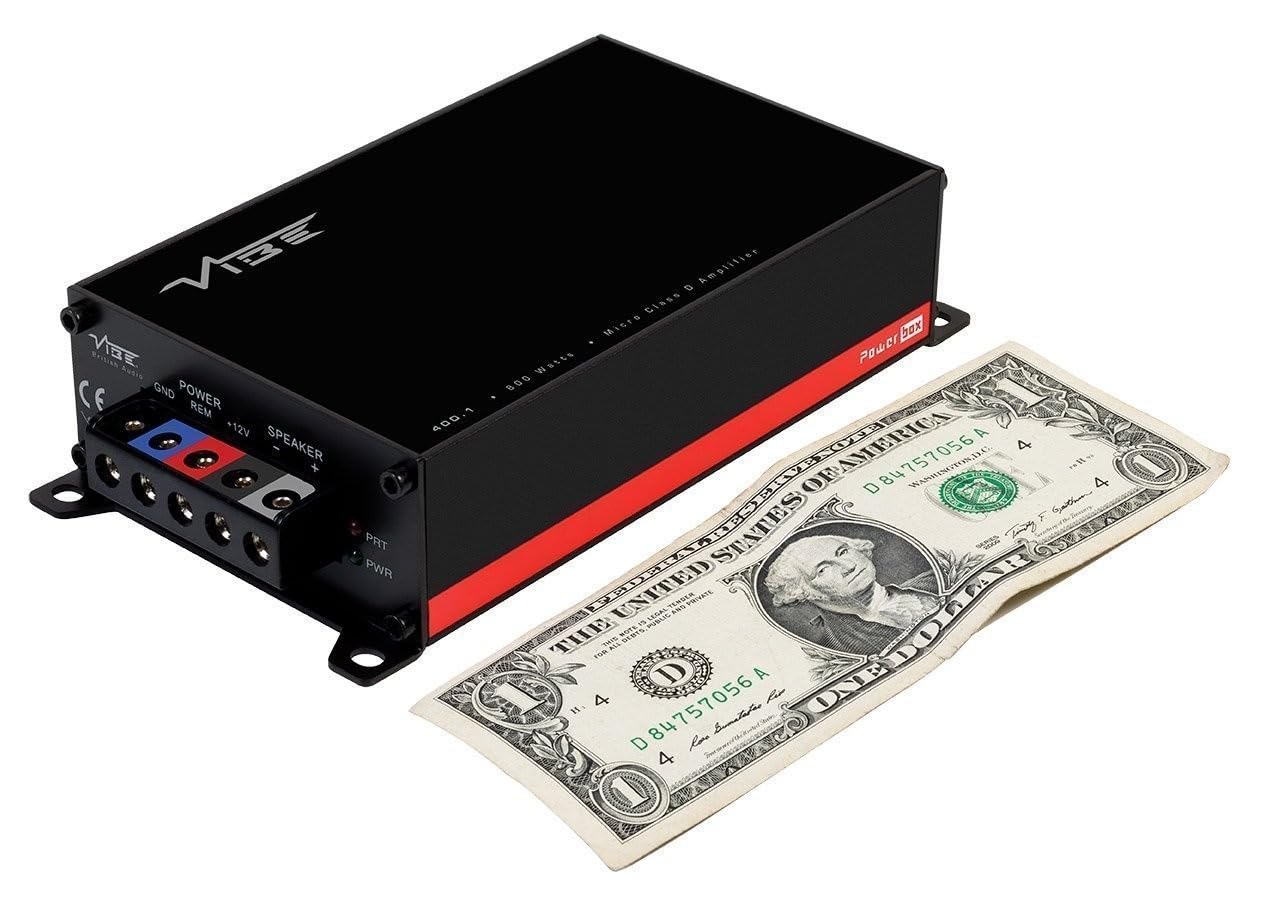
5. Identifikace součásti
5.1 Power and Speaker Terminals

The power input section includes terminals for Ground (GND), Remote Turn-On (REM), and +12V power. The speaker output section provides terminals for connecting your subwoofer.
5.2 Input and Control Panel
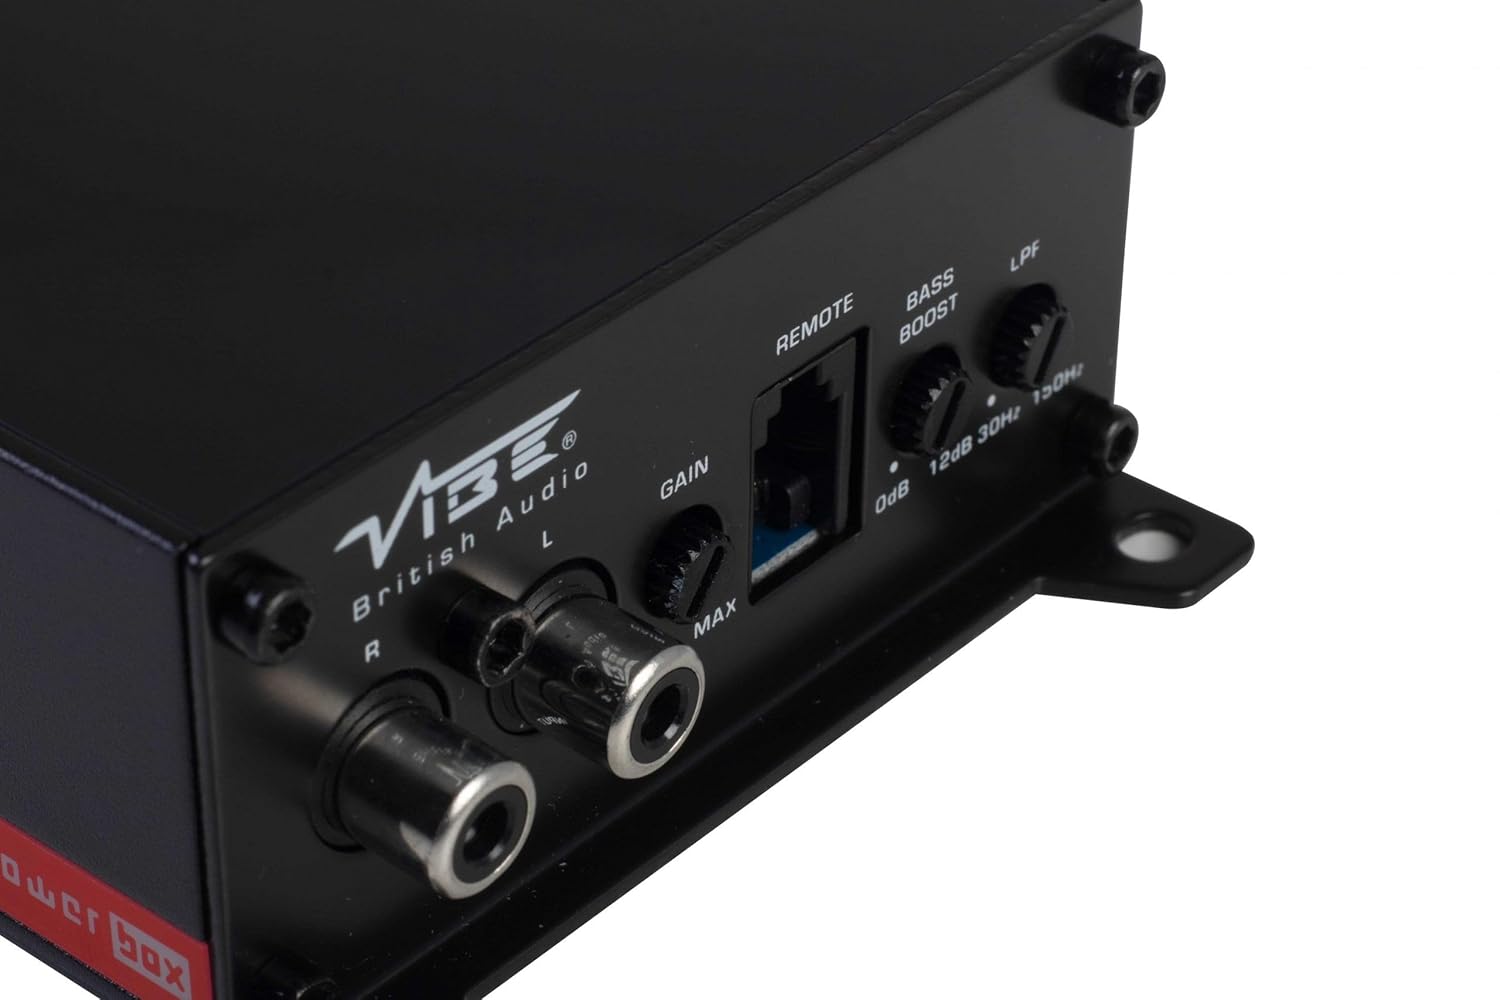
This panel features the RCA input jacks for audio signal, a Gain control knob to match the amplifier's input sensitivity to your head unit's output, a dedicated port for the remote gain control, a Bass Boost switch for enhancing low frequencies, and an LPF (Low Pass Filter) control to adjust the upper frequency limit for the subwoofer.
5.3 Remote Gain Control

The remote gain control unit connects to the amplifier via the 'REMOTE' port and allows for convenient adjustment of the subwoofer's output level from the vehicle's cabin.
6. Nastavení a instalace
Proper installation is crucial for optimal performance and safety. If you are not confident in your ability to install the amplifier, seek professional assistance.
6.1 Místo montáže
Choose a mounting location that is dry, well-ventilated, and away from direct heat sources. The compact size of the Powerbox Micro allows for installation under seats, behind trim panels, or in other discreet locations. Ensure there is sufficient airflow around the ampzvlhčovač pro chlazení.
6.2 Zapojení kabeláže
Napájení:
- Připojte +12V terminal to the vehicle's positive battery terminal using a suitable gauge power cable (e.g., 8 AWG or 10 AWG). Install an in-line fuse holder within 18 inches (45 cm) of the battery.
- Připojte GND terminal to a clean, unpainted metal surface on the vehicle's chassis. Ensure a good electrical connection. The ground cable should be of the same gauge as the power cable and as short as possible.
- Připojte REM (Remote Turn-On) terminal to the remote output of your head unit. This wire signals the amplifier to turn on and off with your stereo. If your head unit lacks a remote output, you can use an accessory wire that turns on with the ignition, or utilize the amplifier's auto-sense feature if applicable.
Zapojení reproduktorů:
- Připojte svůj subwoofer k Výstup reproduktoru terminals (+ and -). Ensure correct polarity. This amplifier is 1 Ohm stable, allowing flexibility in subwoofer impedance configurations. Refer to your subwoofer's specifications for optimal impedance matching.
Signal Input (RCA):
- Connect the RCA output from your head unit or signal processor to the INPUT (L/R) RCA konektory na ampživější.
Dálkové ovládání zisku:
- Plug the remote gain control unit into the dedicated VZDÁLENÝ port na amplifier. Route the cable to a convenient location for adjustment.
ISO T Harness / ISOAWK Kit:
- For simplified installation with existing stereo looms, an optional ISOAWK kit (available separately) can be used to make the amplifier compatible with an ISO T harness. This allows for plug-and-play integration for audio signal, power, and ground, potentially eliminating the need for separate battery connections.
7. Provoz
7.1 Počáteční zapnutí
Po provedení a ověření všech připojení znovu připojte baterii vozidla. Zapněte hlavní jednotku. amplifier's power indicator (PWR) should illuminate green. If the protection indicator (PRT) illuminates red, refer to the troubleshooting section.
7.2 Nastavení zisku
Ovládání zesílení odpovídá ampvstupní citlivost liferátoru na výstupní hlasitosttage of your head unit. To set the gain:
- Otočte amplifier's Gain control to its minimum (MIN) setting.
- Nastavte hlasitost hlavní jednotky na přibližně 75–80 % jejího maxima.
- Zahrajte dynamickou hudební skladbu.
- Pomalu zvyšujte amplifier's Gain control until you hear distortion, then back it off slightly until the sound is clear.
The remote gain control unit allows for real-time adjustment of the subwoofer level without affecting the main system volume.
7.3 nízkoprůchodový filtr (LPF)
The LPF control sets the upper frequency limit for the amplifier's output. This is essential for subwoofers, ensuring they only reproduce low frequencies. Adjust the LPF knob (typically 30Hz to 150Hz) to blend the subwoofer's output seamlessly with your main speakers. A common starting point is around 80-100Hz.
7.4 Zvýraznění basů
The Bass Boost switch provides an adjustable low-frequency enhancement. Use this feature sparingly, as excessive bass boost can lead to distortion and potential damage to your subwoofer. Adjust the boost level (0dB to 12dB) to your preference.
8. Údržba
- Čištění: Pravidelně otírejte ampVnější povrch vysavače otírejte měkkým, suchým hadříkem. Nepoužívejte agresivní chemikálie ani abrazivní čisticí prostředky.
- Spojení: Regularly check all power, ground, and speaker connections to ensure they are secure and free from corrosion. Loose connections can cause performance issues or damage.
- Větrání: Ujistěte se, že ampChladicí žebra zhášeče tepla nejsou zakryta, aby byl zajištěn správný odvod tepla.
9. Řešení problémů
| Problém | Možná příčina | Řešení |
|---|---|---|
| Bez napájení (LED dioda PWR nesvítí) | Spálená pojistka, uvolněné připojení napájení/uzemnění, žádný dálkový signál. | Zkontrolujte pojistku v síti, ověřte připojení +12V, GND a REM. |
| Protection Mode (PRT LED on) | Přehřátí, zkrat v kabeláži reproduktoru, příliš nízká impedance. | Ensure proper ventilation, check speaker wiring for shorts, verify speaker impedance. |
| Žádný zvukový výstup | No input signal, gain too low, speaker wires disconnected. | Check RCA input connections, adjust gain, verify speaker wiring. |
| Zkreslený zvuk | Gain set too high, LPF incorrectly set, poor ground connection. | Reduce gain, adjust LPF, check ground connection. |
10. Specifikace
- Číslo modelu: POWERBOX400.1M-V7
- Amplifier Typ: Třída D Mono Ampdoživotní
- RMS výkon: 1 x 400W RMS @ 1 Ohm
- Maximální výstupní výkon: 800W
- Rozměry produktu (D x Š x V): Přibližně 157 x 82 x 37 mm (6.18 x 3.23 x 1.46 palce)
- Hmotnost: Přibližně 1.54 liber
- svtage: 12 voltů (nominální)
- Maximální objem dodávkytage: 12 voltů
- Typ montáže: Povrchová montáž
- Výrobce: Vibe Audio
- Datum první dostupnosti: 21. července 2018
11. Záruka a podpora
Vibe Audio products are designed and manufactured to the highest standards. For warranty information and technical support, please refer to the warranty card included with your product or visit the official Vibe Audio webUschovejte si doklad o koupi pro případ reklamace.


