1. Úvod
This manual provides detailed instructions for the installation, operation, and maintenance of the ASUS PRIME B250M-C/CSM motherboard. This motherboard is designed to support 7th generation Intel Core processors and features a B250 chipset, offering a robust foundation for personal computer systems.
For optimal performance and system stability, please read this manual thoroughly before proceeding with installation or configuration.
2. Bezpečnostní informace
Vždy dodržujte následující bezpečnostní opatření, abyste předešli poškození základní desky a zranění:
- Disconnect the power cord from the wall outlet before touching any component.
- Wear an anti-static wrist strap or frequently touch a grounded object to discharge static electricity before handling components.
- Součásti manipulujte za hrany, abyste se nedotkli citlivých částí.
- Ensure all cables are correctly connected before powering on the system.
- Chraňte základní desku před vlhkostí a extrémními teplotami.
3. Obsah balení
Ověřte, zda jsou v balení základní desky přítomny všechny položky:
- ASUS PRIME B250M-C/CSM Motherboard
- Uživatelská příručka
- Kabely Serial ATA 6.0 Gb/s (2)
- I / O štít
- M.2 screws (2)
- Podpora DVD
4. Konec produktuview
The ASUS PRIME B250M-C/CSM is a micro-ATX motherboard featuring the Intel B250 chipset. It is designed for Intel LGA1151 processors (6th and 7th Generation Core i3/i5/i7/Pentium/Celeron). Key features include:
- Dva sloty M.2: For high-speed NVMe or SATA M.2 SSDs, compatible with Intel Optane Memory.
- 5násobná ochrana III: Hardware-level safeguards for component longevity and reliability.
- FanXpert 2: Advanced fan control for dynamic cooling.
- 8kanálový zvuk: On-board audio with premium Japanese capacitors for clear sound.
- Front Panel USB 3.0: For convenient access and accelerated data transfers.

Obrázek 4.1: Shora dolů view of the ASUS PRIME B250M-C/CSM motherboard, highlighting the CPU socket, DIMM slots, PCIe slots, and M.2 slots.

Obrázek 4.2: Úhlové view of the ASUS PRIME B250M-C/CSM motherboard, showing various components and connectors from a different perspective.
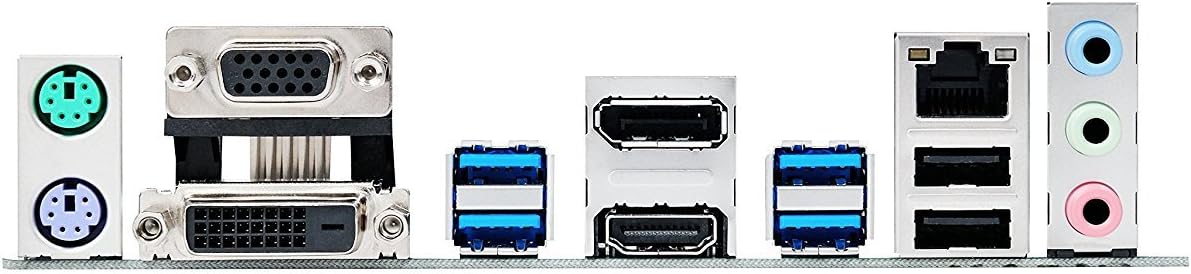
Obrázek 4.3: Close-up of the rear I/O panel, displaying the PS/2 ports, VGA, DVI, HDMI, USB 3.0, LAN, and audio jacks.
5. Nastavení a instalace
Pro správnou instalaci základní desky a jejích součástí postupujte podle těchto kroků.
5.1. Instalace procesoru
- Otevřete páčku patice procesoru a zvedněte nosnou desku.
- Pečlivě zarovnejte procesor s paticí a ujistěte se, že zlatý trojúhelník na procesoru odpovídá trojúhelníku na patici.
- Opatrně vložte procesor do patice. Netlačte na něj silou.
- Zavřete nakládací desku a zatlačte páku dolů, dokud nezapadne na místo.
- Nainstalujte chladič CPU podle pokynů výrobce.
5.2. Instalace paměti (RAM)
This motherboard supports DDR4 memory modules. Refer to the motherboard's QVL (Qualified Vendor List) for compatible memory.
- Otevřete klipy na obou koncích slotu DIMM.
- Zarovnejte zářez na paměťovém modulu DDR4 s výstupkem ve slotu DIMM.
- Modul pevně zasuňte do slotu, dokud nezacvaknou klipy.
- Ensure both clips are fully closed.
5.3. Storage Device Installation (SATA and M.2)
The motherboard provides SATA 6Gb/s ports and two M.2 slots.
- SATA disky: Connect SATA data cables from your SSDs/HDDs to the SATA ports on the motherboard. Connect power cables from your power supply to the drives.
- M.2 SSD disky:
- Vyhledejte slot(y) M.2 na základní desce.
- Vložte disk M.2 SSD do slotu pod úhlem 30 stupňů.
- Gently push down the M.2 SSD and secure it with the provided M.2 screw.
- Poznámka: Using a SATA-based M.2 SSD in M.2_1 slot may disable SATA port 1. Consult the full manual for specific port sharing details.
5.4. Instalace rozšiřující karty
Insert PCIe expansion cards (e.g., graphics cards, network cards) into the appropriate PCIe slots. Ensure they are fully seated and secured with a case screw.
5.5. Připojení napájení
Connect the main 24-pin ATX power connector and the 8-pin (or 4-pin) CPU power connector from your power supply to the corresponding ports on the motherboard.
5.6. Konektory na předním panelu
Connect the cables from your PC case's front panel (power button, reset button, USB ports, audio jacks, power LED, HDD LED) to the corresponding headers on the motherboard. Refer to the motherboard's full manual for detailed pin assignments, as labels on the board can be small.
6. Operační systém a ovladače
After hardware installation, proceed with installing your operating system and drivers.
- Nastavení systému BIOS: Power on your system and press the DEL key during startup to enter the BIOS/UEFI setup. Configure boot order and other system settings as needed.
- Instalace operačního systému: Nainstalujte si preferovaný operační systém (např. Windows 10).
- Note on Windows 7: While some documentation may suggest Windows 7 compatibility, users have reported significant challenges with driver availability and stability for Windows 7 on this B250 chipset motherboard. It is highly recommended to use Windows 10 or a newer operating system for full compatibility and driver support.
- Instalace ovladače: Install all necessary drivers from the included Support DVD or download the latest versions from the official ASUS support webwebu. To zahrnuje ovladače čipové sady, ovladače zvuku, ovladače LAN a veškeré další ovladače periferních zařízení.
7. Údržba
Pravidelná údržba pomáhá zajistit dlouhou životnost a stabilní provoz vaší základní desky.
- Aktualizace BIOSu: Pravidelně kontrolujte podporu ASUS website for BIOS updates. BIOS updates can improve compatibility, stability, and performance. Follow ASUS's instructions carefully when updating the BIOS.
- Aktualizace ovladačů: Pravidelnou kontrolou podpory ASUS udržujte ovladače aktuální. webmísto.
- Fyzické čištění:
- Před čištěním se ujistěte, že je systém vypnutý a odpojený od sítě.
- K odstranění prachu z ventilátorů, chladičů a dalších součástí použijte stlačený vzduch.
- Use a soft, lint-free cloth to gently wipe surfaces. Avoid using liquid cleaners directly on components.
8. Řešení problémů
Tato část se zabývá běžnými problémy, se kterými se můžete setkat.
- Systém se nezapne:
- Verify that the 24-pin ATX and 8-pin (or 4-pin) CPU power connectors are securely attached to the motherboard.
- Ensure the power supply is switched on and the power cord is firmly connected to both the power supply and the wall outlet.
- Check that the front panel power button cable is correctly connected to the motherboard header.
- Žádný výstup na displej:
- Ensure your monitor is connected to the correct video output port (VGA, DVI, HDMI) on the motherboard or dedicated graphics card.
- Verify that the graphics card (if installed) is properly seated in its PCIe slot and has adequate power connected.
- Check that RAM modules are correctly installed. Reseat them if necessary.
- Operating System Installation Issues (Windows 7):
- If attempting to install Windows 7, be aware of potential driver compatibility issues, especially for USB and graphics. ASUS provides specific instructions for Windows 7 installation on their support site, often requiring driver integration into the installation media. Consider using Windows 10 for a smoother experience.
- SATA Port Disabled After M.2 Installation:
- If you install a SATA-based M.2 SSD into the M.2_1 slot, it may share bandwidth with and disable one of the SATA 6Gb/s ports (typically SATA_1). If you experience a missing SATA drive, try connecting it to a different SATA port.
9. Specifikace
| Funkce | Specifikace |
|---|---|
| Značka | ASUS |
| Název modelu | ASUS COMPUTER INTL (PRIME B250M-C/CSM) |
| Zásuvka CPU | LGA 1151 |
| Kompatibilní procesory | Intel Core sedmé generace |
| Typ čipové sady | Intel B250 |
| Technologie paměti RAM | DDR4 |
| Rychlost paměti | 2400 MHz |
| Počet portů USB 2.0 | 2 (zadní I/O) |
| Rozměry produktu (DxŠxV) | 10.24 x 2.03 x 10.63 palce |
| Hmotnost položky | 1.28 libry |
| Kompatibilní zařízení | Osobní počítač |
10. Záruka a podpora
For warranty information, technical support, or further assistance, please refer to the warranty card included in your product package or visit the official ASUS support webstránky. The website provides access to drivers, BIOS updates, FAQs, and contact information for customer service.
Podpora ASUS Webmísto: www.asus.com/support/


