1. Konec produktuview
The Excelvan Wireless Weather Station (Model AOK-5061A) is designed to provide accurate indoor and outdoor temperature and humidity readings, along with weather forecasts and an alarm clock function. It features a large, colorful LCD display with LED backlight for easy readability.
Klíčové vlastnosti:
- Měření vnitřní/venkovní teploty a vlhkosti
- Weather Forecast with 5 Icons (Sunny, Partially Sunny, Cloudy, Rain, Heavy Rain)
- DCF Radio-Controlled Clock with Manual Setting
- Budík s funkcí odložení
- Large Color LCD Display with LED Backlight
- DST (Daylight Saving Time) Automatic Update
- Wireless Outdoor Sensor with up to 50m range

Obrázek 1: Přední strana view of the Excelvan Wireless Weather Station main unit, displaying weather forecast, outdoor/indoor temperature and humidity, and time.
2. Průvodce nastavením
2.1 Obsah balení
Before proceeding with the setup, ensure all items are present in the package:
- 1 x Hlavní jednotka meteorologické stanice
- 1 x Bezdrátový dálkový senzor
- 1 x AC napájecí adaptér
- 1 x Uživatelská příručka

Figure 2: The complete package contents, including the main weather station unit, wireless remote sensor, power adapter, and user manual.
2.2 Napájení hlavní jednotky
- Instalace baterie (volitelné): Open the battery compartment on the back of the main unit. Insert 3 x 1.5V AA batteries (not included), ensuring correct polarity. The LED backlight will stay on for 5 minutes when powered by batteries.
- AC Power Adapter (Recommended): For continuous backlight, connect the provided AC power adapter (4.5V, 150mA) to the main unit's power input and then plug it into a wall outlet.

Obrázek 3: Zadní view of the main unit showing the battery compartment with the cover removed, ready for battery insertion.

Obrázek 4: Zadní view of the main unit with the AC power adapter connected, illustrating the power input port.
2.3 Powering the Wireless Remote Sensor
- Open the battery compartment of the wireless remote sensor.
- Vložte 2 x 1.5V AAA baterie (nejsou součástí balení) a dbejte na správnou polaritu.
- Bezpečně uzavřete přihrádku na baterie.

Figure 5: The wireless remote sensor, showing its display and the battery compartment on the back.
2.4 Umístění snímače
- The main unit is intended for indoor use only.
- Place the wireless remote sensor outdoors in a sheltered area, away from direct sunlight and rain, to ensure accurate readings.
- Ensure the sensor is within 50 meters (open space) of the main unit for optimal signal reception.
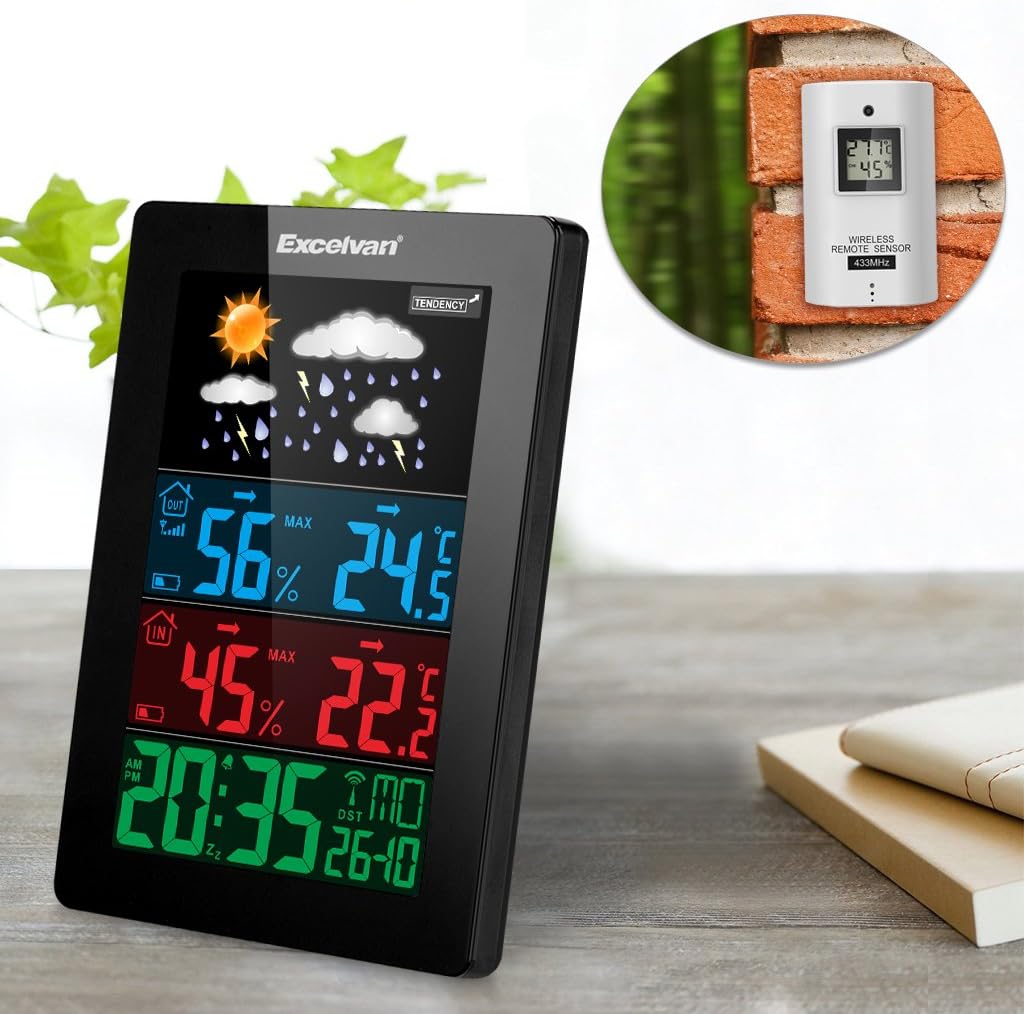
Figure 6: An illustration showing the main weather station unit indoors and the wireless remote sensor mounted on an outdoor wall.

Figure 7: A diagram highlighting the effective wireless transmission distance of 50 meters between the main unit and the remote sensor.
3. Návod k obsluze
3.1 Počáteční synchronizace
After powering both units, the main unit will automatically attempt to synchronize with the remote sensor and receive the DCF radio-controlled time signal. This process may take a few minutes.
3.2 Zobrazení nadview
Velký LCD displej zobrazuje různé informace:
- Horní sekce: Weather forecast icons (sunny, cloudy, rainy, etc.) and weather tendency indicator.
- Middle-Top Section (Blue): Outdoor humidity and temperature.
- Middle-Bottom Section (Red): Indoor humidity and temperature.
- Bottom Section (Green): Current time (12/24 hour format), day of the week, and date.
Figure 8: Close-up of the main unit's display, illustrating the different data sections for weather, outdoor/indoor conditions, and time.
3.3 Ruční nastavení času a data
While the unit is radio-controlled, manual adjustments can be made:
- Stiskněte tlačítko MODE button to cycle through display modes.
- Podržte MODE button for a few seconds to enter time setting mode.
- Použijte + a - tlačítka pro úpravu hodnot.
- Stiskněte MODE again to confirm and move to the next setting (e.g., hour, minute, year, month, day, language for day of week).
3.4 Funkce budíku a opakovaného buzení
- Stiskněte tlačítko POPLACH tlačítko na view nebo nastavte čas budíku.
- Podržte POPLACH button to enter alarm setting mode. Use + a - upravit.
- Chcete-li aktivovat/deaktivovat budík, stiskněte tlačítko POPLACH krátce stiskněte tlačítko. Na displeji se zobrazí/zmizí ikona alarmu.
- Když zazní budík, dotkněte se SNOOZE / SVĚTLO button on top of the unit to activate the snooze function. The alarm will sound again after a few minutes.
- Chcete-li alarm úplně zastavit, stiskněte jakékoli jiné tlačítko.

Figure 9: Top edge of the main unit, highlighting the "SNOOZE/LIGHT" touch-sensitive button for alarm snooze and backlight activation.
3.5 Výběr jednotky teploty
Stiskněte tlačítko - tlačítko pro přepínání mezi jednotkami teploty Celsia (°C) a Fahrenheita (°F).
3.6 Předpověď počasí
The weather station predicts weather conditions based on atmospheric pressure changes. The icons (sunny, partially sunny, cloudy, rain, heavy rain) indicate the forecast for the next 12-24 hours, not the current weather.
4. Údržba
- Čištění: Otřete hlavní jednotku a senzor měkkým hadříkemamp tkanina. Nepoužívejte abrazivní čisticí prostředky nebo rozpouštědla.
- Výměna baterie: Vyměňte baterie v hlavní jednotce i v dálkovém senzoru, když se na displeji zobrazí indikátor slabé baterie. Dbejte na správnou polaritu.
- Umístění senzoru: Periodically check the outdoor sensor's placement to ensure it remains sheltered and within range.
- Skladování: Pokud budete přístroj skladovat delší dobu, vyjměte všechny baterie, abyste zabránili jejich vytečení.
5. Řešení problémů
| Problém | Možná příčina | Řešení |
|---|---|---|
| Žádné údaje o venkovní teplotě/vlhkosti. |
|
|
| Nesprávné zobrazení času. |
|
|
| Displej je tmavý nebo prázdný. |
|
|
6. Specifikace
| Funkce | Detail |
|---|---|
| Rádiem řízené hodiny | DCF77 |
| Rozsah vnitřní teploty | 0 ° C až +50 ° C (32 ° F až 122 ° F) |
| Rozsah venkovních teplot | -20 °C až +60 °C (-4 °F až 140 °F) |
| Přesnost měření teploty | ±2 °C |
| Rozsah vnitřní/venkovní vlhkosti | 20-90% RH |
| Rozlišení vlhkosti | 1 % |
| Frekvence bezdrátového senzoru | 433 MHz |
| Rozsah bezdrátového signálu | Až 50 metrů (otevřený prostor) |
| Probe Cable Length (for external probe, if applicable) | 1 m |
| Waterproof Level of Sensor | IPX3 |
| Main Station Power | 3 x 1.5V AA batteries (not included) or 4.5V, 150mA AC adapter (included) |
| Napájení dálkového senzoru | 2 x 1.5V AAA baterie (nejsou součástí balení) |
| Main Station Dimensions | 148 × 110 × 30 mm |
| Main Station Weight (without batteries) | 242 g |
| Remote Sensor Dimensions | 60 × 100 × 20 mm |
| Remote Sensor Weight (without batteries) | 50 g |
| Jazyky pro den v týdnu | German, English, Italian, French, Dutch, Spanish, Danish |
7. Záruka a podpora
For warranty information or technical support, please refer to the documentation provided with your purchase or contact Excelvan customer service through their official webstránky nebo vašeho prodejce.
Poznámka: Tato příručka slouží pouze pro informační účely. Specifikace se mohou změnit bez předchozího upozornění.


