1. Úvod
The PreSonus AIR10 is a compact and lightweight 2-way active sound-reinforcement loudspeaker designed to deliver rich low-end and natural high-frequency extension. Its enclosure is engineered for portability and versatility, fitting easily into various setups.
Key features of the AIR10 include:
- 10palcový nízkofrekvenční měnič na míru s 2palcovou kmitací cívkou.
- 1palcový vysokofrekvenční kompresní měnič.
- 90° horizontální rozptyl x 60° vertikální rozptyl.
- Hybridní výkon 1 200 W ampkonfigurace lifieru (třída D pro nízké frekvence, třída AB pro vysoké frekvence).
- Vestavěný mixážní pult se dvěma kombinovanými XLR a ¼” vstupy a jedním stereo 1/8” vstupem.
- Easy-to-use Digital Signal Processing (DSP) performance presets.
2. Bezpečnostní informace
Before operating your PreSonus AIR10 loudspeaker, please read and understand all safety instructions. Retain this manual for future reference.
- Zdroj napájení: Připojujte jednotku pouze k typu zdroje napájení popsanému v této příručce nebo na jednotce.
- Základy: Ujistěte se, že je jednotka řádně uzemněna, abyste zabránili úrazu elektrickým proudem.
- Větrání: Neblokujte ventilační otvory. Instalujte v souladu s pokyny výrobce.
- Voda a vlhkost: Nepoužívejte tento přístroj v blízkosti vody a nevystavujte jej kapající nebo stříkající vodě.
- Teplo: Neinstalujte v blízkosti zdrojů tepla, jako jsou radiátory, tepelné regulátory, kamna nebo jiná zařízení (včetně amplifikátory), které produkují teplo.
- Servis: Veškerý servis svěřte kvalifikovanému servisnímu personálu. Je -li zařízení jakýmkoli způsobem poškozeno, je nutná údržba.
- Ochrana sluchu: Dlouhodobé vystavení vysokým hladinám akustického tlaku může způsobit trvalé poškození sluchu. Při nastavování úrovní hlasitosti buďte opatrní.
3. Nastavení
Proper setup ensures optimal performance and safety for your AIR10 loudspeaker.
3.1 Vybalení
Carefully remove the AIR10 from its packaging. Inspect the unit for any signs of damage that may have occurred during shipping. If damage is found, contact your dealer or PreSonus immediately.
3.2 Umístění a montáž
The AIR10 is designed for versatile placement, including front-of-house (FOH), floor wedge monitoring, stand mounting, bracket mounting, or flown installations. Location presets optimize performance for these different configurations.

Obrázek 1: Přední strana view of the PreSonus AIR10 Active Loudspeaker.

Obrázek 2: Strana view of the PreSonus AIR10 Active Loudspeaker, showing integrated handles.
3.3 Připojení napájení
Connect the provided power cord to the AC inlet on the rear panel of the AIR10 and then to a suitable grounded power outlet. Ensure the voltage selector switch matches your local power supply before powering on the unit.
3.4 Vstupní připojení
The AIR10 features an onboard mixer with various input options:
- Mic/Line 1 & 2: Two combo XLR and ¼” inputs for microphones or line-level sources.
- Aux In: A stereo 1/8” input for connecting portable media players or other consumer-level devices.
- Mix Out: An XLR output for sending the mixed signal to another AIR series loudspeaker or a subwoofer.
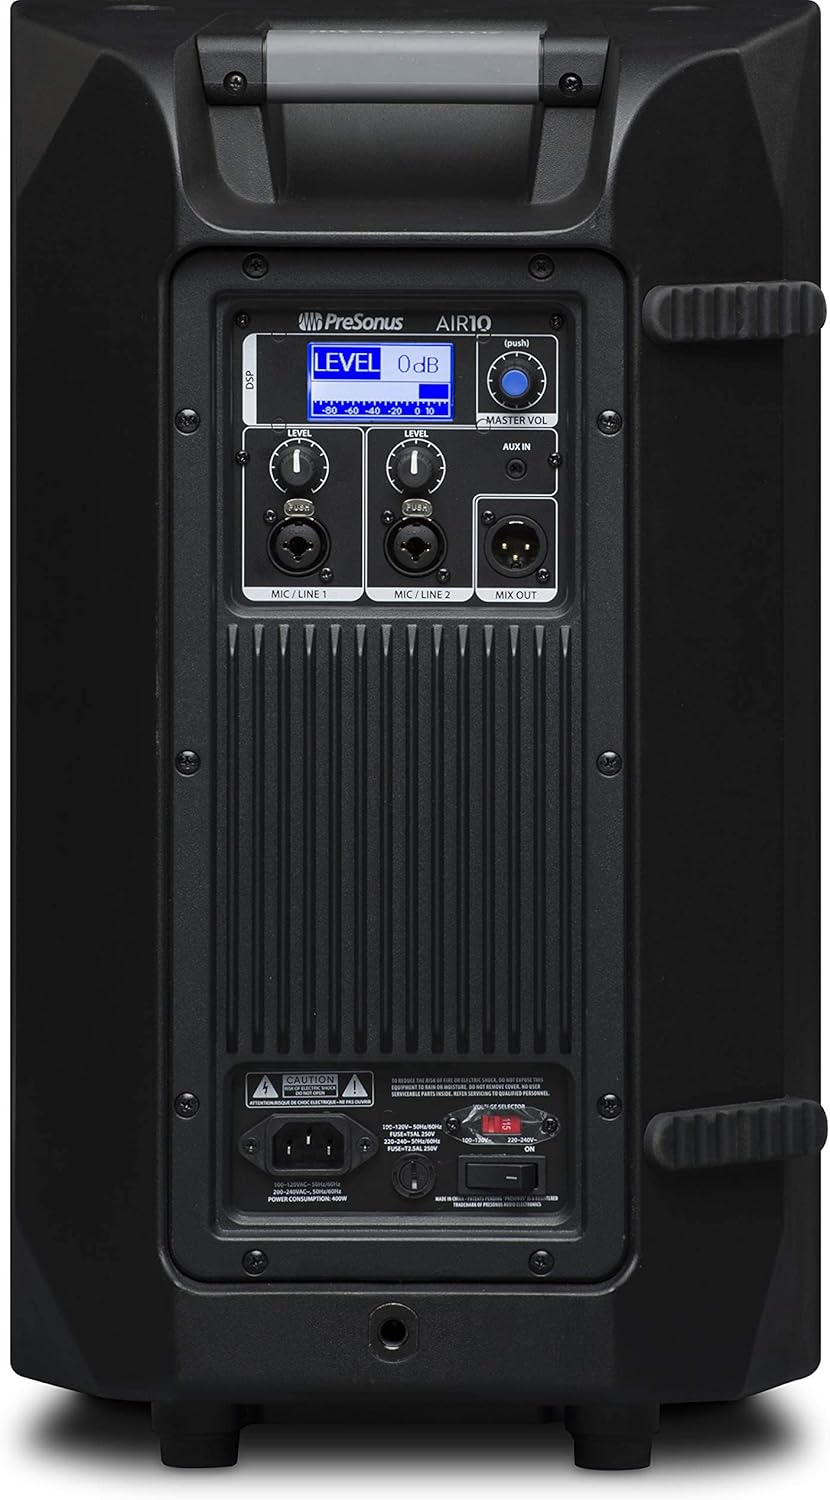
Figure 3: Rear panel of the PreSonus AIR10, showing input/output connections, level controls, DSP display, and power switch.
4. Provoz
The AIR10 is designed for straightforward operation with powerful DSP controls.
4.1 Zapnutí/vypnutí
After connecting the power cord, locate the power switch on the rear panel. Flip the switch to the 'ON' position. The front panel LED will illuminate to indicate power. Always power on your AIR10 after connecting all audio sources and power off before disconnecting.
4.2 Ovládání úrovně
Adjust the individual LEVEL knobs for Mic/Line 1 and Mic/Line 2 to set the input gain for your sources. The MASTER VOL knob controls the overall output level of the loudspeaker.
4.3 DSP Performance Presets
The AIR10 features easy-to-use DSP presets to optimize its performance for various applications. These presets include options for front-of-house use, floor wedge placement, music playback, enhanced low-end warmth, and improved speech intelligibility. Use the DSP button and display on the rear panel to navigate and select the appropriate preset for your environment.
4.4 Ovládací prvky EQ
The onboard EQ controls allow you to compensate for room anomalies and fine-tune the sound. Access these controls via the DSP menu to adjust frequency response as needed for your specific acoustic space.
4.5 Video Overview
Video 1: Úředník u konceview of the PreSonus AIR series loudspeakers, demonstrating features and sound quality. This video provides a visual guide to the product's capabilities and design.
5. Údržba
Regular maintenance helps prolong the life and performance of your AIR10 loudspeaker.
- Čištění: K čištění vnější strany reproduktoru používejte měkký, suchý hadřík. Nepoužívejte abrazivní čisticí prostředky, vosky ani rozpouštědla.
- Mřížka: Periodically check the front grille for dust or debris accumulation. Gently clean with a soft brush or vacuum if necessary.
- Skladování: Pokud reproduktor delší dobu nepoužíváte, skladujte jej v suchém prostředí s kontrolovanou teplotou, ideálně v originálním obalu nebo ochranném krytu.
6. Řešení problémů
This section addresses common issues you might encounter with your AIR10 loudspeaker.
6.1 Bez napájení
- Check that the power cord is securely connected to both the loudspeaker and the power outlet.
- Ověřte, že je elektrická zásuvka aktivní.
- Zajistěte zvtage selector switch on the rear panel is set correctly for your region.
- Check the fuse on the rear panel. Replace if blown with a fuse of the correct type and rating.
6.2 Žádný zvuk
- Confirm the loudspeaker is powered on and the front LED is illuminated.
- Check all audio cable connections from your source to the AIR10 inputs.
- Ensure the input LEVEL knobs and the MASTER VOL knob are turned up.
- Verify that your audio source is active and producing sound.
- If using the Mix Out, ensure the connected device is receiving a signal and its volume is adjusted.
6.3 Hissing or Noise
- Reduce the input gain (LEVEL knobs) if the input signal is too strong.
- Ujistěte se, že všechny kabely jsou v dobrém stavu a řádně stíněné.
- Try connecting the loudspeaker to a different power outlet to rule out ground loop issues.
- Disconnect all inputs and listen for the noise. If the noise persists, the issue may be internal.
7. Specifikace
| Funkce | Specifikace |
|---|---|
| Název modelu | VZDUCH10 |
| Typ reproduktoru | 2-Way Active Sound-Reinforcement Loudspeaker |
| Průměr basového reproduktoru | 10 palce |
| Průměr výškového reproduktoru | 1 palce |
| Reproduktor AmpTyp liifikace | Active (Hybrid Class D/Class AB) |
| Maximální výstupní výkon reproduktoru | 1200 wattů |
| Technologie připojení | XLR, 1/4", 1/8" |
| Režim zvukového výstupu | Stereo |
| Hmotnost položky | 28.7 libry |
| Rozměry produktu | 14.1 x 14.6 x 24.4 palce |
| Typ montáže | Car Mount, Floor Mount, Stand, Bracket, Suspend |
| Kontrolní metoda | Touch (DSP) |
8. Co je v krabici
Your PreSonus AIR10 package should contain the following items:
- PreSonus AIR10 10" 2-Way Active Sound-Reinforcement Loudspeaker
- Napájecí kabel
- Product Documentation (including this manual)
9. Záruka a podpora
PreSonus provides a limited warranty for the AIR10 loudspeaker. For detailed warranty information, please refer to the warranty card included with your product or visit the official PreSonus webmísto.
For technical support, product registration, or to access additional resources, please visit the PreSonus support page or contact their customer service directly. Keeping your product registered can facilitate warranty claims and support.


