1. Úvod
This manual provides comprehensive instructions for the installation, operation, and maintenance of the Supermicro X10SLM+-LN4F motherboard. Designed for server applications, this motherboard features an LGA1150 socket, Intel C224 PCH, DDR3 memory support, and multiple Gigabit Ethernet ports. Please read this manual thoroughly before proceeding with installation to ensure proper setup and optimal performance.
2. Konec produktuview
The Supermicro X10SLM+-LN4F is a microATX server motherboard built for reliability and performance. Key features include:
- LGA1150 Socket for Intel Xeon E3-1200 v3/v4 and 4th Gen Core i3 processors.
- Intel C224 PCH chipset.
- Four DDR3 DIMM slots supporting up to 64GB ECC/non-ECC UDIMM.
- Multiple SATA3 (6Gbps) ports.
- Integrated quad Gigabit Ethernet ports.
- USB 3.0 and USB 2.0 support.
- VGA output for integrated graphics.
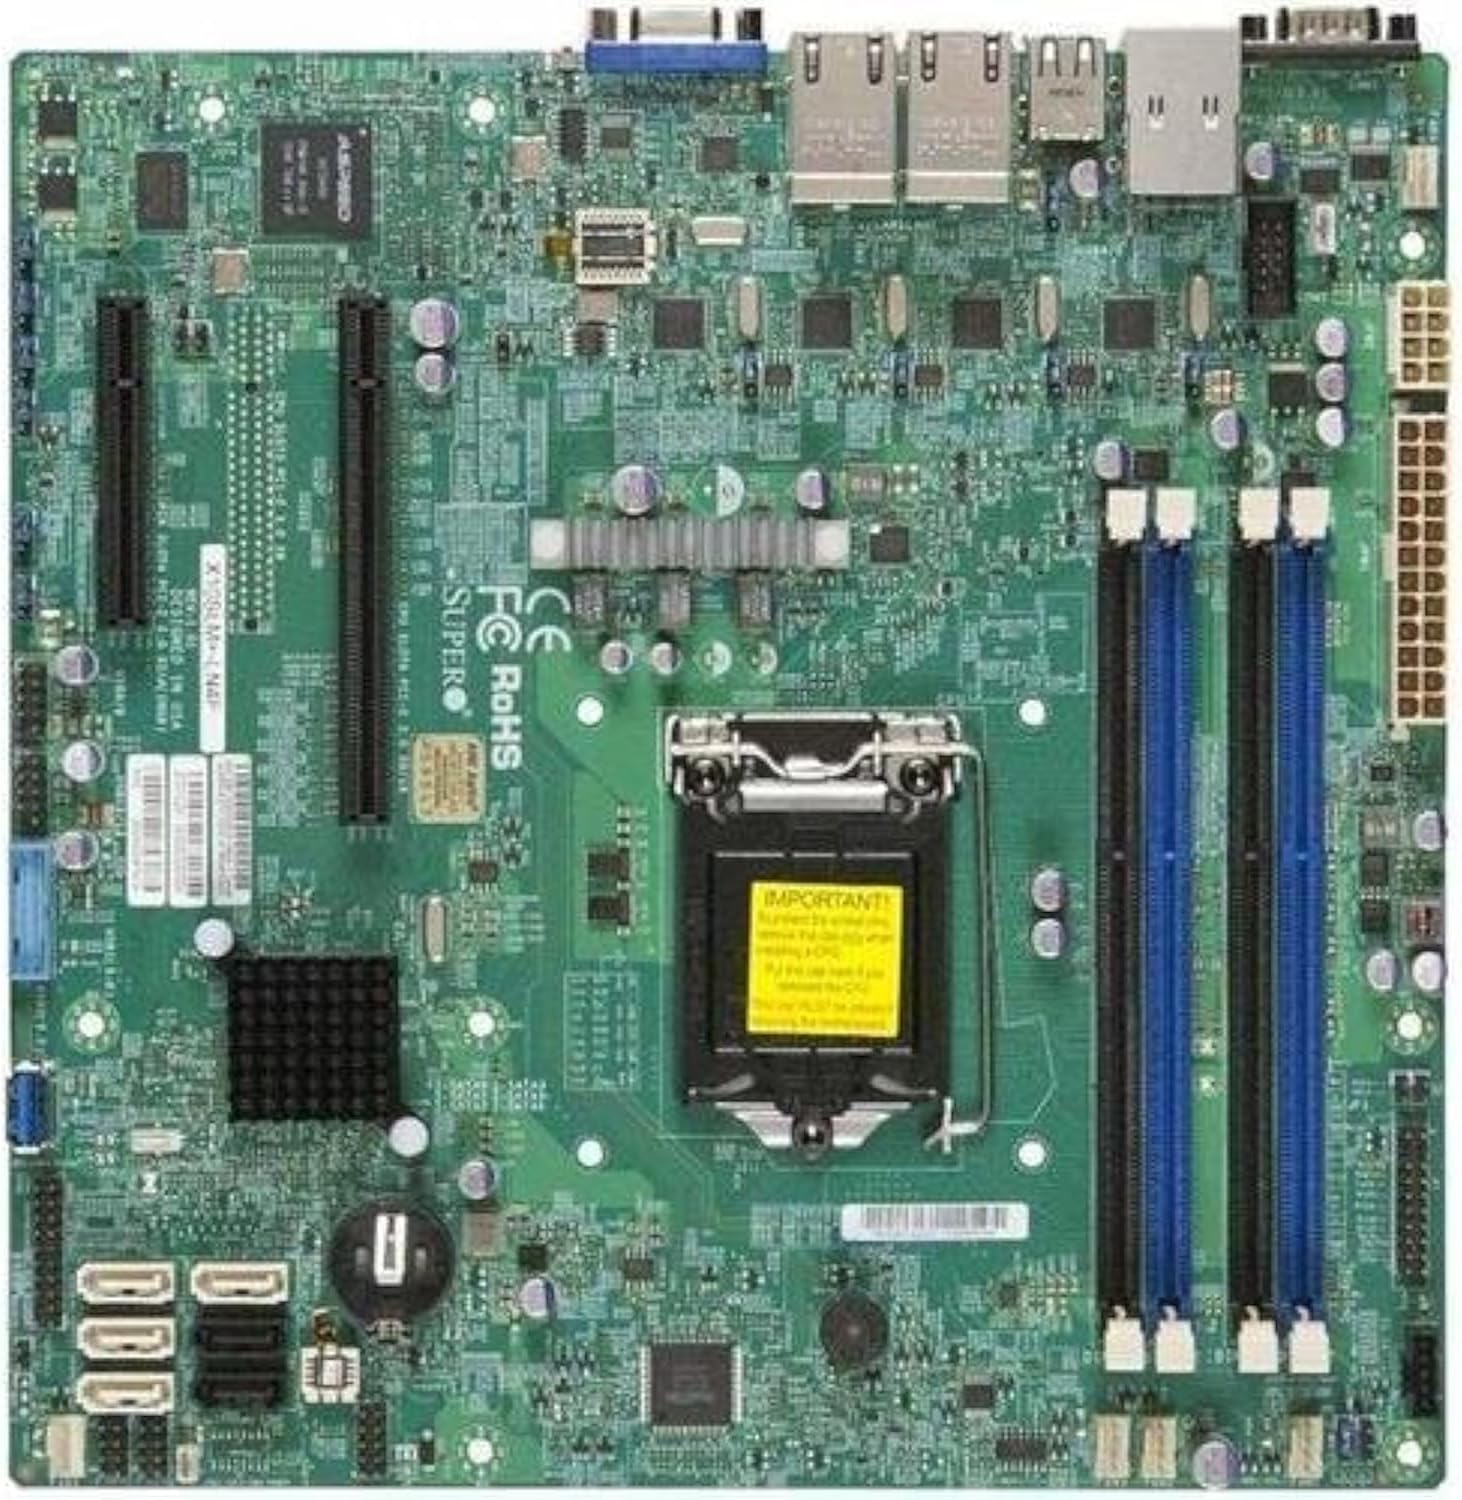
Obrázek 2.1: Shora dolů view of the Supermicro X10SLM+-LN4F motherboard, showing the CPU socket, DIMM slots, PCIe slots, and various connectors.

Obrázek 2.2: Úhlové view of the motherboard, highlighting the layout of components and expansion slots.
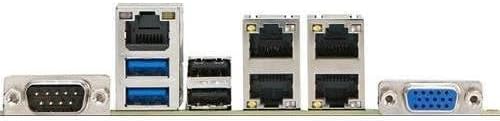
Obrázek 2.3: Rear I/O panel of the Supermicro X10SLM+-LN4F motherboard, featuring multiple LAN ports, USB ports, and serial ports.
3. Nastavení a instalace
Before beginning installation, ensure your system is powered off and disconnected from the power source. Wear an anti-static wrist strap to prevent electrostatic discharge (ESD) damage to components.
3.1. Instalace procesoru
- Najděte na základní desce patici procesoru LGA1150.
- Jemně zatlačte páčku zátěže dolů a zatáhněte ji do strany, abyste otevřeli zajišťovací rámeček patice procesoru.
- Pečlivě zarovnejte trojúhelníkovou značku na procesoru s odpovídající značkou na patici.
- Place the CPU into the socket without forcing it.
- Zavřete zajišťovací rám a zajistěte jej zatěžovací pákou.
- Naneste tenkou, rovnoměrnou vrstvu teplovodivé pasty na integrovaný rozdělovač tepla (IHS) procesoru.
- Nainstalujte chladič CPU podle pokynů výrobce.
3.2. Instalace paměti (RAM)
- Locate the four DDR3 DIMM slots. For optimal performance, refer to the motherboard's specific memory population guidelines, typically starting with slots closest to the CPU or specific colored slots for dual-channel configurations.
- Otevřete pojistné klipy na obou koncích slotu DIMM.
- Zarovnejte zářez na paměťovém modulu DDR3 s výstupkem ve slotu DIMM.
- Pevně zasuňte paměťový modul do slotu, dokud nezacvaknou pojistné klipy.
- Ensure both clips are fully closed and the module is seated correctly.
3.3. Instalace úložného zařízení
Connect SATA storage devices (HDDs/SSDs) to the SATA ports on the motherboard using SATA data cables. Connect the power cables from your power supply unit (PSU) to the storage devices.
3.4. Instalace rozšiřující karty
This motherboard features PCI Express (PCIe) slots. To install an expansion card:
- Remove the corresponding slot cover from your chassis.
- Align the expansion card with the PCIe slot.
- Pevně zatlačte dolů, dokud karta zcela nezapadne do slotu.
- Zajistěte kartu šroubem nebo pojistnou sponou ze šasi.
3.5. Připojení napájení
- 24pinový napájecí konektor ATX: Connect the main 24-pin power cable from your PSU to the ATX power connector on the motherboard.
- 8-pin EPS/CPU Power Connector: Connect the 8-pin (or 4+4 pin) CPU power cable from your PSU to the EPS connector near the CPU socket.
3.6. Připojení předního panelu a zadních vstupů/výstupů
- Konektory na předním panelu: Connect the power switch, reset switch, power LED, and HDD activity LED cables from your chassis to the corresponding pins on the motherboard's front panel header. Refer to the motherboard's silkscreen labels for correct orientation.
- USB záhlaví: Connect front panel USB ports to the onboard USB headers.
- Zvukové záhlaví: Connect front panel audio jacks to the onboard audio header.
- Zadní I/O panel: Connect peripherals such as keyboard, mouse, monitor (via VGA), and network cables (to the Gigabit Ethernet ports) to the rear I/O panel.
4. Návod k obsluze
4.1. Počáteční zapnutí a nastavení BIOSu/UEFI
- After all components are installed and connected, connect the power cord to the PSU and turn on the power switch on the PSU.
- Stiskněte tlačítko napájení na šasi.
- Během samočinného testu při zapnutí (POST) opakovaně stiskněte tlačítko DEL or F2 key (or as indicated on screen) to enter the BIOS/UEFI setup utility.
- In the BIOS/UEFI, configure essential settings such as date and time, boot order, and enable/disable specific features as required for your operating system and hardware.
- Uložte změny a ukončete BIOS/UEFI. Systém se restartuje.
4.2. Instalace operačního systému
To install an operating system (e.g., Windows, Linux, VMware ESXi):
- Insert the operating system installation media (USB drive or DVD) into the system.
- Boot from the installation media (you may need to adjust the boot order in BIOS/UEFI).
- Follow the on-screen prompts to install the operating system on your chosen storage device.
- After installation, install all necessary drivers for the motherboard components (chipset, LAN, VGA, etc.) from the Supermicro website or the provided driver disc.
5. Údržba
Pravidelná údržba pomáhá zajistit dlouhou životnost a stabilní provoz vaší základní desky a systému.
5.1. Čištění
- Periodically clean dust from the motherboard and system components using compressed air. Ensure the system is powered off and unplugged before cleaning.
- Nepoužívejte tekuté čisticí prostředky přímo na součástky.
- Ensure proper airflow within the chassis by keeping fan vents clear.
5.2. Aktualizace firmwaru a ovladačů
- Zkontrolujte Supermicro website periodically for updated BIOS/UEFI firmware and drivers for your motherboard model.
- Follow the provided instructions carefully when updating firmware to avoid system instability.
5.3. Ohledy na životní prostředí
- Abyste předešli poškození, provozujte základní desku v doporučených teplotních a vlhkostních rozmezích.
- Ensure adequate ventilation in the server chassis.
6. Řešení problémů
Tato část obsahuje řešení běžných problémů, se kterými se můžete setkat.
6.1. Žádné napájení / Žádný POST (automatický test při zapnutí)
- Verify that the power supply unit (PSU) is connected correctly to the motherboard (24-pin ATX and 8-pin EPS connectors).
- Ensure the PSU is switched on and receiving power from the wall outlet.
- Zkontrolujte, zda je kabel vypínače na předním panelu správně připojen ke konektoru základní desky.
- Reseat the CPU, RAM modules, and any expansion cards.
- Zkuste spustit systém pouze s nezbytnými komponenty (CPU, jedna RAM karta, chladič CPU), abyste problém izolovali.
- Listen for beep codes from the system speaker, which can indicate specific hardware failures. Refer to the Supermicro webStránka pro interpretaci pípacích kódů.
6.2. Problémy se zobrazením
- Ensure the monitor is properly connected to the motherboard's VGA port.
- Ověřte, zda je monitor zapnutý a nastavený na správný vstupní zdroj.
- If using a discrete graphics card, ensure it is properly seated and connected to power (if required).
6.3. Operační systém se nespustí
- Check the boot order in the BIOS/UEFI to ensure the correct storage device is prioritized.
- Verify that the operating system is installed correctly on the storage device.
- Ensure SATA data and power cables are securely connected to the storage device and motherboard.
7. Specifikace
Below are the technical specifications for the Supermicro X10SLM+-LN4F motherboard:
| Funkce | Detail |
|---|---|
| Značka | Supermikro |
| Název modelu | X10SLM+-LN4F-B |
| Zásuvka CPU | LGA 1150 |
| Typ čipové sady | Intel C224 |
| Technologie paměti RAM | DDR3 SDRAM |
| Rychlost paměti | 1600 MHz |
| Kapacita paměti | Až 64 GB |
| Počet portů USB 2.0 | 2 (zadní I/O) |
| Rozhraní grafické karty | Integrated, PCI |
| Kompatibilní zařízení | Server |
| Platforma | Windows 10 |
| Hmotnost položky | 5.8 libry |
| Rozměry produktu (DxŠxV) | 10 x 10 x 2 palce |
| Datum první dostupnosti | 4. června 2013 |
Note: Specifications are subject to change without notice. For the most current information, please refer to the official Supermicro product page.
8. Záruka a podpora
For detailed warranty information, please refer to the warranty card included with your product or visit the official Supermicro website. Technical support is available through Supermicro's customer service channels, including their support portal, email, and phone. Please have your product model number (X10SLM+-LN4F) and serial number ready when contacting support.
For the latest drivers, BIOS updates, and additional documentation, please visit: www.supermicro.com


