1. Konec produktuview
The Blue Ox BX1128 Base Plate is engineered to provide a secure and integrated connection point for flat towing your vehicle behind a recreational vehicle (RV). This base plate is custom-designed for specific vehicle models, ensuring compatibility and optimal performance. It bolts directly to your vehicle's chassis, offering a robust and reliable towing solution.
The design incorporates hidden reinforcement and allows the base plate to flex, absorbing towing forces rather than rigidly transferring them to the vehicle's frame. When not in use, the removable arms provide a seamless appearance, and receiver covers keep dirt and debris out.

Figure 1: Blue Ox BX1128 Base Plate components, highlighting custom design for vehicle chassis integration.
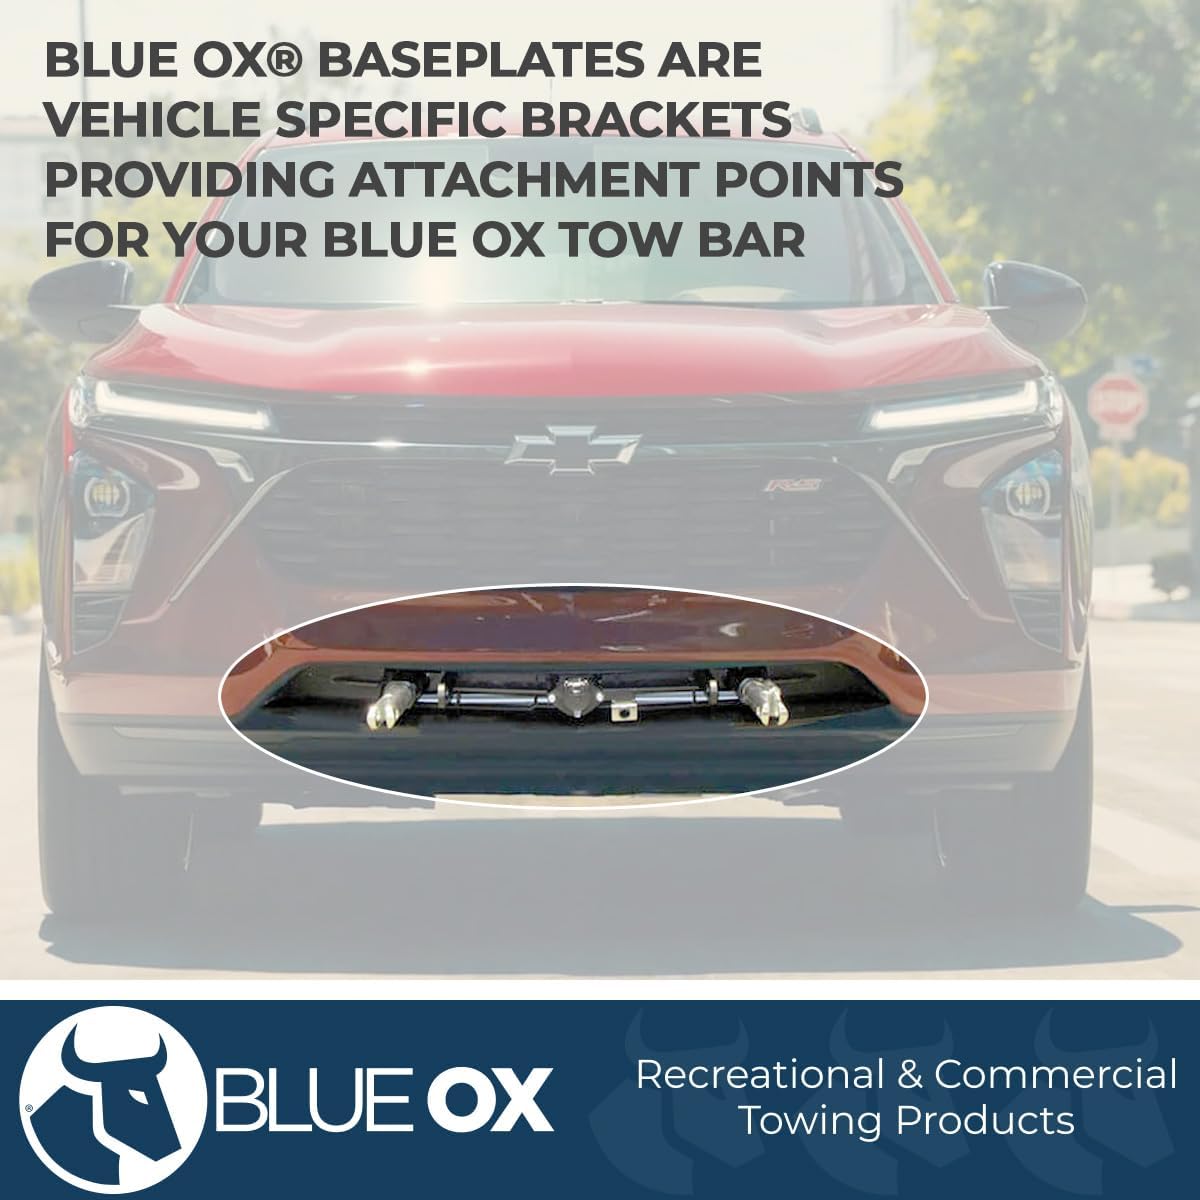
Figure 2: The Blue Ox BX1128 Base Plate installed, showing vehicle-specific brackets and attachment points for a tow bar.

Figure 3: A towed vehicle connected to an RV, demonstrating the solid and durable connection provided by the base plate for dinghy towing.
2. Kompatibilita s vozidly
- 2011-2013 Durango
- 2022 Grand Cherokee WK (Excludes L or WL models) (Includes Adaptive Cruise Control & Limited) (Quadra Trac/Drive II)
- 2011-2021 Grand Cherokee (Includes Trail Rated & ACC) (Excludes Grand Cherokee L models)
3. Bezpečnostní informace
- Před tažením se vždy ujistěte, že jsou všechna spojení bezpečná a řádně utažená.
- Regularly inspect the base plate and all towing components for wear, damage, or corrosion.
- Ensure safety cables are correctly installed in a crossing pattern and are not pinched or interfering with moving parts.
- Refer to your vehicle's owner's manual for specific towing capacities and recommendations.
- Do not exceed the maximum towing capacity of any component in your towing system.
4. Instalace
Installation of the Blue Ox BX1128 Base Plate requires careful attention to detail. It is recommended to consult the detailed instruction sheet provided with your product for vehicle-specific steps. The following provides a general overview procesu instalace.
4.1. Kroky před instalací
- Bumper/Fascia Removal: Most applications require removing the vehicle's front bumper fascia. This involves removing screws or push pins holding it in place. Depending on the vehicle, you may need to remove the grill or the entire front bumper cover.
- Fender Liner/Trim Removal: For full bumper removal, partially or fully remove the inner fender liners to access additional fasteners. Some applications may also require removing additional fender trim.
- Underbody Panels/Skid Plates: Loosen or remove any underbody panels or skid plates as required to access the chassis.
- Elektrické připojení: Disconnect any electrical connections to the bumper fascia. In some cases, the wiring harness may need to be disconnected.
- Bumper Beam Removal: Some applications require temporary removal of the bumper beam. In certain cases, the base plate will act as the new bumper beam.
- Headlight Assembly Removal: A few applications may require removing the headlight assembly.
- Washer Fluid Reservoir: In some instances, the washer fluid reservoir may need to be removed. Disconnect hoses, electrical plugs, and hardware. Drain the fluid into a clean bucket before removal.
4.2. Base Plate Attachment
- Internal Panel Trimming: You may need to remove or trim internal plastic paneling or air dams to accommodate the base plate.
- Hardware Installation (Fish Wiring): Use the provided fish wires to guide hardware (square hole spacers, bolts) into place through mounting holes and access holes in the vehicle's frame.
- Positioning the Base Plate: With assistance, lift the base plate to the vehicle. Insert the end of the fish wire through the attachment hole on the base plate.
- Securing the Base Plate: Lift the base plate into position, remove the fish wire, and secure it with a serrated flange nut. Do not fully tighten the hardware at this stage.
- Leveling and Adjustments: Check that the base plate is level and make any necessary adjustments.
- Frame Drilling (If Required): In some applications, frame drilling is required. Securely clamp the base plate to the vehicle's frame and use the holes in the side plate as a guide. Use cutting fluid for easier drilling.
- Hole Protection: After drilling or enlarging any holes, protect the edges with a paint pen or other rust preventative.
- Final Hardware Attachment: Finish by fish wiring any remaining hardware into place.
- Torqueing Hardware: Once all hardware is attached and the base plate is level, torque all hardware to the values listed in the supplied instruction sheet.
4.3. Safety Cable Installation
- Install the safety cables by looping them around the vehicle's frame and linking them to the base plate. Perform this on each side of the vehicle.
- Ensure safety cables do not pinch or interfere with any cables, hoses, wiring, or other moving components.
4.4. Fascia/Grille Trimming and Reassembly
- Before reattaching the bumper cover, trimming may be needed on the fascia panels or grille to allow safety cable loops and attachment tabs to pass through. Follow the instructions to mark and carefully remove the required areas.
- Reattach the bumper cover, grille, or any other trim pieces that were removed.
- Reinstall any internal components (e.g., washer fluid reservoir, headlight assembly) that were removed during the process.
4.5. Instalační videa
Common Tow Bar Base Plate Installation Techniques
Toto video poskytuje obecný přehledview of common installation techniques for flat towing base plates, including bumper removal, hardware installation, and reassembly steps.
Blue Ox BX1128 Base Plate Demo and Review
This video demonstrates the features and quick-connect/disconnect functionality of the Blue Ox BX1128 Base Plate, showing how the tow bar attaches and detaches from the base plate.
5. Operating the Base Plate
Once the base plate is installed, connecting and disconnecting your tow bar is designed to be straightforward.
- Connecting the Tow Bar: Align your tow bar with the base plate's attachment points. Insert the tow bar arms into the base plate receivers. Secure them with the provided pins and clips.
- Bezpečnostní kabely: Attach the safety cables from the tow bar to the designated safety chain loops on the base plate, ensuring they are crossed under the tow bar.
- Elektrické připojení: Connect any necessary electrical wiring for lights and brakes between the RV and the towed vehicle.
- Závěrečná kontrola: Before driving, perform a thorough check of all connections, ensuring they are secure and free from obstruction.
6. Údržba
- Keep the base plate and all components clean and free of dirt and debris.
- Regularly inspect all bolts and fasteners for proper torque.
- Check for any signs of wear, cracks, or damage on the base plate and its welds.
- Lubricate moving parts of the tow bar (if applicable) according to its manufacturer's instructions.
7. Řešení problémů
- Obtížnost s připevněním/odpojením: Ensure the vehicle and RV are on a level surface and aligned as straight as possible. Check for any debris in the receiver.
- Uvolněná připojení: Re-torque all fasteners to the specified values. If bolts repeatedly loosen, consult a professional.
- Neobvyklé zvuky během tažení: Inspect all components for proper installation and wear. Ensure the tow bar is fully extended and locked.
8. Specifikace
| Atribut | Hodnota |
|---|---|
| Číslo modelu | BX1128 |
| Hmotnost položky | 35 libry |
| Výrobce | Modrý vůl |
| Kompatibilita vozidel | 2011-2013 Durango, 2011-2021 Grand Cherokee (specific trims), 2022 Grand Cherokee WK (specific trims) |
9. Záruka a podpora
For detailed warranty information and customer support, please refer to the official Blue Ox webnebo se obraťte přímo na jejich zákaznický servis. Uschovejte si doklad o koupi pro případ reklamace.


