1. Úvod
The SPL 2Control is a compact and user-friendly stereo monitor controller designed to provide comprehensive control over your digital audio workstation's (DAW) monitoring functions. It ensures high-quality audio reproduction through both studio monitors and headphones, allowing you to hear every detail of your mix. Key features include a precise speaker volume potentiometer, active circuitry for sound integrity, and a unique Crossfeed control for accurate headphone monitoring that simulates a stereo speaker image.
2. Bezpečnostní pokyny
- Před použitím zařízení si pečlivě přečtěte tyto pokyny.
- Uschovejte tento návod pro budoucí použití.
- Nevystavujte jednotku dešti ani vlhkosti, abyste předešli požáru nebo úrazu elektrickým proudem.
- Zajistěte dostatečné větrání; neblokujte žádné větrací otvory.
- Používejte pouze nástavce/příslušenství specifikované výrobcem.
- Během bouřek nebo pokud přístroj delší dobu nepoužíváte, odpojte napájecí kabel.
- Veškeré opravy svěřte kvalifikovanému servisnímu personálu.
- Neumísťujte jednotku do blízkosti zdrojů tepla, jako jsou radiátory, topná tělesa, kamna nebo jiná zařízení (včetně amplifikátory), které produkují teplo.
3. Obsah balení
Po vybalení se prosím ujistěte, že jsou součástí balení následující položky:
- 1 x SPL 2Control Module
- 1 x Napájecí kabel
- Tato uživatelská příručka
4. Konec produktuview
4.1 Ovládací prvky a indikátory na předním panelu
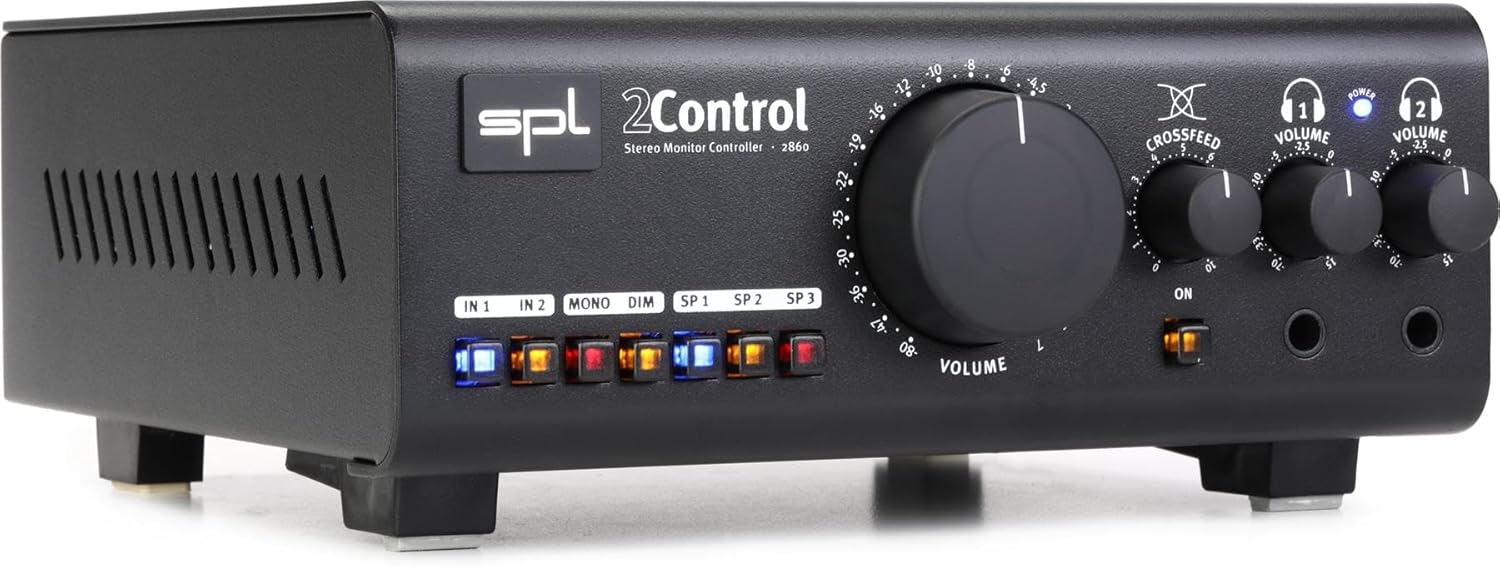
Obrázek 1: Front Panel of the SPL 2Control Stereo Monitor Controller.
This image displays the front panel of the SPL 2Control. From left to right, it features input selection buttons (IN 1, IN 2), function buttons (MONO, DIM), speaker output selection buttons (SP 1, SP 2, SP 3), a large central master VOLUME knob, a CROSSFEED knob, and two individual headphone VOLUME knobs with corresponding headphone output jacks. A power indicator LED is visible above the headphone controls.
- IN 1 / IN 2 Buttons: Selects the active stereo input source.
- Tlačítko MONO: Sums the stereo signal to mono for compatibility checking.
- Tlačítko DIM: Reduces the output volume by a fixed amount (e.g., -20dB) for temporary level reduction.
- SP 1 / SP 2 / SP 3 Buttons: Selects the active stereo speaker output pair.
- Knoflík VOLUME: Master volume control for selected speaker outputs.
- CROSSFEED Knob: Adjusts the stereo panorama for headphone monitoring to simulate a speaker listening environment.
- HEADPHONE VOLUME 1 / 2 Knobs: Independent volume controls for the two headphone outputs.
- HEADPHONE 1 / 2 Jacks: 1/4-inch stereo headphone outputs.
- LED POWER: Indikuje, že je jednotka zapnutá.
4.2 Rear Panel Connections (Inferred)
The rear panel typically houses the audio input and output connections, as well as the power input. Based on common audio equipment and product specifications, you can expect:
- Analogové vstupy: Balanced XLR or TRS inputs for connecting your audio interface or mixer.
- Výstupy reproduktorů: Multiple sets of balanced XLR or TRS outputs for connecting up to three pairs of studio monitors.
- Příkon: Connector for the included power cord.
5. Nastavení
- Umístění: Position the SPL 2Control on a stable, flat surface, ensuring adequate ventilation around the unit.
- Připojení napájení: Connect the provided power cord to the power input on the rear panel of the 2Control and then to a suitable AC power outlet.
- Vstupní připojení: Connect the stereo outputs of your audio interface, mixer, or other audio source to the IN 1 and/or IN 2 inputs on the rear panel using balanced XLR or TRS cables.
- Připojení reproduktorů: Connect your studio monitors to the SP 1, SP 2, and/or SP 3 outputs on the rear panel using balanced XLR or TRS cables. Ensure correct left and right channel connections.
- Headphone Connections: Plug your headphones into the HEADPHONE 1 and/or HEADPHONE 2 jacks on the front panel.
- Počáteční zapnutí: Ensure all volume controls are set to their minimum positions before powering on the unit. Then, connect the power cord to the wall outlet. The POWER LED on the front panel will illuminate.
6. Návod k obsluze
- Výběr vstupu: Stiskněte buď VE 1 or VE 2 button to select your desired audio source. The active button will illuminate.
- Selecting Speaker Outputs: Stiskněte tlačítko SP 1, SP 2nebo SP 3 button to route the audio to the corresponding pair of studio monitors. Only one speaker output can be active at a time.
- Nastavení hlavní hlasitosti: Slowly turn the large OBJEM knob clockwise to increase the listening level for the selected speaker outputs. Turn counter-clockwise to decrease.
- Mono sčítání: Stiskněte tlačítko MONO button to sum the stereo signal to mono. This is useful for checking phase compatibility and mix balance. Press again to return to stereo.
- Funkce stmívání: Stiskněte tlačítko ZTLUMIT button to temporarily reduce the output volume. This is useful for quick conversations or when you need to lower the volume without losing your main volume setting. Press again to restore the original volume.
- Monitoring sluchátek:
- Plug your headphones into the desired headphone jack (HEADPHONE 1 or 2).
- Upravte jednotlivce HEADPHONE VOLUME 1 or 2 knob to set the listening level for your headphones.
- Použijte CROSSFEED knob to adjust the stereo image for headphone listening. Turning it clockwise increases the crossfeed, simulating a more natural speaker-like stereo field by blending the left and right channels slightly.
7. Údržba
- Čištění: K čištění vnější strany jednotky používejte měkký, suchý hadřík. Nepoužívejte tekuté čisticí prostředky ani rozpouštědla.
- Větrání: Ensure that the ventilation slots are kept clear of dust and debris to prevent overheating.
- Skladování: Pokud budete jednotku skladovat delší dobu, odpojte ji od napájení a uložte ji na chladném a suchém místě.
8. Řešení problémů
| Problém | Možná příčina | Řešení |
|---|---|---|
| Žádný zvuk z reproduktorů. |
|
|
| Ze sluchátek není slyšet žádný zvuk. |
|
|
| Zkreslený zvuk. |
|
|
9. Specifikace
| Funkce | Detail |
|---|---|
| Název modelu | 2 Control (also known as 2860) |
| Značka | SPL |
| Typ reproduktoru | Monitor |
| Doporučená použití | Control, Volume for Monitors |
| Kompatibilní zařízení | Monitors, Speakers |
| Konfigurace kanálů prostorového zvuku | 2.0 |
| Barva | Černý |
| Zahrnuté komponenty | 1 x SPL Control Module |
| Rozměry produktu (D x Š x V) | 8.66 cm x 8.46 cm x 3.15 cm |
| Hmotnost položky | 7.06 libry (přibližně 3.2 kg) |
| Zdroj napájení | Elektrický kabel |
| Technologie připojení | TRS, XLR |
| Režim zvukového výstupu | Stereo |
| Typ montáže | Stolní držák |
| Výrobce | Sound Performance Lab |
10. Záruka a podpora
The SPL 2Control Monitor Controller comes with a limited warranty. For specific warranty terms, duration, and conditions, please refer to the documentation provided with your purchase or visit the official SPL website. For technical support, service, or inquiries, please contact the manufacturer, Sound Performance Lab, or your authorized dealer.
Výrobce: Sound Performance Lab