1. Konec produktuview
The Polaroid JXM122 is a portable AM/FM weather band radio designed for reliable reception and ease of use. It features a digital display, programmable station presets, and an integrated NOAA All Hazards Alert System. This manual provides instructions for proper setup, operation, and maintenance of your radio.
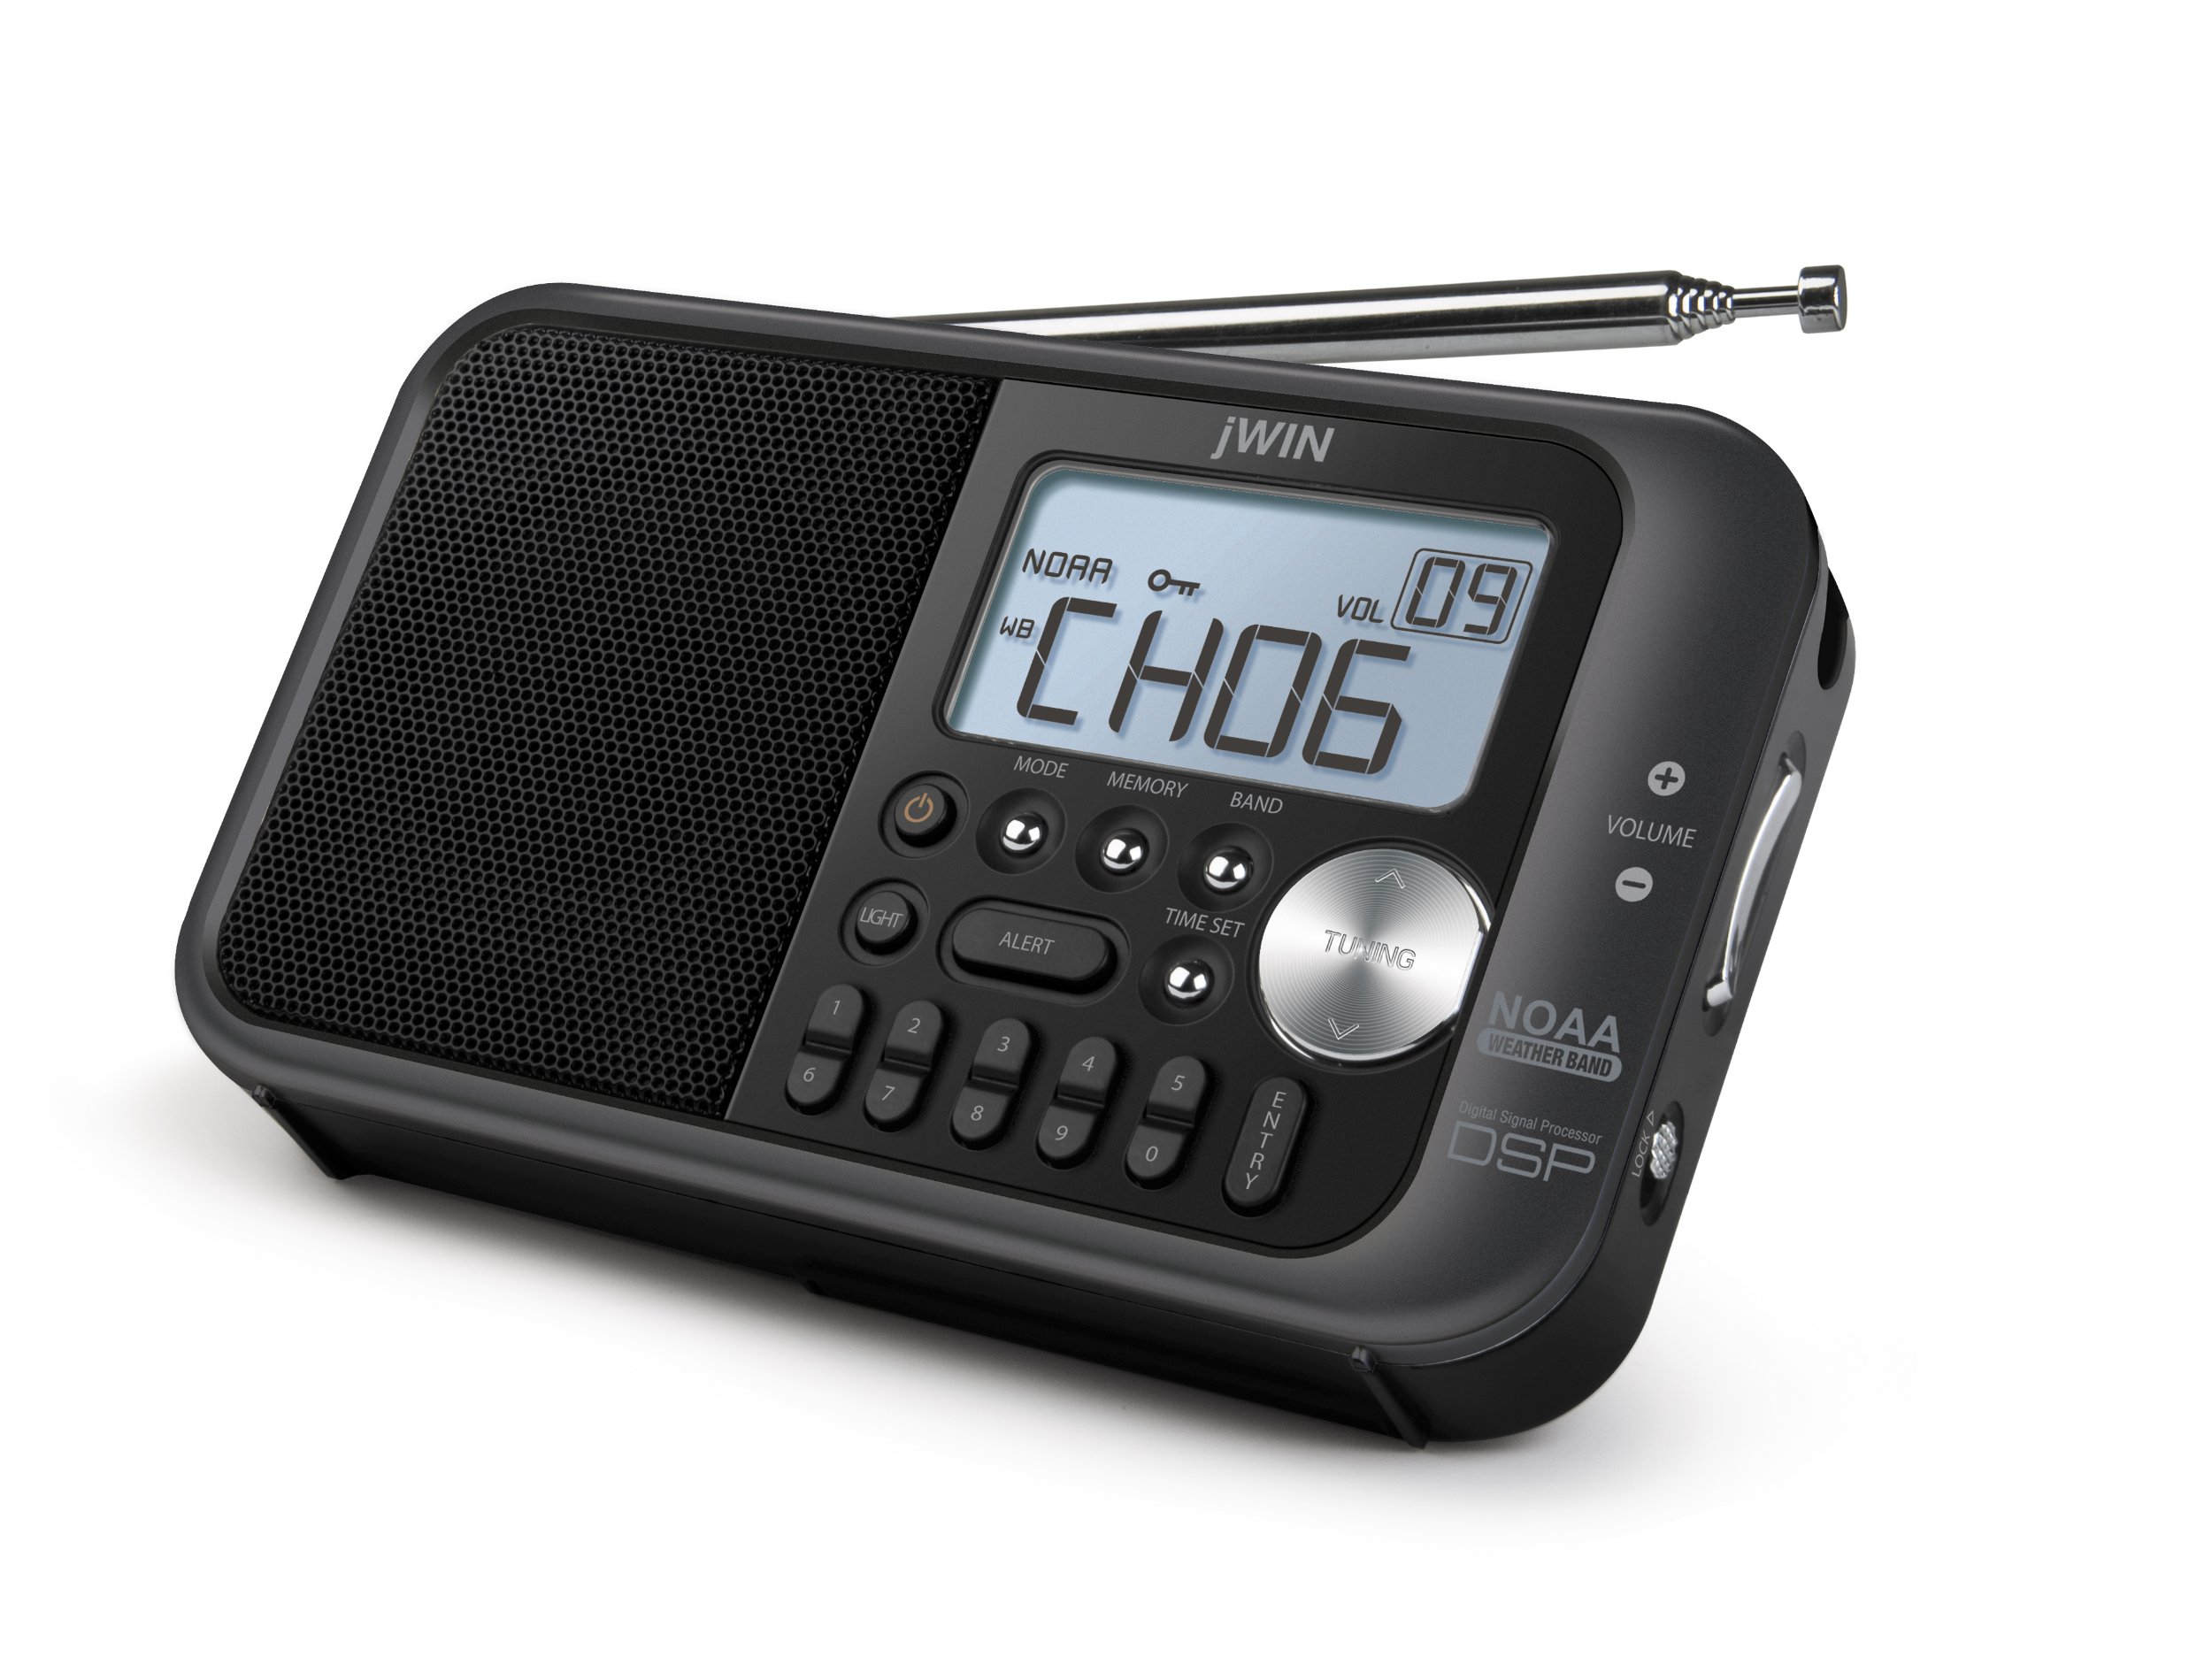
Obrázek 1: Přední strana view of the Polaroid JXM122 radio, highlighting the speaker, digital display, control buttons, and telescopic antenna.
Klíčové komponenty:
- Reproduktor: Located on the left side of the front panel.
- Digitální LCD displej: Shows frequency, time, band, and other indicators.
- Teleskopická anténa: Extendable for improved reception.
- Ovládací tlačítka: Including MODE, MEMORY, BAND, TIME SET, TUNING, LIGHT, ALERT.
- Ovládání hlasitosti: '+' and '-' buttons for adjusting audio output.
- Zamykací spínač: Zabraňuje nechtěnému stisknutí tlačítek.
- Vestavěný stojan: For upright positioning.
- Řemínek na ruku: Pro přenositelnost.
2. Nastavení
2.1 Zapnutí jednotky
The JXM122 radio can be powered by either an AC adapter or 3 AA batteries.
2.1.1 Instalace baterie
- Najděte kryt přihrádky na baterie na zadní straně rádia.
- Posuňte nebo odepněte kryt pro otevření.
- Insert 3 AA-size batteries, ensuring correct polarity (+/-) as indicated inside the compartment.
- Bezpečně nasaďte kryt prostoru pro baterie.
Note: When replacing batteries, it is recommended to keep the unit connected to AC power if possible to retain saved settings.
2.1.2 AC Power Adapter Connection
- Locate the DC IN jack on the side of the radio.
- Insert the small plug of the supplied AC power adapter into the DC IN jack.
- Plug the other end of the AC power adapter into a standard wall outlet.
2.2 Nastavení antény
For optimal reception, extend the telescopic antenna fully. Adjust its angle and direction to achieve the clearest signal for FM and Weather Band broadcasts. For AM reception, the radio uses an internal antenna; rotating the entire unit may improve signal quality.
3. Návod k obsluze
3.1 Zapnutí/vypnutí
Stiskněte tlačítko MOC button (often integrated with the MODE button or a separate button) to turn the radio on or off.
3.2 Výběr pásma
Stiskněte tlačítko KAPELA button repeatedly to cycle through available bands: AM, FM, and Weather Band (WB).
3.3 Ladění stanic
Použijte LADĚNÍ up (∧) or down (∨) buttons to manually adjust the frequency. Press and hold the TUNING buttons for automatic scanning to the next available station.
3.4 Setting and Recalling Presets
The radio allows for 10 AM and 10 FM programmable presets.
3.4.1 Ukládání předvoleb
- Tune to the desired station using the TUNING buttons.
- Stiskněte tlačítko PAMĚŤ button. The preset number on the display will flash.
- Use the TUNING buttons to select the desired preset number (0-9).
- Stiskněte tlačítko PAMĚŤ znovu tlačítko nebo VSTUP tlačítko pro potvrzení a uložení stanice.
3.4.2 Vyvolání předvoleb
Stiskněte tlačítko PRESET buttons (numbered 0-9, or use MEMORY and TUNING) to cycle through or directly select saved stations.
3.5 Ovládání hlasitosti
Použijte OBJEM + tlačítko pro zvýšení hlasitosti a OBJEM - tlačítko pro jeho snížení.
3.6 NOAA All Weather/Hazards Alert System
When in Weather Band (WB) mode, press the VÝSTRAHA button to activate or deactivate the NOAA alert function. When active, the radio will automatically switch to a NOAA weather alert broadcast if a warning is issued.
3.7 Nastavení hodin
Stiskněte a podržte NASTAVENÍ ČASU button. While the time is flashing, use the TUNING buttons to adjust the hours and minutes. Press TIME SET again to confirm.
3.8 Podsvícení displeje
Stiskněte tlačítko SVĚTLO button to illuminate the LCD display. The backlight may have a timed duration or can be set to stay on, depending on the model's specific settings.
3.9 Funkce zámku
Posuňte ZÁMEK switch (located on the side of the radio) to the 'Lock' position to disable all buttons and prevent accidental operation. Slide it back to the 'Unlock' position to resume normal function.
4. Údržba
4.1 Čištění
Wipe the radio's exterior with a soft, dry cloth. Do not use abrasive cleaners, waxes, or solvents, as these can damage the finish. Avoid getting moisture into any openings.
4.2 Péče o baterii
If the radio will not be used for an extended period, remove the batteries to prevent leakage and potential damage to the unit.
5. Řešení problémů
- Bez napájení:
- Ujistěte se, že jsou baterie správně nainstalovány a nejsou vybité.
- Verify the AC adapter is securely connected to both the radio and a working power outlet.
- Check if the LOCK switch is engaged.
- Špatný příjem:
- Fully extend and adjust the telescopic antenna for FM/WB.
- Rotate the entire radio for better AM reception.
- Přemístěte rádio dále od jiných elektronických zařízení, která by mohla způsobovat rušení.
- Display Not Working/Garbled:
- Replace batteries or ensure stable AC power.
- Pokud problém přetrvává, kontaktujte zákaznickou podporu.
- Žádný zvuk nebo nízká hlasitost:
- Increase the volume using the VOLUME + button.
- Ensure no headphones are connected if you intend to use the built-in speaker.
6. Specifikace
- Číslo modelu: JXM122
- Rozměry produktu: 8.5 x 2 x 4 palce
- Hmotnost položky: 8 unce
- Podporovaná rádiová pásma: AM, FM, Weather Band (NOAA)
- Technologie displeje: LCD s bílým podsvícením
- Zdroj napájení: 3 x AA batteries or Corded Electric (AC Adapter included)
- Speciální vlastnosti: Portable, Digital Clock Display, Programmable Presets (10 AM, 10 FM)
- Barva: Bílý
7. Záruka a podpora
This product typically includes a warranty card with purchase. Please refer to the warranty card for specific terms and conditions regarding coverage and duration. For technical support or service inquiries, please contact the manufacturer or your retailer.


