1. Úvod
This manual provides detailed instructions for the operation and maintenance of the Generic V539 OBDII Auto Diagnostic Code Scanner. This device is designed to assist in diagnosing engine-related issues in compatible vehicles, specifically BMW I3 (2011-2020) and BMW I8 (2019-2020) models. It supports all 10 modes of OBDII test for comprehensive vehicle diagnosis.

Image 1.1: The V539 OBDII Auto Diagnostic Code Scanner, highlighting its multi-language support and plug-and-play functionality.
2. Vlastnosti produktu
- Kompatibilita OBDII: Supports all 10 modes of OBDII test for a complete diagnosis.
- Kompatibilita vozidla: Specifically designed for BMW I3 (2011-2020) and BMW I8 (2019-2020) models.
- Diagnostické funkce: Determines the cause of the engine light, reads I/M readiness, reads and clears codes, turns off engine light (MIL), performs battery voltage tests, displays live data streams, supports onboard monitoring mode, and conducts component testing.
- Odolný design: Features an upgraded processing chip and a rugged, drop-resistant housing made from engineering-grade ABS for reliability and longevity.
- Uživatelsky přívětivé rozhraní: Equipped with a 2.8-inch high-definition color screen for clear visuals and structured data display, even in varying lighting conditions.
- Snadné použití: Boots up instantly with clear menu prompts and a one-click scan function for straightforward operation.
- One-Click Smog Check: A dedicated I/M Readiness hotkey provides instant emission monitor status.

Image 2.1: The V539 scanner's 2.8-inch high-definition color screen, showing various diagnostic menu options.

Image 2.2: The V539 scanner's robust engineering-grade ABS protective shell and anti-slip design for enhanced durability.
3. Nastavení
- Vyhledejte port OBDII: Zásuvka OBDII se obvykle nachází pod palubní deskou na straně řidiče vozidla. Pokud ji nemůžete najít, podívejte se do návodu k obsluze vozidla.
- Připojení skeneru: With the vehicle's ignition off, firmly plug the V539 scanner's OBDII connector into the vehicle's OBDII port.
- Zapnutí: Turn the vehicle's ignition to the "ON" position (do not start the engine). The scanner will automatically power on and display the main menu.
- Výběr jazyka (pokud je potřeba): If prompted, select your preferred language from the available options.
4. Provozní postupy
Follow these steps to diagnose and clear fault codes using the V539 scanner.
- Insert OBDII Plug: Connect the scanner to your vehicle's OBDII port as described in the Setup section.
- Retrieve Fault Codes: From the main menu, select "OBD/EOBD" or "Diagnosis" and press "OK". The scanner will communicate with the vehicle's ECU and display any detected Diagnostic Trouble Codes (DTCs). Each code will be accompanied by a brief description.
- Review Chybové kódy: Carefully read and understand the displayed fault codes. You can use the "LOOKUP" function on the scanner to get more detailed information about specific DTCs.
- Vymazání chybových kódů: After addressing the underlying issue that caused the fault code, you can clear the codes. Navigate to the "Clear Codes" option (often found within the "Diagnosis" menu or as a dedicated button/option) and confirm your selection. This will turn off the Malfunction Indicator Lamp (MIL) or "Check Engine" light.

Image 4.1: Visual guide for the V539 scanner's operating procedure, showing connection, code retrieval, and code clearing steps.
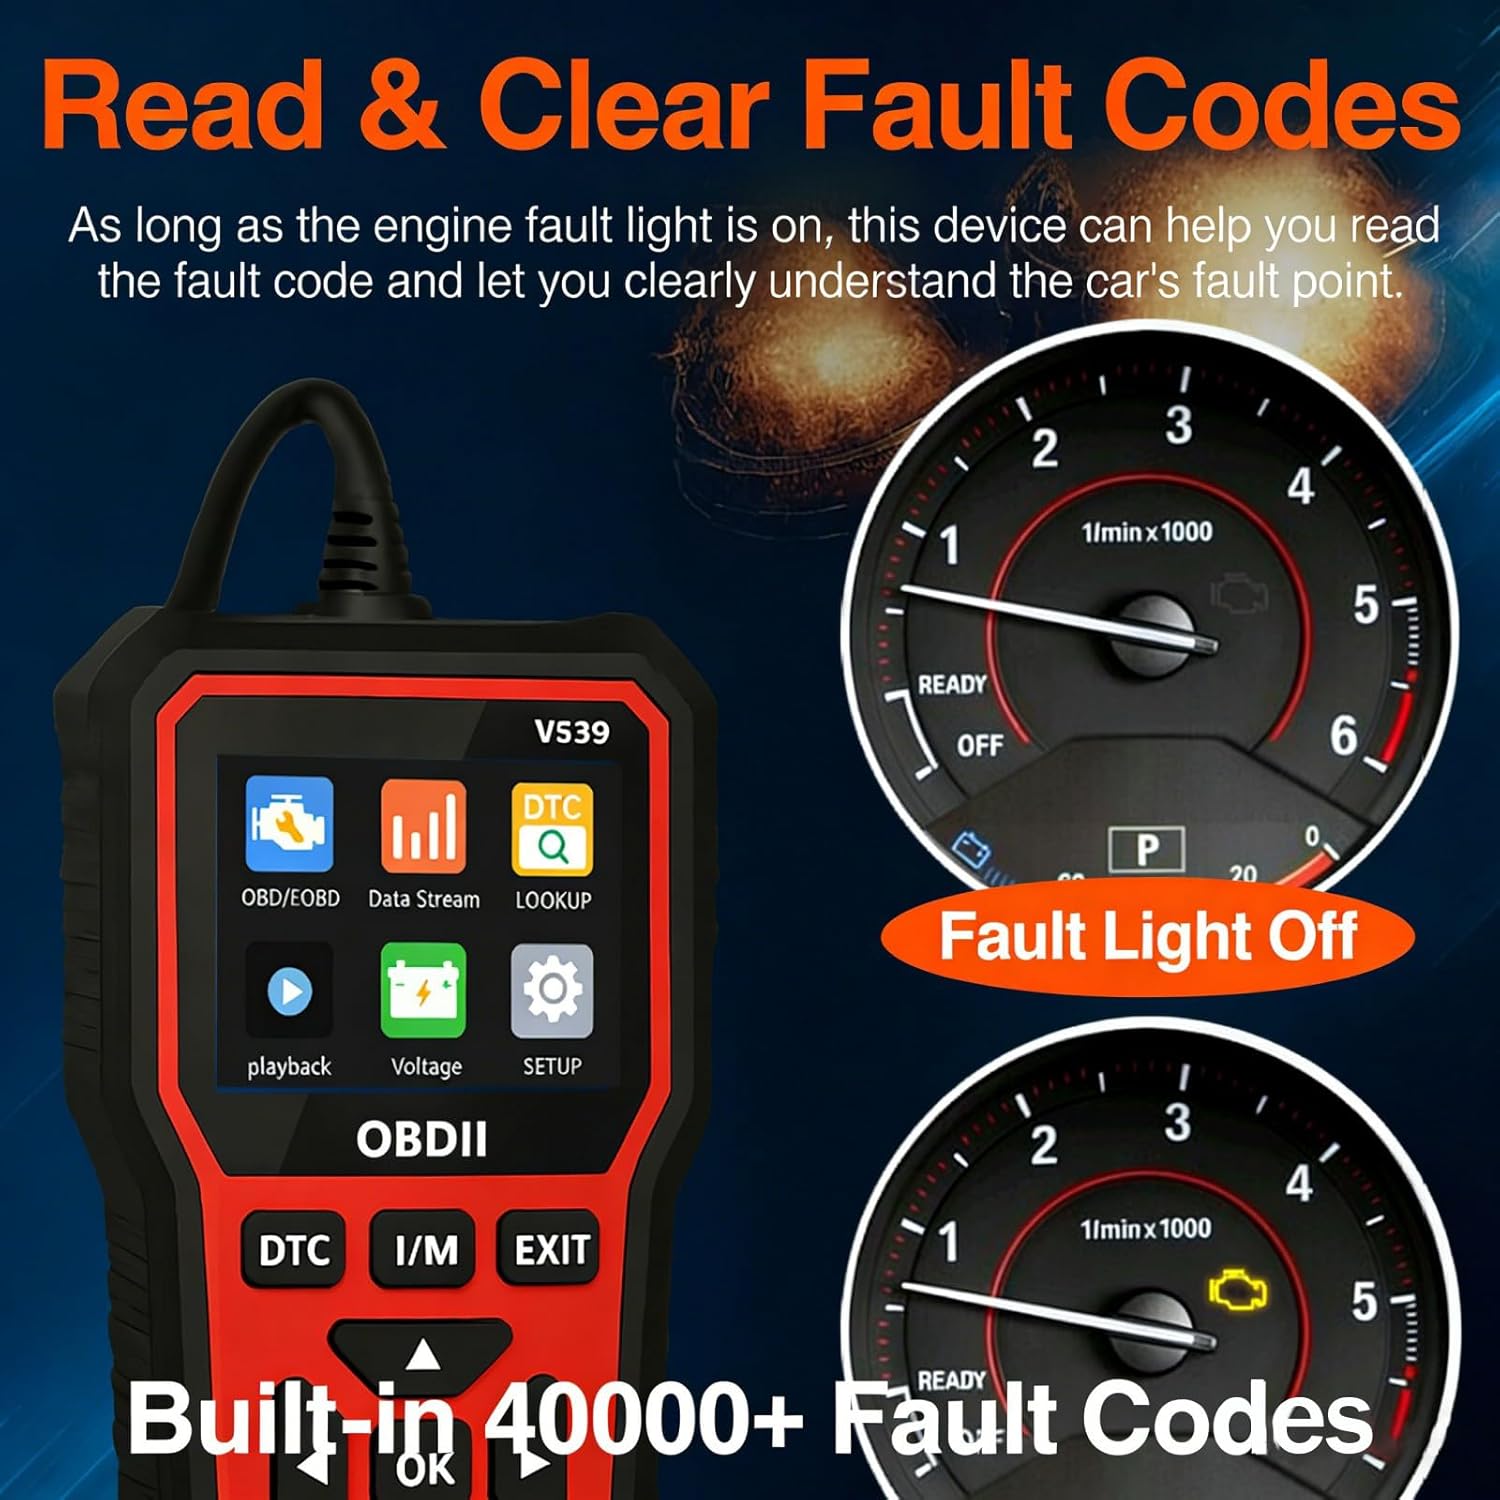
Image 4.2: The V539 scanner's ability to read and clear fault codes, demonstrating how the fault light turns off after successful clearance.
5. Core Functions Overview
The V539 OBDII scanner offers a range of diagnostic capabilities:
- Engine Fault Diagnosis
- Engine Fault Code Clearance
- Record Freeze Frame Information
- Čtení informací o vozidle
- Kontrola stavu připravenosti I/M
- Real-time Data Stream Reading
- Baterie Voltage Test
- Test kyslíkového senzoru
- Retrieve Fault Code Library
- Playback Function for recorded data

Image 5.1: An illustration of the V539 scanner's main diagnostic functions.
6. Údržba
- Čištění: K čištění obrazovky a těla skeneru používejte měkký, suchý hadřík. Nepoužívejte abrazivní čisticí prostředky ani rozpouštědla.
- Skladování: Přístroj skladujte na chladném a suchém místě mimo dosah přímého slunečního záření a extrémních teplot.
- Péče o kabely: Do not bend or crimp the OBDII cable excessively. Ensure the connector pins are clean and free from debris.
- Aktualizace softwaru: Zkontrolujte výrobce webpravidelně kontrolujte dostupné aktualizace softwaru na webu, abyste zajistili optimální výkon a kompatibilitu.
7. Řešení problémů
| Problém | Možná příčina | Řešení |
|---|---|---|
| Skener se nezapne. | Loose connection; vehicle ignition off; faulty OBDII port. | Ensure the OBDII connector is firmly plugged in. Turn the vehicle ignition to the "ON" position. Test the scanner on another compatible vehicle if possible. |
| Chyba komunikace s vozidlem. | Incorrect protocol; vehicle not OBDII compliant; loose connection. | Verify vehicle is OBDII compliant. Check the connection. Try again after turning the ignition off and on. |
| Nelze vymazat chybové kódy. | Underlying issue not resolved; ignition not in "ON" position. | Ensure the vehicle's fault has been repaired. Confirm ignition is "ON" (engine off). Some codes may require specific driving cycles to clear after repair. |
| Obrazovka je prázdná nebo zamrzlá. | Softwarová závada; problém s napájením. | Disconnect the scanner from the vehicle, wait a few seconds, then reconnect. If the issue persists, contact support. |
8. Specifikace
- Model: V539
- Výrobce: HDCAL
- Číslo modelu položky: HDCAL-6670383
- Hmotnost položky: 1.1 libry (přibližně 0.5 kg)
- Rozměry produktu: 0.39 x 0.39 x 0.39 palce (přibližně 1 x 1 x 1 cm) - Note: This dimension seems incorrect based on images, likely a placeholder. Actual dimensions are closer to 15.5cm x 7.3cm based on Image 7.1.
- Zobrazit: 2.8-inch High-Definition Color Screen
- Materiál pouzdra: Engineering-grade ABS
- Kompatibilita: OBDII compliant vehicles, specifically BMW I3 (2011-2020) and BMW I8 (2019-2020).

Image 8.1: Physical dimensions of the V539 OBDII scanner and its OBDII plug.
9. Záruka a podpora
For warranty information or technical support, please refer to the documentation included with your purchase or contact the manufacturer directly. Keep your purchase receipt as proof of purchase for warranty claims.