1. Úvod
This instruction manual provides comprehensive guidance for the assembly, safe operation, and proper maintenance of your Tangkula 62" Reversible L-Shaped Computer Desk. This desk features a built-in power strip with USB and Type-C ports, a hutch, shelves, and a mobile CPU stand, designed to optimize your workspace. Please read all instructions carefully before assembly and use to ensure safety and product longevity.

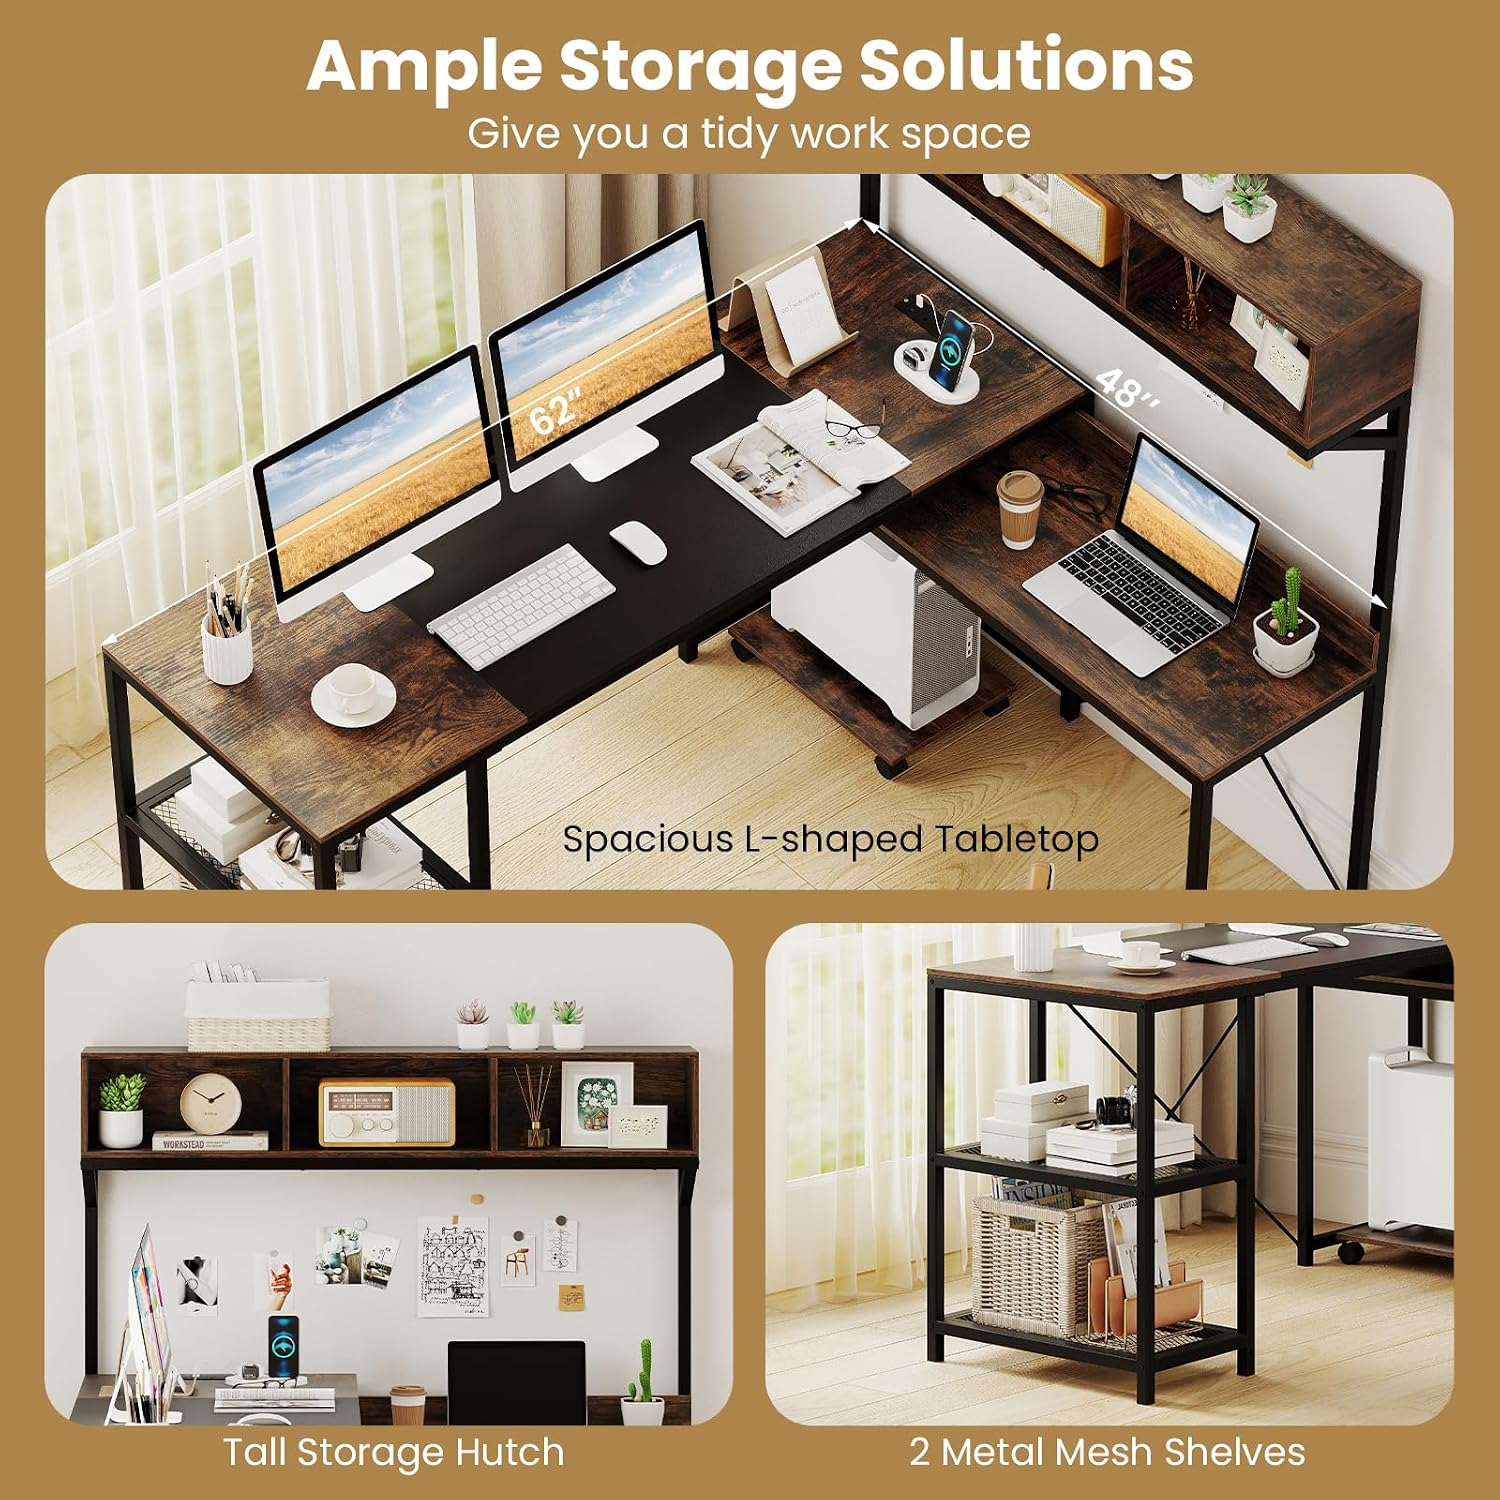
Obrázek 1.1: Konecview of the Tangkula L-Shaped Computer Desk, showcasing its spacious design, hutch, and integrated power strip.
2. Bezpečnostní informace
- Stůl vždy sestavujte na měkkém a čistém povrchu, abyste zabránili poškrábání.
- Ensure all screws and fasteners are securely tightened before use. Periodically check and retighten as necessary.
- Do not overload the desk or shelves beyond their specified weight capacities. Refer to the 'Specifications' section for details.
- Udržujte děti a domácí zvířata mimo dosah montážního prostoru. Malé díly mohou představovat nebezpečí udušení.
- For electrical safety, ensure the power cord is not pinched or damaged. Do not expose the power strip to moisture.
- Use only the provided power cord and do not attempt to modify the electrical components.
- Pokud některé díly chybí nebo jsou poškozené, nepokračujte v montáži. Okamžitě kontaktujte zákaznickou podporu.
3. Obsah balení
Verify that all components are present and undamaged before beginning assembly. The package should contain:
- L-shaped Desk Panels (various sizes for tabletops and hutch)
- Metal Frame Components (legs, support bars, X-shaped reinforcements)
- Built-in Power Strip with USB, Type-C, and AC Outlets
- Mobile CPU Stand with Casters
- Metal Mesh Shelves
- Montážní materiál (šrouby, vruty, imbusový klíč)
- Uživatelská příručka
4. Nastavení a montáž
Assembly requires two people for optimal safety and ease. Follow the numbered steps in the included assembly diagram. The desk features a reversible design, allowing the L-shape to be configured for either left or right-hand orientation to suit your room layout.
4.1 Oboustranná instalace
The L-shaped desk can be assembled with the longer section on either the left or right side. Carefully review the assembly diagrams to select your preferred orientation before attaching the main tabletop sections.

Image 4.1: Illustration of the reversible L-shaped configuration, demonstrating how the desk can be adapted to different room layouts.
4.2 Sestavení rámu
Begin by assembling the heavy-duty metal frame. Ensure all X-shaped reinforced structures are correctly positioned and tightened to provide maximum stability.

Image 4.2: Detail of the desk's robust metal frame, highlighting the X-shaped reinforcement and triangle support brackets for enhanced stability.
4.3 Attaching Tabletop and Hutch
Once the frame is stable, attach the engineered wood tabletop sections and the hutch. The hutch provides additional storage compartments above the desk surface.
4.4 Installing Shelves and CPU Stand
Secure the metal mesh shelves to the designated areas on the desk frame. Assemble the mobile CPU stand by attaching the 4 universal casters, ensuring the 2 lockable casters are positioned for easy access.

Image 4.3: The desk's storage features, including the 3-cube hutch and two metal mesh shelves, designed to keep your workspace organized.
5. Návod k obsluze
5.1 Vestavěný prodlužovací kabel
The desk includes a built-in power strip for convenient device charging. It features 2 AC outlets (125V/12A), 1 USB port, and 1 Type-C port (5V/2.4A). Connect the desk's 4.9 ft power cord to a standard wall outlet.
- Zapojte svá zařízení do příslušných portů.
- Do not exceed the maximum electrical load for the power strip.
- Ensure the power cord is not a tripping hazard and is kept away from water.
Obrázek 5.1: Detailní view of the integrated power strip, showing the 2 AC outlets, USB port, and Type-C port for charging various devices.
5.2 Mobile CPU Stand
The mobile CPU stand is equipped with 4 universal casters, two of which are lockable. This allows for flexible placement of your computer tower and easy movement for cleaning or access.
- To move the CPU stand, unlock the casters.
- To secure the CPU stand in place, engage the brakes on the two lockable casters.

Image 5.2: The mobile CPU stand, featuring 360-degree universal casters, with two equipped with brakes for stability and easy repositioning.
6. Údržba
- Čištění: Otřete povrchy měkkým, damp hadříkem. Nepoužívejte agresivní chemikálie ani abrazivní čisticí prostředky, které by mohly poškodit povrchovou úpravu.
- Utírat prach: Pravidelně otírejte prach ze všech povrchů, abyste zabránili hromadění nečistot.
- Spojovací materiál: Pravidelně kontrolujte všechny šrouby a vruty, zda jsou pevně utažené. V případě potřeby je dotáhněte pro zachování stability.
- Rozlití: Rozlité tekutiny ihned očistěte, abyste zabránili vzniku skvrn nebo poškození dřevěného obložení.
- Teplo: Nepokládejte horké předměty přímo na povrch stolu. Používejte podtácky nebo ochranné podložky.
7. Řešení problémů
- Stůl se kymácí: Ensure all assembly screws and bolts are fully tightened. Check that the desk is on a level surface. Adjust non-slip foot pads if necessary.
- Prodlužovací kabel nefunguje: Verify that the desk's power cord is securely plugged into a functional wall outlet. Check if the wall outlet itself is receiving power. Ensure devices are properly plugged into the power strip.
- Chybějící části: If any parts are missing upon unboxing, do not proceed with assembly. Contact Tangkula customer support for assistance.
- Obtížnost s montáží: Review the assembly diagrams carefully. Ensure you are using the correct hardware for each step. If issues persist, contact customer support.
8. Specifikace
Detailed product specifications for the Tangkula L-Shaped Computer Desk (Model AM12666HM):

Image 8.1: Comprehensive dimensions of the L-shaped computer desk, including tabletop lengths, heights, and hutch measurements.
| Funkce | Detail |
|---|---|
| Číslo modelu | AM12666HM |
| Celkové rozměry | 158 x 123 x 142 cm (D x Š x V) |
| Higher Tabletop Dimensions | 158 x 55 x 75 cm (D x Š x V) |
| Lower Tabletop (Exposed Part) | 68 x 36 x 63 cm (D x Š x V) |
| Storage Compartment Dimensions | 39 x 20 x 18 cm (Š x H x V) |
| Metal Mesh Shelf Dimensions | 50 x 27 x 30 cm (D x Š x V) |
| Space Between Higher Tabletop and Hutch | 19" (49 cm) |
| Rozměry stojanu CPU | 42 x 28 x 6.5 cm (D x Š x V) |
| Délka napájecího kabelu | 4.9 stopa (150 cm) |
| Jmenovité hodnoty síťové zásuvky | 125V/12A |
| USB + Type-C Output | 5V/2.4A |
| Weight Capacity (Higher Tabletop) | 135 lb (60 kg) |
| Weight Capacity (Lower Tabletop) | 90 lb (40 kg) |
| Weight Capacity (Metal Mesh Shelf) | 25 lb (10 kg) |
| Weight Capacity (Storage Compartment) | 10 lb (5 kg) |
| Weight Capacity (Hutch Top) | 45 lb (20 kg) |
| Weight Capacity (CPU Stand) | 25 lb (10 kg) |
| Čistá hmotnost | 78 lb (35.5 kg) |
| Materiál | Konstrukce dřeva, MDF, kov |
| Barva | Rustikální hnědá + černá |
9. Záruka a podpora
For warranty information, missing parts, or any questions regarding your Tangkula L-Shaped Computer Desk, please refer to the purchase documentation or contact Tangkula customer support directly. Keep your purchase receipt for warranty claims.