
Zavedení
The Xvive AT-2 Pro is a compact, multi-functional audio testing device designed for audio professionals and enthusiasts. It integrates five essential tools: a signal generator, an XLR cable tester, a 48V phantom power checker, an XLR input meter, and a headphone/built-in speaker monitor. This manual provides instructions for the proper use and maintenance of your AT-2 Pro to ensure optimal performance and longevity.

Image: The Xvive AT-2 Pro highlighting its five core functions.
Bezpečnostní informace
- Nevystavujte zařízení vodě ani nadměrné vlhkosti.
- Vyhněte se extrémním teplotám.
- Nepokoušejte se jednotku rozebírat ani upravovat. Veškerý servis svěřte kvalifikovanému personálu.
- Use only the specified USB-C cable for charging.
- Uchovávejte mimo dosah dětí.
Obsah balení
Ověřte, zda jsou v balení přítomny všechny položky:
- Xvive AT-2 Pro Audio Tester Unit
- Nabíjecí kabel USB-C
- Jack adaptér
- Ochranné pouzdro

Image: Contents of the Xvive AT-2 Pro package.
Konec produktuviewOvládací prvky a funkce
Familiarize yourself with the various inputs, outputs, and controls on your AT-2 Pro.
Obrázek: Podrobný view of the AT-2 Pro's control panel.
- XLR Input/Output: Standard 3-pin XLR connectors for cable testing, signal generation, and input metering.
- 1/4" Jack Input/Output: For connecting to various audio equipment.
- 1/8" výstup pro sluchátka: Pro monitorování zvuku.
- Knoflík hlasitosti: Adjusts headphone and built-in speaker volume.
- Signal Generator Buttons: Select 1kHz Tone or Pink Noise.
- Output Pad Switches: Adjust output level (-10dB, -20dB, -40dB).
- XLR Cable Test Button: Initiates XLR cable pin-by-pin test.
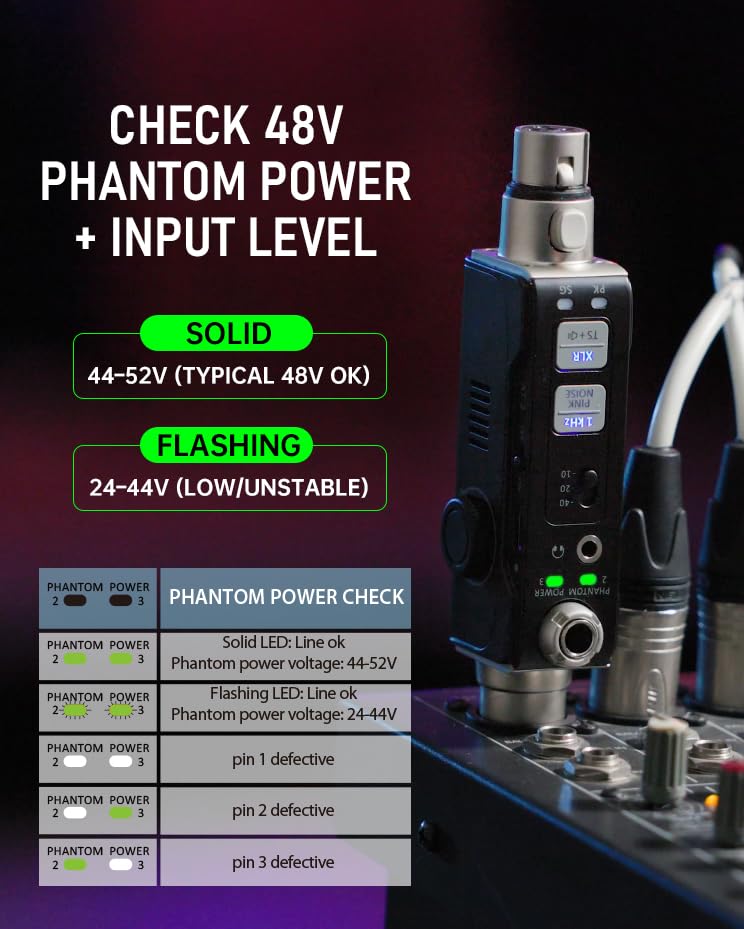
- Phantom Power Check LEDs: Indicate 48V phantom power status.
- Input Level Meter LEDs: Display signal presence (SG) and peak levels (PK).
- Port USB-C: Pro nabíjení interní baterie.
Nastavení a nabíjení
Počáteční nabíjení
Before first use, fully charge the AT-2 Pro using the provided USB-C cable. Connect the cable to the USB-C port on the device and to a standard USB power adapter (not included). The charging indicator will show progress and turn off when fully charged (approximately 1.5 hours).
Zapnutí/vypnutí
Press and hold the power button to turn the device on or off. The display will illuminate upon activation.
Provozní režimy
1. Signal Generator (1kHz Tone & Pink Noise)
The signal generator provides a clean test signal for various audio equipment.
- Connect the AT-2 Pro to the input of the device you wish to test (e.g., mixer, DI box, active speaker) using an XLR or 1/4" cable.
- Stiskněte tlačítko Tón 1 kHz or Růžový šum button to select the desired signal.
- Adjust the output level using the -10/-20/-40 dB pad switches to match the input sensitivity of the connected equipment.
- Monitor the signal through the connected equipment or via the AT-2 Pro's headphone output/built-in speaker.

Image: Signal Generator function in use.


2. XLR Cable Tester (Pin-by-Pin)
Test XLR cables for continuity and correct wiring.
- Connect both ends of the XLR cable to the AT-2 Pro's XLR input and output ports.
- Stiskněte tlačítko XLR Cable Test button. The device will automatically cycle through pins 1, 2, and 3, indicating their status.
- Alternatively, you can manually select pins to test by repeatedly pressing the button.
- Green LEDs indicate a good connection for each pin. Red LEDs or no illumination indicate a fault.

Image: XLR Cable Tester in action, showing pin status.
3. 48V Phantom Power Check + XLR Input Metering
Verify phantom power supply and monitor input signal levels.
- Connect the AT-2 Pro to an XLR input that is expected to provide phantom power.
- The Kontrola fantomového napájení LEDs will indicate the voltage: a solid light for 44-52V (typical 48V OK) and a flashing light for 24-44V (low/unstable).
- The XLR Input Meter LEDs (SG for Signal, PK for Peak) will illuminate to show signal presence and warn of very hot levels.

Image: Phantom Power Check and Input Level Meter.
4. Headphone/Built-in Speaker Monitoring
Listen to incoming audio signals directly from the device.
- Connect headphones to the 1/8" headphone output jack or use the built-in speaker.
- Hlasitost upravte pomocí příslušného knoflíku hlasitosti.
- This feature allows for quick verification of audio signals at any point in your signal chain.

Image: Headphone Monitoring feature.
Odstraňování problémů
Common issues and solutions for the Xvive AT-2 Pro.
| Problém | Možná příčina | Řešení |
|---|---|---|
| Žádná síla | Low battery; device off | Charge the unit; press and hold power button to turn on. |
| No signal from generator | Incorrect output pad setting; incorrect cable connection | Adjust output pad; ensure cables are securely connected. |
| XLR cable test fails | Faulty cable; improper connection | Ensure cable is fully inserted; replace cable if necessary. |
| No phantom power detected | Source not providing 48V; faulty source | Verify phantom power is enabled on the source; test with another source. |
| No audio from headphone/speaker | Volume too low; no input signal | Increase volume; ensure an audio signal is present at the input. |
Specifikace
- Model: AT-2 PRO
- Funkce: Signal Generator (1kHz Tone, Pink Noise), XLR Cable Tester, 48V Phantom Power Checker, XLR Input Meter, Headphone/Built-in Speaker Monitor
- Output Pad Levels: -10dB, -20dB, -40dB
- Phantom Power Detection: Solid LED (44-52V), Flashing LED (24-44V)
- Baterie: Dobíjecí nestandardní baterie (součástí balení)
- Nabíjení: USB-C, approx. 1.5 hours for full charge
- Rozměry: 8.19 x 4.29 x 2.6 palce (přibližně)
- Hmotnost: 5.3 unce (přibližně)
Oficiální video produktu
Video: Úředník u konceview of the Xvive AT-2 Pro Audio Tester, demonstrating its 5-in-1 signal generator, XLR cable tester, and other features.
Záruka a podpora
The Xvive AT-2 Pro Audio Tester comes with a limited manufacturer's warranty. For detailed warranty information, technical support, or service inquiries, please refer to the official Xvive webwebu nebo se obraťte přímo na jejich zákaznickou podporu. Uschovejte si účtenku jako doklad o koupi pro případ reklamace.
Pro další pomoc prosím navštivte Obchod Xvive na Amazonu.