
1. Úvod
Thank you for choosing the BitFenix AL118 ATX Mid Tower PC Case. This manual provides essential information for the proper installation, operation, and maintenance of your new PC case. Please read this manual thoroughly before beginning installation to ensure correct setup and to prevent any damage to the product or its components. Keep this manual for future reference.
Bezpečnostní informace
- Před instalací nebo demontáží jakýchkoli součástí vždy odpojte napájecí kabel ze zásuvky.
- Handle components with care to avoid electrostatic discharge (ESD) damage. Consider using an anti-static wrist strap.
- Ujistěte se, že všechny kabely jsou správně vedeny a zajištěny, aby nedocházelo k kolizi s ventilátory nebo jinými pohyblivými částmi.
- Do not open the power supply unit (PSU) as it contains high voltage komponenty.
- Chraňte pouzdro před přímým slunečním zářením, vysokými teplotami a vlhkostí.
2. Konec produktuview a funkce
The BitFenix AL118 is a high-performance ATX Mid Tower PC case designed for enthusiasts. It features a tempered glass side panel, integrated ARGB lighting, and comes equipped with a 1000W 80+ Gold Gen5 ATX 3.0 power supply unit. The case offers extensive compatibility for various motherboard sizes, GPUs, and cooling solutions.
Klíčové vlastnosti:
- Form Factor: Střední věž ATX
- Napájení: Integrated 1000W 80+ Gold Gen5 ATX 3.0 PSU
- Boční panel: Tvrzené sklo
- Osvětlení: Addressable RGB (ARGB) elements
- Podpora základní desky: MicroATX, Mini-ITX (ATX implied by case type)
- Přední I / O: 1 x USB 3.2 Type-C, 2 x USB 3.0
- Storage Bays: 2 x 2.5" internal, 1 x 3.5" internal
- Vyčištění GPU: Až 400 mm
- Podpora chlazení:
- Top Radiator: 240mm, 280mm, 360mm
- Rear Radiator: 1 x 120mm
- Rear Fan: 1 x 120mm (pre-installed ARGB)
- Top Fan: 3 x 120mm or 3 x 140mm (support)
- Side Fan: 3 x 120mm (pre-installed ARGB)
3. Průvodce nastavením
Follow these steps to properly set up your BitFenix AL118 PC case and install your components.
3.1 Vybalení a počáteční kontrola
- Opatrně vyjměte pouzdro z obalu.
- Inspect the case for any signs of damage during transit. If damaged, contact your retailer immediately.
- Remove the tempered glass side panel by unscrewing the thumb screws (if present) or releasing the latch mechanism. Place it on a soft, flat surface to prevent scratches.
- Locate the accessory box inside the case, which contains screws, cable ties, and other mounting hardware.
3.2 Instalace základní desky
- Ensure the correct standoffs are installed for your motherboard form factor (MicroATX, Mini-ITX). Additional standoffs may be in the accessory box.
- Nainstalujte kryt I/O do zadního otvoru skříně.
- Opatrně umístěte základní desku na distanční sloupky a zarovnejte otvory pro šrouby.
- Zajistěte základní desku dodanými šrouby. Nepřetahujte je.

Obrázek 3.2.1: Vnitřní view of the case, highlighting the motherboard tray and various mounting points for fans and components.
3.3 Instalace grafické karty (GPU)
- Remove the necessary expansion slot covers from the rear of the case, corresponding to your GPU's size.
- Insert your GPU into the appropriate PCIe slot on the motherboard until it clicks into place.
- Připevněte grafickou kartu k pouzdru pomocí šroubů.
- Connect the required PCIe power cables from the PSU to the GPU.
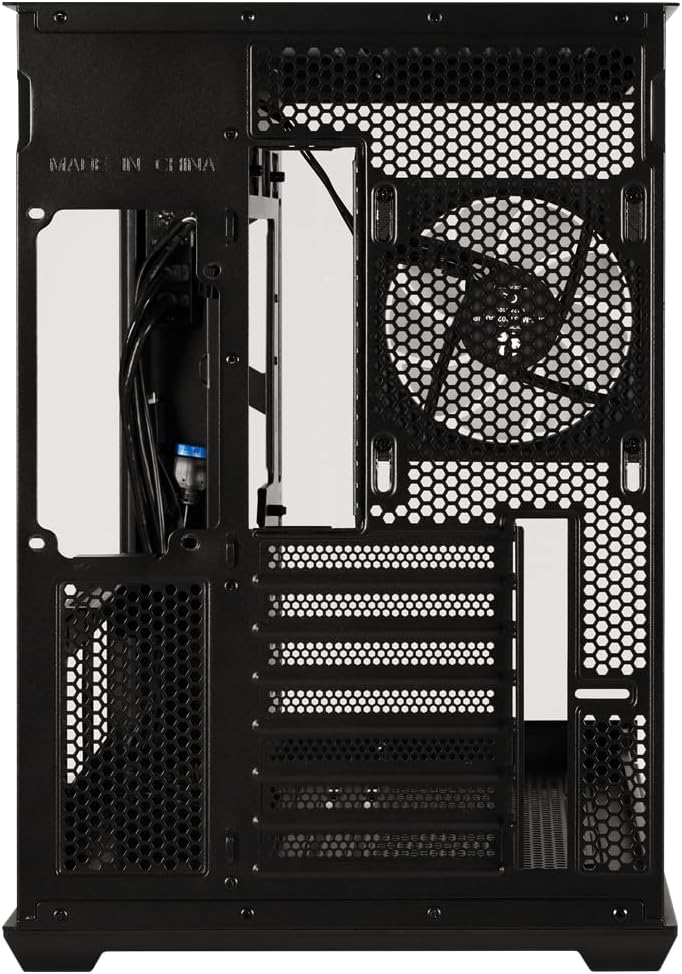
Obrázek 3.3.1: Zadní view of the case, showing the expansion slots where graphics cards are mounted and the pre-installed rear fan.
3.4 Storage Drive Installation (2.5" SSD/HDD, 3.5" HDD)
- Locate the 2.5" drive mounts (2 available) and 3.5" drive bay (1 available). These are typically found behind the motherboard tray or in a dedicated drive cage.
- For 2.5" drives, secure them to the mounting brackets with screws.
- For 3.5" drives, slide them into the drive cage and secure with screws or tool-less clips if available.
- Connect SATA data cables to the motherboard and SATA power cables from the PSU to each drive.
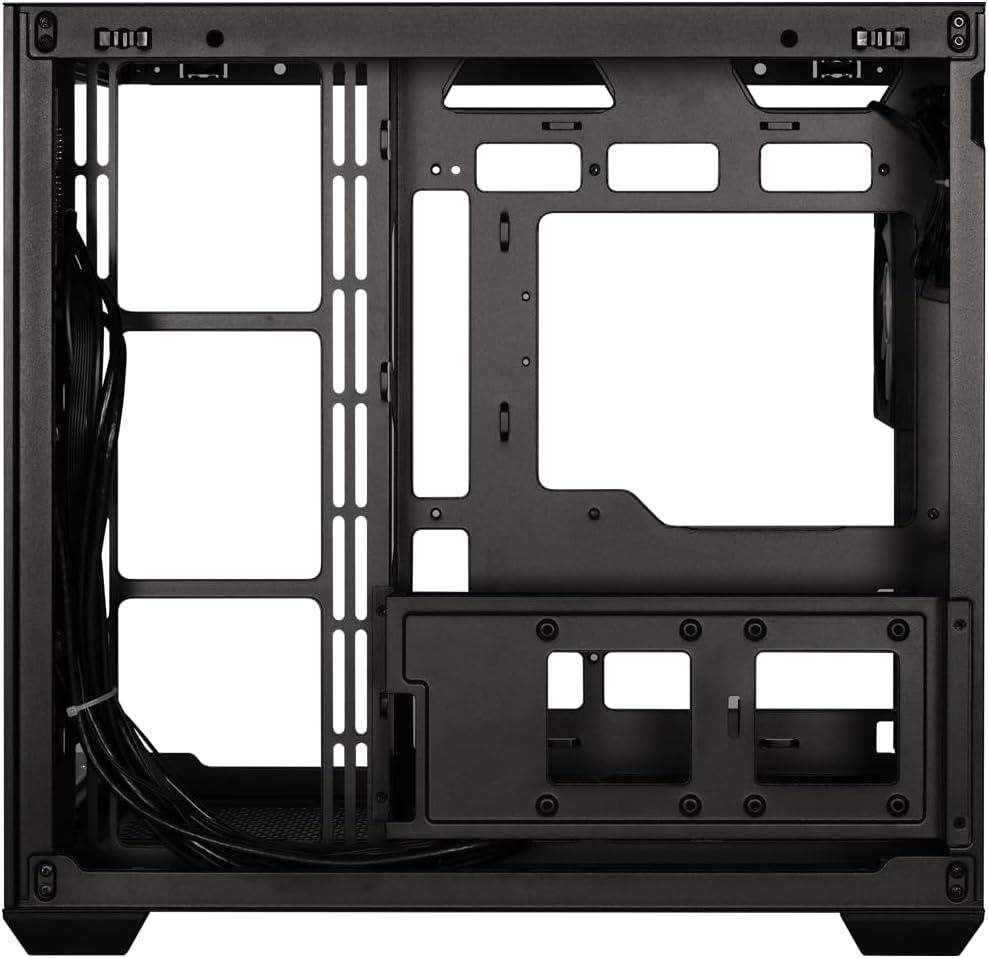
Obrázek 3.4.1: View behind the motherboard tray, illustrating the cable management channels and mounting locations for 2.5-inch and 3.5-inch storage drives.
3.5 Power Supply Unit (PSU) Connections
Your BitFenix AL118 case comes with a pre-installed 1000W 80+ Gold Gen5 ATX 3.0 PSU. Ensure all necessary power cables are connected:
- 24pinový ATX konektor Connect to the motherboard.
- 8-pin (4+4) EPS/CPU Power: Connect to the motherboard CPU power header.
- Napájení PCIe: Connect to your graphics card(s) as required.
- Napájení SATA: Connect to your storage drives.
- Peripheral/Molex Power: Connect to any other components requiring this type of power.
3.6 Připojení předního panelu
Connect the front panel cables to the corresponding headers on your motherboard:
- USB 3.2 Type-C: Connect the internal USB-C header cable to your motherboard's USB 3.2 Gen2 Type-C header.
- USB 3.0: Connect the internal USB 3.0 header cable to your motherboard's USB 3.0 header.
- HD zvuk: Connect to your motherboard's audio header.
- Přepínač napájení, přepínač resetování, LED dioda HDD, LED dioda napájení: Connect these small connectors to the front panel header pins on your motherboard according to your motherboard manual.

Obrázek 3.6.1: Vnitřní view showing the pre-installed ARGB fans and the routing of front panel I/O cables, including USB 3.2 Type-C and USB 3.0 connections.
3.7 Správa kabelů
Utilize the cable routing cutouts and tie-down points behind the motherboard tray to manage cables. Proper cable management improves airflow and aesthetics.
- Route main power cables (24-pin, EPS) through the largest cutouts.
- Use cable ties or Velcro straps (included in accessory box) to bundle and secure cables.
- Ensure no cables obstruct fan blades or airflow paths.
4. Návod k obsluze
4.1 Zapnutí systému
- Once all components are installed and cables connected, replace the tempered glass side panel.
- Připojte napájecí kabel k napájecímu zdroji a poté do zásuvky ve zdi.
- Přepněte vypínač na zadní straně zdroje do polohy „ON“.
- Press the power button on the front panel of your case.
4.2 Ovládání osvětlení ARGB
The BitFenix AL118 features Addressable RGB (ARGB) lighting. The control method depends on how the ARGB components are connected:
- Synchronizace základní desky: If the ARGB cables are connected to a compatible 3-pin 5V ARGB header on your motherboard, you can control the lighting effects using your motherboard's RGB software (e.g., ASUS Aura Sync, MSI Mystic Light, Gigabyte RGB Fusion, ASRock Polychrome Sync).
- Integrated Controller: If the case includes a built-in ARGB controller (often connected to a reset button or dedicated ARGB button), you can cycle through pre-programmed lighting modes by pressing that button. Refer to the specific controller's instructions if applicable.
5. Údržba
Pravidelná údržba pomáhá zajistit optimální výkon a dlouhou životnost komponent vašeho počítače.
- Prachové filtry: The case is equipped with dust filters (e.g., top, front, bottom). Regularly remove and clean these filters with water and mild soap, or by vacuuming/brushing them. Ensure they are completely dry before re-installing.
- Čištění interiéru: Periodically use compressed air to blow dust out of the case interior, especially from fan blades, heatsinks, and vents. Ensure the system is powered off and unplugged before cleaning.
- Tvrzené sklo: Očistěte tvrzené sklo hadříkem z mikrovlákna a neabrazivním čističem skla. Vyhněte se agresivním chemikáliím.
6. Řešení problémů
If you encounter issues with your PC build, refer to the following common troubleshooting steps:
- Žádné napájení / Systém se nespustí:
- Ensure the PSU power switch is in the 'ON' position.
- Check that the AC power cord is securely connected to both the PSU and the wall outlet.
- Verify all PSU cables (24-pin, EPS, PCIe) are firmly connected to the motherboard and components.
- Zkontrolujte, zda je kabel vypínače na předním panelu správně připojen ke konektoru základní desky.
- Žádný výstup na displej:
- Ensure your monitor is connected to the graphics card (GPU) output, not the motherboard's integrated graphics output (unless you are using integrated graphics).
- Znovu vložte grafickou kartu do slotu PCIe.
- Check that the GPU's power cables are securely connected.
- Fans Not Spinning / ARGB Not Working:
- Verify that all fan power cables are connected to the motherboard fan headers or a fan controller.
- Check ARGB cables are connected to a compatible 3-pin 5V ARGB header on the motherboard or an ARGB controller.
- Pokud používáte software základní desky, ujistěte se, že je správně nainstalován a nakonfigurován.
- Přehřívání:
- Ujistěte se, že se všechny ventilátory skříně otáčejí a jsou správně orientovány pro optimální proudění vzduchu (sání/výfuk).
- Clean dust filters and case interior as described in the Maintenance section.
- Verify CPU cooler and GPU cooler are properly installed and functioning.
7. Specifikace
| Funkce | Specifikace |
|---|---|
| Název modelu | BitFenix AL118 1000W 80+Gold Gen5 ATX 3.0 TemperedGlass ARGB ATX MidTower SiyahKasa BFC-ALB100KKGSK-4A |
| Číslo dílu | BFC-ALB100KKGSK-4A |
| Typ pouzdra | Střední věž ATX |
| Kompatibilita základní desky | MicroATX, Mini-ITX (ATX implied by case type) |
| Napájecí jednotka (PSU) | 1000W 80+ Gold Gen5 ATX 3.0 (Pre-installed) |
| Umístění PSU | Dno |
| Boční panel | Tvrzené sklo |
| Přední I / O porty | 1 x USB 3.2 Type-C, 2 x USB 3.0 |
| Interní 2.5" pozice pro mechaniky | 2 |
| Interní 3.5" pozice pro mechaniky | 1 |
| Maximální délka GPU | 400 mm |
| Horní podpora radiátorů | 240 mm, 280 mm, 360 mm |
| Podpora zadního chladiče | 1 x 120 mm |
| Front Panel Fan Support | None (Side fans are present) |
| Rear Panel Fan Support | 1 x 120 mm |
| Top Panel Fan Support | 3 x 120 mm, 3 x 140 mm |
| Pre-installed Fans (Side) | 3 x 120mm ARGB |
| Pre-installed Fans (Rear) | 1 x 120mm ARGB |
| Rozměry produktu | 48 x 45.5 x 34.5 cm |
| Hmotnost produktu | 8 kg |
8. Záruka a podpora
BitFenix products are manufactured to the highest quality standards. For specific warranty terms and conditions, please refer to the warranty card included with your product or visit the official BitFenix website. If you encounter any issues that cannot be resolved using this manual, please contact BitFenix customer support or your retailer for assistance.
Official BitFenix Webmísto: www.bitfenix.com