
1. Úvod
This manual provides detailed instructions for the installation, operation, and maintenance of your MakeSkyBlue 60A MPPT Solar Charge Controller V124 with CloudBOX. This advanced controller is designed for stable, efficient, and intelligent solar charging in various applications, including home, RV, cabin, and off-grid power systems.
Klíčové vlastnosti:
- Upgraded 60A MPPT Controller with CloudBOX: New generation controller for stable, efficient, and intelligent solar charging.
- Advanced MPPT Charging Technology: True 100% MPPT algorithm and intelligent DSP control for faster, more precise power point tracking, improving efficiency by up to 30% compared to PWM controllers.
- Inteligentní správa baterií: Automatic detection of 12V/24V/48V systems and 3-stage charging (Bulk, Absorption, Float). Supports AGM, Gel, and Flooded batteries.
- Komplexní ochranný systém: Protection against overcharge, over-discharge, overheating, reverse polarity, and short circuit.
- User-Friendly & Expandable Design: LCD display for real-time data and charging status. Supports parallel connection.
2. Bezpečnostní informace
Před instalací a provozem si pečlivě přečtěte všechny pokyny a varování. Nedodržení těchto pokynů může vést k úrazu elektrickým proudem, požáru nebo vážnému zranění.
Obecná bezpečnostní opatření:
- Regulátor instalujte v dobře větraném prostoru, mimo dosah hořlavých materiálů.
- Zajistěte správné uzemnění systému.
- Nerozebírejte ani se nepokoušejte o opravu regulátoru. Pro servis se obraťte na kvalifikovaný personál.
- Keep children away from the solar power system components.
Elektrická bezpečnost:
- Always disconnect the solar panel array and battery bank before installing or servicing the controller.
- Pro všechna připojení použijte vhodné jističe a pojistky.
- Ensure all wiring is correctly polarized (+ to + and - to -). Reverse polarity can damage the controller and other components.
- Používejte izolované nástroje, abyste zabránili náhodnému zkratu.
- Verify that the solar panel open-circuit voltage (VOC) does not exceed the controller's maximum input voltage (160 V DC).
3. Konec produktuview
The MakeSkyBlue 60A MPPT Solar Charge Controller V124 is a robust device designed for optimal solar energy harvesting. It features a durable aluminum casing for heat dissipation and an intuitive LCD display for monitoring.
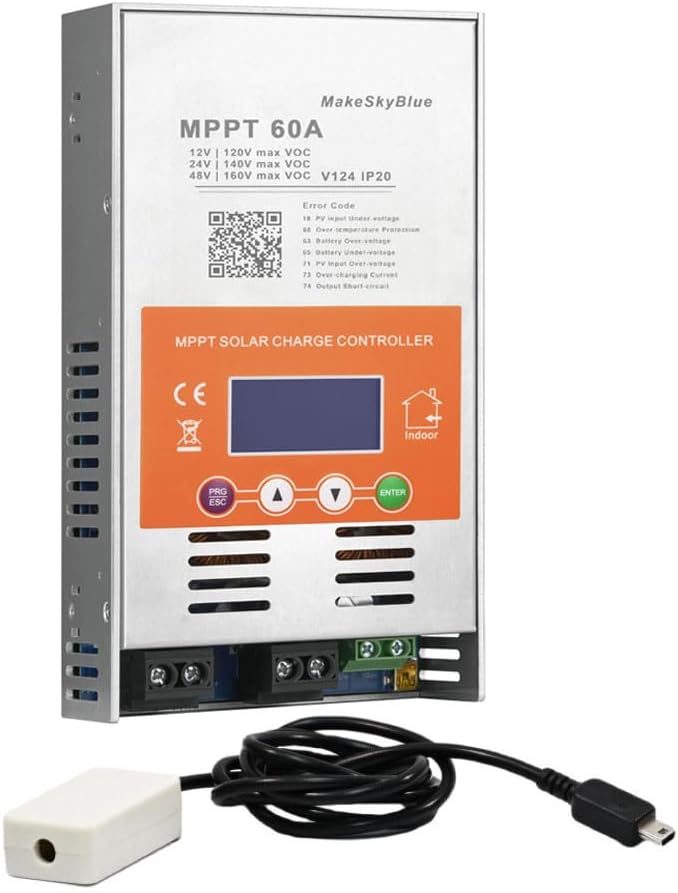
Figure 1: MakeSkyBlue 60A MPPT Solar Charge Controller V124 with CloudBOX
Komponenty:
- MPPT Solar Charge Controller Unit
- CloudBOX (for remote monitoring/control)
- Uživatelská příručka
Fyzický popis:
The controller features a metallic enclosure with ventilation slots and a cooling fan for temperature management. The front panel includes an LCD display and control buttons. Connection terminals for solar input, battery, and DC load are located at the bottom.

Figure 2: Controller Dimensions (8.46 x 4.52 x 1.96 inches)
LCD displej:
The LCD provides real-time data and status indicators. It typically shows:
- PV vstup Voltage (PV)
- Baterie Voltage (BATT)
- Charging Current (CHARGE)
- Load Output (LOAD)
- Operating Mode (e.g., 24H for continuous load, 00H for light control)
- Teplota (TEMP)
- Error Codes (FAULT)
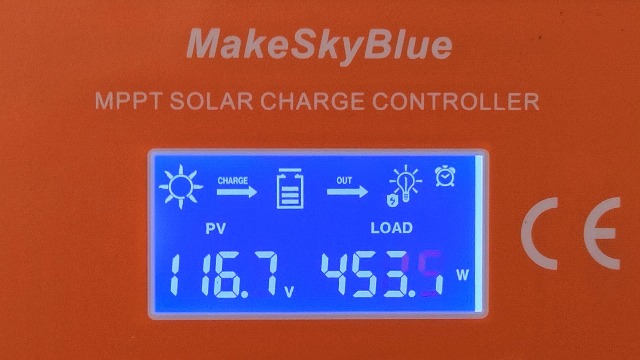
Obrázek 3: Rozhraní LCD displeje
4. Nastavení a instalace
Proper installation is crucial for the safe and efficient operation of your solar charge controller. Follow these steps carefully.
4.1 Mounting the Controller:
- Choose a dry, well-ventilated indoor location, protected from direct sunlight, high temperatures, and moisture.
- Ensure adequate clearance (at least 75mm) around all sides of the controller for proper airflow and heat dissipation.
- Securely mount the controller to a stable surface using appropriate screws.

Figure 4: Temperature Protection and Mounting Considerations
4.2 Připojení kabelů:
Abyste předešli poškození, připojte komponenty v následujícím pořadí:
- Připojte baterii: Connect the battery to the controller's battery terminals (+ to + and - to -). Ensure a secure connection. The controller will automatically detect the system voltage (12 V/24 V/48 V).
- Připojení solárních panelů: Connect the solar panel array to the controller's PV input terminals (+ to + and - to -). Ensure the PV open-circuit voltage nepřesahuje 160 V DC.
- Připojení stejnosměrné zátěže (volitelné): Connect your DC loads to the controller's load terminals (+ to + and - to -).

Obrázek 5: Typické schéma zapojení systému
4.3 Parallel Connection (Optional):
The controller supports parallel connection for expanding your solar power system. Refer to the official video for detailed instructions on parallel setup and communication line configuration.
Video 1: HHJ60-PRO Paralleling Guide. This video demonstrates the installation and configuration of multiple controllers for parallel operation, including wiring and communication settings.
5. Návod k obsluze
After successful installation, the controller will power on and display the main interface. Use the control buttons to navigate and adjust settings.
5.1 LCD Display Navigation:
Use the "Up" and "Down" arrow buttons to cycle through different display interfaces, showing PV voltage, objem baterietage, charging current, load status, temperature, and error codes.
Video 2: MPPT Controller Connected | Real-Time LCD Display Demo. This video illustrates how to navigate the LCD display to view real-time system data.
5.2 Nastavení parametrů:
To enter the settings interface, press the "PRG/ESC" button. Use the "Up" and "Down" arrows to adjust values and "ENTER" to confirm. Key settings include:
- d00 (Load Operating Mode): Configure how the DC load operates (e.g., 24H for continuous, 00H for light control, 1H-23H for timed operation).
- d01 (Charging VoltagE): Nastavte objem boost nabíjenítage.
- d02 (Float Charging VoltagE): Nastavte plovoucí nabíjecí objemtage.
- d03 (Low Voltage ochrana): Set the battery low voltagpráh odpojení e (LVD).
- d04 (Battery Voltage Kalibrace): Calibrate the displayed battery voltage if it differs from a multimeter reading.
- d05 (Parallel Communication Code): Define the communication address for parallel operation (lowest code acts as master).
- d06 (Battery Type): Select the battery type (e.g., Sealed, Gel, Flooded, Lithium Iron Phosphate). Choosing "USE" allows manual settings for d01, d02, and d03.
- d07 (System VoltagE): Configure the system voltage (např. 12 V, 24 V, 48 V).
Video 3: D01-D06 Parameter Setting Information. This video guides you through adjusting various operational parameters of the controller.
6. Údržba
Pravidelná údržba zajišťuje optimální výkon a dlouhou životnost vašeho solárního regulátoru nabíjení.
- Čistota: Udržujte ovladač čistý a bez prachu a nečistot. K čištění používejte suchý hadřík.
- Spojení: Pravidelně kontrolujte těsnost a korozi všech kabelových spojů.
- Větrání: Ujistěte se, že větrací otvory nejsou zablokované, aby bylo zajištěno správné odvádění tepla.
- Aktualizace firmwaru: Zkontrolujte výrobce webwebu, kde najdete dostupné aktualizace firmwaru pro lepší výkon nebo nové funkce.
7. Řešení problémů
If you encounter issues with your controller, refer to the following common problems and their solutions. The LCD display may show error codes to help diagnose the problem.
Kódy chyb:
| Kód | Popis | Možná příčina / řešení |
|---|---|---|
| E1 | FV vstup over-voltage | FV pole objtage exceeds maximum allowed. Reduce the number of solar panels in series. |
| E2 | PV input under-voltage | FV pole objtage is too low. Check solar panel connections, ensure sufficient sunlight. |
| E3 | Ochrana proti přehřátí | Controller is overheating. Ensure adequate ventilation and ambient temperature. |
| E4 | Přebití baterietage | Baterie voltage překračuje nastavený pře-objtage protection. Check battery settings (d01, d02). |
| E5 | Napětí baterie podtage | Baterie voltage is below the set low voltage protection. Charge battery or reduce load. |
| E6 | Nadproud PV vstupu | PV array current exceeds maximum allowed. Check PV array configuration. |
| E7 | Výstupní zkrat | Short circuit detected on the load output. Disconnect load, check wiring, and reconnect. |
| E8 | Přetížení výstupu | Load current exceeds maximum allowed. Reduce the connected load. |
Obecné tipy pro řešení problémů:
- If the controller is not charging, ensure solar panels are receiving adequate sunlight and all connections are secure.
- If the load is not working, check the load operating mode (d00) and ensure the battery has sufficient charge.
- For persistent issues, power cycle the controller by disconnecting the solar panels, then the battery, waiting a few minutes, and reconnecting in the correct order (battery first, then solar).
8. Specifikace
| Funkce | Specifikace |
|---|---|
| Model | 60A-V124 |
| System Voltage | 12V/24V/48V Auto-detection |
| Max PV Input Voltage | 160V DC |
| Jmenovitý nabíjecí proud | 60A |
| Podporované typy baterií | AGM, Gel, Flooded, Lithium |
| Algoritmus nabíjení | 3-Stage (Bulk, Absorption, Float) |
| Typ zobrazení | LCD |
| Materiál | Hliník |
| Hmotnost položky | 3.5 libry |
| Rozměry balení | 8.46 x 4.52 x 1.96 palce |
| Zahrnuté komponenty | Solar Charge Controller, CloudBOX, User Manual |
9. Záruka a podpora
For warranty information, technical support, or service inquiries, please contact MakeSkyBlue customer service through the retailer where the product was purchased or visit the official MakeSkyBlue webweb. Před kontaktováním podpory si prosím připravte model produktu a datum zakoupení.