
Zavedení
This manual provides detailed instructions for the safe and efficient operation of your GRAUGEAR NVMe SSD Clone Station and SATA to NVMe M.2 Cloner Bundle. Please read this manual thoroughly before use and retain it for future reference.
Konec produktuview
Obsah balení
The GRAUGEAR SSD bundle includes a multi-format SSD/HDD docking station and a dual-bay NVMe SSD duplicator. The package typically contains:
- GRAUGEAR M.2 NVMe & SATA SSD/HDD Docking Station
- GRAUGEAR Dual-Bay NVMe SSD Cloner
- Kabel USB-C na USB-C
- Kabel USB-C na USB-A
- Power Adapter (for docking station)
- Power Adapter (for cloner)
Klíčové vlastnosti
- Versatile Storage Management: Supports M.2 NVMe SSDs, SATA 2.5" and 3.5" SSDs/HDDs.
- Vysokorychlostní přenos dat: Up to 10Gbps for the docking station (USB-C) and 20Gbps for the NVMe cloner (USB 3.2 Gen2x2).
- Offline klonování: Direct drive-to-drive cloning without a computer.
- Instalace bez nářadí: Easy setup for drives.
- Integrované chlazení: Built-in cooling fan to prevent overheating during operation.

Image: The GRAUGEAR NVMe SSD Clone Station and SATA Docking Station, shown with included USB-C cables and power adapters.

Image: The GRAUGEAR USB 3.2 Gen2x2 Clone Station designed for two M.2 NVMe SSDs, highlighting its 20Gbps speed and one-key offline clone feature.
Setup and Drive Installation
Docking Station (M.2 NVMe & SATA)
- Connect the provided power adapter to the DC 12V input port on the docking station and plug it into a power outlet.
- If connecting to a computer, use the USB-C cable to connect the docking station's USB-C port to your computer.
- For M.2 NVMe SSD: Gently insert the M.2 NVMe SSD into the designated M.2 NVMe slot. Secure it with the provided SSD fastener if necessary.
- For SATA 2.5"/3.5" SSD/HDD: Insert the SATA drive into the 2.5"/3.5" SATA slot until it is firmly seated.
- Zapněte hlavní vypínač.
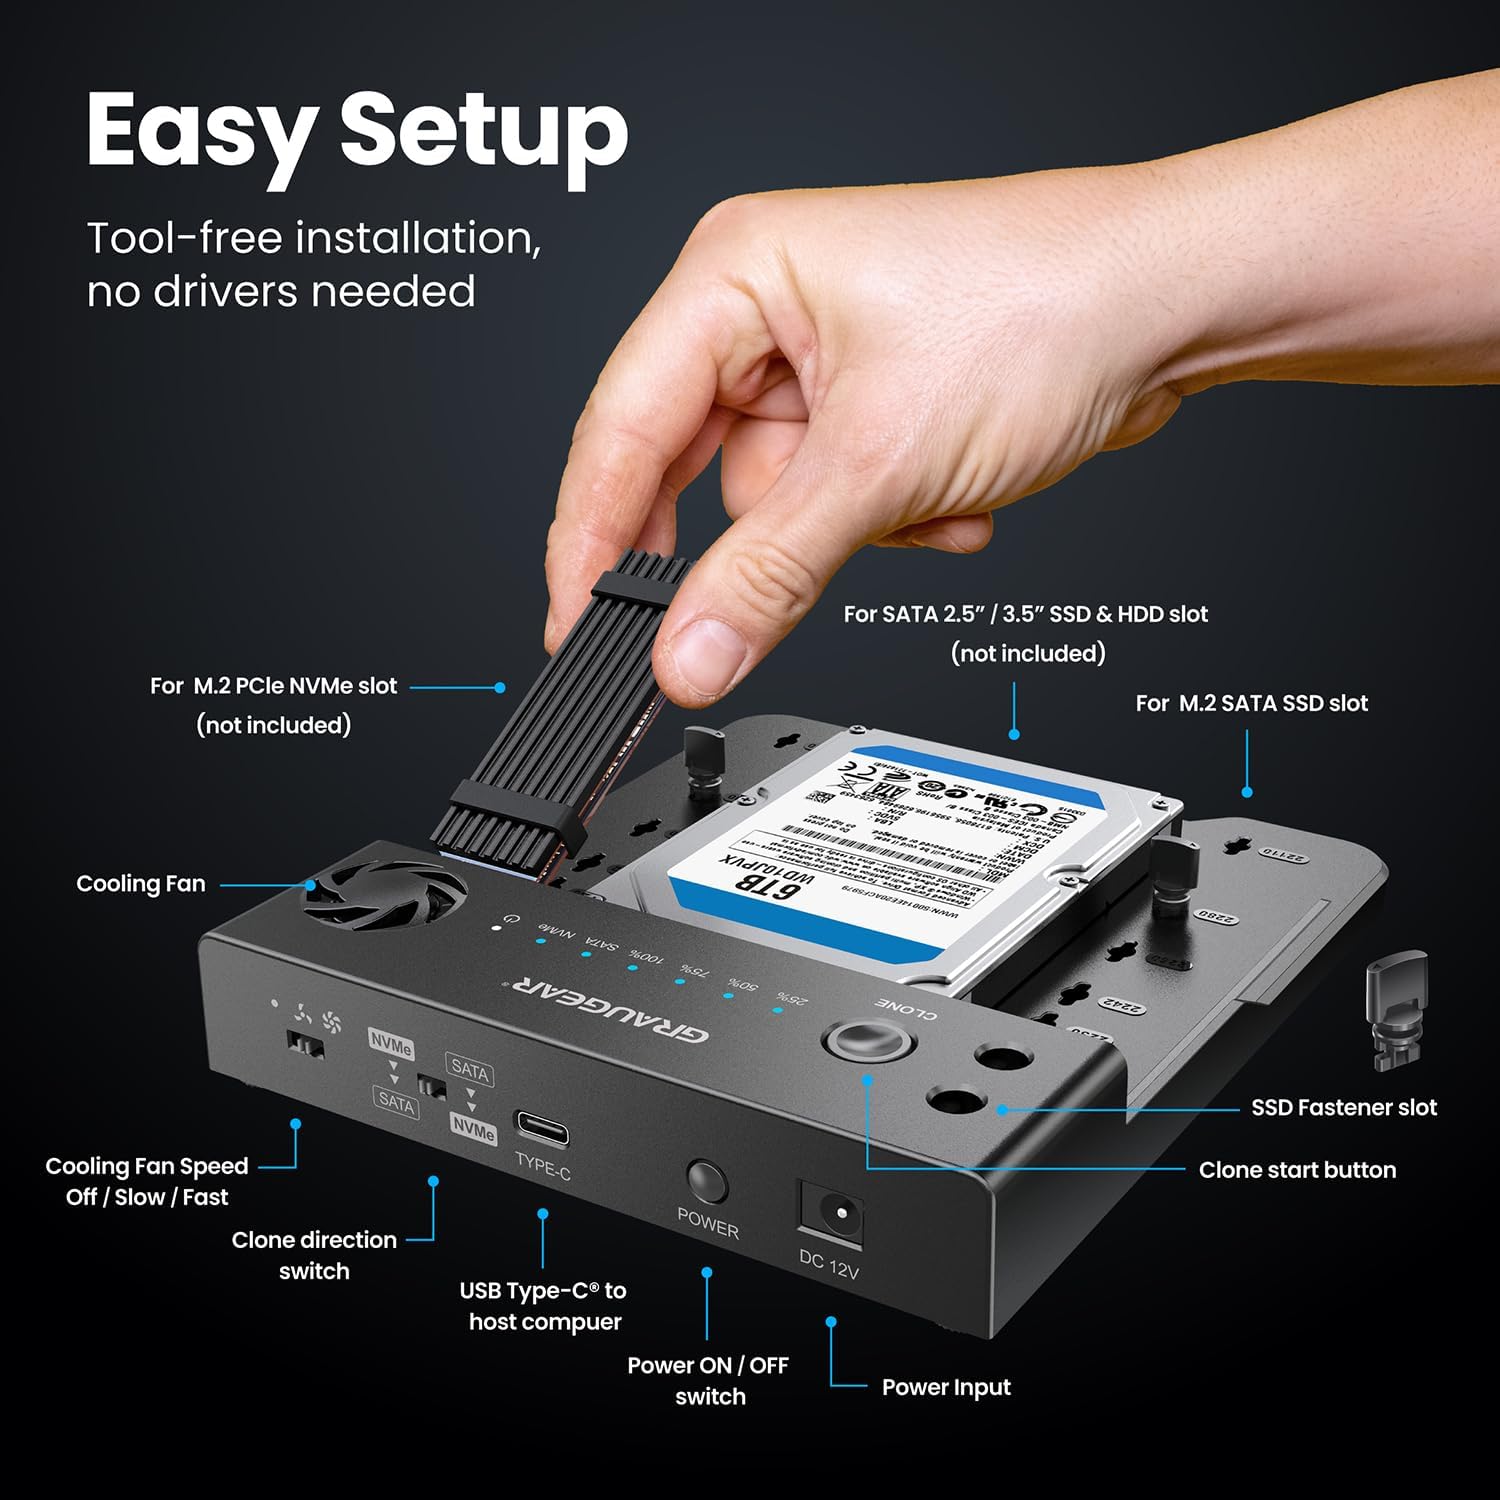
Image: A hand demonstrating the tool-free installation of an M.2 NVMe SSD and a 3.5-inch SATA HDD into the GRAUGEAR docking station.

Image: The GRAUGEAR docking station illustrating its versatility by connecting simultaneously with M.2 NVMe and M.2 SATA, M.2 NVMe and 2.5" HDD/SSD, or M.2 NVMe and 3.5" HDD.
NVMe Cloner (Dual-Bay M.2 NVMe)
- Connect the provided 5V/2A power adapter to the NVMe cloner and plug it into a power outlet.
- For M.2 NVMe SSDs: Insert the source M.2 NVMe SSD into the "SOURCE" slot and the target M.2 NVMe SSD into the "TARGET" slot. Ensure they are fully seated.

Image: The GRAUGEAR NVMe Cloner with two M.2 NVMe SSDs inserted into the source and target slots, ready for cloning.
Návod k obsluze
Connecting to a Computer (Docking Station Mode)
Once drives are installed and the docking station is powered on, connect it to your computer using the USB-C cable. The drives will appear as external storage devices. No drivers are typically required for Windows, macOS, or Linux operating systems.

Image: The GRAUGEAR docking station connected to a laptop, illustrating high-speed data transmission up to 10Gbps for NVMe and 6Gbps for SATA.
Offline Cloning (Docking Station)
The docking station supports offline cloning between M.2 NVMe and SATA drives. Ensure the docking station is NE připojen k počítači během offline klonování.
- Insert the source drive (e.g., M.2 NVMe) into its respective slot and the target drive (e.g., SATA HDD/SSD) into its slot. The target drive must be equal to or larger in capacity than the source drive.
- Use the "Clone Direction Switch" to select the desired cloning direction (e.g., NVMe to SATA or SATA to NVMe).
- Press and hold the "Clone Start Button" for approximately 3-5 seconds until the cloning progress indicators light up.
- Release the button. Press it again briefly to confirm and start the cloning process.
- The progress indicators (25%, 50%, 75%, 100%) will illuminate sequentially as cloning progresses.
- Once all indicators are solid, the cloning process is complete.

Image: Diagram showing the clone direction switch on the GRAUGEAR docking station and various cloning scenarios between NVMe and SATA drives, including NVMe to 3.5" HDD, NVMe to 2.5" HDD/SSD, NVMe to M.2 SATA, and the reverse directions.
Offline Cloning (NVMe Cloner)
The NVMe cloner supports offline cloning between two M.2 NVMe SSDs. Ensure the cloner is NE připojen k počítači během offline klonování.
- Insert the source M.2 NVMe SSD into the "SOURCE" slot and the target M.2 NVMe SSD into the "TARGET" slot. The target drive must be equal to or larger in capacity than the source drive.
- Press and hold the "Clone" button for approximately 3-5 seconds until the cloning progress indicators light up.
- Release the button. Press it again briefly to confirm and start the cloning process.
- The progress indicators (25%, 50%, 75%, 100%) will illuminate sequentially as cloning progresses.
- Once all indicators are solid, the cloning process is complete.

Image: The GRAUGEAR NVMe Cloner with source and target M.2 NVMe SSDs, illustrating the one-key offline cloning process, power adapter connection, and cloning speed up to 10Gbps.
Provoz chladicího ventilátoru
Both the docking station and the NVMe cloner feature built-in cooling fans to maintain optimal operating temperatures for your SSDs.
- The docking station has a fan speed control switch (Off / Slow / Fast). Adjust as needed based on drive temperature and workload.
- The NVMe cloner's fan operates automatically to dissipate heat during cloning or data transfer.

Image: An illustration of the GRAUGEAR NVMe Cloner's built-in cooling fan, showing airflow and three-speed adjustment options (Power Off, Low Speed, High Speed) to prevent overheating.
Údržba
- Udržujte zařízení čisté a bez prachu. K čištění používejte měkký, suchý hadřík.
- Ensure proper ventilation around the devices, especially during prolonged operation or cloning tasks.
- Nevystavujte zařízení extrémním teplotám, vlhkosti nebo přímému slunečnímu záření.
- When not in use, store the devices in a cool, dry place.
Always handle SSDs and HDDs with care to prevent damage to the connectors or internal components.
Odstraňování problémů
- Zařízení nebylo počítačem rozpoznáno:
- Ensure all cables are securely connected (USB-C and power).
- Zkuste jiný port USB na počítači.
- Verify the drive is properly seated in its slot.
- Check if the drive is initialized and formatted in your computer's Disk Management (Windows) or Disk Utility (macOS).
- Cloning fails or does not start:
- Ensure the target drive's capacity is equal to or larger than the source drive's capacity.
- Verify both drives are properly seated.
- Ujistěte se, že je zařízení NE připojen k počítači během offline klonování.
- Press and hold the clone button for the specified duration (3-5 seconds) and then press again briefly to confirm.
- Zkontrolujte připojení napájení.
- Pomalé přenosové rychlosti:
- Ensure you are using a USB 3.2 Gen2x2 compatible port and cable for the NVMe cloner to achieve 20Gbps speeds.
- For the docking station, ensure you are using a USB 3.1 Gen2 compatible port and cable for 10Gbps speeds.
- The actual speed may vary depending on the SSD model, device version, and SSD capacity.
- Přehřívání:
- Ensure the cooling fan is operating (for docking station, check fan speed switch).
- Provide adequate ventilation around the device.
- Avoid placing the device on soft surfaces that might block airflow.
If issues persist, please contact GRAUGEAR customer support.
Specifikace
| Funkce | Popis |
|---|---|
| Název produktu | GRAUGEAR NVMe SSD Clone Station & SATA to NVMe M.2 Cloner Bundle |
| Model | (No specific model number provided, refers to the bundle) |
| Interface (Docking Station) | USB-C (USB 3.1 Gen2), 10Gbps |
| Interface (NVMe Cloner) | USB-C (USB 3.2 Gen2x2), 20Gbps |
| Drive Compatibility (Docking Station) | M.2 NVMe SSDs, SATA 2.5"/3.5" SSDs/HDDs |
| Drive Compatibility (NVMe Cloner) | M.2 NVMe SSDs |
| Funkce klonování | Offline One-Key Clone (NVMe to NVMe, SATA to NVMe, NVMe to SATA) |
| Chlazení | Built-in Cooling Fan with speed adjustment (docking station) |
| Napájení | External Power Adapter (12V for docking station, 5V/2A for cloner) |
| Kompatibilita operačního systému | Windows, macOS, Linux, PlayStation, Xbox, Smart TV, Router (for data access) |
Poznámka: Specifikace se mohou změnit bez předchozího upozornění.
Záruka a podpora
GRAUGEAR products come with a standard manufacturer's warranty. For specific warranty terms and conditions, please refer to the warranty card included with your product or visit the official GRAUGEAR webmísto.
For technical support, troubleshooting assistance, or any inquiries regarding your GRAUGEAR NVMe SSD Clone Station & SATA to NVMe M.2 Cloner Bundle, please contact GRAUGEAR customer support through their official webwebu nebo kontaktních informací uvedených na obalu produktu.
GRAUGEAR Official Webmísto: www.graugear.de (or refer to regional webweb)