
1. Úvod
The Skyking WORKZONE 36TRMS Digital Clamp Meter is a portable, stable, and versatile instrument designed for accurate electrical measurements. Featuring a 6000-count LCD display, auto-ranging capabilities, and overload protection, this meter is suitable for a wide range of applications, from home electrical needs to professional use. It can measure AC/DC Voltage, AC/DC Current, Resistance, Capacitance, Frequency, Duty Cycle, Temperature, and includes Non-Contact AC Voltage (NCV) detection, diode, and continuity test functions.
2. Bezpečnostní informace
Při používání elektrických testovacích zařízení vždy dodržujte bezpečnostní opatření. Nedodržení těchto pokynů může vést k úrazu elektrickým proudem, zranění nebo poškození měřicího přístroje či testovaného zařízení.
- Před použitím se ujistěte, že je měřič v dobrém provozním stavu.
- Nepřekračujte maximální vstupní hodnoty pro žádný rozsah.
- Use appropriate personal protective equipment (PPE), such as safety glasses and insulated gloves.
- Disconnect power to the circuit before making resistance, capacitance, or continuity measurements.
- Be cautious when working with live circuits. Avoid contact with bare conductors.
- Nepoužívejte měřič, pokud se jeví poškozený nebo pokud kryt baterie není správně uzavřen.
3. Obsah balení
Ověřte, zda jsou v balení přítomny všechny položky:
- WORKZONE 36TRMS Digital Clamp Metr
- Měřicí kabely (červený a černý)
- Teplotní sonda
- AAA Batteries (Pre-installed or separate)
- Uživatelská příručka (tento dokument)

This image displays the Skyking WORKZONE 36TRMS Digital Clamp Meter along with its included test leads (red and black) and a white temperature probe. The clamp meter itself is red and black, showing the rotary dial, LCD screen, and input jacks.
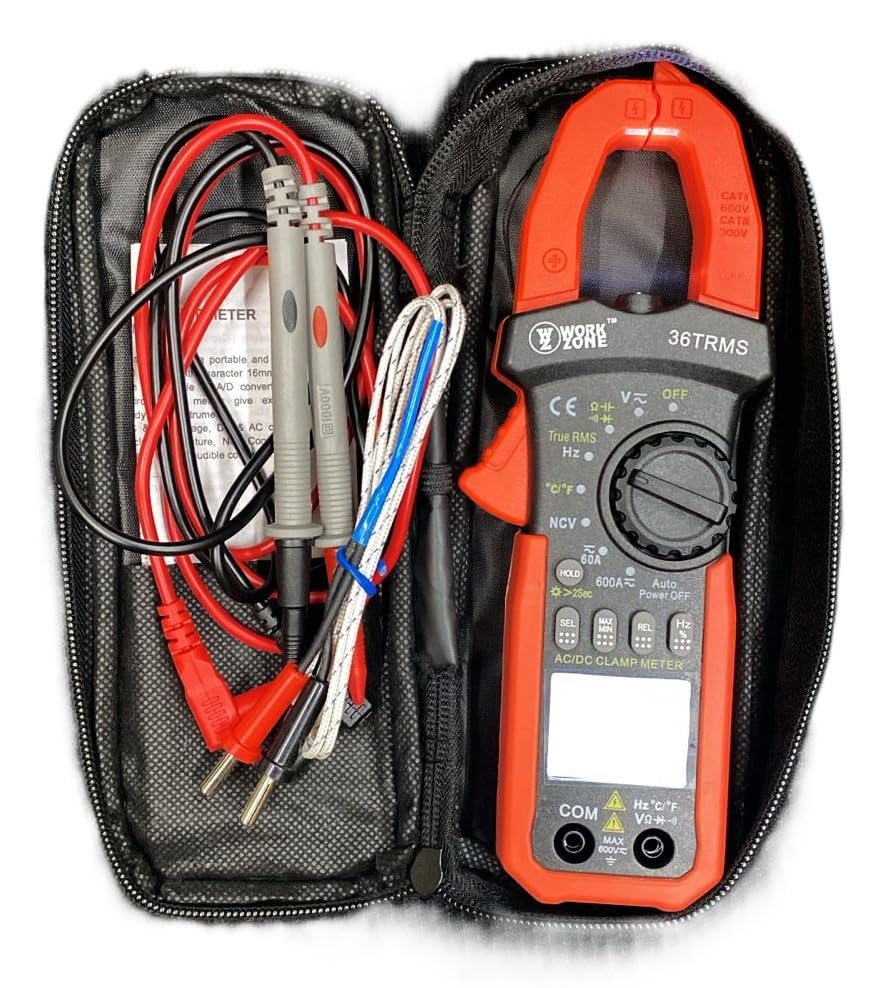
The Skyking WORKZONE 36TRMS Digital Clamp Meter, test leads, and temperature probe neatly organized within a black zippered carrying case. This illustrates how the product and its accessories are stored and transported.
4. Konec produktuview
The WORKZONE 36TRMS Digital Clamp Meter offers a range of features for comprehensive electrical testing:
- 6000 counts digit LCD monitor with 16mm character height.
- Auto-range and auto power-off function (after 15 minutes of inactivity).
- Clamp opening size: 26mm for non-invasive current measurement.
- Measures DC Voltage (600mV~600V) and AC Voltage (6 V ~ 600 V).
- Measures DC Current (60A~600A) and AC Current (True RMS) (60A~600A).
- Measures Resistance (600Ω~60MΩ) and Capacitance (6nF~60mF).
- Measures Frequency (9.999Hz~9.999MHz) and Duty Cycle (0.1%~99.9%).
- Temperature measurement: -20~1000°C / -4~1832°F.
- Bezkontaktní AC Voltage (NCV) detection for safety.
- Diode and audible continuity test functions.
- Funkce Data Hold pro zmrazení naměřených hodnot.
- Backlight for easy reading in dark environments.
- Relative measurement (REL) function for zeroing readings.

A detailed close-up of the Skyking WORKZONE 36TRMS Digital Clamp Meter. The image highlights the rotary switch with various measurement functions, the LCD display showing '0.000', function buttons (HOLD, SEL, MAX/MIN, REL, Hz), and the input jacks at the bottom.
5. Nastavení
5.1 Instalace baterie
- The meter requires 2x 1.5V 'AAA' batteries.
- Najděte kryt přihrádky na baterie na zadní straně měřiče.
- Open the cover, insert the batteries observing correct polarity (+ and - markings).
- Bezpečně zavřete kryt bateriového prostoru.
5.2 Zapnutí/vypnutí
- To power on the meter, rotate the rotary switch from the 'OFF' position to any desired measurement function.
- To power off, rotate the switch back to the 'OFF' position.
- Měřič je vybaven funkcí automatického vypnutí po přibližně 15 minutách nečinnosti, která šetří životnost baterie.
5.3 Připojení měřicích vodičů
- Za svtage, resistance, capacitance, frequency, duty cycle, diode, and continuity measurements, insert the red test lead into the 'VΩHz°C' input jack.
- Zasuňte černý měřicí vodič do vstupní zdířky „COM“.
- Ensure test leads are fully inserted and securely connected.
6. Návod k obsluze
6.1 DC/AC Voltage Měření
- Rotate the rotary switch to 'V~' for AC Voltage nebo 'V-' pro DC Voltage.
- Připojte měřicí vodiče paralelně k testovanému obvodu nebo součástce.
- Přečtěte si svtage hodnota na LCD displeji.
6.2 Měření střídavého/stejnosměrného proudu (Clamp Čelist)
- Rotate the rotary switch to '60A~' or '600A~' for AC Current, or '60A-' or '600A-' for DC Current.
- Stiskněte tlačítko clamp trigger to open the jaws and clamp around a single conductor. Ensure the conductor is centered within the jaws.
- Odečtěte aktuální hodnotu na LCD displeji.
6.3 Měření odporu
- Rotate the rotary switch to 'Ω'.
- Ensure the circuit or component is de-energized before measurement.
- Připojte měřicí vodiče k měřené součástce.
- Odečtěte hodnotu odporu na LCD displeji.
6.4 Měření kapacity
- Rotate the rotary switch to 'F'.
- Před měřením se ujistěte, že je kondenzátor zcela vybitý, aby nedošlo k poškození měřiče.
- Připojte měřicí vodiče ke svorkám kondenzátoru.
- Odečtěte hodnotu kapacity na LCD displeji.
6.5 Měření frekvence/pracovního cyklu
- Rotate the rotary switch to 'Hz'.
- Připojte měřicí vodiče ke zdroji signálu.
- Press the 'Hz' button to toggle between Frequency (Hz) and Duty Cycle (%) display.
6.6 Měření teploty
- Rotate the rotary switch to '°C/°F'.
- Connect the temperature probe to the input jacks.
- Umístěte hrot sondy na předmět, jehož teplotu chcete měřit.
- Press the '°C/°F' button to switch between Celsius and Fahrenheit units.
6.7 Test diod
- Rotate the rotary switch to 'Diode/Continuity'.
- Připojte červený měřicí vodič k anodě a černý měřicí vodič ke katodě diody.
- Na displeji se zobrazí hlasitost vpředtage drop. Reverse the leads; the display should show 'OL' for an open circuit.
6.8 Test kontinuity
- Rotate the rotary switch to 'Diode/Continuity'.
- Připojte měřicí vodiče k obvodu nebo součástce.
- An audible buzzer will sound if continuity is detected (typically resistance below approximately 50Ω).
6.9 Bezkontaktní AC svtage (NCV) Detekce
- Rotate the rotary switch to 'NCV'.
- Bring the NCV sensor (located at the top of the clamp meter) close to an AC voltage zdroj.
- The meter will emit an audible beep and the NCV indicator light will flash if AC voltage je detekováno.
6.10 Funkce Data Hold
- Press the 'HOLD' button to freeze the current reading on the display. Press again to release the hold.
- Long press the 'HOLD' button to activate the backlight for improved visibility in low-light conditions.
6.11 Relativní měření (REL)
- In a measurement mode, press the 'REL' button to zero the current reading. Subsequent measurements will be displayed relative to this zero point.
- Press the 'REL' button again to exit relative mode.
7. Údržba
7.1 Čištění
- Otřete měřič casing s měkkým, damp tkanina.
- Do not use abrasive cleaners, solvents, or harsh chemicals, as these may damage the casing nebo displej.
7.2 Výměna baterie
- When the low battery indicator appears on the LCD, replace the batteries promptly to ensure accurate readings.
- Postupujte podle kroků pro instalaci baterie uvedených v části 5.1.
- Použité baterie zlikvidujte v souladu s místními předpisy.
7.3 Skladování
- When not in use for extended periods, store the meter in a cool, dry place.
- Vyhněte se přímému slunečnímu záření, extrémním teplotám a vysoké vlhkosti.
- It is recommended to remove batteries if storing for a very long time to prevent leakage.
8. Řešení problémů
- Žádný displej nebo slabý displej: Check battery installation. If the low battery indicator is on, replace the batteries.
- Nesprávné čtení: Ensure the correct function is selected for the measurement. Verify test lead connections are secure and in the correct input jacks. For resistance or capacitance, ensure the circuit is de-energized. For current, ensure only a single conductor is clamped within the jaws.
- Displej „OL“: This indicates an over-range condition or an open circuit. If measuring resistance, it means the resistance is too high or the circuit is open. If measuring voltage or current, the value exceeds the selected range; switch to a higher range if available.
- Žádný pípnutí kontinuity: The resistance of the circuit or component is too high, or there is an open circuit.
9. Specifikace
| Parametr | Hodnota |
|---|---|
| Značka | Skyking |
| Číslo modelu | Workzone 36 TRMS |
| Typ měření | Digitální Clamp Metr |
| Zobrazit | 6000 counts digit LCD |
| Clamp Velikost otvoru | 26 mm |
| DC svtage Dosah | 600mV ~ 600V |
| AC svtage Dosah | 6V ~ 600V |
| Rozsah DC proudu | 60 A ~ 600 A. |
| AC Current Range (True RMS) | 60 A ~ 600 A. |
| Rozsah odporu | 600Ω ~ 60MΩ |
| Rozsah kapacity | 6nF ~ 60mF |
| Frekvenční rozsah | 9.999 Hz ~ 9.999 MHz |
| Pracovní cyklus | 0.1 % ~ 99.9 % |
| Teplotní rozsah | -20 °C ~ 1000 °C / -4 °F ~ 1832 °F |
| Indikace přesahující rozsah | "OL" |
| Indikace negativní polarity | Automatické zobrazení "-" |
| Indikace slabé baterie | Ano |
| Automatické vypnutí | Přibl. 15 minut |
| Napájení | 2 x 1.5V "AAA" batteries |
| Provozní teplota | 0°C ~ 40°C (relative humidity <85%) |
| Skladovací teplota | -10°C ~ 50°C (relative humidity <85%) |
| Guaranteed Precision Temp. | 23±5°C (relative humidity <70%) |
| Rozměry (V x Š x H) | 207 x 75 x 37 mm |
| Hmotnost | Cca. 280 g (včetně baterie) |
| Hodnocení bezpečnosti | CAT II 600V or CAT III 300V |
10. Záruka a podpora
For warranty information or technical support regarding your Skyking WORKZONE 36TRMS Digital Clamp Meter, please contact Skyking Instruments directly. Refer to your purchase documentation or the manufacturer's official website for specific warranty terms, conditions, and contact details.