1. Úvod
This manual provides detailed instructions for the installation, operation, and maintenance of your plplaaoo 100A MPPT Solar Charge Controller. This advanced controller is designed to optimize energy harvest from your solar panels and manage battery charging efficiently for 12V, 24V, 36V, and 48V solar power systems. Please read this manual thoroughly before installation and use to ensure proper function and safety.
2. Bezpečnostní pokyny
Během instalace a provozu dodržujte následující bezpečnostní opatření:
- Ujistěte se, že veškeré kabely jsou správně připojeny a bezpečně upevněny, aby se zabránilo uvolnění kontaktů a přehřátí.
- Před instalací nebo nastavením regulátoru vždy odpojte solární panel a napájení z baterie.
- Use appropriate tools and wear protective gear, including eye protection, during installation.
- Regulátor instalujte v dobře větraném prostoru, mimo dosah hořlavých plynů a kapalin.
- Nerozebírejte ani se nepokoušejte o opravu ovladače sami. Pro servis se obraťte na kvalifikovaný personál.
- Ensure the battery bank is properly sized and compatible with the controller's voltage a aktuální hodnocení.
- Avoid short-circuiting the solar panel, battery, or load terminals.
3. Vlastnosti produktu
- Maximum Power Point Tracking (MPPT): Achieves up to 98% conversion efficiency by intelligently tracking the maximum power point of solar panels under varying conditions.
- Automatický svtage Adaptation: Automaticky detekuje a přizpůsobuje se bateriovým systémům 12V, 24V, 36V nebo 48V.
- Multifunkční ovládání: Supports various operating modes including PWM charging, constant current output, and voltage regulace.
- Integrated USB and DC Outputs: Features dual 5V 1A USB ports and a 2A DC output for charging external devices.
- Komplexní ochrana: Includes safeguards against overvoltage, overcurrent, overtemperature, overload, short circuits, and reverse polarity.
- Uživatelsky přívětivé rozhraní: Equipped with a backlit LCD display for real-time monitoring and intuitive buttons for configuration.
- Odolná konstrukce: Features an aluminum heatsink for efficient cooling and robust design for harsh environments (0°C to 60°C).
- Kompatibilita baterie: Compatible with gel, sealed lead-acid, and lithium batteries.
4. Obsah balení
- 1 x plplaaoo 100A MPPT Solar Charge Controller
- 1 x Uživatelská příručka
5. Konec produktuview a Komponenty
Familiarize yourself with the main components and interface of the solar charge controller.

Obrázek 5.1: Přední view of the solar charge controller, highlighting the LCD screen and various connection terminals.
The controller features an intuitive LCD display and clearly labeled ports for easy connection. The display provides real-time information about the system's status.
Obrázek 5.2: Detailní view of the controller's connection ports.

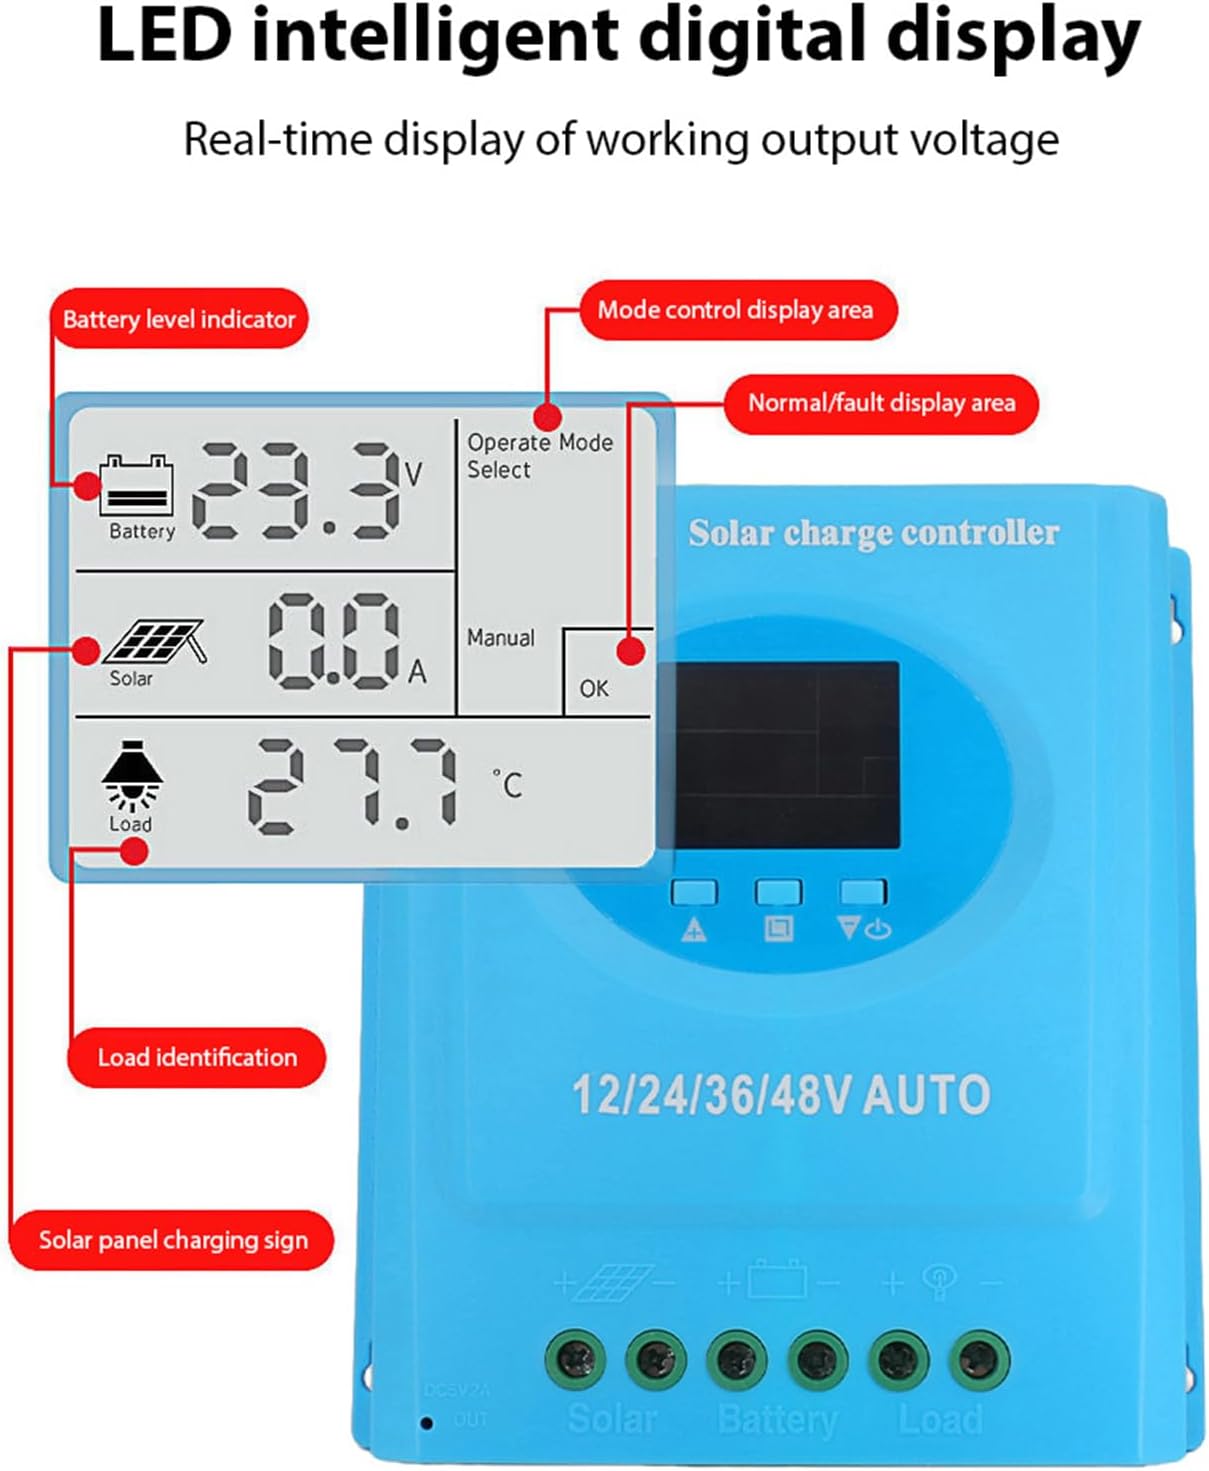
Obrázek 5.3: Detailní view of the LCD display, indicating battery level, solar panel charging sign, load identification, operating mode, and real-time voltage.
5.1. Porty připojení
- Duální USB rozhraní: Two 5V 1A USB ports for charging mobile devices.
- Solar Panel Port: Connects to your solar panels (positive and negative).
- Port baterie: Connects to your battery bank (positive and negative).
- DC Load Port: Connects to your DC loads (positive and negative).
- DC výstupní port: Additional DC output.
6. Nastavení a instalace
Follow these steps for proper installation of the solar charge controller. Ensure all power sources are disconnected before beginning.
6.1. Způsob zapojení
Abyste předešli poškození, připojte komponenty v následujícím pořadí:
- Připojte baterii: Connect the battery to the controller's battery terminals (positive to positive, negative to negative). The controller will automatically detect the battery voltage.
- Připojte solární panel: Connect the solar panel to the controller's solar panel terminals (positive to positive, negative to negative).
- Připojení stejnosměrné zátěže: Connect the DC load to the controller's load terminals (positive to positive, negative to negative).
Důležité: Vždy nejprve připojte baterii, poté solární panel a nakonec zátěž. Odpojení provádějte v opačném pořadí.

Obrázek 6.1: Solar energy system wiring diagram. Note the correct polarity for all connections.
6.2. Montáž
Mount the controller vertically on a flat surface in a well-ventilated area, ensuring adequate clearance for air circulation around the heatsink. Avoid direct sunlight, high temperatures, and humid environments.
7. Návod k obsluze
Once installed, the controller will automatically begin operating. The LCD display provides real-time system status.
7.1. Informace na LCD displeji
The LCD screen displays various parameters:
- Indikátor stavu baterie: Shows the current charge status of the battery.
- Solar Panel Charging Sign: Indicates when the solar panels are actively charging the battery.
- Load Identification: Shows the status of the connected DC load.
- Operating Mode Display Area: Displays the current operating mode (e.g., manual, automatic).
- Normal/Fault Display Area: Indicates normal operation or displays error codes if a fault occurs.
- Real-time Working Output Voltage: Zobrazuje aktuální objemtage systému.
7.2. Funkce tlačítek
The controller typically features multiple buttons for navigation and setting adjustments:
- Tlačítko nabídky: Used to enter and exit the menu settings.
- Tlačítka nahoru/dolů: Used to navigate through menu options and adjust parameter values.
- Tlačítko OK: Používá se k potvrzení výběru a uložení nastavení.
Refer to the on-screen menu for specific parameter adjustments such as battery type, load control mode, and charging thresholds.
8. Údržba
Pravidelná údržba zajišťuje optimální výkon a dlouhou životnost vašeho solárního regulátoru nabíjení.
- Čištění: Pravidelně čistěte vnější povrch ovladače suchým hadříkem, abyste odstranili prach a nečistoty. Ujistěte se, že jsou větrací otvory čisté.
- Kontrola připojení: Annually inspect all wiring connections for tightness and corrosion. Re-tighten if necessary.
- Kontrola prostředí: Ensure the installation environment remains within the specified operating temperature range and is free from excessive moisture or dust.
- Kontrola baterie: Regularly check the battery terminals for corrosion and ensure the battery is in good condition.
9. Řešení problémů
Pokud narazíte na problémy se solárním regulátorem nabíjení, podívejte se na následující běžné problémy a jejich řešení:
| Problém | Možná příčina | Řešení |
|---|---|---|
| Ovladač se nezapíná / LCD displej je prázdný |
|
|
| Baterie se nenabíjí |
|
|
| Zatížení nefunguje |
|
|
| Zobrazí se kód chyby | Specifická systémová chyba. | Refer to the controller's display for the specific error code and consult the full product documentation or contact support for detailed interpretation and resolution. |
10. Specifikace
| Parametr | Hodnota |
|---|---|
| Model | plplaaoozi6egog4wm-0A |
| Značka | plplaaoo |
| Jmenovitý proud | 100A |
| System Voltage | 12V / 24V / 36V / 48V Automatic Adaptation |
| Typ nabíjení | MPPT (sledování maximálního výkonového bodu) |
| Účinnost konverze | až 98 % |
| USB výstup | Dual 5V 1A ports |
| DC výstup | 2A |
| Provozní teplota | 0 °C až 60 °C |
| Rozměry (přibližně) | 19.5 cm x 18.3 cm x 6.8 cm (7.7 palce x 7.2 palce x 2.7 palce) |

Obrázek 10.1: Approximate dimensions of the solar charge controller.
11. Záruka a podpora
Pro informace o záruce, technickou podporu nebo servisní dotazy se prosím obraťte na svého prodejce nebo přímo na výrobce. Uschovejte si účtenku jako doklad o koupi.