
1. Úvod
The CINOTON Waterproof Connector C5107-D is designed for securely connecting CINOTON Permanent Outdoor Lights, specifically RGBW/RGBCW lines. This connector ensures a waterproof and reliable connection, allowing for customization and extension of your lighting setup. This manual provides detailed instructions for installation and proper use.
2. Co je v krabici
- Waterproof Connector (Male-to-Female)
3. Specifikace
| Značka | Cinoton |
| Číslo modelu | C5107-D |
| Rozměry balení | 5.9 x 0.2 x 0.2 palce |
| Hmotnost položky | 7 unce |
| Barva | bílý |
| Pohlaví konektoru | Z muže na ženu |
| svtage | 36 voltů |
| Seznam UL | Žádný |
4. Nastavení a instalace
This section details the process of cutting, splicing, and extending your CINOTON Permanent Outdoor Lights using the Waterproof Connector. Follow these steps carefully to ensure a secure and functional connection.
4.1. Understanding the Connector
The CINOTON Waterproof Connector is designed for seamless integration with your existing permanent outdoor lights. It features a male-to-female connection with three pins, ensuring proper electrical contact and weather resistance.

Figure 1: CINOTON Waterproof Connectors. These connectors are designed for secure and waterproof connections between light strands.

Figure 2: Connector Dimensions. The male and female connectors have a diameter of 17mm (0.67 inches) and pin spacing of 12mm (0.47 inches).
4.2. Cutting and Splicing Light Strands
To extend or repair your light strands, you may need to cut and splice them. This process requires careful attention to wire connections.
Video 1: How to cut and connect CINOTON outdoor Lights. This video demonstrates the step-by-step process of preparing and connecting light strands using the waterproof connector.
- Prepare Tools and Disconnect Power: Ensure you have appropriate wire strippers/cutters. Always disconnect the light strand from the power source before beginning any work.
- Unscrew the Connector: If reusing a connector, carefully unscrew its components.
- Měření a řezání: Measure the desired length of the light strand. Cut the string light in the middle of two light beads.
- Odizolování drátů: Using professional tools, carefully strip off the outer insulation of the power cord to reveal the three insulated wires inside. Ensure the length of the exposed insulated wires is approximately 30 mm.
- Identifikace vodičů: The wires are typically color-coded or marked (e.g., 'Printing', 'Blank', 'Dashed line'). Match these to the corresponding color-coded slots (Red, Yellow, Blue) within the connector.
- Vložení vodičů do konektoru: Remove the caps from the connector components. Pass the power cord through the caps. Pull outwards to open the locking buckles on the connector's internal mechanism. Insert the exposed wires into their corresponding color-coded slots. Push back the locking buckles to secure the wires.
- Assemble Connector: Firmly screw the connector components together. Push the silicone plug into the shell to ensure a waterproof seal.
- Test připojení: Once assembled, plug the light strand back into the power source to check if the connection is working properly and all lights illuminate.

Figure 3: Preparation for splicing. Gather your tools and disassemble the waterproof connector.

Figure 4: Cutting and stripping wires. Use appropriate tools to expose the internal wires for connection.

Figure 5: Wire identification and connector mechanism. Match the wires to the correct color-coded slots and open the locking buckles.
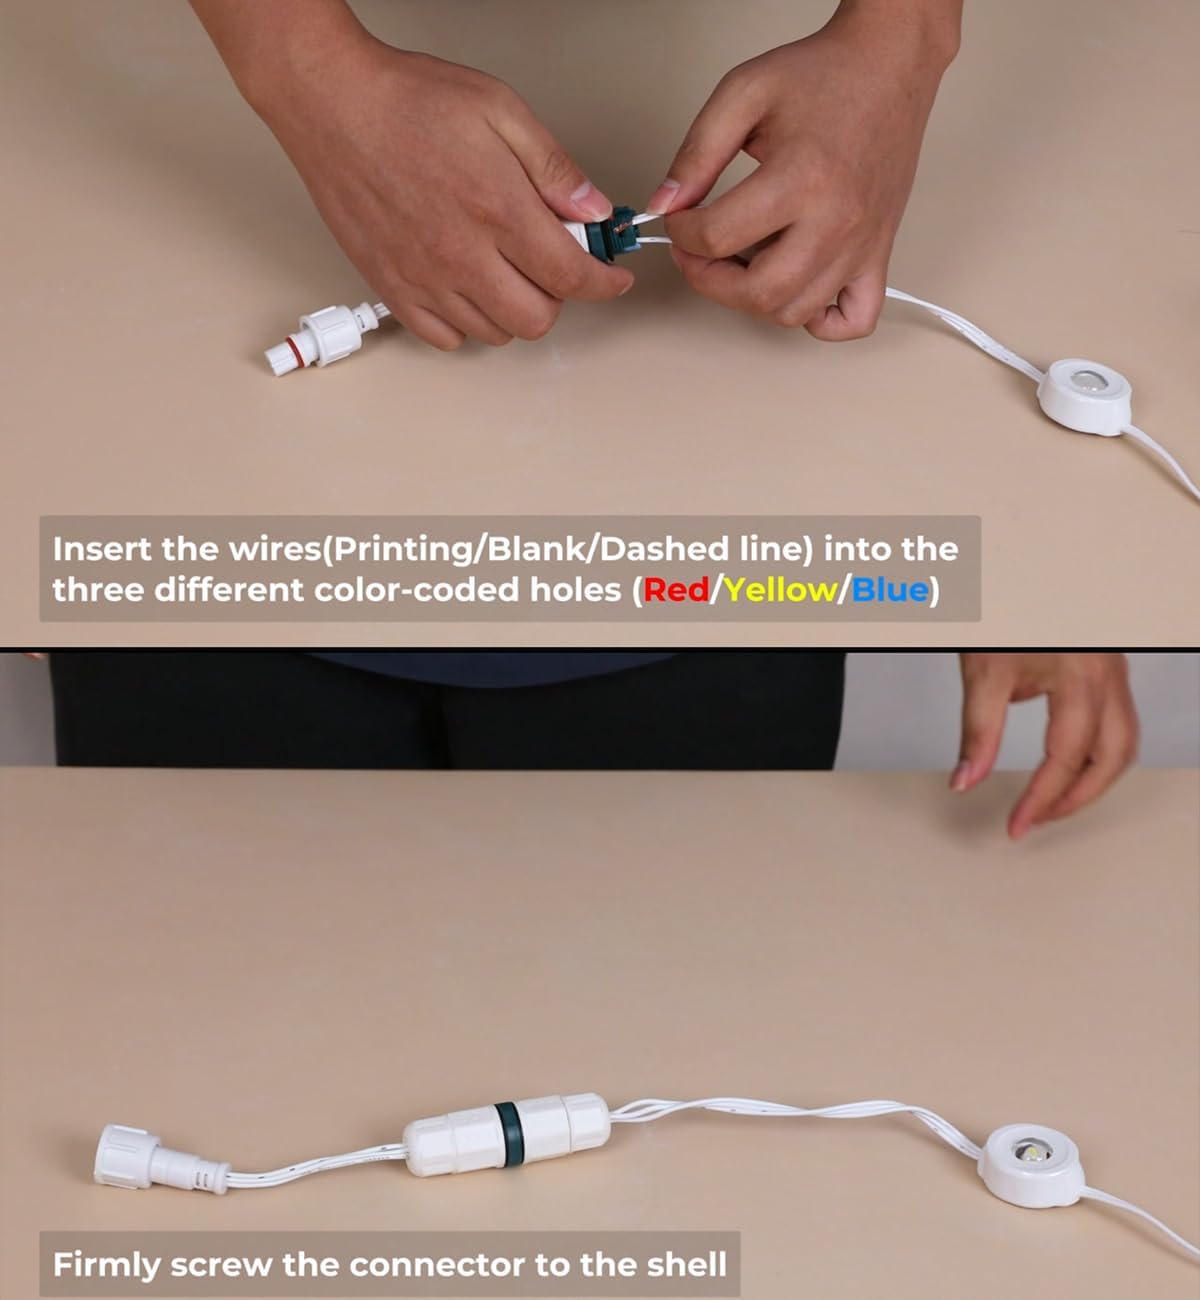
Figure 6: Inserting wires. Carefully place each exposed wire into its designated slot.

Figure 7: Final assembly and testing. Screw the connector firmly and verify the lights are working.
5. Operating the Connector
The CINOTON Waterproof Connector is a passive component designed to facilitate electrical connection and provide weather protection. Once properly installed, it requires no further operation. Its function is to maintain a continuous and secure circuit for your outdoor lights.
6. Údržba
To ensure the longevity and optimal performance of your waterproof connector and light strands:
- Pravidelná kontrola: Periodically inspect the connectors for any signs of wear, damage, or loose connections.
- Čistota: Keep the connectors free from dirt, debris, and moisture. A damp cloth can be used for cleaning, ensuring the connector is dry before reconnecting to power.
- Bezpečná instalace: Ensure the connectors are always screwed tightly to maintain their waterproof seal.
7. Řešení problémů
If your lights are not functioning correctly after installing the connector, consider the following:
- Bez napájení: Check the power source and ensure it is active.
- Uvolněné připojení: Verify that all connector components are tightly screwed and the internal wires are securely fastened in their slots.
- Nesprávné zapojení: Double-check that the wires are inserted into the correct color-coded slots as per the instructions.
- Damaged Wires/Connector: Inspect the wires and connector for any visible damage. If damage is found, replace the affected component.
8. Záruka a podpora
For warranty information or technical support regarding your CINOTON Waterproof Connector, please refer to the product packaging or contact CINOTON customer service directly. Keep your purchase receipt for warranty claims.