1. Úvod
This instruction manual provides essential information for the safe and efficient operation, maintenance, and troubleshooting of your 3i P10 Ultra Robot Vacuum and Mop Combo. Please read this manual thoroughly before using the product and retain it for future reference.
2. Bezpečnostní informace
Při používání elektrických spotřebičů vždy dodržujte základní bezpečnostní opatření, abyste snížili riziko požáru, úrazu elektrickým proudem nebo zranění. Tento spotřebič je určen pouze pro domácí použití.
- Nedovolte dětem obsluhovat robota. Dohlížejte na děti a domácí zvířata, když je robot v provozu.
- Zajistěte výkon voltage odpovídá štítku s výkonem na nabíjecí stanici.
- Nepoužívejte robota na mokrém povrchu ani v oblastech se stojatou vodou.
- Remove loose cables, small objects, and fragile items from the cleaning path before operation.
- Do not use the robot to pick up large or sharp objects, flammable materials, or liquids.
- Only use manufacturer-specified accessories and replacement parts.
- Pokud je napájecí kabel poškozen, musí jej vyměnit výrobce nebo kvalifikovaný servisní technik, aby se předešlo nebezpečí.
3. Konec produktuview
3.1 Součásti balení
Balíček obsahuje následující položky:
- 1 x Robotický vysavač
- 1 x základnová stanice
- 2 x mopové podložky
- 2 x Boční kartáče
- 1 x 800ml Cleaning Solution
- 1 x Odnímatelná základna
- 1 x Napájecí kabel
- 1 x Uživatelská příručka
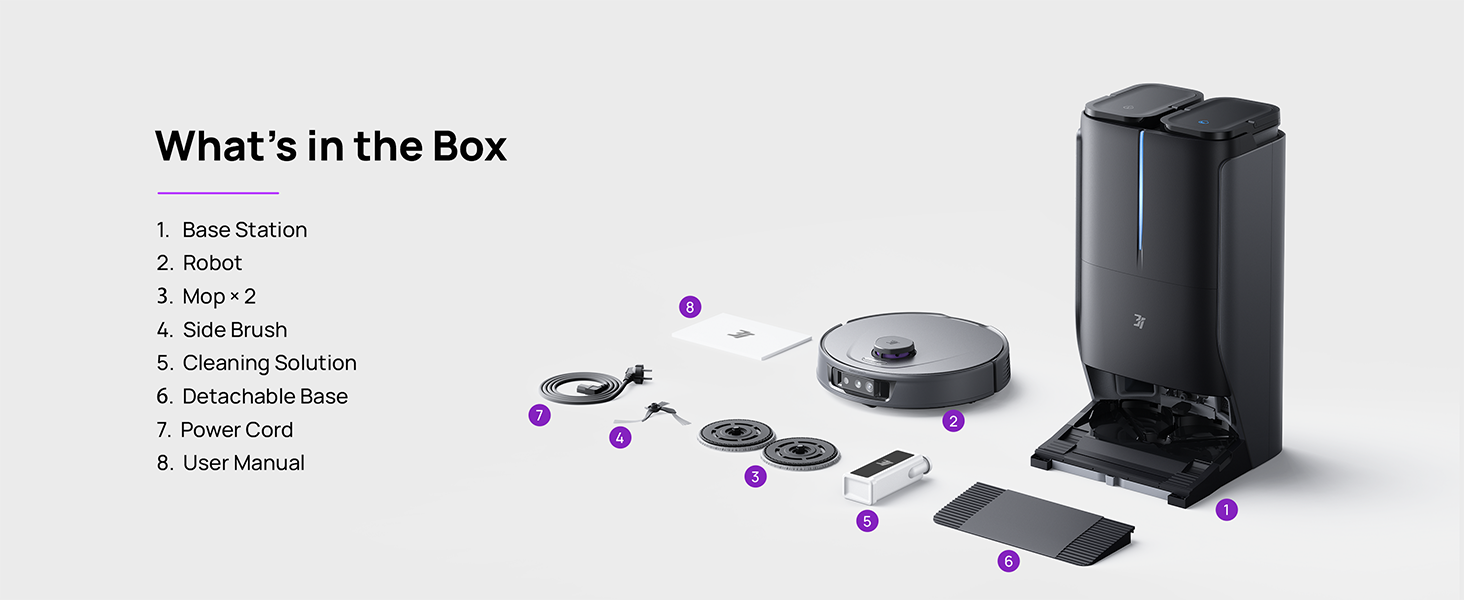
Figure 3.1: Contents of the 3i P10 Ultra package.
3.2 Robot Vacuum Features
- UltraReach Mop: The auto-extending mop system cleans edges and corners thoroughly. Dual mops spin at 220 RPM for effective stain removal.
- 18,000 Pa Suction: Provides powerful suction for deep cleaning on various floor types, including carpets and hard floors. Features smart carpet detection to boost suction and lift mops.
- All-in-One Automated Station: Offers automatic hot-water mop washing, hot air drying, solution adding, and hands-free dust collection for up to 70 days.
- Pokročilá navigace: Utilizes LiDAR for 3D mapping, dual 3D structured light, and an AI camera for obstacle avoidance, threshold crossing, and collision resistance.
- AI-Powered DirtScan: Identifies over 100 household objects and messes, adapting cleaning methods for optimal results, even in low light conditions.
- Hair Management: Equipped with anti-tangle brushes and a TangleCut blade to prevent hair from wrapping around components.
- Smart Route Planning: Learns home layouts for efficient cleaning routes. Supports scheduled cleaning, no-go zones, and app control. Compatible with Alexa and Google Assistant.
- Wi-Fi připojení: Supports both 2.4G and 5G Wi-Fi networks.

Obrázek 3.2: Nahoře view of the 3i P10 Ultra Robot Vacuum.

Figure 3.3: The 3i P10 Ultra Base Station.
4. Nastavení
4.1 Vybalení a umístění
- Opatrně vyjměte všechny součásti z obalu.
- Choose a suitable location for the base station. Ensure it is placed against a wall, on a hard, level surface, with at least 0.5 meters (1.6 feet) of clear space on both sides and 1.5 meters (4.9 feet) in front. Avoid areas with direct sunlight or strong Wi-Fi interference.
- Připojte napájecí kabel k základní stanici a zapojte ji do elektrické zásuvky.
4.2 Příprava robota
- Install the side brushes by pressing them into their slots until they click.
- Attach the mop pads to the mop holders on the robot.
- Place the robot onto the base station to charge. Ensure the charging contacts align. The robot will announce its charging status.
4.3 Instalace a připojení aplikace
- Download the 3i app from your mobile device's app store (iOS or Android).
- Open the app and follow the on-screen instructions to create an account and add your 3i P10 Ultra robot.
- Ensure your phone is connected to a 2.4GHz or 5GHz Wi-Fi network during the pairing process.
5. Návod k obsluze
5.1 Initial Cleaning and Mapping
For the first use, allow the robot to complete a full cleaning cycle to create a map of your home. This map is crucial for advanced features.

Figure 5.1: Precision 3D Mapping in the 3i App.
5.2 Spuštění čisticího cyklu
- Prostřednictvím robota: Jedním stisknutím tlačítka napájení na robotu spustíte nebo pozastavíte úklid.
- Přes aplikaci: Open the 3i app, select the desired cleaning mode (Vacuum, Mop, Vac & Mop, AI Auto, Custom), and tap 'Start'.
- Prostřednictvím hlasového ovládání: Use compatible voice assistants (Alexa, Google Assistant) with commands like "Hey Google, start vacuuming."

Figure 5.2: Using voice control to operate the 3i P10 Ultra.
5.3 Funkce aplikace
The 3i app provides extensive control and customization options:
- Nastavení čištění: Schedule cleaning, select rooms, set no-go zones, customize carpet cleaning.
- Nastavení mapy: View 3D maps, quick mapping, multi-floor maps, edit rooms and furniture.
- Station Settings: Customize dust collection, mop washing, auto-drying, and TangleCut.
- Další nastavení: Do Not Disturb mode, Smart Route Planning, Pet Recognition, Child Lock.
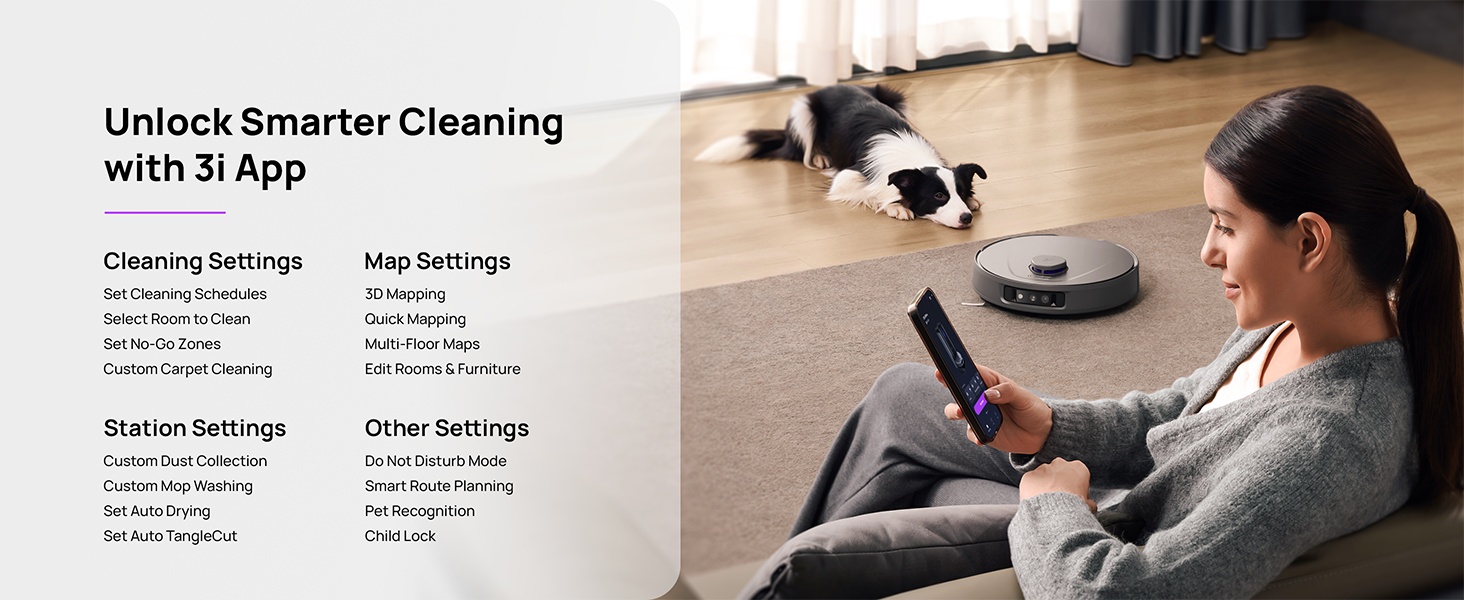
Figure 5.3: The 3i App interface for smart cleaning.
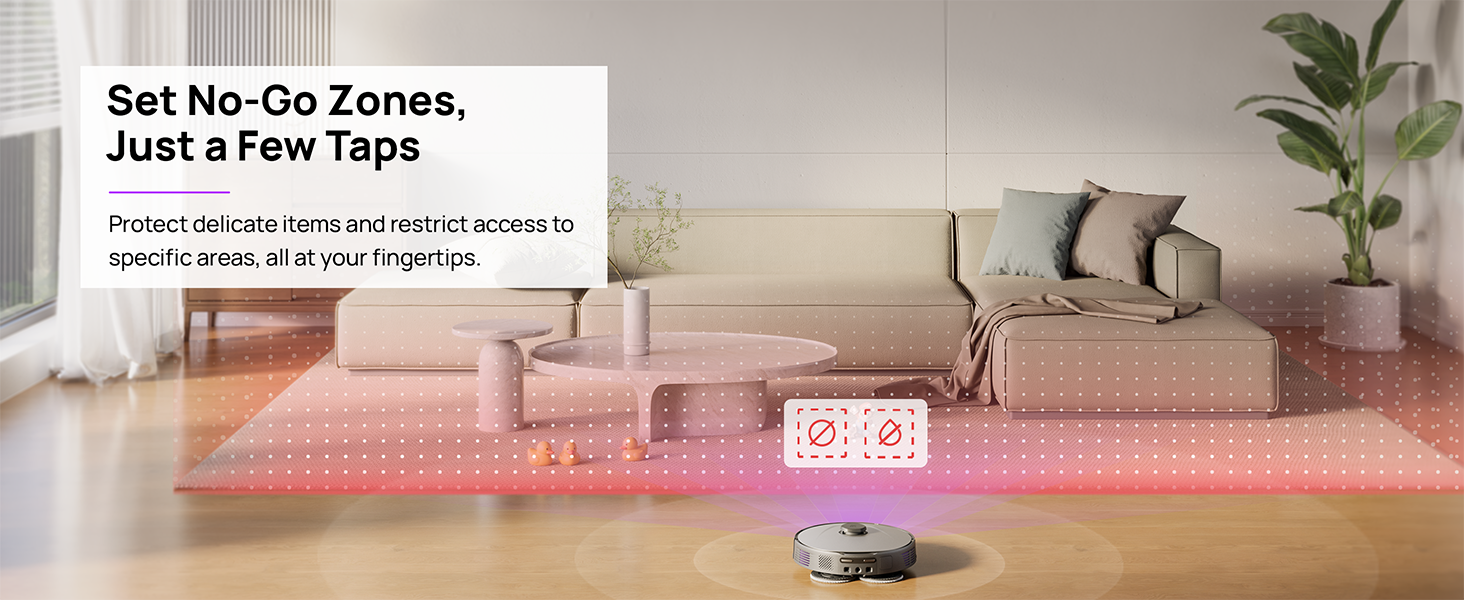
Figure 5.4: Setting No-Go Zones in the 3i App.
6. Údržba
Regular maintenance ensures optimal performance and extends the lifespan of your 3i P10 Ultra.
6.1 Údržba základnové stanice
- Vyprázdnění popelnice: The base station automatically empties the robot's dustbin into a 3L bag. Replace the dust bag approximately every 70 days, or as indicated by the app.
- Mytí a sušení mopem: The base station automatically washes mop pads with 140°F / 60°C hot water and dries them with hot air (131°F / 55°C) after each cleaning cycle. Ensure the clean and dirty water tanks are properly installed.
- Water Tank Refilling: The extra-large 4L clean water tank automatically refills the robot. Refill the clean water tank as needed. The base station also collects dirty water into a separate wastewater tank. Empty the wastewater tank regularly.
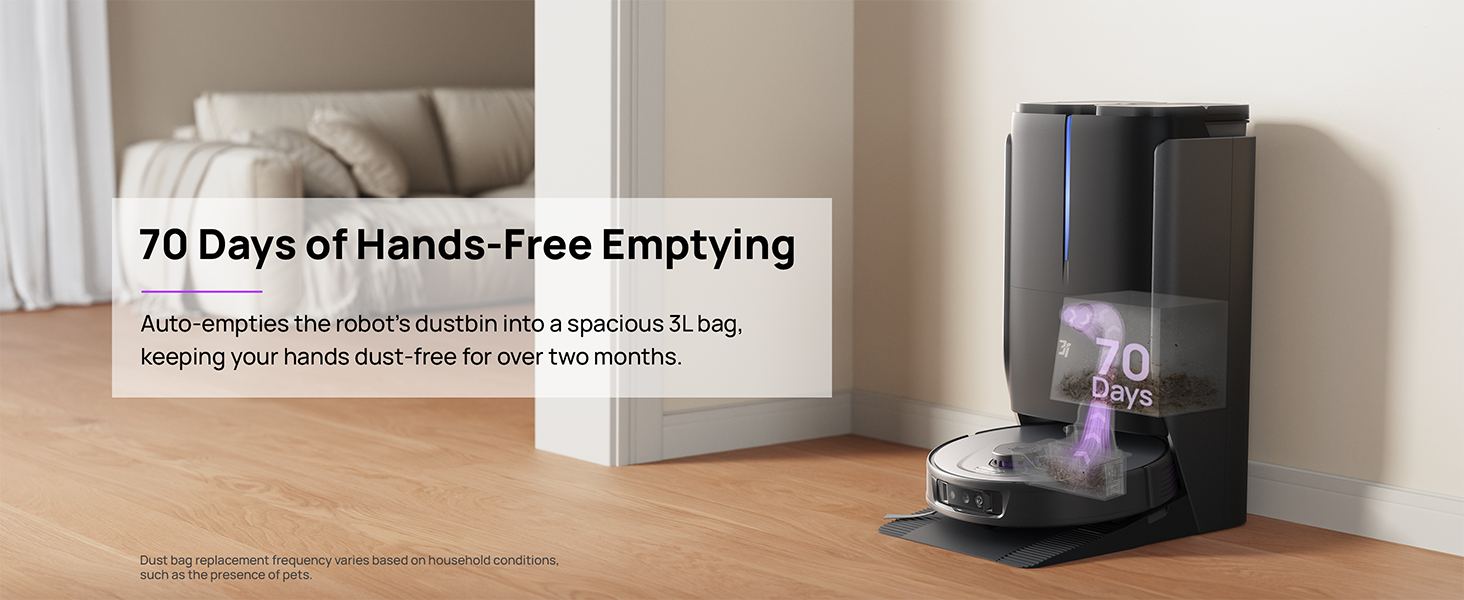
Figure 6.1: Automatic dustbin emptying at the base station.
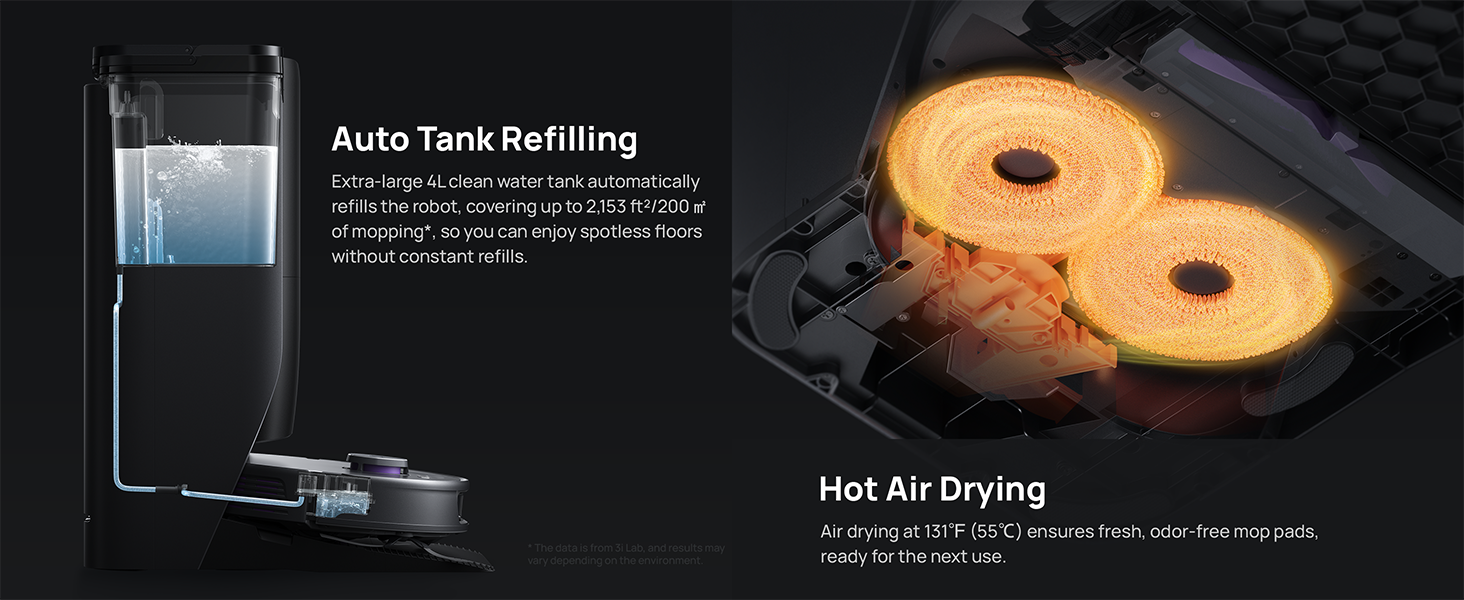
Figure 6.2: Auto tank refilling and hot air drying process.
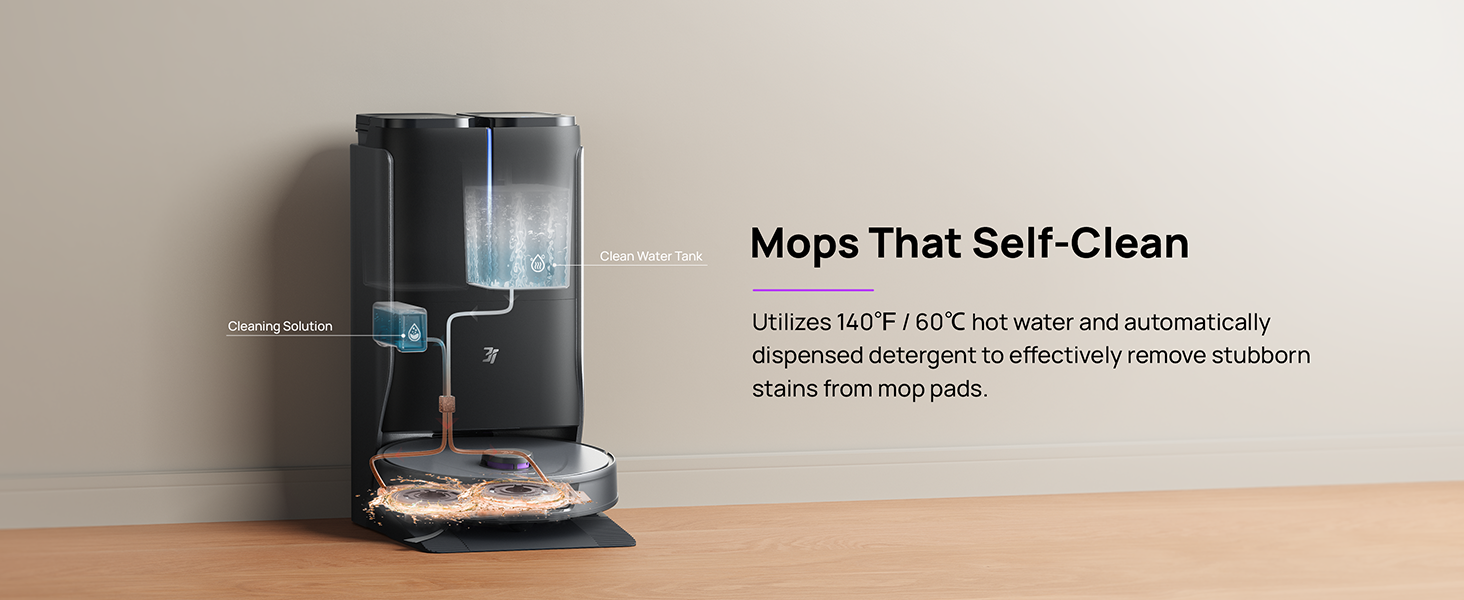
Figure 6.3: Mop self-cleaning function.
6.2 Údržba součástí robota
- Hlavní kartáč: Regularly check the main brush for tangled hair or debris. Use the cleaning tool provided to remove any obstructions. The TangleCut blade helps prevent excessive tangling.
- Boční kartáče: Inspect side brushes for wear or damage. Clean them periodically and replace if necessary.
- Mopové podložky: Although self-cleaned, inspect mop pads for excessive wear or stubborn stains. Replace them when their cleaning effectiveness diminishes.
- Filtr: The filter is washable. Remove and rinse it under running water. Allow it to air dry completely before reinstalling.
- Senzory: Wipe all sensors (LDS, anti-drop, wall-following, charging contacts) with a clean, dry cloth to ensure proper function.
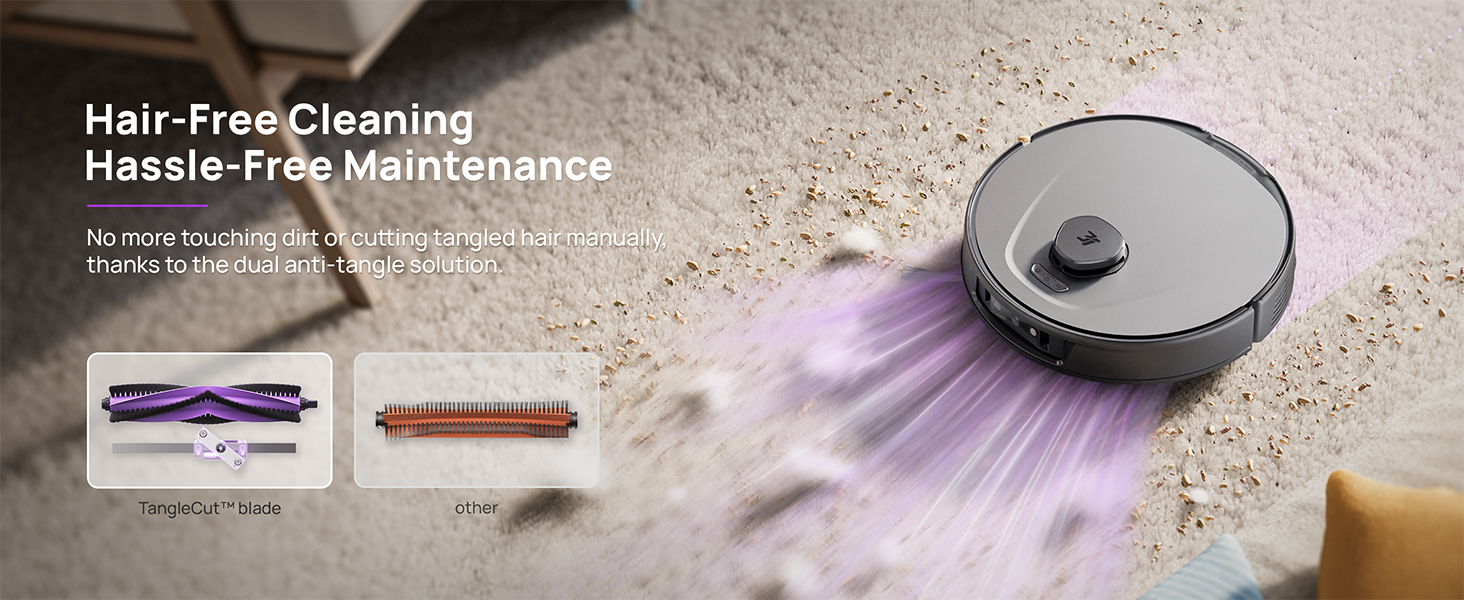
Figure 6.4: Hair-free cleaning with anti-tangle design.
7. Řešení problémů
If you encounter issues with your 3i P10 Ultra, refer to the following common problems and solutions:
| Problém | Možná příčina | Řešení |
|---|---|---|
| Robot se nezapne. | Slabá baterie; Tlačítko napájení nebylo správně stisknuto. | Umístěte robota na nabíjecí stanici; stiskněte a podržte tlačítko napájení po dobu 3 sekund. |
| Robot nemůže najít nabíjecí dok. | Dock is obstructed or too far; Poor Wi-Fi signal. | Ensure dock is in an open area; Check Wi-Fi connection. |
| Čisticí výkon je špatný. | Plný odpadkový koš; Zamotané kartáče; Ucpaný filtr; Znečištěné mopové podložky. | Empty dustbin; Clean brushes; Clean/replace filter; Clean/replace mop pads. |
| Robot se často zasekává. | Překážky na podlaze; Znečištěné senzory. | Vyčistěte podlahu od překážek; Vyčistěte všechny senzory. |
| Problémy s připojením k aplikaci. | Nesprávné heslo k Wi-Fi; Problémy s routerem; Robot je offline. | Verify Wi-Fi password; Restart router; Restart robot; Re-pair device in app. |
For further assistance, please refer to the 3i app's help section or contact customer support.
8. Specifikace
| Funkce | Detail |
|---|---|
| Značka | 3i |
| Název modelu | Robotický vysavač 3i P10 Ultra |
| Rozměry produktu (robot) | 13.78 cm D x 13.78 cm Š x 3.94 cm V |
| Rozměry produktu (stanice) | 12.2 cm D x 18.43 cm Š x 23.39 cm V |
| Hmotnost položky | 37.3 libry |
| Životnost baterie | 180 minut |
| Typ filtru | Omyvatelný |
| Doporučení pro povrch | Koberec, mramor, dřevo, dlaždice |
| Sací výkon | 18,000 Pa |
| Navigační systém | LDS LiDAR, Dual 3D Structured Light, AI Camera |
| Podpora Wi-Fi | 2.4G a 5G |

Figure 8.1: Dimensions of the 3i P10 Ultra Robot and Base Station.
9. Záruka a podpora
For warranty information, please refer to the warranty card included with your product or visit the official 3i website. For technical support, troubleshooting beyond this manual, or to inquire about replacement parts, please contact 3i customer service through the contact information provided on their official website or within the 3i app.