LLA-F64F3DC80492D1B631E6CE5B2345BA46
User Manual: Kuco Teneth Plotter Pinch Roller Assembly
Model: LLA-F64F3DC80492D1B631E6CE5B2345BA46
Zavedení
This manual provides essential information for the installation, operation, and maintenance of the Kuco Teneth Plotter Pinch Roller Assembly. Please read this manual thoroughly before using the product to ensure proper function and longevity. This assembly is designed for use with Kuco vinyl cutting plotters, specifically models such as TH1300, 740, T24, T48X, and 1300X.
Konec produktuview
The Kuco Teneth Plotter Pinch Roller Assembly is a critical component for accurate paper and rubber feeding in vinyl cutting plotters. It ensures stable material handling during the cutting process. This product is available in various package quantities, including 2pcs, 4pcs, and 10pcs, to suit different user needs.
Obsah balení:
- Kuco Pinch Roller Assembly (quantity as per purchase: 2pcs, 4pcs, or 10pcs)
- Inner Package: Transparent plastic bag
- Outer Package: Safety packed box
Obrázky produktů:

Image: Two Kuco Teneth Plotter Pinch Roller Assemblies, showcasing their design and components.

Image: A single Kuco Teneth Plotter Pinch Roller Assembly, demonstrating its detailed structure.

Image: Side-back view of the pinch roller assembly, illustrating its operational components.
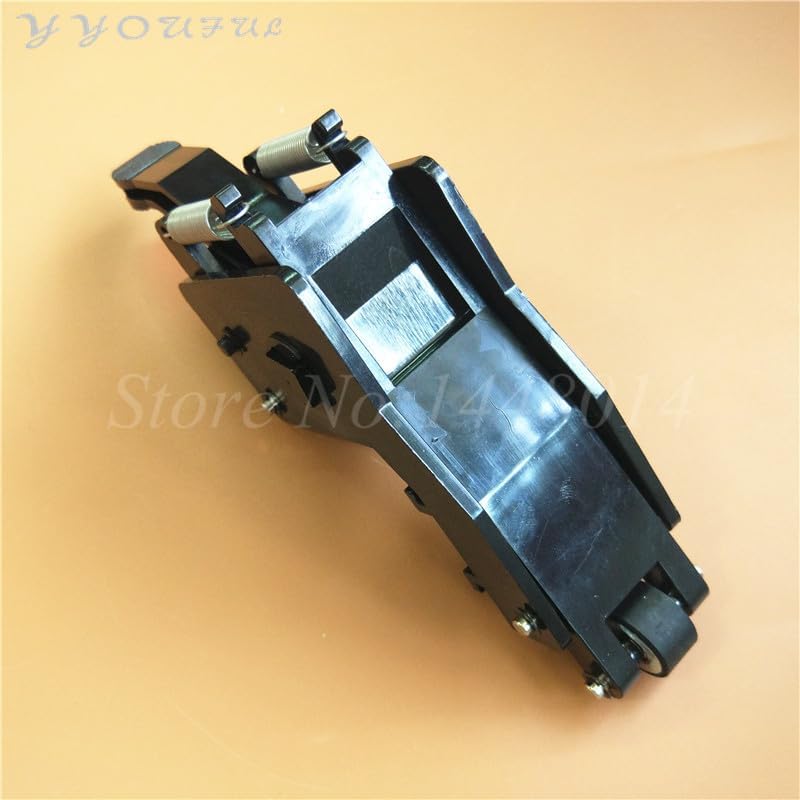
Image: Top-back view of the pinch roller assembly, providing a different perspective of its design.

Obrázek: Další view of two pinch roller assemblies, highlighting their compact form factor.

Obrázek: Boční view of two pinch roller assemblies, illustrating their profile.

Image: Bulk packaging of the Kuco Teneth Plotter Pinch Roller Assemblies.
Poznámka: Please confirm your pinch roller assembly is 100% identical to the images provided before installation to ensure compatibility.
Nastavení a instalace
Proper installation of the pinch roller assembly is crucial for the optimal performance of your vinyl cutting plotter. Follow these steps carefully:
Kroky instalace:
- Vypnout: Ensure your vinyl cutting plotter is completely powered off and unplugged from the power source before beginning any installation.
- Locate Old Assembly: Identify the existing pinch roller assembly on your plotter. Note its position and how it is secured.
- Odstraňte starou sestavu: Carefully unfasten any screws or clips holding the old assembly in place. Gently remove it, taking care not to damage surrounding components.
- Inspect New Assembly: Before installation, inspect the new Kuco pinch roller assembly for any visible damage or defects.
- Pozice Nové shromáždění: Align the new pinch roller assembly with the mounting points on your plotter. Ensure it fits snugly and correctly.
- Zabezpečení nové sestavy: Fasten the new assembly using the appropriate screws or clips. Ensure it is securely mounted and does not wobble.
- Testovací pohyb: Gently move the pinch roller lever to ensure smooth operation and proper engagement with the paper feed mechanism.
- Znovu připojte napájení: Once the assembly is securely installed, plug in and power on your plotter.
- Počáteční test: Perform a test cut with a scrap piece of material to verify that the new pinch rollers are feeding the material correctly and evenly.
If you encounter any difficulties during installation, refer to your plotter's specific service manual or consult a qualified technician.
Provozní směrnice
The pinch roller assembly works in conjunction with your plotter's main functions. While specific operation depends on your plotter model, here are general guidelines:
- Nakládání materiálu: Lift the pinch roller levers to release pressure, carefully insert your vinyl or paper material, and then lower the levers to secure the material. Ensure the material is straight and aligned.
- Rovnoměrný tlak: Verify that all pinch rollers are applying even pressure across the material. Uneven pressure can lead to material shifting or inaccurate cuts.
- Roller Position: Position the pinch rollers appropriately for the width of your material. Avoid placing rollers over areas that will be cut or where they might interfere with the cutting head's path.
- Pre-feed Test: Before starting a large job, perform a small pre-feed test to ensure the material feeds smoothly without slipping or skewing.
Údržba
Regular maintenance of your pinch roller assembly will extend its lifespan and ensure consistent performance:
- Čisticí válečky: Periodically clean the rubber rollers with a lint-free cloth dampened with isopropyl alcohol. This removes vinyl dust, adhesive residue, and other debris that can cause slipping.
- Zkontrolujte opotřebení: Regularly inspect the rubber surface of the rollers for signs of wear, cracking, or flattening. Worn rollers should be replaced promptly.
- Mazání: The mechanical parts of the assembly generally do not require lubrication. Avoid applying oils or greases unless specifically instructed by the plotter manufacturer.
- Skladování: If the plotter is not in use for an extended period, release the pinch roller pressure to prevent flat spots on the rollers.
Odstraňování problémů
Here are some common issues and their potential solutions related to the pinch roller assembly:
| Problém | Možná příčina | Řešení |
|---|---|---|
| Material slips or skews during cutting. | Dirty or worn rollers; uneven pressure; material not loaded straight. | Clean rollers; check for wear and replace if necessary; ensure material is loaded straight and pinch rollers apply even pressure. |
| Pinch roller lever is stiff or stuck. | Accumulation of debris; damaged spring or pivot point. | Clean around the lever mechanism; inspect for physical damage. If damaged, replacement may be necessary. |
| Material creases or jams at pinch rollers. | Improper material loading; damaged roller. | Re-load material carefully, ensuring it is flat; inspect rollers for damage and replace if found. |
For issues not listed here, or if solutions do not resolve the problem, please contact your plotter manufacturer's support or a qualified service technician.
Specifikace
| Atribut | Detail |
|---|---|
| Název položky | Kuco pinch roller assembly |
| Kompatibilita | Kuco vinyl cutting printers (e.g., TH1300, 740, T24, T48X, 1300X) |
| Package Quantity Options | 2ks, 4ks, 10ks |
| Typ | New type (please confirm if old type is needed) |
| Výrobce | Obecný |
| Číslo dílu | LLA-F64F3DC80492D1B631E6CE5B2345BA46 |
| ASIN | B0F2FH6SGV |
| První dostupný termín | 25. března 2025 |
Záruka a podpora
Specific warranty information for this product is not provided within this manual. Please refer to the product packaging or contact the seller, Lilianos, for details regarding warranty coverage and customer support.
For technical assistance or inquiries, please reach out to the product's manufacturer or authorized distributors.
Ask a question about this manual
Ask about setup, troubleshooting, compatibility, parts, safety, or missing instructions. Manuals+ will review the question and use this page’s manual context to help answer it.